Description
The toner cartridge is not installed or installed improperly.
Solution
<Cause>
The toner cartridge is not installed or installed improperly.
<Solution>
Install the toner cartridge properly.
Follow the procedure below to replace the toner cartridge.
1. Open the front cover while pressing the open button.
2. Remove the toner cartridge.
3. Take out the new toner cartridge from the protective bag.
You can open the protective bag with your hands from the notch.
![]() Keep the protective bag. Do not discard it. You will need it when you remove the toner cartridge for printer maintenance or other purposes.
Keep the protective bag. Do not discard it. You will need it when you remove the toner cartridge for printer maintenance or other purposes.
4. Shake the toner cartridge five or six times as shown in the figure to evenly distribute the toner inside the cartridge.
5. Place the toner cartridge on a flat surface.
6. Fold the tab, and then pull out the sealing tape (approx. 19 in. (48cm)).
IMPORTANT
Precautions when pulling out the sealing tape
- Do not pull the sealing tape diagonally, upward, or downward. If the tape is severed, this may become difficult to pull out completely.
- If the sealing tape stops at midpoint, pull it out of the toner cartridge completely. If any tape remains in the toner cartridge, this may result in poor print quality.
- Dispose of the removed sealing taper according to local regulations.

7, Install the toner cartridge.
Push the toner cartridge into the printer firmly until it touches the back of the printer while aligning (A) on sides of the toner cartridge with the toner cartridge guides inside the printer.
8. Close the front cover.
If you cannot close the front cover
Make sure that the toner cartridge is installed in the printer properly. Do not try to forcefully close the front cover, as this may damage the printer.
I’m using LD Products toner cartridges and have had no problems with them since I started useing them in all my printers starting about 2001.
After my original post, I noticed that my photo printouts were degraded. The colors were not what they should be and they had streaks in them. This forced me to find out what was going wrong since the printer was no help. So, the following ensued:
The diagnostic page shows the alignment to be correct. Using paint shop pro I generated a page with four color bars running across it. Black, cyan, magenta, and yellow. When I printed it I saw that the black cartridge was failing to print correctly. Now, I’ve been doing a ton of greyscale photo printing and the cartridge was about a year old. A call to LD Products informed that the cartridge was rated for 1200 pages at 5% coverage and the way I was using it would reduce that by as much as a half. Examining the cartridge, I found that the roller that is normally coated with toner, Was nearly bare. I removed it, shook it vigoursly, reinstalled it, and printed the test page again. The error message went away but the printout was still messed up. I’ve ordered a new cartridge and, after I install it, I’ll run a new print and le tyou know how it turns out.
Since the cartridge was, for all practical purposes empty, I would have thought the printer would have alerted me to this fact. Every time I printed something, the information window that pops up showed the black cartridge was nearly full.
Solution
When the printer cannot continue printing for some reason (an error status), the printer beeps, the Message indicator comes on, and an error message that indicates the description of the error appears in the display. A Warning message appears in the display when the printer requires some remedy (a warning status) although the job is not affected.
If either of these messages appears, perform the following procedures according to the message.
NOTE
- When multiple warnings are occurring at the same time, the Warning messages appear by rotation.
- When the printer is in error status and warning status at the same time, the Warning message does not appear.
- Even when a message with (Warning Message) appears (when the printer is in a warning status), the printer does not stop printing.
- For a message with the <Auto Error Skip> mark, you can skip the error by pressing [Online] and continue printing. However, part of the print data may be missing or it may not be printed properly. When you want to stop the process, perform a soft reset to eliminate the cause of the error, press [Online], and then print again. Also, you can automatically skip the errors to which this mark is attached by setting AUTO ERROR SKIP in the SETUP menu to ON.
<E nnn-nnnn> («n» represents a number)
<Cause>
A problem has occurred inside the printer.
<Remedy>
Solve the problem following the instructions of «Service Call Display» in «Chapter 8 Troubleshooting» in User’s Guide in the CD-ROM supplied with the printer.
<OF OPT.CONN.ERR.>
<Cause 1>
The optional paper feeder is not installed properly.
<Remedy>
Turn the power OFF, install the paper feeder properly, and then turn it ON again.
<Cause 2>
The optional paper feeder is installed or removed when the printer is ON.
<Remedy>
Turn the power OFF, install or remove the paper feeder, then turn the printer ON again.
<Cause 3>
The connector of the optional paper feeder is disconnected.
<Remedy>
Turn the printer OFF, unplug the power plug from the AC power outlet and contact your local authorized Canon dealer.
<Cause 4>
A paper feeder that is not for this printer is installed.
<Remedy>
Turn the power OFF, install the paper feeder for this printer, and then turn it ON again.
<11 NO «size» PAPER>
<Cause>
Paper of the size specified in the application is not loaded in the paper source (in all the paper sources when PAPER SOURCE is set to AUTO; in the specified paper source when the setting is fixed).
<Remedy 1>
Refill or load paper.
<Remedy 2>
Press [Feeder Selection], then select other paper source for the same paper size or larger paper size.[Selecting a Paper Source]
<12 COVER OPEN>
<Cause>
The front cover is open.
<Remedy>
Close the front cover firmly. If the printer is not online, press [Online].
<13 PAPER JAM>
<Cause>
Paper is jammed inside the printer
<Remedy>
Remove the jammed paper and set the paper cassette and covers to the original position. If the printer is not online, press [Online]. [Paper Jams]
IMPORTANT
- If paper jams have occurred at multiple areas at the same time, the areas appear in the display by rotation.
- If you have removed the jammed paper without opening any cover, be sure to open and close the front cover once, and then press [Online].
<14 NO TONER CART>
<Cause>
The toner cartridge is not installed or installed improperly.
<Remedy>
<18 FEED ERROR>
<Cause>
Paper of the size or type that cannot be fed from the multi-purpose tray or paper cassette is specified.
<Remedy 1>
If a paper source is specified, press [Feeder Selection], then set PAPER SOURCE to AUTO.
<Remedy 2>
Press [Feeder Selection], select a paper source from which paper of the specified size or type can be fed, then load paper.
<Remedy 3>
Specify the settings for STD PAPER SIZE and STD PAPER TYPE in the FEEDER MENU options in the SETUP menu to the size or type of paper that can be loaded in the paper source.
<Remedy 4>
Press [Online], then print from the currently selected paper source. However, this may result in deterioration in print quality.
<1H CHK TNR CONN.> (Warning Message)
<Cause>
There is a possibility that the toner cartridge is not installed properly.
<Remedy 1>
Remove the toner cartridge, then reinstall it properly.
<Remedy 2>
If <1H CHK TNR CONN.> appears and there is a problem with the print quality even after applying the Remedy 1, remove the toner cartridge and replace it with a new one. [Replacing the Toner Cartridge]
<23 DOWN.MEM.FULL> <Auto Error Skip>
<Cause>
The memory for registering macro and custom characters has run out and overflowed.
<Remedy 1>
The printer continues printing by pressing [Online]. However, the overflowed data cannot be registered.
<Remedy 2>
Perform a soft reset using the RESET menu, increase the free space of RAM using the following procedure, register the data again, and then print again.
- Perform a hard reset or cycle the power of the printer (Be aware that all the data in the memory will be deleted).
<26 SYS.MEM.FULL> <Auto Error Skip>
<Cause>
The work memory required for the printer process has run out while the system is processing the data (mainly the graphics data and text data).
<Remedy 1>
The printer continues printing by pressing [Online]. However, the data with which an error has occurred is not printed properly.
<Remedy 2>
Perform a soft reset using the RESET menu, and then increase the free space of RAM using the following procedure.
- Perform a hard reset or cycle the power of the printer (Be aware that all thedata in the memory will be deleted).
<27 JOB START ERR> <Auto Error Skip>
<Cause>
The specified emulation does not exist.
<Remedy>
Press [Online] to continue printing from the next data. However, the data with which an error has occurred is not printed.
<30 MEMORY FULL> <Auto Error Skip>
<Cause>
The work memory has run out while the system is processing the data.
<Remedy>
The printer continues printing by pressing [Online]. However, the data with which an error has occurred may not be printed properly.
<32 2-SIDED ERROR> <Auto Error Skip>
<Cause>
The printer received 2-sided printing data of paper sizes (including the orientation) or paper types unavailable for automatic 2-sided printing.
<Remedy 1>
The printer continues printing by pressing [Online]. However, the data on each side is printed on two pages.
<Remedy 2>
After performing a soft reset in the RESET menu, change the setting to a paper size or type available for automatic 2-sided printing, and then print again.
<33 WORK MEM.FULL> <Auto Error Skip>
<Cause>
The work memory for each print mode cannot be secured.
<Remedy 1>
The printer continues printing by pressing [Online]. However, the data with which an error has occurred is not printed properly.
IMPORTANT
When you continue printing by pressing [Online], be aware that the data of macro that is already registered may be deleted.
<Remedy 2>
Perform a soft reset in the RESET menu, increase the free space of RAM using the following procedure, and then print again.
- Perform a hard reset or cycle the power of the printer (Be aware that all the data in the memory that the printer has received will be deleted).
<35 TABLE FULL> <Auto Error Skip>
<Cause>
The number of the documents in a job has exceeded 16.
<Remedy>
The printer continues printing by pressing [Online]. However, the job with which an error has occurred is not printed.
<38 LOW IMGE QLTY> <Auto Error Skip>
<Cause>
The printer cannot process the data because it is too complicated.
<Remedy 1>
The printer continues printing by pressing [Online]. However, the printer prints with the image quality level being lowered.
<Remedy 2>
Perform a soft reset in the RESET menu, set GRADATION LEVEL in the QUALITY MENU options in the SETUP menu to STANDARD, and then print again.
<39 SPL MEM.FULL> <Auto Error Skip>
<Cause>
Because spool memory has run out, the printer cannot print.
<Remedy 1>
The printer continues printing by pressing [Online]. However, the page with which an error has occurred is not printed.
<Remedy 2>
Perform a soft reset in the RESET menu, specify the paper size smaller, and then print again.
<Remedy 3>
Perform a soft reset in the RESET menu, set GRADATION LEVEL in the QUALITY MENU options in the SETUP menu to STANDARD, and then print again.
<Remedy 4>
If 2-SIDED PRINT. in the FEEDER MENU options in the SETUP menu is set to ON, specify OFF, and then print again.
<Remedy 5>
Change the setting for HALFTONES in the QUALITY MENU options in the SETUP menu, and then print again.
<41 CHK PAPER SZE>
<Cause 1>
The size of the paper loaded in the multi-purpose tray or paper cassette is different from the setting for TRAY PAPER SIZE, CASSETTE1 SIZE, or CASSETTE2 SIZE specified from the computer or control panel.
<Remedy>
Match the size specified in TRAY PAPER SIZE, CASSETTE1 SIZE, or CASSETTE2 SIZE and the size of the loaded paper, and then press [Online].
<Cause 2>
You are using UFR II Printer Driver, and you loaded custom paper of its long edges 215.9 mm or less and printed when TRAY PAPER SIZE, CASSETTE1 SIZE, or CASSETTE2 SIZE in the FEEDER MENU options in the SETUP menu was set to MIXED SIZE.
<Remedy>
Load the paper in landscape orientation, then print again.
<Cause 3>
CHK PAPER SIZE in the USER MAIN. options in the SETUP menu is set to OFF.
<Remedy>
<52 RAST.MODE ERR> <Auto Error Skip>
<Cause>
The printer received data in format that it does not support during printing in the Raster mode.
<Remedy 1>
The printer continues printing by pressing [Online]. However, the data may not be printed properly.
<Remedy 2>
Print again using a printer driver that supports image data formats.
<53 SEC.PRINT ERR> <Auto Error Skip>
<Cause>
Secured print data is sent from a printer driver that is not for LBP3370.
<Remedy>
Press [Online] to cancel the job.
<53 STORE ERROR> <Auto Error Skip>
<Cause>
The data for which a stored job print is specified is sent from a printer driver that is not for LBP3370.
<Remedy>
Press [Online] to cancel the job.
<58 JOB MEM.FULL> <Auto Error Skip>
<Cause>
There is not sufficient free RAM space to process jobs.
<Remedy 1>
If you are processing multiple jobs at once, press [Online] to cancel printing, wait for other jobs complete, and then print again.
<Remedy 2>
If the job data is too large, divide the job and print again.
<59 JOB RX ERROR> <Auto Error Skip>
<Cause>
The printer received any unanalyzable data while it is receiving a job, or it timed out.
<Remedy 1>
Press [Online] to cancel printing, then print again.
<Remedy 2>
A problem may be occurring in the network you are using. Check the status of the network that your are using.
<A4 nn ERROR> («nn» represents two-digit alphanumeric characters)
<Cause>
A problem has occurred and the printer does not operate properly.
<Remedy>
Cycle the power of the printer. If the message appears even after cycling the power of the printer, note down the message in the display, and contact your local authorized Canon dealer.
<A5 nn ERROR> («nn» represents two-digit alphanumeric characters)
<Cause>
A problem has occurred and the printer does not operate properly.
<Remedy>
Cycle the power of the printer. If the message appears even after cycling the power of the printer, note down the message in the display, and contact your local authorized Canon dealer.
<A7 nn ERROR> («nn» represents two-digit alphanumeric characters)
<Cause>
A problem has occurred and the printer does not operate properly.
<Remedy>
Cycle the power of the printer. If the message appears even after cycling the power of the printer, note down the message in the display, and contact your local authorized Canon dealer.
<D7 nn ERROR> («nn» represents two-digit alphanumeric characters)
<Cause>
A problem has occurred and the printer does not operate properly.
<Remedy>
Cycle the power of the printer. If the message appears even after cycling the power of the printer, note down the message in the display, and contact your local authorized Canon dealer.
<D8 LAYOUT ERROR>
<Cause>
The page cannot be laid out because the memory has run out.
<Remedy 1>
Set [Graphics Mode] in UFR II Printer Driver to [Raster Mode], then print again. (See Help of UFR II Printer Driver)
<Remedy 2>
After performing a soft reset using the RESET menu, perform a hard reset to increase the free memory space or cycle the power of the printer, and then print again. (Be aware that all the data in the memory that the printer has received will be deleted.)
<Remedy 3>
Perform «Error Skip», then continue printing. However, the data with which an error has occurred is not printed properly.
<D8 VERSION ERROR>
<Cause>
You tried to print from a printer driver that is not for LBP3370.
<Remedy>
Print from the printer driver for LBP3370.
<D8 SYNTAX ERROR>
<Cause>
Invalid data is sent when printing using UFR II Printer Driver.
<Remedy 1>
Press [Online] to continue printing from the next data. However, the page with which an error has occurred and its subsequent pages are not printed.
<Remedy 2>
Confirm the data to be printed, then print again.
<D8 nn ERROR> («nn» represents two-digit alphanumeric characters)
<Cause>
A problem has occurred and the printer does not operate properly.
<Remedy>
Cycle the power of the printer. If the message appears even after cycling the power of the printer, note down the message in the display, and contact your local authorized Canon dealer.
<D9 IMG.DATA ERR.>
<Cause>
Data which this printer cannot process is included in TIFF data or JPEG data.
<Remedy>
This printer cannot print the data. Press [Online] to cancel the job.
<D9 IMG.REFER.ERR>
<Cause>
Data which this printer cannot process is included in TIFF data.
<Remedy>
This printer cannot print the data. Press [Online] to cancel the job.
<D9 nn ERROR> («nn» represents two-digit alphanumeric characters)
<Cause>
A problem has occurred and the printer does not operate properly.
<Remedy>
Cycle the power of the printer. If the message appears even after cycling the power of the printer, note down the message in the display, and contact your local authorized Canon dealer.
<F9-nn PWR OFF>ON> («nn» represents two-digit alphanumeric characters)
<Cause>
A problem has occurred while the printer is processing print data.
<Remedy>
Cycle the power of the printer. If the message appears even after cycling the power of the printer, note down the message in the display, and contact your local authorized Canon dealer.
<FF FONT FULL> <Auto Error Skip>
<Cause>
Because of too many fonts to be registered, the field (font table) for registering font information has run out and overflowed.
<Remedy>
The printer continues printing by pressing [Online]. However, the page with which an error has occurred is not printed properly.
<FM SIZE ERROR> <Auto Error Skip>
<Cause>
There is some font with its size exceeds the pseudo-scalable font size.
<Remedy>
Perform «Error Skip», then continue printing. However, the characters with which an error has occurred are not printed properly.
<FM SCALE ERROR> <Auto Error Skip>
<Cause>
There is a character in which the number of coordinate points on the contour lines exceeds the limitation of a pseudo-scalable font.
<Remedy>
Perform «Error Skip», then continue printing. However, the characters with which an error has occurred are not printed properly.
<PC LOAD «size»>
<Cause>
The paper of the size specified in the application is not loaded in the paper cassette or multi-purpose tray, or the paper source for the different paper size is selected.
<Remedy 1>
<Remedy 2>
If you are using the multi-purpose tray, check TRAY PAPER SIZE, and when the paper size does not match the size specified in the application, specify the setting properly. [Loading Paper in the Multi-purpose Tray]
<Remedy 3>
Press [Feeder Selection], then select the paper cassette in which the paper of the matched size is loaded. [Selecting a Paper Source]
<Remedy 4>
Press [Online], then print to the currently loaded paper forcibly. If you are using the multi-purpose tray, the setting for TRAY PAPER SIZE automatically changes to the setting specified in the application.
IMPORTANT
If you open the front cover when the message <PC LOAD «size»> is displayed, the message may disappear. However, be sure to follow the directions in the displayed message to change the paper.
I’m using LD Products toner cartridges and have had no problems with them since I started useing them in all my printers starting about 2001.
After my original post, I noticed that my photo printouts were degraded. The colors were not what they should be and they had streaks in them. This forced me to find out what was going wrong since the printer was no help. So, the following ensued:
The diagnostic page shows the alignment to be correct. Using paint shop pro I generated a page with four color bars running across it. Black, cyan, magenta, and yellow. When I printed it I saw that the black cartridge was failing to print correctly. Now, I’ve been doing a ton of greyscale photo printing and the cartridge was about a year old. A call to LD Products informed that the cartridge was rated for 1200 pages at 5% coverage and the way I was using it would reduce that by as much as a half. Examining the cartridge, I found that the roller that is normally coated with toner, Was nearly bare. I removed it, shook it vigoursly, reinstalled it, and printed the test page again. The error message went away but the printout was still messed up. I’ve ordered a new cartridge and, after I install it, I’ll run a new print and le tyou know how it turns out.
Since the cartridge was, for all practical purposes empty, I would have thought the printer would have alerted me to this fact. Every time I printed something, the information window that pops up showed the black cartridge was nearly full.
Issue
When the printer cannot continue printing for some reason (an error status), the printer beeps, the  (Message) indicator comes on, and an error message that indicates the description of the error appears in the display. A Warning message appears in the display when the printer requires some remedy (a warning status) although the job is not affected.
If either of these messages appears, perform the following procedures according to the message.
NOTE
Clarifications of the operation and additional explanations for the procedure are indicated at the end of this page. Reading these notes is highly recommended.
Cause and Solution
| Message | Cause and Remedy |
| <E nnn-nnnn> («n» represents a number) | Cause: A problem has occurred inside the printer. Remedy : Solve the problem following the instructions in «Service Call Display». |
| <00 NO SLOT LOAD> | Cause: Because the printer is in the middle of printing, it forbids loading paper in the manual feed slot. Remedy : When loading paper in the manual feed slot, wait until printing and printer operation finish completely.Important: Make sure that the printer is not operating and the  (Ready) indicator is on when loading paper in the manual feed slot. When printing multiple copies or multiple pages from the manual feed slot, make sure that the printer is not operating and the (Ready) indicator is on when loading paper in the manual feed slot. When printing multiple copies or multiple pages from the manual feed slot, make sure that the printer is not operating and the  (Message) indicator is on before loading the second and subsequent paper. If paper is loaded in the manual feed slot while the printer is operating such as when the printer is printing or immediately after outputting paper, the loaded paper may be output without being printed, or this may result in paper jams. (Message) indicator is on before loading the second and subsequent paper. If paper is loaded in the manual feed slot while the printer is operating such as when the printer is printing or immediately after outputting paper, the loaded paper may be output without being printed, or this may result in paper jams.
|
| <OF OPT.CONN.ERR.> | Cause 1: The optional paper feeder is not installed properly. Remedy : Turn the power OFF, install the paper feeder properly, and then turn it ON again. Cause 2: Cause 3: Cause 4: |
| <11 NO «size» PAPER> | Cause: Paper of the size specified in the application is not loaded in the paper source (in all the paper sources when PAPER SOURCE is set to AUTO; in the specified paper source when the setting is fixed). Remedy 1: Refill or load paper. Remedy 2: Press the  (Feeder Selection) key, then select other paper source for the same paper size or larger paper size. (Feeder Selection) key, then select other paper source for the same paper size or larger paper size.
|
| <12 COVER OPEN> | Cause: Paper is jammed inside the printer. Remedy : Remove the jammed paper and set the paper cassette and covers to the original position. If the printer is not online, press the  (Online) key. (Online) key. |
| <13 PAPER JAM> | Cause: Paper is jammed inside the printer. Remedy : Remove the jammed paper and set the paper cassette and covers to the original position. If the printer is not online, press the (Online) key.Important:a. If paper jams have occurred at multiple areas at the same time, the areas appear in the display by rotation. b. If you have removed the jammed paper without opening any cover, be sure to open and close the front cover once, and then press the (Online)key. |
| <14 NO TONER CART> | Cause: The toner cartridge is not installed or installed improperly. Remedy : Install the toner cartridge properly. |
| <18 FEED ERROR> | Cause: Paper of the size or type that cannot be fed from the manual feed slot or paper cassette is specified. Remedy 1: If a paper source is specified, press the (Feeder Selection) key, then set PAPER SOURCE to AUTO.Remedy 2: Press the (Feeder Selection) key, select a paper source from which paper of the specified size or type can be fed, then load paper.Remedy 3: Specify the settings for STD PAPER SIZE and STD PAPER TYPE in the FEEDER MENU options in the SETUP menu to the size or type of paper that can be loaded in the paper source. Remedy 4: Press the (Online) key, then print from the currently selected paper source. However, this may result in deterioration in print quality.
|
| <18 CHK MANU SLOT > | Cause: Paper is loaded in the manual feed slot. Remedy 1: If you want to use the paper loaded in the manual feed slot for printing, press the the (Feeder Selection) key, and then set PAPER SOURCE to MANU.FEED SLOT.Remedy 2: Remove any paper loaded in the manual feed slot. |
| <1H CHK TNR CONN.>
(Warning Message) |
Cause: There is a possibility that the toner cartridge is not installed properly. Remedy 1: Remove the toner cartridge, then reinstall it properly. Remedy 2: If <1H CHK TNR CONN.> appears and there is a problem with the print quality even after applying the Remedy 1, remove the toner cartridge and replace it with a new one. |
| <23 DOWN.MEM.FULL>
<Auto Error Skip> |
Cause: The memory for registering overlay forms and custom characters has run out and overflowed. Remedy 1: The printer continues printing by pressing the (Online) key. However, the overflowed data cannot be registered.Remedy 2: Perform a soft reset using the RESET menu, increase the free space of RAM using the following procedure, register the data again, and then print again. — Perform a hard reset or cycle the power of the printer (Be aware that all the data in the memory will be deleted). |
| <26 SYS.MEM.FULL>
<Auto Error Skip> |
Cause: The work memory required for the printer process has run out while the system is processing the data (mainly the graphics data and text data). Remedy 1: The printer continues printing by pressing the (Online) key. However, the data with which an error has occurred is not printed properly.Remedy 2: Perform a soft reset using the RESET menu, and then increase the free space of RAM using the following procedure. — Perform a hard reset or cycle the power of the printer (Be aware that all the data in the memory will be deleted). |
| <27 JOB START ERR>
<Auto Error Skip> |
Cause: The specified emulation does not exist. Remedy : Press the (Online) key to continue printing from the next data. However, the data with which an error has occurred is not printed.
|
| <30 MEMORY FULL>
<Auto Error Skip> |
Cause : The work memory has run out while the system is processing the data. Remedy : The printer continues printing by pressing the (Online) key. However, the data with which an error has occurred may not be printed properly.
|
| <32 2-SIDED ERROR>
<Auto Error Skip> |
Cause : The printer received 2-sided printing data of paper sizes (including the orientation) or paper types unavailable for automatic 2-sided printing. Remedy 1: The printer continues printing by pressing the (Online) key. However, the data on each side is printed on two pages.Remedy 2: After performing a soft reset in the RESET menu, change the setting to a paper size or type available for automatic 2-sided printing, and then print again. |
| <33 WORK MEM.FULL>
<Auto Error Skip> |
Cause: The work memory for each operation mode cannot be secured. Remedy 1: The printer continues printing by pressing the (Online) key. However, the data with which an error has occurred is not printed properly.Important:When you continue printing by pressing the (Online) key, be aware that the data of overlay or macro that is already registered may be deleted.
Remedy 2: |
| <35 TABLE FULL>
<Auto Error Skip> |
Cause: The number of the documents in a job has exceeded 16. Remedy : The printer continues printing by pressing the (Online) key. However, the job with which an error has occurred is not printed.
|
| <38 LOW IMAGE QLTY>
<Auto Error Skip> |
Cause: The printer cannot process the data because it is too complicated. Remedy 1: The printer continues printing by pressing the (Online) key. However, the printer prints with the image quality level being lowered.Remedy 2: Perform a soft reset in the RESET menu, set GRADATION LEVEL in the QUALITY MENU options in the SETUP menu to STANDARD, and then print again. |
| <39 SPL MEM.FULL>
<Auto Error Skip> |
Cause: Because spool memory has run out, the printer cannot print. Remedy 1: The printer continues printing by pressing the (Online) key. However, the page with which an error has occurred is not printed.Remedy 2: Perform a soft reset in the RESET menu, specify the paper size smaller, and then print again. Remedy 3: Perform a soft reset in the RESET menu, set GRADATION LEVEL in the QUALITY MENU options in the SETUP menu to STANDARD, and then print again. Remedy 4: If 2-SIDED PRINT. in the FEEDER MENU options in the SETUP menu is set to ON, specify OFF, and then print again. Remedy 5: Change the setting for HALFTONES in the QUALITY MENU options in the SETUP menu, and then print again. |
| <41 CHK PAPER SZE> | Cause 1:
The size of the paper loaded in the manual feed slot or paper cassette is different from the setting for SLOT PAPER SIZE, CASSETTE1 SIZE, or CASSETTE2 SIZE specified from the computer or control panel. Cause 2:
You are using UFR II Printer Driver, and you loaded custom paper of its long edges 215.9 mm or less and printed when SLOT PAPER SIZE, CASSETTE1 SIZE, or CASSETTE2 SIZE in the FEEDER MENU options in the SETUP menu was set to MIXED SIZE. Load the paper in landscape orientation, then print again. Cause 3: Set SPECIAL MODE J to ON, then print again. |
| <52 RAST.MODE ERR>
<Auto Error Skip> |
Cause: The printer received data in format that it does not support during printing in the Raster mode. Remedy 1: The printer continues printing by pressing the (Online) key. However, the data may not be printed properly.Remedy 2: Print again using a printer driver that supports image data formats. |
| <53 SEC.PRINT ERR>
<Auto Error Skip> |
Cause:
Secured print data is sent from a printer driver that is not for LBP3360. |
| <53 STORE ERROR>
<Auto Error Skip> |
Cause: The data for which a stored job print is specified is sent from a printer driver that is not for LBP3360. Remedy : Press the (Online) key to cancel the job. |
| <58 JOB MEM.FULL>
<Auto Error Skip> |
Cause: There is not sufficient free RAM space to process jobs. Remedy 1: If you are processing multiple jobs at once, press the (Online) key to cancel printing, wait for other jobs complete, and then print again.Remedy 2: If the job data is too large, divide the job and print again. |
| <59 JOB RX ERROR>
<Auto Error Skip> |
Cause: The printer received any unanalyzable data while it is receiving a job, or it timed out. Remedy 1: Press the (Online) key to cancel printing, then print again.Remedy 2: A problem may be occurring in the network you are using. Check the status of the network that you are using. |
| <A4 nn ERROR> («nn» represents two-digit alphanumeric characters) | Cause: A problem has occurred and the printer does not operate properly. Remedy : Cycle the power of the printer. If the message appears even after cycling the power of the printer, note down the message in the display, and contact your local authorized Canon dealer. |
| <A5 nn ERROR> («nn» represents two-digit alphanumeric characters) | Cause: A problem has occurred and the printer does not operate properly. Remedy : Cycle the power of the printer. If the message appears even after cycling the power of the printer, note down the message in the display, and contact your local authorized Canon dealer. |
| <A7 nn ERROR> («nn» represents two-digit alphanumeric characters) | Cause: A problem has occurred and the printer does not operate properly. Remedy : Cycle the power of the printer. If the message appears even after cycling the power of the printer, note down the message in the display, and contact your local authorized Canon dealer. |
| <D7 nn ERROR> («nn» represents two-digit alphanumeric characters) | Cause: A problem has occurred and the printer does not operate properly. Remedy : Cycle the power of the printer. If the message appears even after cycling the power of the printer, note down the message in the display, and contact your local authorized Canon dealer. |
| <D8 LAYOUT ERROR> | Cause: The page cannot be laid out because the memory has run out. Remedy 1: Set [Graphics Mode] in UFR II Printer Driver to [Raster Mode], then print again. Remedy 2: After performing a soft reset using the RESET menu, perform a hard reset to increase the free memory space or cycle the power of the printer, and then print again. (Be aware that all the data in the memory that the printer has received will be deleted.) Remedy 3: Perform «Error Skip», then continue printing. However, the data with which an error has occurred is not printed properly. |
| <D8 VERSION ERROR> | Cause: Any job is sent from a UFR II Printer Driver that this printer does not support. Remedy 1: Change the version of the UFR II Printer Driver to that this printer supports, and then print again. Remedy 2: Perform «Error Skip», then continue printing. However, the data with which an error has occurred is not printed properly. |
| <D8 SYNTAX ERROR> | Cause: Invalid data is sent when printing using UFR II Printer Driver. Remedy 1: Press the (Online) key to continue printing from the next data. However, the page with which an error has occurred and its subsequent pages are not printed.Remedy 2: Confirm the data to be printed, then print again. |
| <D8 nn ERROR> («nn» represents two-digit alphanumeric characters) | Cause: A problem has occurred and the printer does not operate properly. Remedy : Cycle the power of the printer. If the message appears even after cycling the power of the printer, note down the message in the display, and contact your local authorized Canon dealer. |
| <F2 NO FONT>
< Auto Error Skip> |
Cause: The registered fonts used for creating overlay forms had been deleted during printing. Remedy 1: The printer continues printing by pressing the (Online) key. However, unregistered fonts are not printed.Remedy 2: Register the fonts in the memory again or create a form using usable registered fonts, and then print again. |
| <F9-nn PWR OFF>ON> («nn» represents two-digit alphanumeric characters) | Cause: A problem has occurred while the printer is processing print data. Remedy : Cycle the power of the printer. If the message appears even after cycling the power of the printer, note down the message in the display, and contact your local authorized Canon dealer. |
| <FF FONT FULL>
<Auto Error Skip> |
Cause: Because of too many fonts to be registered, the field (font table) for registering font information has run out and overflowed. Remedy : The printer continues printing by pressing the (Online) key. However, the page with which an error has occurred is not printed properly. |
| <FM SIZE ERROR>
<Auto Error Skip> |
Cause: There is some font with its size exceeds the pseudo-scalable font size. Remedy : Perform «Error Skip», then continue printing. However, the characters with which an error has occurred are not printed properly. |
| <FM SCALE ERROR>
<Auto Error Skip> |
Cause: There is a character in which the number of coordinate points on the contour lines exceeds the limitation of a pseudo-scalable font. Remedy : Perform «Error Skip», then continue printing. However, the characters with which an error has occurred are not printed properly. |
| <PC LOAD «size»> | Cause: The paper of the size specified in the application is not loaded in the paper cassette or manual feed slot, or the paper source for the different paper size is selected. Remedy 1: Load the paper of the size selected in the application (or the one specified by scaling factors). Remedy 2: If you are using the manual feed slot, check SLOT PAPER SIZE, and when the paper size does not match the size specified in the application, specify the setting properly. Remedy 3: Press the (Feeder Selection) key, then select the paper cassette in which the paper of the matched size is loaded.Remedy 4: Press the (Online) key, then print to the currently loaded paper forcibly. If you are using the manual feed slot, the setting for SLOT PAPER SIZE automatically changes to the setting specified in the application.Important:If you open the front cover when the message is displayed, the message may disappear. However, be sure to follow the directions in the displayed message to change the paper. |
NOTE
a. When multiple warnings are occurring at the same time, the Warning messages appear by rotation.
b. When the printer is in error status and warning status at the same time, the Warning message does not appear.
c. Even when a message with (Warning Message) appears (when the printer is in a warning status), the printer does not stop printing.
d. For a message with the <Auto Error Skip> mark, you can skip the error by pressing the  (Online) key and continue printing. However, part of the print data may be missing or it may not be printed properly. When you want to stop the process, perform a soft reset to eliminate the cause of the error, press the (Online) key, and then print again. Also, you can automatically skip the errors to which this mark is attached by setting AUTO ERROR SKIP in the SETUP menu to ON.
Лазерный принтер HP LaserJet 1200 — При включении ошибка — н
Помогите разобраться, пожалуйста! При включеении принтера, после прохождения теста выдает ошибку нет картриджа или бумаги. Как реально проверить работоспосбность оптодатчиков? И, если дело не в них, то в чем еще?
- Михаил С.
- Консультант
- Сообщения: 793
- Зарегистрирован: 17:49 — 11.04.06
- Откуда: Пятигорск
- Баллы репутации: 0


![]() Ramcke » 14:19 — 16.05.06
Ramcke » 14:19 — 16.05.06
Проверьте вращение губчатого коротрона-если не крутится, промыть узлы крепления.
- Ramcke
- Консультант
- Сообщения: 475
- Зарегистрирован: 13:05 — 20.07.05
- Откуда: Пятигорск
- Баллы репутации: 0
![]() Владимир А. » 14:19 — 16.05.06
Владимир А. » 14:19 — 16.05.06
При включеении принтера, после прохождения теста
Что Вы понимаете под этими словами? Двигателем прокручивает? Или тока промаргивается?
- Владимир А.
- Помощник админа Консультант
- Сообщения: 6638
- Зарегистрирован: 14:47 — 09.02.06
- Откуда: г.Обнинск
- Баллы репутации: 1
-
- ICQ

![]() RTM » 14:27 — 16.05.06
RTM » 14:27 — 16.05.06
А до этого Вы его разбирали или проблема возникла спонтанно
по машинам HP DesignJet 500, 800, 1050, 4500 можете обращаться, помогу
- RTM
- Консультант
- Сообщения: 272
- Зарегистрирован: 21:17 — 31.03.06
- Откуда: Казахстан
- Баллы репутации: 0
![]() Михаил С. » 14:35 — 16.05.06
Михаил С. » 14:35 — 16.05.06
Двигатель прокручивает, после выхода на режим моргает. До этого не разбирался, отпечатал 50000 листов.
- Михаил С.
- Консультант
- Сообщения: 793
- Зарегистрирован: 17:49 — 11.04.06
- Откуда: Пятигорск
- Баллы репутации: 0
![]() Владимир А. » 14:46 — 16.05.06
Владимир А. » 14:46 — 16.05.06
Тогда проверить легкость вращения вала переноса под картриджем как советует Ramcke.
Может и нет контакта на фотобарабан(справа в принтере выдвижной контакт).
- Владимир А.
- Помощник админа Консультант
- Сообщения: 6638
- Зарегистрирован: 14:47 — 09.02.06
- Откуда: г.Обнинск
- Баллы репутации: 1
-
- ICQ
![]() Михаил С. » 15:29 — 16.05.06
Михаил С. » 15:29 — 16.05.06
Спасибо всем! Дело было скорее всего в датчиках. После двухкратной полной разбоки (кроме печки) принтер заработал, однако, не знаю почему, полностью обнулился — нет серийного № и страници начал считать с нуля. Мне, правда,это не мешает, хоть и интересно, почему?
- Михаил С.
- Консультант
- Сообщения: 793
- Зарегистрирован: 17:49 — 11.04.06
- Откуда: Пятигорск
- Баллы репутации: 0
![]() RTM » 19:52 — 16.05.06
RTM » 19:52 — 16.05.06
И вправду интересно? 
по машинам HP DesignJet 500, 800, 1050, 4500 можете обращаться, помогу
- RTM
- Консультант
- Сообщения: 272
- Зарегистрирован: 21:17 — 31.03.06
- Откуда: Казахстан
- Баллы репутации: 0
Re: Лазерный принтер HP LaserJet 1200 — При включении ошибка
![]() zwitter » 09:45 — 14.12.11
zwitter » 09:45 — 14.12.11
Можно воскресить тему?
Менял шестерню колебательного механизма, потерял пружинку что прижимает привод картриджа к картриджу, поставил вместо маленькой внутренней большую от 1320…
собрал, все крутится но после старта принтер моргает нижней маленькой лампочкой…
т.к. у меня вынь7, то поставил дрова юниверсал принтер драйвер, они мне пишет 14 no toner cart
что я мог зацепить?
кроме редуктора ничего не разбирал
- zwitter
- ученик
- Сообщения: 165
- Зарегистрирован: 10:04 — 23.04.07
- Откуда: Ukraine
- Баллы репутации: 0
- Владимир А.
- Помощник админа Консультант
- Сообщения: 6638
- Зарегистрирован: 14:47 — 09.02.06
- Откуда: г.Обнинск
- Баллы репутации: 1
-
- ICQ
Вернуться в HEWLETT PACKARD (HP)
Кто сейчас на конференции
Сейчас этот форум просматривают: нет зарегистрированных пользователей и гости: 0
“I have an HP LaserJet 4 printer with the error message 14 No EP Cart . I recently replaced the ink cartridge, ran ‘self test’ on the printer, now the message 14 No EP Cart won’t go away. The printer will not print. Help.”
There are several possible causes for the 14 No EP Cart error message that vary by HP printer model. For HP LaserJet 4 series printers, the likely cause is one of three things:
- The new toner cartridge may be defective.
- The high voltage unit in your printer may be defective.
- The contacts in the printer or on the printer cartridge are dirty or misaligned.
Issues 1 and 3 are the most common, especially when you’re simply changing out the toner cartridge. The key thing to look for is whether the metal rod on the bottom left side of the cartridge is making proper contact with the printer.

You may need to clean the contacts in the printer or adjust the metal rod to get the toner cartridge to seat properly. This is a problem more common to recycled cartridges because parts can get damaged through all the handling.
Here are some other common issues for all HP Printers related to the 14 No EP Cart Error Message.
- Print rollers in tray 2 and tray 3 are worn.
- You need to change all feed rollers.
- Toner cartridge not fully seated or not installed.
- Toner sensor tabs missing.
- Defective toner cartridge.
- A defective paper control PCA.
I’m using LD Products toner cartridges and have had no problems with them since I started useing them in all my printers starting about 2001.
After my original post, I noticed that my photo printouts were degraded. The colors were not what they should be and they had streaks in them. This forced me to find out what was going wrong since the printer was no help. So, the following ensued:
The diagnostic page shows the alignment to be correct. Using paint shop pro I generated a page with four color bars running across it. Black, cyan, magenta, and yellow. When I printed it I saw that the black cartridge was failing to print correctly. Now, I’ve been doing a ton of greyscale photo printing and the cartridge was about a year old. A call to LD Products informed that the cartridge was rated for 1200 pages at 5% coverage and the way I was using it would reduce that by as much as a half. Examining the cartridge, I found that the roller that is normally coated with toner, Was nearly bare. I removed it, shook it vigoursly, reinstalled it, and printed the test page again. The error message went away but the printout was still messed up. I’ve ordered a new cartridge and, after I install it, I’ll run a new print and le tyou know how it turns out.
Since the cartridge was, for all practical purposes empty, I would have thought the printer would have alerted me to this fact. Every time I printed something, the information window that pops up showed the black cartridge was nearly full.
Issue
When the printer cannot continue printing for some reason (an error status), the printer beeps, the (Message) indicator comes on, and an error message that indicates the description of the error appears in the display. A Warning message appears in the display when the printer requires some remedy (a warning status) although the job is not affected.
If either of these messages appears, perform the following procedures according to the message.
NOTE
Clarifications of the operation and additional explanations for the procedure are indicated at the end of this page. Reading these notes is highly recommended.
Cause and Solution
| Message | Cause and Remedy |
| <E nnn-nnnn> («n» represents a number) | Cause: A problem has occurred inside the printer. Remedy : Solve the problem following the instructions in «Service Call Display». |
| <00 NO SLOT LOAD> | Cause: Because the printer is in the middle of printing, it forbids loading paper in the manual feed slot. Remedy : When loading paper in the manual feed slot, wait until printing and printer operation finish completely.Important: Make sure that the printer is not operating and the (Ready) indicator is on when loading paper in the manual feed slot. When printing multiple copies or multiple pages from the manual feed slot, make sure that the printer is not operating and the (Message) indicator is on before loading the second and subsequent paper. If paper is loaded in the manual feed slot while the printer is operating such as when the printer is printing or immediately after outputting paper, the loaded paper may be output without being printed, or this may result in paper jams.
|
| <OF OPT.CONN.ERR.> | Cause 1: The optional paper feeder is not installed properly. Remedy : Turn the power OFF, install the paper feeder properly, and then turn it ON again. Cause 2: Cause 3: Cause 4: |
| <11 NO «size» PAPER> | Cause: Paper of the size specified in the application is not loaded in the paper source (in all the paper sources when PAPER SOURCE is set to AUTO; in the specified paper source when the setting is fixed). Remedy 1: Refill or load paper. Remedy 2: Press the (Feeder Selection) key, then select other paper source for the same paper size or larger paper size.
|
| <12 COVER OPEN> | Cause: Paper is jammed inside the printer. Remedy : Remove the jammed paper and set the paper cassette and covers to the original position. If the printer is not online, press the (Online) key. |
| <13 PAPER JAM> | Cause: Paper is jammed inside the printer. Remedy : Remove the jammed paper and set the paper cassette and covers to the original position. If the printer is not online, press the (Online) key.Important:a. If paper jams have occurred at multiple areas at the same time, the areas appear in the display by rotation. b. If you have removed the jammed paper without opening any cover, be sure to open and close the front cover once, and then press the (Online)key. |
| <14 NO TONER CART> | Cause: The toner cartridge is not installed or installed improperly. Remedy : Install the toner cartridge properly. |
| <18 FEED ERROR> | Cause: Paper of the size or type that cannot be fed from the manual feed slot or paper cassette is specified. Remedy 1: If a paper source is specified, press the (Feeder Selection) key, then set PAPER SOURCE to AUTO.Remedy 2: Press the (Feeder Selection) key, select a paper source from which paper of the specified size or type can be fed, then load paper.Remedy 3: Specify the settings for STD PAPER SIZE and STD PAPER TYPE in the FEEDER MENU options in the SETUP menu to the size or type of paper that can be loaded in the paper source. Remedy 4: Press the (Online) key, then print from the currently selected paper source. However, this may result in deterioration in print quality.
|
| <18 CHK MANU SLOT > | Cause: Paper is loaded in the manual feed slot. Remedy 1: If you want to use the paper loaded in the manual feed slot for printing, press the the (Feeder Selection) key, and then set PAPER SOURCE to MANU.FEED SLOT.Remedy 2: Remove any paper loaded in the manual feed slot. |
| <1H CHK TNR CONN.>
(Warning Message) |
Cause: There is a possibility that the toner cartridge is not installed properly. Remedy 1: Remove the toner cartridge, then reinstall it properly. Remedy 2: If <1H CHK TNR CONN.> appears and there is a problem with the print quality even after applying the Remedy 1, remove the toner cartridge and replace it with a new one. |
| <23 DOWN.MEM.FULL>
<Auto Error Skip> |
Cause: The memory for registering overlay forms and custom characters has run out and overflowed. Remedy 1: The printer continues printing by pressing the (Online) key. However, the overflowed data cannot be registered.Remedy 2: Perform a soft reset using the RESET menu, increase the free space of RAM using the following procedure, register the data again, and then print again. — Perform a hard reset or cycle the power of the printer (Be aware that all the data in the memory will be deleted). |
| <26 SYS.MEM.FULL>
<Auto Error Skip> |
Cause: The work memory required for the printer process has run out while the system is processing the data (mainly the graphics data and text data). Remedy 1: The printer continues printing by pressing the (Online) key. However, the data with which an error has occurred is not printed properly.Remedy 2: Perform a soft reset using the RESET menu, and then increase the free space of RAM using the following procedure. — Perform a hard reset or cycle the power of the printer (Be aware that all the data in the memory will be deleted). |
| <27 JOB START ERR>
<Auto Error Skip> |
Cause: The specified emulation does not exist. Remedy : Press the (Online) key to continue printing from the next data. However, the data with which an error has occurred is not printed.
|
| <30 MEMORY FULL>
<Auto Error Skip> |
Cause : The work memory has run out while the system is processing the data. Remedy : The printer continues printing by pressing the (Online) key. However, the data with which an error has occurred may not be printed properly.
|
| <32 2-SIDED ERROR>
<Auto Error Skip> |
Cause : The printer received 2-sided printing data of paper sizes (including the orientation) or paper types unavailable for automatic 2-sided printing. Remedy 1: The printer continues printing by pressing the (Online) key. However, the data on each side is printed on two pages.Remedy 2: After performing a soft reset in the RESET menu, change the setting to a paper size or type available for automatic 2-sided printing, and then print again. |
| <33 WORK MEM.FULL>
<Auto Error Skip> |
Cause: The work memory for each operation mode cannot be secured. Remedy 1: The printer continues printing by pressing the (Online) key. However, the data with which an error has occurred is not printed properly.Important:When you continue printing by pressing the (Online) key, be aware that the data of overlay or macro that is already registered may be deleted.
Remedy 2: |
| <35 TABLE FULL>
<Auto Error Skip> |
Cause: The number of the documents in a job has exceeded 16. Remedy : The printer continues printing by pressing the (Online) key. However, the job with which an error has occurred is not printed.
|
| <38 LOW IMAGE QLTY>
<Auto Error Skip> |
Cause: The printer cannot process the data because it is too complicated. Remedy 1: The printer continues printing by pressing the (Online) key. However, the printer prints with the image quality level being lowered.Remedy 2: Perform a soft reset in the RESET menu, set GRADATION LEVEL in the QUALITY MENU options in the SETUP menu to STANDARD, and then print again. |
| <39 SPL MEM.FULL>
<Auto Error Skip> |
Cause: Because spool memory has run out, the printer cannot print. Remedy 1: The printer continues printing by pressing the (Online) key. However, the page with which an error has occurred is not printed.Remedy 2: Perform a soft reset in the RESET menu, specify the paper size smaller, and then print again. Remedy 3: Perform a soft reset in the RESET menu, set GRADATION LEVEL in the QUALITY MENU options in the SETUP menu to STANDARD, and then print again. Remedy 4: If 2-SIDED PRINT. in the FEEDER MENU options in the SETUP menu is set to ON, specify OFF, and then print again. Remedy 5: Change the setting for HALFTONES in the QUALITY MENU options in the SETUP menu, and then print again. |
| <41 CHK PAPER SZE> | Cause 1:
The size of the paper loaded in the manual feed slot or paper cassette is different from the setting for SLOT PAPER SIZE, CASSETTE1 SIZE, or CASSETTE2 SIZE specified from the computer or control panel. Cause 2:
You are using UFR II Printer Driver, and you loaded custom paper of its long edges 215.9 mm or less and printed when SLOT PAPER SIZE, CASSETTE1 SIZE, or CASSETTE2 SIZE in the FEEDER MENU options in the SETUP menu was set to MIXED SIZE. Load the paper in landscape orientation, then print again. Cause 3: Set SPECIAL MODE J to ON, then print again. |
| <52 RAST.MODE ERR>
<Auto Error Skip> |
Cause: The printer received data in format that it does not support during printing in the Raster mode. Remedy 1: The printer continues printing by pressing the (Online) key. However, the data may not be printed properly.Remedy 2: Print again using a printer driver that supports image data formats. |
| <53 SEC.PRINT ERR>
<Auto Error Skip> |
Cause:
Secured print data is sent from a printer driver that is not for LBP3360. |
| <53 STORE ERROR>
<Auto Error Skip> |
Cause: The data for which a stored job print is specified is sent from a printer driver that is not for LBP3360. Remedy : Press the (Online) key to cancel the job. |
| <58 JOB MEM.FULL>
<Auto Error Skip> |
Cause: There is not sufficient free RAM space to process jobs. Remedy 1: If you are processing multiple jobs at once, press the (Online) key to cancel printing, wait for other jobs complete, and then print again.Remedy 2: If the job data is too large, divide the job and print again. |
| <59 JOB RX ERROR>
<Auto Error Skip> |
Cause: The printer received any unanalyzable data while it is receiving a job, or it timed out. Remedy 1: Press the (Online) key to cancel printing, then print again.Remedy 2: A problem may be occurring in the network you are using. Check the status of the network that you are using. |
| <A4 nn ERROR> («nn» represents two-digit alphanumeric characters) | Cause: A problem has occurred and the printer does not operate properly. Remedy : Cycle the power of the printer. If the message appears even after cycling the power of the printer, note down the message in the display, and contact your local authorized Canon dealer. |
| <A5 nn ERROR> («nn» represents two-digit alphanumeric characters) | Cause: A problem has occurred and the printer does not operate properly. Remedy : Cycle the power of the printer. If the message appears even after cycling the power of the printer, note down the message in the display, and contact your local authorized Canon dealer. |
| <A7 nn ERROR> («nn» represents two-digit alphanumeric characters) | Cause: A problem has occurred and the printer does not operate properly. Remedy : Cycle the power of the printer. If the message appears even after cycling the power of the printer, note down the message in the display, and contact your local authorized Canon dealer. |
| <D7 nn ERROR> («nn» represents two-digit alphanumeric characters) | Cause: A problem has occurred and the printer does not operate properly. Remedy : Cycle the power of the printer. If the message appears even after cycling the power of the printer, note down the message in the display, and contact your local authorized Canon dealer. |
| <D8 LAYOUT ERROR> | Cause: The page cannot be laid out because the memory has run out. Remedy 1: Set [Graphics Mode] in UFR II Printer Driver to [Raster Mode], then print again. Remedy 2: After performing a soft reset using the RESET menu, perform a hard reset to increase the free memory space or cycle the power of the printer, and then print again. (Be aware that all the data in the memory that the printer has received will be deleted.) Remedy 3: Perform «Error Skip», then continue printing. However, the data with which an error has occurred is not printed properly. |
| <D8 VERSION ERROR> | Cause: Any job is sent from a UFR II Printer Driver that this printer does not support. Remedy 1: Change the version of the UFR II Printer Driver to that this printer supports, and then print again. Remedy 2: Perform «Error Skip», then continue printing. However, the data with which an error has occurred is not printed properly. |
| <D8 SYNTAX ERROR> | Cause: Invalid data is sent when printing using UFR II Printer Driver. Remedy 1: Press the (Online) key to continue printing from the next data. However, the page with which an error has occurred and its subsequent pages are not printed.Remedy 2: Confirm the data to be printed, then print again. |
| <D8 nn ERROR> («nn» represents two-digit alphanumeric characters) | Cause: A problem has occurred and the printer does not operate properly. Remedy : Cycle the power of the printer. If the message appears even after cycling the power of the printer, note down the message in the display, and contact your local authorized Canon dealer. |
| <F2 NO FONT>
< Auto Error Skip> |
Cause: The registered fonts used for creating overlay forms had been deleted during printing. Remedy 1: The printer continues printing by pressing the (Online) key. However, unregistered fonts are not printed.Remedy 2: Register the fonts in the memory again or create a form using usable registered fonts, and then print again. |
| <F9-nn PWR OFF>ON> («nn» represents two-digit alphanumeric characters) | Cause: A problem has occurred while the printer is processing print data. Remedy : Cycle the power of the printer. If the message appears even after cycling the power of the printer, note down the message in the display, and contact your local authorized Canon dealer. |
| <FF FONT FULL>
<Auto Error Skip> |
Cause: Because of too many fonts to be registered, the field (font table) for registering font information has run out and overflowed. Remedy : The printer continues printing by pressing the (Online) key. However, the page with which an error has occurred is not printed properly. |
| <FM SIZE ERROR>
<Auto Error Skip> |
Cause: There is some font with its size exceeds the pseudo-scalable font size. Remedy : Perform «Error Skip», then continue printing. However, the characters with which an error has occurred are not printed properly. |
| <FM SCALE ERROR>
<Auto Error Skip> |
Cause: There is a character in which the number of coordinate points on the contour lines exceeds the limitation of a pseudo-scalable font. Remedy : Perform «Error Skip», then continue printing. However, the characters with which an error has occurred are not printed properly. |
| <PC LOAD «size»> | Cause: The paper of the size specified in the application is not loaded in the paper cassette or manual feed slot, or the paper source for the different paper size is selected. Remedy 1: Load the paper of the size selected in the application (or the one specified by scaling factors). Remedy 2: If you are using the manual feed slot, check SLOT PAPER SIZE, and when the paper size does not match the size specified in the application, specify the setting properly. Remedy 3: Press the (Feeder Selection) key, then select the paper cassette in which the paper of the matched size is loaded.Remedy 4: Press the (Online) key, then print to the currently loaded paper forcibly. If you are using the manual feed slot, the setting for SLOT PAPER SIZE automatically changes to the setting specified in the application.Important:If you open the front cover when the message is displayed, the message may disappear. However, be sure to follow the directions in the displayed message to change the paper. |
NOTE
a. When multiple warnings are occurring at the same time, the Warning messages appear by rotation.
b. When the printer is in error status and warning status at the same time, the Warning message does not appear.
c. Even when a message with (Warning Message) appears (when the printer is in a warning status), the printer does not stop printing.
d. For a message with the <Auto Error Skip> mark, you can skip the error by pressing the (Online) key and continue printing. However, part of the print data may be missing or it may not be printed properly. When you want to stop the process, perform a soft reset to eliminate the cause of the error, press the (Online) key, and then print again. Also, you can automatically skip the errors to which this mark is attached by setting AUTO ERROR SKIP in the SETUP menu to ON.
I’m using LD Products toner cartridges and have had no problems with them since I started useing them in all my printers starting about 2001.
After my original post, I noticed that my photo printouts were degraded. The colors were not what they should be and they had streaks in them. This forced me to find out what was going wrong since the printer was no help. So, the following ensued:
The diagnostic page shows the alignment to be correct. Using paint shop pro I generated a page with four color bars running across it. Black, cyan, magenta, and yellow. When I printed it I saw that the black cartridge was failing to print correctly. Now, I’ve been doing a ton of greyscale photo printing and the cartridge was about a year old. A call to LD Products informed that the cartridge was rated for 1200 pages at 5% coverage and the way I was using it would reduce that by as much as a half. Examining the cartridge, I found that the roller that is normally coated with toner, Was nearly bare. I removed it, shook it vigoursly, reinstalled it, and printed the test page again. The error message went away but the printout was still messed up. I’ve ordered a new cartridge and, after I install it, I’ll run a new print and le tyou know how it turns out.
Since the cartridge was, for all practical purposes empty, I would have thought the printer would have alerted me to this fact. Every time I printed something, the information window that pops up showed the black cartridge was nearly full.
Спустя какое-то время любая оргтехника начинает сбоить во время работы. Это также касается лазерных принтеров и МФУ Hawlett-Packard (HP). К счастью, данные устройства оснащены средством самодиагностики, которое информирует потребителя о возникшей проблеме. Вывод информации может осуществляться различными способами: специфическим миганием светодиодных индикаторов, появлением специальных кодов на сегментном дисплее, отображением информационных сообщений с кодом и описанием ошибки, а также вывод кода ошибки на персональный компьютер. В этой статье мы представим самые популярные коды ошибок лазерных принтеров HP с их расшифровкой и рекомендациями по устранению.
Коды ошибок лазерных принтеров и МФУ HP
Первое, что нужно знать, так это то, что ошибки работы оргтехники делятся на несколько видов. Есть коды ошибок обычного информационного характера, которые просто показывают потребителю, что в данный момент делает печатающее устройство. Например, 00 READY ON LINE с кодом 10001 указывает лишь на то, что печатающее устройство готово к работе. В свою очередь, предупреждающие или сервисные коды ошибок HP, как правило, информируют о скором окончании онера, либо о том, что пора заменить какой-либо расходник. Страшнее всего, когда на дисплее принтера HP, появляется код критической ошибки. Возникновение подобного сообщения, обычно указывает на серьезную проблему с печатающим устройством (к примеру, поломка механизма протяжки бумаги, привода или блока лазера).
Быстрее всего узнать о возникшей проблеме можно по светодиодным индикаторам. В зависимости от их состояния можно приблизительно определить, что произошло с печатающим аппаратом. В частности, речь идет о следующем (пример взят из официального мануала HP LaserJet Pro M1132, M12a, M12w, P1102, P1102s, P1102w, P1106, P1108, P1109 и P1109w):
- Постоянно мигает индикатор Wi-Fi (беспроводной связи или локальной сети). Указывает на то, что принтер не может подключиться к сети. Нужно перенастроить параметры подключения, либо заменить модуль Wi-Fi.
- Постоянно мигает светодиод индикатора ошибки. Таким образом, устройство предупреждает о проблеме с тонер-картриджем. Также может указывать на то, что открыта верхняя крышка или на образования замятия бумаги/постороннего предмета.
- Постоянно горят два индикатора (обычно, это светодиод готовности и ошибки). Указывает на возникновение критической ошибки. Лучше всего не искать причину, а сразу обратиться в сервисный центр.
Кроме того, если после нажатия кнопки включения, ни один светодиод не загорается и принтер также не осуществляет пуск, то, скорее всего, возникли проблемы с блоком питания печатающего устройства. Далее представим таблицы с самыми популярными кодами ошибок принтеров HP.
Основные группы кодов ошибок лазерных принтеров HP
|
Код ошибки принтера HP |
Расшифровка |
Описание |
|
HP 10XXX |
Обычные сообщения информационного характера. |
Такие коды сообщают о готовности работы принтера, об отсутствии подключения (HP 10002) и т.д. |
|
HP 102XX |
Информационные сообщения о том, что устройство нуждается в обслуживании. |
Например, информирует об окончании тонера в картридже, а также о том, что пора заменить расходный материал. |
|
HP 11XXX |
Предупреждающие сообщения, касающиеся загрузки бумаги. |
Выводятся, когда в одном или нескольких лотках отсутствует бумажный носитель. Также может указывать на некорректность выставленного размера бумаги. |
|
HP 12XYY |
Серия кодов для лотков подачи бумаги. |
Указывают на наличие/отсутствие бумаги, а также на различные сбои в работе. |
|
HP 15XXY |
Серия кодов для лотков приема бумаги. |
Указывают на наличие/отсутствие бумаги, а также на различные сбои в работе. |
|
HP 20XXX |
Ошибки синтаксических команд. |
Появляются тогда, когда система обнаруживает нелогические команды, посылаемые печатающему устройству. |
|
HP 25XXX |
Ошибки, вызванные нарушением синтаксиса команд. |
Появляются тогда, когда система обнаруживает нелогические команды, посылаемые печатающему устройству. |
|
HP 27XXX |
Ошибки семантических команд. |
Появляются тогда, когда система обнаруживает нелогические команды, посылаемые печатающему устройству. |
|
HP 30XXX |
Ошибки, которые автоматически могут быть устранены. |
Тип информационных кодов, которые указывают на временные сбои в работе устройства, по типу, память принтера заполнена и т.д. |
|
HP 32XXX |
Ошибки файловой системы PJL. |
Появляются тогда, когда система обнаруживает сбои в работе системы. |
|
HP 35XXX |
Ошибки, которые можно сразу же решить выполнением определенных команд и продолжить работу. |
Такие коды приходят на дисплей принтера вместе с рекомендациями по их устранению. Например, когда нужно увеличить объем памяти. |
|
HP 40XXX |
Ошибки, которые можно решить выполнением определенных команд, но работа устройства прерывается. |
Такие коды приходят на дисплей принтера вместе с рекомендациями по их устранению. Например, когда необходимо перезагрузить печатающий аппарат, по той или иной причине. |
|
HP 41XYY |
Сервисные сообщения, касающиеся загрузки бумаги. |
Выводятся, когда во всех лотках отсутствует бумажный носитель. Указывает на некорректность выставленного размера бумаги, а также проблемы в работе данных частей принтера. |
|
HP 42XYY |
Сообщают о наличии замятия бумаги или постороннего предмета (актуально для HP LaserJet 5Si/ 5SiMx). |
В зависимости от кода можно максимально точно определить причину замятия бумаги. |
|
HP 43XYY |
Предупреждающие сообщения о проблемах с подключенными модулями. |
Многие офисные МФУ способны расширять свой функционал, за счет дополнительно подключенных моделей (лотков, податчиков, ADF и т.д.). Если в них обнаружатся сбои, то именно данные коды об этом проинформируют. |
|
HP 44XYY |
Сообщают о наличии замятия бумаги или постороннего предмета (актуально для HP LaserJet 4000/ 5000). |
В зависимости от кода можно максимально точно определить причину замятия бумаги. |
|
HP 50XXX |
Группа ошибок, указывающих на механические проблемы принтера. |
Если у принтера начал сбоить какой-то узел (печка, система охлаждения, блок лазера и т.д.), то принтер выдаст сообщение с кодом ошибки данной серии. |
|
HP 55XXX |
Ошибки, касающиеся персональных настроек печатающего устройства. |
Обычно можно исправить сбросом и перенастройкой принтера. |
На практике, вместо [X] и [Y] в коде будет указанно уникальное цифровое значение, соответствующее той или иной ошибке.
Коды ошибок принтеров и МФУ HP, выводимые на штатный дисплей устройства
|
Код ошибки принтера HP |
Содержание |
Расшифровка |
|
HP 10001 |
Принтер готов к работе (00). |
Принтер находится в режиме готовности, либо ему требуется незначительное сервисное обслуживание. Можно перезагрузить или очистить память принтера. Еще может помочь сброс настроек до заводских. |
|
Принтеру требуется сервисное обслуживание (68). |
||
|
Память принтера заполнена. Настройки не могут быть сохранены (68). |
||
|
HP 10002 |
Принтер не готов к работе (00). |
Принтер не готов к работе. Включить/разбудить/перезагрузить. |
|
Устройство нуждается в обслуживании (68). |
||
|
HP 10003 |
Осуществляется прогрев принтера (02). |
Печатающее устройство находится в режиме прогрева. Немного подождать, либо перезагрузить МФУ. |
|
HP 10004 |
Проводится самодиагностика печатающего устройства (05). |
Принтер создает тестовый отпечаток. Дождаться окончания процесса печати, либо перезагрузить устройство. |
|
Осуществляется печать страницы диагностики (05). |
||
|
HP 10005 |
Перезагрузка памяти (07). |
Параметры или память принтера были сброшены. Перенастроить печатающее устройство. |
|
Очистка памяти (07). |
||
|
HP 10006 |
Низкий уровень тонера в картридже (16). |
В тонер-картридже заканчивается красящее вещество. Заправить или купить новый картридж. |
|
HP 10007 |
Задание отменено. |
Очистите память принтера и очередь печати. Перезагрузите или перенастройте устройство. |
|
HP 10010 |
Буфер памяти принтера переполнен. |
Очистите память принтера и очередь печати. Перезагрузите или перенастройте устройство. |
|
HP 10011 |
Осуществляется подключение или отсутствует связь с дополнительными модулями принтера (18). |
Переподключить дополнительные лотки и прочие модули. Перезагрузить МФУ. |
|
HP 10013 |
Осуществляется печать тестовой страницы (04). |
Принтер создает тестовый отпечаток. Дождаться окончания процесса печати, либо перезагрузить устройство. |
|
HP 10014 |
Осуществляется печать тестовой страницы или листа конфигурации (06). |
Дождаться окончания процесса печати, либо перезагрузить устройство. |
|
HP 10015 |
Осуществляется печать шрифтов, поддерживаемых принтером (06). |
Дождаться окончания процесса печати, либо перезагрузить устройство. |
|
HP 10016 |
Осуществляется печать теста работы узлов печатающего устройства (15). |
Дождаться окончания процесса печати, либо перезагрузить устройство. |
|
HP 10017 |
Осуществляется демо-печать (06). |
Дождаться окончания процесса печати, либо перезагрузить устройство. |
|
HP 10018 |
Включение режима сброса настроек (09). |
Выйти из режима, перезагрузить принтер, либо выполнить сброс параметров (если устройство нуждается в этом). |
|
HP 10019 |
Включение режима сброса параметров активных портов (09). |
Выйти из режима, перезагрузить принтер, либо выполнить сброс параметров (если устройство нуждается в этом). |
|
HP 10020 |
Включение режима сброса параметров всех портов (09). |
Выйти из режима, перезагрузить принтер, либо выполнить сброс параметров (если устройство нуждается в этом). |
|
HP 10021 |
Осуществление сброса параметров принтера, в том числе очистка NVRAM (08). |
Дождаться окончания процесса, либо перезагрузить устройство. |
|
HP 10022 |
Осуществляется печать листа конфигурации (06). |
Дождаться окончания процесса печати, либо перезагрузить устройство. |
|
HP 10023 |
Осуществляется обработка задания. |
Дождаться окончания процесса, либо перезагрузить устройство. |
|
HP 10024 |
Осуществляется передача данных. |
Нужно принять/отменить задание, дождаться окончания процесса или перезагрузить принтер. |
|
HP 10025 |
Отказ в доступе к той или иной функции МФУ. |
Перезагрузить принтер, обратиться в СЦ за помощью. |
|
HP 10026 |
Невозможно отменить задание. |
Перезагрузить принтер, обратиться в СЦ за помощью. |
|
HP 10027 |
Забился тракт подачи бумаги. |
Следует очистить тракт от посторонних предметов, устранить замятие. |
|
HP 10028 |
Осуществляется печать журнала событий. |
Дождаться окончания процесса печати, либо перезагрузить устройство. |
|
HP 10029 |
Осуществляется подача бумаги. |
Дождаться окончания процесса, перезагрузить принтер, устранить проблему. |
|
HP 10030 |
Ошибки, связанные с системой команд PJL. |
Перезагрузить ноутбук, сбросить настройки принтера. |
|
HP 10031 |
Осуществляется самоочистка устройства. |
Дождаться окончания процесса, перезагрузить принтер, почистить устройство самостоятельно. |
|
HP 10032 |
Принтер не может распознать совместимый картридж. |
Установить оригинальный картридж, прошить принтер, заменить чип картриджа, сменить главную плату. |
|
HP 10033 |
Введен неверный PIN-код. |
Заново ввести код, сбросить настройки принтера. |
|
HP 10034 |
Прерывание задания. |
Очистить очередь печати, перезагрузить принтер, проверить подключение. Если все хорошо, продолжить работу. |
|
HP 10035 |
Можно продолжить выполнение прерванного задания. |
Подтвердить или отменить действие. |
|
HP 10036 |
Осуществление повторного прогрева печатающего устройства. |
Дождаться окончания процесса, перезагрузить принтер. |
|
HP 10200 |
Заканчивается черный тонер, но принтер еще может печатать. |
Временно продолжить работу. После придется перезаправить картридж или купить новый. |
|
HP 10201 |
Заканчивается голубой тонер, но принтер еще может печатать. |
Временно продолжить работу. После придется перезаправить картридж или купить новый. |
|
HP 10202 |
Заканчивается пурпурный тонер, но принтер еще может печатать. |
Временно продолжить работу. После придется перезаправить картридж или купить новый. |
|
HP 10203 |
Заканчивается желтый тонер, но принтер еще может печатать. |
Временно продолжить работу. После придется перезаправить картридж или купить новый. |
|
HP 10204 |
Требуется замена фотобарабана. |
Следует осуществить замену указанного расходника. |
|
HP 10205 |
Требуется замена черного фотобарабана. |
Следует осуществить замену указанного расходника. |
|
HP 10206 |
Требуется замена голубого фотобарабана. |
Следует осуществить замену указанного расходника. |
|
HP 10207 |
Требуется замена пурпурного фотобарабана. |
Следует осуществить замену указанного расходника. |
|
HP 10208 |
Требуется замена желтого фотобарабана. |
Следует осуществить замену указанного расходника. |
|
HP 10209 |
Требуется замена черного картриджа. |
Следует осуществить замену указанного расходника. |
|
HP 10210 |
Требуется замена голубого картриджа. |
Следует осуществить замену указанного расходника. |
|
HP 10211 |
Требуется замена пурпурного картриджа. |
Следует осуществить замену указанного расходника. |
|
HP 10212 |
Требуется замена желтого картриджа. |
Следует осуществить замену указанного расходника. |
|
HP 10213-10403 |
Различные коды сервисного обслуживания принтера, связанные с использованием расходных материалов. |
Заправить/заменить картридж, восстановить/заменить блок фотобарабана и т.д. Все зависит от информации, указанной в описании ошибки. |
Внимание: Не пытайтесь самостоятельно починить печатающий аппарат, если не имеете опыта сервисного обслуживания оргтехники. Лучше доверьте дело специалисту.
Коды ошибок E-серии для лазерных принтеров и МФУ HP
|
Код ошибки принтера HP |
Расшифровка |
Варианты решения |
|
HP E0 |
Указывает на замятие бумаги или наличие постороннего предмета. |
Извлечь замявшийся лист или иной предмет. Почистить или заменить ролик захвата бумаги. Проверить датчик и механизм протяжки бумаги. |
|
HP E1 |
Информирует об отсутствии бумаги в лотке подачи или установленный размер не соответствует. |
Загрузить или поправить бумагу. Проверить ролик захвата. Сменить задание на печать. |
|
HP E2 |
Предупреждает о том, что открыта дверца или датчик вышел из строя. |
Открыть/закрыть все крышки, проверить защелку и датчик. |
|
HP E3 |
Принтер не видит или не может распознать картридж. |
Поправить картридж, снять защитную чеку/пленку, прочистить чип картриджа и принтера и т.д. Подробнее, читайте в статье «Что делать, если принтер не распознает картридж». Почистить контакты и осуществить сервисное обслуживание принтера и картриджа. |
|
HP E4 |
Память печатающего устройства заполнена или ее не хватает. |
Очистить память принтера, сбросить настройки, прошить или сменить главную плату. |
|
HP E5 |
Проблема в работе механизма захвата или протяжки бумаги. |
Проверить наличие бумаги в лотке, поправить листы, пододвинуть флажок, почистить/заменить ролик захвата, проверить механизм протяжки, энкодер и датчик. Заменить или прошить главную плату. |
|
HP E6 |
Неизвестная ошибка работы принтера. |
Провести диагностику и сервисное обслуживание печатающего устройства. |
|
HP E7 |
Неизвестная аппаратная ошибка работы принтера. |
Провести диагностику и сервисное обслуживание печатающего устройства. |
|
HP E8 |
Критическая ошибка в работе сканера. |
Лучше всего отнести МФУ в сервисный центр. Однако можно разобрать и поправить линейку, либо осмотреть шестеренки привода (заменить, отремонтировать). |
|
HP E9 |
Неизвестная критическая ошибка работы принтера. |
Провести диагностику и сервисное обслуживание печатающего устройства. |
|
HP E10 |
Проблема в подключении дополнительных модулей. |
Перезапустить печатающий аппарат, выполнить переподключение проблемного модуля, проверить/заменить шлейф. |
|
HP E20 |
Не хватает памяти принтера для печати материала. |
Перезапустить устройство, очистить память и очередь печати, сменить задачу на печать. |
|
HP E21 |
Заполнена память печатающего устройства. |
Перезапустить устройство, очистить память и очередь печати, сменить задачу на печать, добавить оперативной памяти. |
|
HP E22 |
Сбой LPT-подключения или несоответствия драйвера принтера. |
Переподключить устройство к ПК, заменить кабель, переустановить драйвер. |
Также сюда стоит отнести ошибку HP 13.А, которая указывает на проблему с деталями механизма подачи бумаги (соленоидом, датчиком и т.д.).
Коды ошибок HP LaserJet, указывающие на проблемы аппаратной части устройства
|
Код ошибки принтера HP |
Расшифровка |
|
HP 50000 |
Данный код появляется в случае возникновения неизвестной ошибки, в работе аппаратной части печатающего устройства. |
|
HP 50001 |
Ошибка одного или нескольких модулей памяти, размещенных на плате форматера. |
|
HP 50002 |
Ошибка модуля оперативной памяти главной платы принтера. |
|
HP 50003 |
Код указывает на проблему двигателя печки лазерного принтера. |
|
HP 50004 |
Сработал датчик лазера, указывающий на проблему данной детали. |
|
HP 50005 |
Проблема с приводом сканера (скорее всего связанная с зеркалом). |
|
HP 50006 |
Проблема в приводе кулера. |
|
HP 50007 |
Потеря связи между контроллером и главной платой принтера. |
|
HP 50008 |
Код указывает на низкую температуру термоэлемента печки принтера. |
|
HP 50009 |
Код указывает на долгий период прогрева печки принтера до нужной температуры. |
|
HP 50010 |
Код указывает на высокую температуру прогрева печки принтера (перегрев). |
|
HP 50011 |
Неизвестная проблема, связанная с печкой лазерного МФУ. |
|
HP 50012 |
Проблема в работе датчика луча лазера. |
|
HP 50013 |
Проблема, связанная с блоком лазера принтера. |
|
HP 50014 |
Ошибка старта работы сканера. |
|
HP 50015 |
Ошибка движения линейки сканера. |
|
HP 50016-50019; HP 50030-50036 |
Проблема в слабом вращении или поломке одного из вентиляторов. |
|
HP 50020 |
Проблемы с механизмом подачи бумаги верхнего лотка. |
|
HP 50021 |
Проблемы с механизмом подачи бумаги нижнего лотка. |
|
HP 50022 |
Проблемы с механизмом подачи бумаги универсального лотка. |
|
HP 50023 |
Ошибка пуска основного электромотора принтера. |
|
HP 50024 |
Ошибка работы основного электромотора принтера. |
|
HP 50025 |
Ошибка подключения дополнительных модулей (актуально для больших офисных МФУ). |
|
HP 50026 |
Ошибка работы дополнительных модулей (актуально для больших офисных МФУ). |
|
HP 50027 |
Проблема в работе дуплекса принтера или МФУ (модуля двусторонней печати). |
|
HP 50028 |
Нарушение контакта между форматером и другими частями печатающего аппарата. |
|
HP 50029 |
Проблема в обработке или получении данных платой форматера. |
|
HP 50048-50063 |
Неизвестные ошибки принтера, связанные с распределением питания. |
|
HP 50064 |
Ошибка датчика совмещения желтого цвета. |
|
HP 50065 |
Ошибка датчика совмещения пурпурного цвета. |
|
HP 50066 |
Ошибка датчика совмещения голубого цвета. |
|
HP 50067 |
Ошибка датчика совмещения черного цвета. |
|
HP 50068 |
Несоответствие диапазона плотности желтого цвета. |
|
HP 50069 |
Несоответствие диапазона плотности пурпурного цвета. |
|
HP 50070 |
Несоответствие диапазона плотности голубого цвета. |
|
HP 50071 |
Несоответствие диапазона плотности черного цвета. |
|
HP 50072 |
Ошибка, возникающая из-за несоответствия данных датчика фазовой калибровки фотобарабана для желтого цвета. |
|
HP 50073 |
Ошибка, возникающая из-за несоответствия данных датчика фазовой калибровки фотобарабана для пурпурного цвета. |
|
HP 50074 |
Ошибка, возникающая из-за несоответствия данных датчика фазовой калибровки фотобарабана для голубого цвета. |
|
HP 50075 |
Ошибка, возникающая из-за несоответствия данных датчика фазовой калибровки фотобарабана для черного цвета. |
|
HP 505XX |
Сбой в работе прошивки лазерного принтера HP. |
|
HP 50599 |
Проблема с питанием платы форматера. |
Важно: В данном случае представлена только расшифровка кодов ошибок HP, так как в большинстве случаев устранить проблему очень сложно, даже для квалифицированного специалиста. Поэтому чаще всего приходится просто заменять испорченную деталь принтера.
Прочие коды ошибок лазерной оргтехники HP
|
Код ошибки принтера HP |
Расшифровка |
Варианты решения |
|
HP 10.XX.YY |
Проблема считывания данных с чипа картриджа (часто сопровождается сообщением «SUPPLY MEMORY ERROR»). |
Переустановить картридж, установить оригинальный картридж HP или сбросить ошибку (подробнее, читайте в статье «Как исправить ошибку памяти картриджа HP»). |
|
HP 10.32.XX |
Принтер определил, что установлен неоригинальный картридж. |
Проигнорировать и пользоваться принтером дальше (может перестать отображаться ресурс картриджа, а также будет часто выскакивать информационное окно о необходимости использования оригинальной продукции). Если нет такой возможности, проблему нужно решать уже исходя из особенностей оргтехники (замена чипа картриджа, прошивка принтера и т.д.). |
|
HP 11.01 и HP 11.02 |
Принтер постоянно запрашивает установку дату и времени, либо они отображаются некорректно. |
Необходимо заменить батарею или форматер принтера. |
|
HP 13.XX.YY (13.A, 13.02.00, 13.03.XX, 13.05.XX, 13.06.XX, 13.12.00, 13.20.00, 13.21.00) |
Произошло замятие бумаги. |
Извлеките замятую бумагу или посторонний предмет. Перезагрузите принтер, проверьте датчики бумаги, а также механизм протяжки бумаги. |
|
HP 20 INSUFFICIENT MEMORY |
Перегрузка оперативной памяти принтера. |
Нажмите продолжить печать, но при этом часть данных может быть утеряна. Лучше переделать файл и отправить его заново на печать. Также можно попробовать очистить память принтера или расширить, за счет установки дополнительного модуля. |
|
HP 21 PAGE TOO COMPLEX |
Принтер не может сжать изображение из-за его сложности. |
Нажмите продолжить печать, но при этом часть данных может быть утеряна. Упростите задание для печати. |
|
HP 22 EIO BUFFER OVERFLOW (EMBEDDED, PARALLEL, USB) |
Переполнен буфер памяти принтера или передаются по определенному каналу слишком объемный материал. |
Нажать продолжить, но данные будут утеряны. Проверить соединения, переключить порты или заменить кабели. |
|
HP 40 EMBEDDED I/O BAD TRANSMISSION |
Ошибка передачи данных. |
Нажать продолжить, на данные будут утеряны. Перезагрузить принтер и отправить повторное задание. Переустановить/заменить серверную карту или плату форматера. |
|
HP 41.3 UNEXPECTED PAPER SIZE IN TRAY X |
Формат бумаги не соответствует заданным параметрам. |
Установить бумагу соответствующего формата или сменить настройки печати. Сменить лоток (если их несколько). Проверить работу механизма протяжки и всех датчиков бумаги. Избавить МФУ от наличия посторонних предметов. |
|
HP 41.5 UNEXPECTED TYPE IN TRAY X |
Тип бумаги не соответствует заданным параметрам. |
Установить бумагу соответствующего типа или сменить настройки печати. Сменить лоток (если их несколько). Проверить работу механизма протяжки и всех датчиков бумаги. Избавить МФУ от наличия посторонних предметов. |
|
HP 41.X ERROR |
Неизвестная ошибка, связанная с протягиванием бумаги. |
Можно попробовать перезагрузить МФУ, почистить ролики захвата бумаги, либо разбирать и искать проблему по пути следования бумаги. |
|
HP 49.XXXXX ERROR |
Критическая ошибка, связанная с микропрограммой (прошивкой, firmware) принтера. |
Перезагрузите принтер, после чего отмените все задания печати, очистите очередь, проверьте обновления для принтера (обновите) и снова попытайтесь печатать при помощи фирменного ПО. Не помогло, пробуйте наоборот понизить версию прошивки, либо перепрошить принтер, установив на него дамп с нового устройства. Замените плату форматера. |
|
HP 50.X FUSER ERROR |
Проблема в работе печки лазерного принтера. |
Выключить принтер и дать ему отдохнуть около 30 минут. Проверить блок печки, почистить и заменить термоэлемент (если он в этом нуждается). Заменить весь блок, БП или плату микроконтроллера. |
|
HP 51.1X ERROR |
Проблема в работе датчика синхронизации луча лазера. |
Перезагрузить МФУ, проверить контакты, шлейфы и различные подключения. Заменить блок лазера или плату микроконтроллера. |
|
HP 52.XX.0 PRINTER ERROR |
Проблема в работе драйвера двигателя лазерного блока. |
Перезагрузить МФУ, проверить контакты, шлейфы и различные подключения. Заменить блок лазера или плату микроконтроллера. |
|
HP 53.10.01 PRINTER ERROR |
Принтер не поддерживает модуль памяти DIMM. |
Перезагрузить принтер. Переустановить или заменить модуль памяти. Заменить форматер. |
|
HP 55.XX.YY DC CONTROLLER ERROR |
Ошибка контроллера DC. |
Перезагрузить принтер. Проверить соединения на плате контроллера, либо заменить плату. |
|
HP 56.XX ERROR |
Неизвестная ошибка, возникшая во время печати. |
Перезапустить принтер. Проверить все контакты. Провести диагностику. |
|
HP 57.XX PRINTER ERROR |
Проблема в работе вентилятора лазерного принтера. |
Проверить кулер на работоспособность, почистить, смазать или заменить. |
|
HP 58.XX ERROR |
Неизвестная ошибка, связанная с работой процессора принтера. |
Проверить все контакты платы контроллера или заменить ее. |
|
HP 59.XX ERROR Main Motor |
Проблема в работе главного электромотора принтера. |
Выключить принтер и дать ему немного отдохнуть. Разобрать и проверить подключения и сам электромотор. Заменить в случае неисправности. |
|
HP 62 NO SYSTEM |
Принтер не может обнаружить систему управления. |
Перезапустить печатающее устройство, обновить прошивку, сменить главную плату. |
|
HP 64 ERROR |
Неизвестная ошибка, связанная с буфером хранения данных для лазера. |
Перезапустить печатающее устройство, обновить прошивку, сменить главную плату. |
|
HP 68.X PERMANENT STORAGE FULL |
Ошибка, связанная с переполнением памяти NVRAM. |
Продолжить печать, перезапустить принтер, очистить буфер памяти. |
|
HP 79.XXXX ERROR |
Критическая ошибка, связанная с аппаратной частью принтера или МФУ. |
Здесь может быть все что угодно. Нужно перезагружать принтер, разбирать и искать проблему. Чаще всего, дело заключается в неисправности материнской платы устройства. |
|
HP 8X. XXXX EIO ERROR |
Критическая ошибка подключения дополнительного модуля. |
Перезапустить принтер, переподключить модуль, обновить прошивку. Заменить плату форматера. |
Внимание: Не пытайтесь самостоятельно починить печатающий аппарат, если не имеете опыта сервисного обслуживания оргтехники. Лучше доверьте дело специалисту.
Содержание этого документа относится к принтерам HP LaserJet M232dw, M232dwc, M233sdn, M233sdw, M233dw, M234sdwe, M234sdw, M234sdne, M234sdn, M234dwe, M234dw, M236sdn, M236sdw, M236dw и M236d.
В следующих разделах описаны основные ошибки, о которых свидетельствуют сочетания мигающих индикаторов на панели управления принтера, а также способы устранения неполадок для каждой комбинации. Определите последовательность мигающих индикаторов на панели управления, затем выполните действие по устранению той или иной проблемы.
МФУ HP LaserJet M232dw, M232dwc, M233dw, M234dwe, M234dw, M236dw и M236d (без устройства подачи документов)
-
Индикаторы панели управления
-
Дисплей панели управления
-
Параметры копирования
-
Кнопка/индикатор копирования
-
Кнопка копирования удостоверения
-
Кнопка/индикатор информации
-
Кнопка/индикатор возобновления печати
-
Кнопка индикатор «Отмена»
-
Кнопка питания
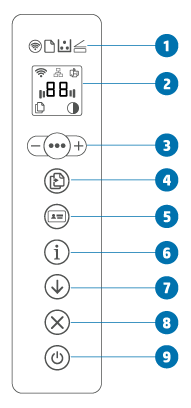
МФУ HP LaserJet M233sdn, M233sdw, M234sdwe, M234sdw, M234sdne, M234sdn, M236sdn и M236sdw (с устройством подачи документов)
-
Клавиша питания
-
Индикатор состояния
-
Индикаторы на панели управления
-
Дисплей панели управления
-
Параметры копирования
-
Кнопка/индикатор копирования
-
Кнопка копирования удостоверения
-
Кнопка/индикатор информации
-
Кнопка/индикатор беспроводной связи
-
Кнопка/индикатор «Возобновить»
-
Кнопка индикатор «Отмена»
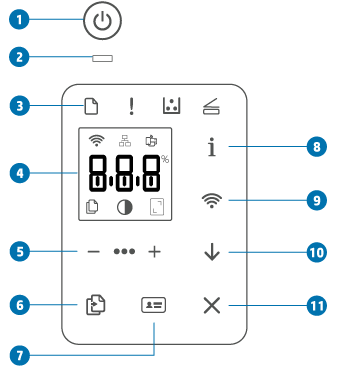
Коды Er (ошибки)
На панели управления отображается Er, затем 2-значный код ошибки.
Отображается Er/01
Сообщение об ошибке Er/01 означает, что входной лоток пуст.
Загрузите бумагу во входной лоток или извлеките и повторно загрузите стопку бумаги.
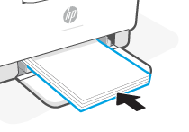
Отображается Er/02
Сообщение об ошибке Er/02 указывает, что дверца доступа к картриджам открыта.
Убедитесь, что дверца доступа к картриджам полностью закрыта.
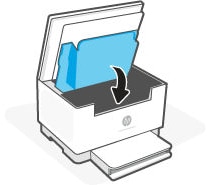
Отображается Er/03
Сообщение об ошибке Er/03 указывает, что принтеру не удалось захватить лист бумаги для печати.
Извлеките стопку бумаги из лотка и проверьте состояние бумаги. Повторно загрузите бумагу и повторите попытку печати, копирования или сканирования. Более подробные сведения об устранении неполадок см. в разделе Принтер не захватывает бумагу.
Отображаются коды Er/04, Er/05 или Er/06
Сообщение об ошибке Er/04, Er/05 или Er/06 обозначает замятие бумаги.
Найдите и извлеките всю замятую бумагу из принтера или перезагрузите принтер, если в нем нет замятой бумаги. Более подробные сведения об устранении неполадок см. в разделе Ошибка замятия бумаги.
Отображается Er/07
Сообщение об ошибке Er/07 указывает, что картридж с тонером отсутствует или установлен неправильно.
Для устранения этой проблемы установите отсутствующий картридж с тонером. Если картридж с тонером отсутствует, перейдите к шагу Установите новый картридж с тонером.
Приобретайте сменные картриджи и другие расходные материалы в магазине HP Store или в местных магазинах розничной торговли.
Шаг 1. Извлеките и снова установите картридж с тонером
Откройте дверцу доступа к картриджам, извлеките картридж с тонером, переустановите его и повторите попытку печати. Более подробные сведения см. в разделе Замена картриджа с тонером.
Если устранить ошибку не удается, перейдите к следующему шагу.
Шаг 2. Установите новый картридж с тонером
Замените картридж с тонером на новый и повторите попытку печати.
Если устранить ошибку не удается, перейдите к следующему шагу.
Шаг 3. Отправьте принтер на сервисное обслуживание
Если вы выполнили все приведенные выше действия, но устранить проблему не удалось, перейдите к разделу Сервисное обслуживание принтера в конце этого документа.
Отображается Er/08
Ошибка Er/08 указывает, что тонер в картридже заканчивается и выставленный для картриджа параметр приведет к прекращению его использования.
Чтобы продолжить печать, выполните следующие действия.
-
Откройте HP Smart и выберите принтер.
-
Выберите пункт Дополнительные параметры.
Примечание.
В Windows 7 и 8 откройте HP Printer Assistant, выберите Печать, затем щелкните Главная страница принтера (EWS).
-
Откройте Система, затем Параметры расходных материалов.
-
Измените Параметр очень низкого уровня на Продолжить.
Чтобы устранить неполадку, замените картридж.
Приобретайте сменные картриджи и другие расходные материалы в магазине HP Store или в местных магазинах розничной торговли.
Шаг 1. Замените пустой картридж или картридж с низким уровнем тонера
Замените картридж с тонером на новый и повторите попытку печати. Если устранить ошибку не удается, перейдите к следующему шагу. Более подробные сведения см. в разделе Замена картриджа с тонером.
Шаг 2. Отправьте принтер на сервисное обслуживание
Если вы выполнили все приведенные выше действия, но устранить проблему не удалось, перейдите к разделу Сервисное обслуживание принтера в конце этого документа.
Отображаются коды Er/11, Er/14 или Er/17
Ошибки могут отображаться по следующим причинам:
-
Картридж с тонером несовместим с принтером.
-
Картридж с тонером был защищен на другом принтере.
Замените затрагиваемые расходные материалы.
Приобретайте сменные картриджи и другие расходные материалы в магазине HP Store или в местных магазинах розничной торговли.
Шаг 1. Замените несовместимый картридж с тонером
Замените картридж с тонером на новый и повторите попытку печати. Если устранить ошибку не удается, перейдите к следующему шагу. Более подробные сведения см. в разделе Замена картриджа с тонером.
Шаг 2. Отправьте принтер на сервисное обслуживание
Если вы выполнили все приведенные выше действия, но устранить проблему не удалось, перейдите к разделу Сервисное обслуживание принтера в конце этого документа.
Отображается Er/20
Сообщение об ошибке Er/20 указывает на ошибку с датчикам картриджа с тонером.
Извлеките картридж с тонером и повторно вставьте его. Если ошибка не устранена, отключите принтер от основного питания, подождите 30 секунд, затем снова включите его. Если ошибка не устранена, перейдите к следующим шагам.
Шаг 1. Замена картриджа с тонером
Для замены отсутствующего или старого картриджа с тонером откройте дверцу доступа к картриджу, извлеките картридж со старым тонером и установите новый картридж. Более подробные сведения см. в разделе Замена картриджа с тонером.
Шаг 2. Отправьте принтер на сервисное обслуживание
Если вы выполнили все приведенные выше действия, но устранить проблему не удалось, перейдите к разделу Сервисное обслуживание принтера в конце этого документа.
Отображается Er/23
Сообщение об ошибке Er/23 указывает, что в принтере заканчивается память.
Чтобы устранить эту ошибку, нажмите кнопку Отмена для отмены текущего задания. Разбейте задание на несколько более мелких заданий, содержащих меньшее число страниц, и повторите отправку. Избегайте одновременного выполнения различных задач, например сканирования во время печати.
Отображается Er/26
Сообщение об ошибке Er/26 указывает, что в принтере возникла общая ошибка привода.
Чтобы устранить эту ошибку и продолжить, нажмите кнопку Возобновить. Если ошибка повторяется, выключите принтер, подождите 30 секунд и включите принтер. Если проблема не устранена, обратитесь в службу поддержки клиентов HP.
Отображается Er/30
Сообщение об ошибке Er/30 указывает на проблему со сканером.
Чтобы устранить ошибку, убедитесь, что защитный лист снят со стекла сканера. Выключите устройство, подождите 30 секунд и снова включите его. Если проблема не устранена, обратитесь в службу поддержки клиентов HP.
Отображается Er/50, Er/51, Er/52, Er/54, Er/55, Er/58 или Er/59
Сообщение об ошибке Er/50, Er/51, Er/52, Er/54, Er/55, Er/58 или Er/59 указывает, что принтер находится в состоянии ошибки из-за проблемы основного привода.
Чтобы устранить эту ошибку, выключите устройство, подождите 30 секунд и снова включите его. Если проблема не устранена, обратитесь в службу поддержки клиентов HP.
Отображается Er/66
Сообщение об ошибке Er/66 указывает, что оборудование Wi-Fi не найдено.
Чтобы устранить ошибку, нажмите кнопку Возобновить для продолжения работы без оборудования Wi-Fi или выключите принтер, подождите 30 секунд, затем включите принтер. Если проблема не устранена, обратитесь в службу поддержки клиентов HP.
Отображается Er/77
Сообщение об ошибке Er/77 указывает на сбой безопасного устройства.
Чтобы устранить ошибку, выключите принтер, подождите 30 секунд, затем снова включите его. Если проблема не устранена, обратитесь в службу поддержки клиентов HP.
Коды Go и P
На панели управления индикатор счетчика страниц показывает Go или P, а затем 2-значный код.
Отображается Go/01
Это условие указывает, что принтер работает в режиме ручной подачи бумаги.
Загрузите во входной лоток бумаги, тип и формат которой подходит для задания печати, затем нажмите кнопку Возобновить , чтобы продолжить печать, или кнопку Отмена
 , чтобы отменить задание печати.
Отображается Go/02
Это условие указывает, что принтер обрабатывает задание ручной двусторонней печати и нуждается в вашей помощи, чтобы завершить это задание.
Чтобы завершить задание печати, извлеките стопку напечатанных листов из приемного лотка, затем загрузите стопку печатной стороной вниз и верхним краем к принтеру. Нажмите кнопку Возобновить, чтобы продолжить, или кнопку Отмена, чтобы отменить задание печати.
Отображается Go/03
Это условие указывает, что тип и размер бумаги, загруженной во входной лоток, отличается от типа и размер бумаги, указанных в настройках задания печати.
Чтобы завершить задание печати, загрузите во входной лоток бумагу нужного формата и типа в соответствии с параметрами задания печати. Нажмите кнопку Возобновить, чтобы продолжить, или кнопку Отмена, чтобы отменить задание печати.
Отображается Go/06 (только для беспроводных принтеров)
Это состояние показывает, что принтер принял запрос для подключения к этому принтеру с помощью Wi-Fi Direct.
Нажмите кнопку Возобновить, чтобы подключиться, или кнопку Отмена, чтобы остановить задание.
Отображается P2
Это состояние указывает, что начато задание по копированию удостоверения.
Если мигает индикатор Откройте крышку , откройте крышку и переверните удостоверение, закройте крышку и нажмите кнопку Возобновить для продолжения или кнопку Отмена для отмены задания.
Цветовые схемы индикатора состояния (M232dw, M232dwc, M233dw, M234dw, M234dwe и M236dw)
Найдите в документе наблюдаемую комбинацию мигающих индикаторов состояния и выполните указанные действия для устранения возникшей неполадки.
Панель горит белым цветом
Принтер находится в режиме ожидания и не подключен к сети Wi-Fi. Подключите принтер к сети Wi-Fi.

Панель горит белым цветом, горит индикатор картриджа
Низкий уровень тонера в картридже. Замените картридж с тонером; дополнительные сведения см. в документе Замена картриджа с тонером.

Панель горит белым цветом, а индикатор картриджа мигает
Очень низкий уровень картриджа. Замените картридж с тонером; дополнительные сведения см. в документе Замена картриджа с тонером.
Примечание.
В случае, если во встроенном веб-сервере задано значение параметра Продолжить, а уровень тонера в картридже очень низкий, никакой код ошибки не отображается. Если для параметра задано значение Стоп, отображается Er/08.

На панели мигает белый индикатор
Принтер обрабатывает и печатает задание.

Белый индикатор по центру панели
Принтер находится в спящем режиме.

Панель непрерывно горит желтым цветом
Открыта дверца. Дверцы принтера могут не быть закрыты надлежащим образом. Убедитесь, что дверцы доступа к картриджам и тыльная дверца доступа надлежащим образом закрыты.

На панели горит желтый индикатор, индикатор бумаги мигает
В принтере могла закончиться бумага или бумага загружена ненадлежащим образом или возникло замятие бумаги. Загрузите бумагу, затем нажмите кнопку Возобновить, чтобы продолжить, или устраните замятие бумаги. Дополнительные сведения о замятии бумаги см в документе Ошибка замятия бумаги.

Индикатор на панели непрерывно светится желтым, а кнопка «Информация» мигает или непрерывно светится
В приложении HP Smart или в информационном отчете отображается сообщение Настройка принтера не завершена, Проверьте учетную запись или Принтеру не удается выполнить печать
На панели горит желтый индикатор, индикатор картриджа мигает
Если индикатор картриджа мигает, уровень картриджа может быть очень низким или возникла ошибка картриджа, например несовместимый, неавторизованный или защищенный картридж. Замените картридж с тонером. Дополнительные сведения см. в документе Замена картриджа с тонером.

Индикатор на панели быстро мигает желтым
На принтере возникла проблема. Выключите принтер, подождите 30 секунд, затем включите принтер. Если проблема не устранена, обратитесь в службу поддержки клиентов HP.
Панель непрерывно горит голубым цветом
Принтер находится в режиме ожидания и подключен к сети Wi-Fi. Компьютер или мобильное устройство напрямую подключено к принтеру через Wi-Fi Direct. Выполнение каких-либо действий не требуется.

Панель мигает голубым цветом
Принтер пытается подключиться к сети Wi-Fi. Дождитесь подключения принтера к сети или к изменению состояния индикатора.

Панель мигает синим, затем желтым цветом
Принтер пытается подключиться к сети Wi-Fi. Проверьте подключение.

Панель горит зеленым цветом
Принтер инициализируется, ожидает подтверждения, выполняет автоматическую очистку, загрузку и установку обновления принтера или охлаждается.
Примечание.
На время охлаждения задание печати может приостановиться; оно возобновиться, когда принтер будет готов. Это может занять несколько минут.

Зеленый индикатор мигает на панели
Принтер выполняет регулярное обслуживание. Выполнение каких-либо действий не требуется.

Панель мигает пурпурным цветом
Принтер находится в режиме настройки Wi-Fi. Если мигает кнопка Информация , нажмите эту кнопку, чтобы подключиться к Wi-Fi.

Панель быстро мигает пурпурным, затем мигает желтым
Истекло время, выделенное на подключение в режиме Wi-Fi Protected Setup (WPS). Нажмите кнопку Отмена, чтобы сбросить ошибку.

Состояние индикатора внимания (M233sdn, M233sdw, M234sdwe, M234sdw, M234sdne, M234sdn, M236d, M236sdn и M236sdw)
Найдите наблюдаемое состояние индикатора внимания и выполните указанные действия для устранения возникшей неполадки.
Индикатор внимания включен, и мигает индикатор бумаги
В принтере могла закончиться бумага, бумага загружена ненадлежащим образом, или возникло замятие бумаги. Загрузите бумагу, затем нажмите кнопку Возобновить, чтобы продолжить, или устраните замятие бумаги. Дополнительные сведения о замятии бумаги см в документе Ошибка замятия бумаги.

Индикатор внимания включен, и мигает индикатор картриджа
Низкий уровень тонера в картридже. Замените картридж с тонером; дополнительные сведения см. в документе Замена картриджа с тонером.

Индикатор внимания мигает
Возможно, дверцы принтера закрыты ненадлежащим образом. Убедитесь, что дверцы доступа к картриджам и тыльная дверца доступа надлежащим образом закрыты.
Индикатор внимания выключен, а индикатор картриджа включен
Низкий уровень тонера в картридже. Если качество печати становится неприемлемым, приготовьте запасной картридж для замены.

HP Laser Printer Error Codes
Here are the typical (and some not so typical) error codes you will find coming up on your HP Laserjet. The more typical ones you could troubleshoot and maybe fix yourself. Of course, Nations Printer Repair can be there the same day or the next day when you encounter the more difficult HP laser printer error codes.
Error 10 – Supplies Memory Error 10.XX.YY (Exact format is dependent on printer model)
The printer is unable to read the electronic information (elabel) on the print cartridge. This helps track page count and life of consumable.
XX Description 00 memory error on the cartridge or 01 memory device not found
10.00.00 Black print cartridge
10.00.01 Cyan print cartridge
10.00.02 Magenta print cartridge
10.00.03 Yellow print cartridge
1. Supplies used in newer printer models contain a memory chip. The information contained on this chip is dependent on the printer model and the supply. The error 10 indicates a problem with the printer obtaining the information from this chip. The chip may be missing or defective or contain incorrect information. There may be a problem with connection between the memory chip and DC controller. Turn the printer off/on to attempt to clear or reset the message. Remove and reinstall the supply, replace the supply.
2. Replace the memory chip cable/connector or the DC controller.
Error 10.32.00 – Unauthorized Supply
Alternates with for help press “?” – A new non-HP supply has been installed this message continues until you press the check button or install an HP supply item
Error 11 – Paper Out
1. Paper Tray Empty or Not Seated Correctly – A buildup of toner on the edges of the tray which slide into the printer can sometimes cause problems. Take a sharp tool, like a razor blade and scrape the buildup off these edges.
2. Sensor Arm Stuck or Broken – Check for free movement of the sensor arm. On the LJ4/4M/4+/4M+ the sensor flag can get knocked out of place when a paper jam occurs and the tray is pulled out abruptly. Most times this can simply be reinstalled. If it’s broken, you will need to replace the sensor flag.
3. Defective Tray Size Sensing or Configuration – Most trays have tabs which depress a series of switches when installed. Verify that the tabs aren’t damaged and that the tray switches located in the printer are not damaged. You can depress these by hand and hear them click. Occasionally the contact for the micro switch will get bent and will have to be replaced. Also verify the configuration through the menus on the printer.
4. Defective Paper Control Sensor PCB – These do fail and will need to be replaced.
Error 12 – Printer Open
1. Paper path door (IIP/IIIP) or top cover open. On the IIP/IIIP this can be caused by a defective toner cartridge, defective cooling fan, and PS4 or PS5 sensors. Also caused by the density adjusting PCA located behind the density adjusting slide switch. This board takes the input from the two sensors and provides info to the DC controller. If the board becomes defective, you will receive an error 12. Easily replaced after removing the top cover and three wiring harness connectors. If you want to attempt board level repair try the electrolytic capacitor, C702, 10 uF 50 VDC. On the 4P/5P printers, the top cover is open or no toner cartridge is installed. This error can also be caused by a defective interlock switch assembly.
2. On the Laserjet 4/4+ an error 12 can indicate the top cover open or a broken tab on the cover assembly. On rare occasions a defective paper control assembly or actuator can cause this problem. Verify the tab on the cover is not broken.
Error 13 – Paper Jam (13.XX.YZ)
13.XX.YY – A jam exists in the media path.
Paper jams can be in the pickup from the tray, inside printer at toner cartridge, inside at the fuser, in duplex assembly, if so equipped.
XX = Jam Code
Y = Device Number
Z = Device Type
Possible Locations: Tray 1, Tray 2, Tray 3, Rear Door, Top Cover, Jam 13.13.00 indicates a jam in the duplexer assembly
1. Check the paper; make sure it meets the paper specifications for your printer. Tractor feed paper with the edges ripped off doesn’t seem to work very well. Extremely heavy or thick paper is also a problem. Check the HP paper specification guide for more info. Be careful with labels, use only labels designed to take the heat generated by the fuser assembly. Regular labels my ‘ooze’ adhesive as they pass through the fuser assembly and literally gum up the works! Also check for any partially peeled labels, this can be a disaster if they come off inside the printer.
2. Check the paper path for toner or paper dust buildup. Look for bits of paper lodged in the path particularly around the sensors. 4L/4P printers can have paper stuck in the pickup area which is accessed by removing the screw over the oblique roller cover.
3. You may have a worn pickup roller. Check the feed and separation rollers in the printer and in the tray. Look for smooth or cracked worn surfaces. Sometimes you can clean a pickup roller and get a little more life miles out of them but when you start to get jams with a smudge on the top middle of the page, it’s time to replace the roller. If your machine uses a paper separation pad, a small rubber or cork material pad check for a smooth surface without any friction. This pad needs to provide friction to the feeding paper. If worn, replace.
4. Is the paper size correct? Is the software set for the size you’re using? Is the menu set for the size you’re using? Check these items. If the software tells the printer to expect a different size (legal, A4, COM10) than the tray available, you will get an error. This can happen when printing a FAX document formatted for A4 size paper.
5. You could also have a defective or dirty exit sensor. Replace or clean as needed.
6. Make sure the paper cassettes are installed correctly and adjustments are set properly. A buildup of toner on the edges of the tray which slides into the printer can sometimes cause problems. Take a sharp tool, like a razor blade and scrape the buildup off these edges.
7. Bad drive gears. Again on the LJII/III we are starting to see more and more failures of the gear drive assembly. A broken tooth on one gear is all it takes. Replace this as an assembly.
8. Listen for the motor operation, make sure it’s operational. If not replace the motor or drive circuit as required.
Error 14 — NO EP Cartridge or No Toner Cartridge
• No toner cartridge or cartridge not fully seated – pull it out and install it again. On the IIP/IIIP the connections for the high voltage are made on the left side of the printer so you may want to favor that side as you install the cartridge.
• On the II and III Series printers, this error message can be caused by a faulty paper control PCA. This is the board mounted to the DC power supply which is in the right front corner of the printer. Press the spring contacts and listen for the micro switches. You should hear a definite clicking.
• On the II and III Series and the IIISi/4Si, make sure at least one of the two drum sensitivity tabs is present. These are small rectangular blocks of plastic which contact the switches in the printer.
• On the 4V/4MV check the toner cartridge micro switch on the High Voltage PCB – SW501.
• Also on the 4V/4MV check the door open sensor (PS402) on the terminal board located under the transfer roller.
• Can also be caused by a defective DC controller. Pretty rare though.
Error 16 – Toner Low
• Toner cartridge is empty or toner in cartridge is not distributed evenly. Gently shake the toner cartridge both from side to side and from front to back. This can generally get you 100 or so more pages.
• Bad or dirty cartridge contacts. Look for the conductive contacts on the cartridge and the corresponding contacts in the printer and make sure they are clean and free of contaminants.
• Defective High Voltage power supply or on the LJ II/III the DC controller to High Voltage power supply can be defective. Check for opens on the cable.
• IIISi/4Si – Check the door open sensor flag, PS1. Also check the toner level sensor and the toner cartridge itself for damage. It can also be caused by a defective DC controller. You can verify this by substituting a known good DC controller if possible.
Error 18 – MIO Not Ready
• The printer is not connected to a LAN when it’s expecting to see a LAN. Terminate the port on the printer with a BNC T and two 50 ohm terminations.
• The MIO card is defective or maybe just not seated correctly. Remove the card and reseat it, try swapping with a card you know is good from another printer. Replace if necessary.
Error 20 – Memory Overflow / Insufficient Memory
• A large print job has exceeded the memory capacity of the printer. Verify that the SIMMS or memory cards are seated. Add memory or simplify the print job.
• On the 5P turn the image adapt and page protect to ON or AUTO. These can be set within the Remote Control Panel. Press GO to resume printing.
• On the 5L, set the Enhanced I/O to AUTO (PCL mode) and resend the print job.
• Press Select button to resume printing, some data loss will occur, you will need to add memory or reduce the complexity of the print job.
Error 21 – Print Overrun
• The print job is to complex. Simplify the job by removing font changes etc. On the III, IIID, IIIP, enable page protect if you have an additional 1 MB of memory installed.
• On the 4/4M/4+ and 5: The print job is to complex, enable page protect from the control panel and from the software. You may need additional memory.
• 4L Same thing with too much data or the page is to complex. Simplify the print job. Turn the image adapt and page protect to ON or AUTO either from the control panel or from within HP Explorers Remote Control Panel.
• 5P/5Si – Same as above, Press GO to resume printing.
Error 22 — Error/ I/O Config Error/ Par I/O Error/MIO Error
• 22 EIO X BUFFER OVERFLOW The EIO card in slot X has overflowed it’s buffer and data loss will occur
• 22 EIO X BUFFER OVERFLOW – The printer parallel buffer has overflowed during a busy state.
• I/O configuration for the computer or printer is incorrect. Configure is properly.
• Check I/O Cable, it could be the wrong cable or damaged.
• Too much data sent to the I/O port – clear data with GO or Continue, data may be lost
• Is the computer on?!
• How about the I/O port – damaged, seated properly, pins not bent?
4+/5P/5 – The computer and printer aren’t talking because of improper signal protocols. Could be a bad cable or loose connection or just a poor quality cable. Reseat the cable and use only high quality IEEE 1284 compliant cables.
• 5Si Are you using a non-HP MIO device?
Error 23 – I/O Not Ready
ALL PRINTERS – The I/O card is not accepting data. May not be connected – check cabling – or it may be defective. Reseat the card and if available, swap with a known working card. Watch the termination’s on the network cabling.
Error 24 – Job Memory Full
• The print job is too complex to be processed. Laser printers are page printers and require the entire page to be processed before beginning to print. Simplify the print job by removing font changes and/or graphics. Add more memory.
Error 30 – PS Error 16
ALL PRINTERS – An I/O time-out or a prompt for user interaction like a manual feed has been exceeded. Check the I/O connections and make sure the proper media is being used.
ALL PRINTERS – This is an unexpected PostScript firmware error. Reseat the PostScript SIMM and/or replace it.
Error 30 – PS Error XX
ALL PRINTERS – PCL file was sent to the printer while in PostScript mode or the PostScript file contains bad data, or you have experienced and application error (crash). You need to check the configuration of your printer and drivers, reset the printer, and try issuing an initialization command from within the application. May need to reload your PostScript print driver file.
Error 40
• Make sure computer and printer are set to the same baud rates. Reset as needed.
• Is the computer powered off!
• Check the MIO card, remove, clean contacts, reinstall. Replace if defective
• An abnormal connection break may have occurred during data transfer – Press Continue or Go to clear this error message.
Error 41
• Momentary error, press “Continue” or “GO” to reset the printer
• 5L/6L Power Cycle the printer if error continues reseat the DC controller to Formatter
• 5P/6P – Occurs if printer picks up two sheets of paper at once. Check pickup rollers and separation pad clean as needed. Replace if problem persists
• IIIP/IIP/IIP+ Paper feed problem – check feed/pickup rollers for movement and wear. Replace as needed
• IIP S/N between 2925J00000 and 3047J99999 replace fuser assembly
Error 41-X
X= 1,2,4,5 A temporary error occurred – Press “CONTINUE” to clear.
41.3 Error – Unexpected paper size – more than one sheet of paper picked up. May be feed problem. The media that is loaded does not match the settings of the paper tray. Can also indicate a misfeed or paper not being picked up.
Error 43 / Error 43 — Opt Interface
This indicates a communication problem between the formatter PCA and an optional interface installed (such as a network card). Remove and reseat the optional interface card. If the problem continues, remove the optional interface card and set the printer for standard parallel interface by taking off-line and holding down “Menu” key for 5-10 seconds. Scroll through items until “I/O =” appears and use the “+/-“ key to display parallel and the “enter” key to select. Then put the printer back online and send a test job from the host computer via the parallel cable. If this is successful, you have a problem with the optional I/O card and should replace it or reset it.
Error 49.XXXX
A critical firmware error has occurred that caused the processor on the formatter to abort the operation. This type of error can be caused by invalid print commands, corrupt data, or invalid operations. In some instances, electrical noise in the cable can corrupt data during transmission to the printer. Other causes include poor quality parallel cables, poor connections, or specific software programs. Remove all EIO devices and firmware DIMM if installed. Restart printer. If error is gone replace each EIO device until error appears. Replace device which triggers error. May also be formatter.
Firmware updates are available for some machines at http://hp.com and clicking on the drivers and software tab. Also try printing from a different application. If that works go back to the first application and try printing a different file to determine if the problem is file related. You may need to reseat the memory DIMM’s or replace the firmware DIMM or formatter board.
Error 51 – Loss of Beam Detect
This is a beam detect error indicating a problem with the laser scanner. Power cycle the printer. On some printers you can press the select button to try to continue. You can reseat the connectors to the scanner assembly and the control board. Generally you will need to replace the laser scanner and occasionally the DC controller PCA
Error 55
On IIISi/4Si Printers this is due to the DC controller not receiving the proper information upon startup. Check the connectors on the DC controller and power supply. If you don’t hear the motor immediately and you don’t have a paper jam, change the power supply.
Error 57
• 6P/5P/5 Main motor problem, check gear train for binding. Check connections to DC controller – replace main motor
• 4L/4 – Main motor problem, check gear train for binding. Replace main motor
• IIIP/IIP+/IIP Error 57-1 Incompatible memory can be either top or bottom slot. Also check motor cable connections. Replace main motor. Can also be DC controller.
• 5Si/4+/4Si/IIISi (X=2, 3 or 4) – Fan motor faulty, check fan number X or duplex or fan and replace as necessary
• 5 – Main motor failure – replace main motor
• 4+ 57.1 – Gears are seized, motor is bad or DC controller is bad
• 4Si/IIISi 57.1 – Gears seized, faulty top cover switch, faulty AC interlock switch, J010 loose or faulty, bad main motor PCA
• LJ 4000/405 – An error occurred with the Fan’s motor. X = Description
4 Printer Fan 7 Duplex Fan
1. Check the Fan’s connector and make sure the Fan is not blocked.
2. Replace the Fan.
• LJ 4250/4300/4350 – A printer fan is not functioning. Power cycle the printer.
• LJ 5100 – A temporary printing error occurred. x = description 1—printer fan
1. Check the fan connector and make sure that the fan is not blocked.
2. Replace the fan.
• LJ8100/8150 – A fan motor failure occurred. All fans are enabled to low speed operation
at power on. Fans will go into high speed operation during the print cycle.
X Description
2 Fan 3 – Formatter Fan (intake)
3 Fan 2 – Laser/scanner (exhaust)
5 Fan 1 -Low-voltage power supply (exhaust)
6 Fan 4 – Face-down delivery (exhaust)
9 Fan 5 – Tray 1 fan
• A temporary printing error occurred in one of the printer fans. X represents the fan motor number associated with the error. For example, 1 = fan motor 1. Power the printer off/on to clear error. Replace appropriate fan as needed.
Error 58
• 4/4L/4P/4V/5/5P Check the fan cable – reseat cable or replace fan
• 4V/4MV Defective DC controller board – replace
• IIISi/4Si Error 58.1 & 58.2 – Improperly seated paper cassette
• 4Si/IIISi 58.1/58.2 – Paper cassette is improperly inserted
• 5Si 58.X – Tray/Lifter Malfunction if X=1: Tray 2 lifter, X=2: Tray 3 lifter, X=3: Tray 1 lifter, X=4: Tray 4 lifter. Press “SELECT” to continue
• A printer power source problem with Laserjet 1000/1150/1300/2300/3300/4100/4200/
4300/5000/5100/8150/9000 Series
To resolve problems with the power supply:
1. Remove the printer from any UPS supplies, additional power supplies, or power strips. Plug the printer into a wall outlet and see if this resolves the problem.
2. If the printer is already plugged into a wall outlet, try another power source in the building that is independent of the one currently being used.
The line voltage and current source at the printer location might need to be inspected to ensure that they meet the electrical specifications for the printer.
Error 59 – Add Memory
• 4Si/IIISi – Not enough memory for PostScript option. Verify SIMM’s are seated properly, replace any defective
• 5Si 59.X – Main motor malfunction X=1: Main motor startup failure, X=2: Main motor rotation
• 59.XY 4200/4300 Series – Main motor failure, check wiring harness Replace main motor, replace DC controller PCA
• 59.A or 59.4 EP – Motor Failure – Replace print cartridge motor (LJ 4300 ONLY) failure
Error 62.X (62.0 Service, 62.1-4 Service, 62.5 Service, 62.6 Service)
ALL PRINTERS
• 1. Improperly seated SIMMs or font cartridge – remove, check/clean contacts re-install and try again. Try with SIMMs or font cartridge removed to be sure error clears.
• 2. Defective Internal Memory – Replace Formatter PCA, check all cables first!
Error 67 – Defective Formatter PCA
• On the 4Si this could be a temporary error which can be corrected by cycling the power
• 4V/4MV – This can also be a temporary error or a defective paper guide plate assembly. A switch on this assembly may not be activated properly. You can remedy this by replacing the paper guide plate assembly, RG5-2248-030. Caution needs to be used when installing the new assembly – be careful of the sensor flag spring!
• 5Si – Can be caused by field replaceable units (FRU’s) not installed correctly. Check and reinstall.
Error 79
• Software/drivers, Memory PCA’s, Font-Macro-Personality Cartridges, option I/O Cards. Defective toner cartridge in the Laserjet 4 Plus only. Remove any accessories (font cartridges, memory PCA’s, SIMMs, etc.) plugged into the formatter card and try again. If the problem persists and is application specific, verify proper setup with application vendor.
• Defective Formatter PCA – Replace with known operational board and try again.
Firmware Update – The configuration page lists the firmware version of the product. Depending on the model, a firmware DIMM may need replacing or a flash update. On flash-memory-based products, you can update the firmware code by downloading the latest flash executable file for the product and running the program according to the readme instructions posted with the update file. If the firmware should become corrupted or fail (usually because of an interruption when attempting to update the firmware), the product will no longer function. In this case, a firmware recovery DIMM is available.
• Reseat DIMM, then Formatter – Replace or flash DIMM then format.
Error 80 (80X.YYYY)
ALL PRINTERS
The EIO card in slot X has encountered a critical error -power cycle, reseat card or replace card if needed. Can also be formatter PCA.
Improper MIO connection – look at pins on formatter MIO connection reseat card.
Defective MIO Card – Replace card
Defective Formatter Card – Replace card
Error 89
All PRINTERS (except 5L/6L)
The PostScript ROM’s have bent or broken pins inspect the pins and reseat if necessary
Check to see that the ROM SIMM’s are in the proper location and oriented properly
This can also be a temporary error, try power cycling the printer
The PostScript ROM’s/SIMM are defective
Error 8X.YYYY — EIO Error
The EIO accessory card has encountered a critical error.
X represents the error location and can equal one of the following:
1 = Slot number 1
2 = Slot number 2
3 = Slot number 3
6 = Card in slot number 1
7 = Card in slot number 2
8 = Card in slot number 3
YYYY represents the error code.
1. Turn the printer power off, and then turn the printer power on.
2. Turn the printer power off, reseat the EIO accessory in slot [X], and then turn the printer power on.
3. Turn the printer power off, remove the EIO accessory from slot [X], install it in a different EIO slot, and then turn the printer power on.
4. Replace the EIO accessory in slot [X].
HP Laser Printer Error Codes
ALL HP LASER PRINTERS
1. Software/drivers, Memory PCA’s, Font-MACRO-Personality cartridge, Optional I/O cards or Bad network card.
2. Defective formatter board.
3. Replace formatter board.
4. Replace the I/O card or the Network card..
HP LASER PRINTER 4, 4+, 5
1. Defective toner cartridge.
2. Replace toner cartridge.
3. Software communications error between the network and the printer.
3. Replace the Network Card.
5. Replace the formatter board.
HP LASER PRINTER 2200
1. Turn power off and back on.
2. If the error persists, turn off power. Remove all accessories (ex. DIMM, EIO card). Turn on the printer.
3. Replace the formatter.
4. Replace the engine controller.
5. Replace the power supply.
HP LASER PRINTER 2300 ERROR 79.XXYY. THE XX. IS THE COMPONENT I.D. AND THE YY. IS THE COMPONENT SPECIFIC ERROR CODE
1. Turn the printer off and then turn the printer on.
2. Try printing a job from a different software program.
3. Replace the network cable and cycle power.
4. Remove the network card and cycle power.
5. Remove the dimms one at a time and cycle power.
6. Try using the parallel interface, and printing threw the parallel cable to test the mother board.
7. With the network removed, Perform a cold reset.
8. If network cable is removed and you still have an error.
9. Replace the EIO card or Network card.
10. Replace the firmware DIMMS.
11. Replace the formatter board.
HP LASER PRINTER 2410, 2420, 2430, 3200
1. Temporary firmware error.
2. Up grade the formatter firmware from HP web site. But it is always better to try replacing the firmware chip with the latest version of the firmware.
2. Replace Firmware DIMMs.
3. Replace formatter.
HP LASER PRINTER P3005, 5200 ERROR 79.XXXX
1. A critical hardware error has occurred.
2. Turn the device off and then on.
3. If the message persists, contact HP Support.
HP LASER PRINTERS 3015/3020/3030MFP
1. Turn the power off and wait for 30 seconds, then turn the power back on.
2. For HP LaserJet 3020 and 3030 only, update the firmware.
3. Replace the formatter.
HP LASER PRINTER 3027M/3035
1. A critical error has occurred.
2. Update the firmware to the latest version.
3. Try printing a job from a different software program.
4. Turn the device off and remove any DIMMs and EIO cards and turn the device on.
5. If after removing the DIMMs and EIO cards, the device behave normally, then check which is causing the error and replace.
6. If the message persists, replace the formatter.
HP LASER PRINTER 3050, 3052, 3055
1. The printer has experienced an internal firmware error.
2. Turn the printer off and wait at least 30 seconds.
3. If a surge protector is being used, remove it. Plug the printer directly into the wall.
4. Update the firmware to the newest version.
5. If the error persists, replace the formatter.
HP LASER PRINTER 3200
1. Disconnect the power cable from the product, wait at least 30 seconds, then reconnect the power cable and wait for the product to initialize.
2. If the error persists, replace the formatter.
3. If after replacing the formatter, the error persists, replace the DIMMs.
HP LASER PRINTER 3300, 3380
1. Disconnect the power cable from the product, wait at least 30 seconds, then reconnect the power cable and wait for the product to initialize
2. if the error persists, upgrade the firmware.
HP LASER PRINTER 3390, 3392
1. The printer has experienced an internal firmware error.
2. Turn the power off and wait for 30 seconds, then turn the power back on again.
3. Remove the DIMMs from the printer and reinstall the DIMM to verify that it is seated properly
4. If a surge protector is being used, remove it. Plug the printer directly into the wall.
5. Replace the formatter.
6. Replace the DIMM.
HP LASER PRINTER 4100
1. Temporary communication error.
2. Software error- try printing from a different software.
3. Turn printer off. Disconnect from the network and turn printer back on. If error code comes back with no network cable or parallel cable in printer. You can also upgrade the firmware in the formatter or the network card. But it is better to replace the network card or the formatter board or both and the firmware DIMM chip.
HP LASER PRINTERS 1100, 2100, 4000, 4050, 8000
1. Power cycle the printer on and off.
2. Remove network cable or parallel cable then power cycle the printer.
3. If still have error remove network card.
4. If still have problem change the formatter board, firmware chip, network card.
HP LASER PRINTER 4200, 4300, 4250, 4350
1.Turn the printer off and turn printer on.
2. Reseat the formatter and the firmware dimms chip.
3. Up grade the firmware in the formatter board and the network card.
4. Replace the firmware Dimms.
5. Replace the formatter board.
HP LASER PRINTER 4345MFP, 5025MFP, 5035MFP
1. A critical hardware error occurred.
2. Turn the MFP off, and then turn the MFP on.
3. If the problem persists, reseat the firmware memory card.
4. Remove and reinstall the formatter.
5. Upgrade the firmware.
6. Replace the formatter.
HP LASER PRINTERS 5000, 5100, 5SI
1. Turn the printer off and then turn the printer on.
2. Try printing a job from a different software program.
3. Replace the network cable and cycle power.
4. Remove the network card and cycle power.
5. Remove the dimms one at a time and cycle power.
6. Try using the parallel interface, and printing threw the parallel cable to test the mother board.
7. With the network removed, Perform a cold reset.
8. If network cable is removed change the network card, formatter board, firmware chip.
HP LASER PRINTER 8100, 8150
1. Turn the printer off and then turn the printer on.
2. Try printing a job from a different software program.
3. Replace the network cable and cycle power.
4. Remove the network card and cycle power.
5. Remove the dimms one at a time and cycle power.
6. Up grade the firmware dimms or replace the firmware dimms.
7. Try using the parallel interface, and printing threw the parallel cable to test the mother board.
8. With the network removed, Perform a cold reset.
9. Remove the hard disk and cycle power.
10. If network cable is removed change the network card, formatter board, firmware chip.
HP COLOR LASER PRINTER 4500, 4550
1. Temporary error.
2. Software error.
3. Replace the firmware DIMMS
4. Replace the jet direct card.
4. Replace the formatter board.
HP COLOR LASER PRINTER 4600, 5500
1. A critical hardware error has occurred.
2. Turn the printer off and then turn the on.
3. Reseat the formatter and the Dimms chip.
4. Replace the Dimms chip.
5. Replace the formatter board.
HP COLOR LASER PRINTER 8500, 8550
2. Firmware has detected a hardware failure within the formatter.
3. Replace the formatter board.
HP LASER PRINTER 9000, 9040, 9050MFP
1. Critical hardware error has occurred.
2. Turn power off and then turn printer on..
3. Software error- try printing from a different software.
5. Replace or reseat interface cable / Network cable.
5. Try using the parallel interface .
6. Upgrade the latest firmware.
7. Remove the hard disk and turn printer on and then off.
7. If error persists replace formatter board.
Найдите решения для устранения ошибок, указываемых определенными сочетаниями мигающих индикаторов и номеров ошибок на принтере.
Панель управления

Индикаторы тонера

Отображается ошибка Er/07, Er/27 или Er/28, мигает индикатор внимания и горит индикатор «Барабан переноса изображений»
Барабан передачи изображений установлен неправильно, слежался тонер, или датчики закрыты лентой.
-
Поднимите сканер, откройте верхнюю крышку и затем за ручку извлеките барабан переноса изображений из принтера.
CAUTION:
Не дотрагивайтесь до зеленого ролика на барабане переноса изображений.
-
Убедитесь, что из принтера удалена вся упаковочная лента.
-
Встряхните барабан не менее 5 раз, чтобы разрыхлить тонер и установите барабан переноса изображений обратно в принтер.
-
Закройте верхнюю крышку, опустите сканер, а затем нажмите кнопку Возобновить печать
для сброса ошибки.

 для сброса ошибки.
Отображается ошибка Er/30 или Er/50–Er/55 и горит индикатор внимания
Принтер находится в состоянии ошибки. Перезагрузите принтер, чтобы решить проблему.
-
Когда принтер включен, отсоедините от него кабель питания.
-
Отсоедините кабель питания от источника питания.
-
Подождите 60 секунд.
-
Снова подключите кабель питания к электрической розетке и принтеру.
NOTE:
Компания HP рекомендует подключать принтер напрямую к электрической розетке.
Отображается Er/31–Er/34 и индикатор «Дозаправка тонера» быстро мигает
В данный момент загрузить тонер в барабан переноса изображений невозможно.
-
Er/31 и Er/34. Невозможно загрузить тонер в барабан переноса изображений, так как барабан полон, уровень тонера неизвестен или принтер занят. Прежде чем загружать тонер, продолжите печать и подождите, пока цвет индикатора «Дозаправка тонера»
не станет белым. При необходимости поместите открытый комплект загрузки тонера в его оригинальную упаковку и храните в сухом прохладном месте. -
Er/32. Барабан переноса изображений вскоре потребует замены, поэтому загрузка в него тонера невозможна. Продолжите печать, пока качество печати остается приемлемым или пока не появится сообщение Замените барабан переноса изображений барабана, затем замените барабан передачи изображений.
-
Er/33. Предыдущий комплект загрузки тонера не был полностью опорожнен в принтер. Повторно вставьте предыдущий комплект загрузки тонера и нажмите плунжер до щелчка.
Если предыдущий комплект загрузки тонера недоступен, используйте принтер, пока барабан переноса изображений не опустеет. Загрузите тонер, когда на индикаторе «Уровень тонера» появятся +2 и значок предупреждения «Уровень тонера»
.Для получения дополнительных сведений перейдите к статье Загрузка тонера.
 не станет белым. При необходимости поместите открытый комплект загрузки тонера в его оригинальную упаковку и храните в сухом прохладном месте.
 .
.Отображается сообщение об ошибке Er/81, мигает индикатор внимания и горит индикатор «Возобновить печать»
Была установлена неправильная версия микропрограммы. Установите правильную микропрограмму.
-
Нажмите кнопку Возобновить печать
, чтобы сбросить ошибку. -
Убедитесь, что принтер включен и подключен к компьютеру, используя локальную сеть или кабель USB.
-
Убедитесь, что выбрана правильная операционная система, затем загрузите и запустите Утилиту обновления микропрограммы.
-
Когда утилита откроется, выберите свой принтер в раскрывающемся меню и нажмите кнопку Отправить микропрограмму.
-
Для завершения установки следуйте инструкциям на экране, затем закройте утилиту.
Содержание данного документа относится к МФУ HP Neverstop Laser 1200a, 1200n, 1200nw, 1200w, 1201n, 1202nw и 1202w.
После отправки задания печати в ПО принтера или приложении HP Smart выводится сообщение «Замятие бумаги в лотке» или «Замятие бумаги в термофиксаторе», а на панели управления отображается информация об одной из следующих ошибок. Каждая ошибка указывает на место в принтере, в котором произошло замятие бумаги.
Примечание.
Сообщения о замятии бумаги могут быть истинными и ложными. Принтер может сообщить о замятии бумаги, хотя замятие отсутствует. Описанные далее действия применимы для случаев истинных и ложных замятий.

Шаг 1. Извлечение замятой бумаги
Найдите и извлеките замятую бумагу в той области принтера, на которую указывает полученный код ошибки.
Внимание!Для устранения замятия не следует использовать острые предметы, такие как пинцет или длинногубцы. Гарантия не распространяется на повреждения, возникшие в результате применения острых предметов.
Извлечение бумаги из области входного лотка (Er/04)
Извлеките замятую бумагу из области входного лотка.
-
Извлеките всю бумагу из выходного лотка.
-
Поднимите сканер, затем откройте верхнюю крышку.
-
Возьмитесь за ручку и потяните барабан переноса изображений вверх и наружу, чтобы извлечь его, затем отложите его в сторону.
Внимание!
Во избежание повреждения барабана переноса изображений оберегайте его от воздействия света и не прикасайтесь к зеленому ролику. Накройте его листом бумаги.
-
Снимите крышку входного лотка.
-
Извлеките стопку бумаги или конвертов из входного лотка.
-
Удерживая бумагу обеими руками, осторожно извлеките ее из области входного лотка.
Внимание!
При извлечении замятой бумаги ее следует вытаскивать из принтера без перекосов. Вытаскивание замятой бумаги под углом может привести к повреждению принтера.
-
Удерживая барабан переноса изображений за ручку, выровняйте его по направляющим, а затем вставьте в принтер.
-
Закройте верхнюю крышку, затем опустите сканер.
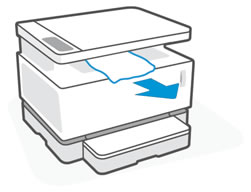
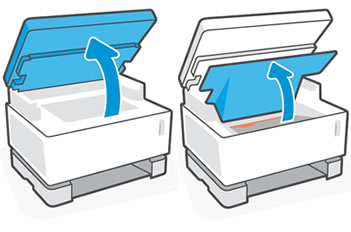


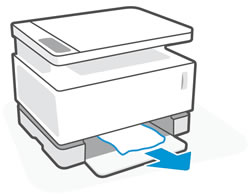
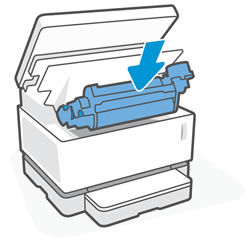
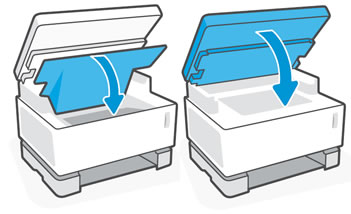
Попробуйте выполнить печать. Если устранить ошибку не удалось, перейдите к следующему шагу.
Извлечение бумаги из области барабана переноса изображений (Er/05)
Извлеките замятую бумагу из области барабана переноса изображений.
-
Извлеките всю бумагу из выходного лотка.
-
Поднимите сканер, затем откройте верхнюю крышку.
-
Возьмитесь за ручку и потяните барабан переноса изображений вверх и наружу, чтобы извлечь его, затем отложите его в сторону.
Внимание!
Во избежание повреждения барабана переноса изображений оберегайте его от воздействия света и не прикасайтесь к зеленому ролику. Накройте его листом бумаги.
-
Удерживая бумагу обеими руками, осторожно извлеките ее из области барабана переноса изображений.
Внимание!
При извлечении замятой бумаги ее следует вытаскивать из принтера без перекосов. Вытаскивание замятой бумаги под углом может привести к повреждению принтера.
-
Удерживая барабан переноса изображений за ручку, выровняйте его по направляющим, а затем вставьте в принтер.
-
Закройте верхнюю крышку, затем опустите сканер.

Попробуйте выполнить печать. Если устранить ошибку не удалось, перейдите к следующему шагу.
Шаг 2. Выполните сброс принтера
Выполните сброс настроек принтера, чтобы устранить имеющиеся состояния ошибок механизма печати или микропрограммы.
-
Когда принтер включен, отсоедините от него кабель питания.
-
Отсоедините кабель питания от источника питания.
-
Подождите 60 секунд.
-
Снова подключите кабель питания к электрической розетке и принтеру.
Примечание.
Компания HP рекомендует подключать принтер напрямую к электрической розетке.
Попробуйте выполнить печать. Если устранить замятие бумаги не удалось, перейдите к выполнению следующего шага.
Шаг 3. Выполните сервисное обслуживание принтера
Проведите сервисное обслуживание или замените устройство HP, если выполнение всех вышеуказанных действий не помогло устранить проблему.
Перейдите на веб-страницу Обращение в службу поддержки клиентов HP, чтобы запланировать ремонт или замену устройства. Если вы находитесь в стране Азиатско-Тихоокеанского региона, вы будете направлены в местный сервисный центр в вашей стране/регионе.
Для проверки состояния гарантии перейдите на веб-страницу Проверка гарантии на устройства HP. За ремонт устройств после окончания гарантийного срока может взиматься оплата.
Относительно недавно HP выпустила линейку печатающих устройств NeverStop, в которых тонер засыпается самим пользователем с помощью специальной тубы. То есть принтеру или МФУ NeverStop заправка картриджа, в классическом его смысле, теперь не нужна.
Несмотря на новизну устройств пользователи уже столкнулись с некоторыми проблемами, которые связаны с этой технологией, а именно, после заправки принтера тонером, он начинает сигнализировать об ошибках.
Рассмотрим эти ошибки и способы их решения на принтере HP Laser NS 1020 и МФУ MFP 1005.
Сразу после заправке тонером может наблюдаться следующая индикация:
1. На принтере быстро мигает индикатор около загрузочного отверстия.
При этом индикатор уровня тонера (+1 +2), пропадает с дисплея.
На МФУ MFP 1005 при этом на экране горит ошибка Er31 или Er34.
Индикатор около загрузочного отверстия также быстро мигает, и пропадает индикатор уровня тонера (+1 +2) на экране.
Эти ошибки указывают на то, что заправку тонером провели неправильно. А именно извлекли заправочный комплект до того, как его поршень опустил весь тонер внутри принтера. Из-за этого принтер не смог правильно измерить уровень тонера и просигнализировал ошибкой.
Чтобы исправить эту ошибку нужно взять заправочный комплект и поместить его обратно в заправочное отверстие, далее повернуть его вокруг своей оси на 180 градусов по часовой стрелке и нажать на поршень до щелчка:
2. При установке заправочного комплекта индикатор заправочного отверстия загорается и начинает быстро мигать желтым светом.
Эта индикация означает, что заправочный комплект не распознается принтером (МФУ).
Как вариант загрязнились контакты чипа (попробуйте очистить их ластиком), или заправочный комплект не от этой модели принтера.
Необходимо заменить заправочный комплект.
3. При установке заправочного комплекта и повороте его на 180 градусов, проворачивается также и ответная часть заправочного отверстия в самом принтере.
В результате тонер не попадает внутрь принтера и просыпается.
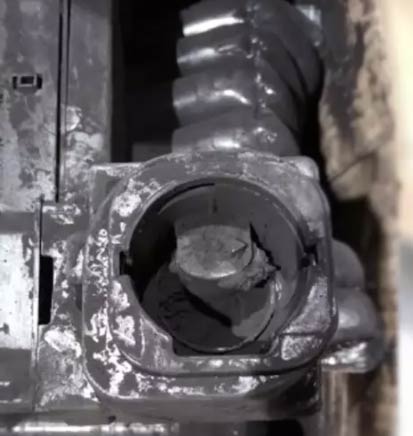
Это происходит оттого, что не дожидаясь сообщения об окончании тонера, пользователь пытается заранее добавить тонер в принтер, что приводит к поломке механизма заправочного устройства.
Так делать ни в коем случае нельзя! Ремонт возможет только в сервис центре.
Заправляете тонер, только когда на принтере появится соответствующая индикация +1 или +2.
Hi @hvmte,
Welcome to the HP Support Community
I understand you are facing an Ink toner issue with your HP Printer. Not to worry I will help you to get a resolution to resolve the issue.
To assist better:
- Are you using genuine HP ink cartridges? (You may refill your cartridges or use remanufactured cartridges, but you may run into problems. HP will not guarantee the functionality of those ink cartridges. There are many cartridges in the market which is refilled and sometimes the chip is not configured to work with the printer. You need to contact the cartridge manufacturer and find out why its not working. Try a different cartridge supplier and check if that works.)
- Was there any recent update on the printer prior to the issue?
- Do you see any Error message on the screen which shows E1, E2, E3, or E4?
While you respond to that, Let’s perform a power drain:
- With the printer turned on, disconnect the power cord from the rear of the printer and also unplug the power cord from the wall outlet.
- Remove USB cable, if present.
- Wait for 2-3 minutes, press and hold the power button on your printer for about 30 seconds to remove any additional charge.
- Now plug back the power cable straight to a wall outlet without any surge protector or an extension cord (This is important) and then plug back the power cord to the printer.
- Turn on the printer and wait till warm-up period finishes and the printer is idle
Update the printer firmware
- Click here to download and install the latest printer firmware from your product
- Click here to know different methods of updating printer firmware.
If the issue persists, then please follow the steps mentioned in this document: HP Neverstop Laser MFP 1200 — Blinking Lights and Error Codes
Hope this helps! Keep me posted.
Please click “Accepted Solution” if you feel my post solved your issue, it will help others find the solution. Click the “Kudos/Thumbs Up» on the bottom right to say “Thanks” for helping!
ANAND_ANDY
I am an HP Employee
Skip to content
Error 02 Warming up
- Turn printer off. Unplug I/O cable from rear of printer. Power up printer and see if it goes to ready. If printer goes to ready, the problem could be a driver issue, a bad I/O port in the computer or a bad I/O cable. If the printer still stays in 02 warm up, replace the formatter board.
Error 11 Paper Out
- Check paper tray for paper. Make sure it is seated properly.
- Check the tray size actuating tabs on the paper tray for damage. Check to see if the actuators they contact aren’t bent. The micro-switches they actuate could be defective or misaligned. Manually depress the actuators and listen for a click.
- Check that the paper sensor arm isn’t stuck or broken.
- Paper Control Sensor PCA is defective.
Error 12 Printer Open no EP cartridge
- Check that the toner cartridge is installed.
- Check that the top cover is firmly closed.
- On HP II/IID/III/IIID printers this error is usually caused by a bad DC power supply.
- On HP IIP/IIP+/IIIP printers the primary cause is the density adjusting PCA. There is a slight possibility of it being a bad fan. There is also a slight possibility of the tab on the fuser access door above the MP tray breaking off and causing the error. If the fan starts to run, quits and you notice a burning odor, the scanner motor has failed and needs to be replaced. The problem can also be caused by a defective drum shutter on the toner cartridge.
- On the 4/4M/4+/4M+ the tab on the top cover that actuates the door interlock could be broken.
Error 13 Paper Jam
- Paper jams can occur in 3 places: Entry, registration and exit.
- If the paper isn’t picking up out of the paper tray, visually inspect the pickup roller. If it looks shiny, replace it. You should also replace the separation pad as they work together. On the 4L/4P/5P/6P the pickup roller has a plastic shaft that breaks. You’ll have to replace the whole pickup assembly. This requires major disassembly of the printer. Check our printer repair kits for your model printer. If you don’t see it listed, email us.
- If you have an HP 4/4+/5 with an optional 500 sheet feeder that’s jamming, check the balance knob adjustment. Center it with a full ream of paper for proper operation.
- If the paper is jamming at registration or anywhere between pickup and exit it could be a number of things. Check the paper path for torn bits of paper or label residue. On the II/III series, remove the metal registration guide plate (2 screws) and check underneath it. If the pickup rollers are moderately worn, the paper will stop just short of the registration roller. On the 4L/4P/5P/6P remove the screw holding the oblique roller assembly (Inside front of printer) and pull out and inspect the assembly and the area under it. On the HP 4/4+/5 pivot up the metal plate and check underneath it. Check the roller assembly on the left side for torn scraps of paper (a flashlight or torch is necessary).
- Make sure paper cassettes are firmly seated, corner tabs aren’t bent. Some trays have lifting springs that could pop out if tray has been dropped.
- On HP IIP/IIP+/IIIP printers if the paper scrunches up at the toner cartridge you’ll need our Inside Accordion Jam Repair Kit.
- Check your software settings in the program you are attempting to print from. Do you have the correct paper size specified? If you have a different paper size than what is in the tray, you’ll get a paper jam.
- Exit jams are frequently caused by exit sensors. These sensors are typically mounted on the fuser assembly or adjacent to it. They are plastic arms that block and unblock an optical sensor. The arms can get stuck or knocked out of place when clearing paper jams. The optical sensors can also get dirt blocking the photo cell. Clean the sensor and check for free movement and proper installation of the sensor arms.
- On HP II/III series exit jams are mostly caused by worn gears. The best way to troubleshoot this is to defeat the door interlock (see door interlock photo on troubleshooting page). Press down on the arm on the top right of the fuser. Initiate a test page. While holding down the arm, press one of the metal cartridge detect switches just below the door interlock. Watch the movement of the gears. You will get a 51 error because the door is open. Recycle power to get rid of error. There is an arm gear on the lower right of the fuser that can shed teeth. There is also a 14 tooth gear below the large gear on top of the fuser. You can also manually rotate the large gear and check for binding or crunching. If that happens, then replace the 14 tooth gear. On the door, there are some delivery coupler gears that mate with the fuser and drive the exit roller. Check the gears for excessive wear. Replace if necessary. If the paper gets almost all the way out and jams, replace the exit roller or the exit roller assembly. If the error occurs after fuser replacement, check and see if the connector on the left of the fuser is properly mated with the one in the printer.
- On HP IIP/IIP+/IIIP printers if the paper has accordion folds on the bottom and jams on exit, order our Top Output Accordion Jam Repair Kit.
- On HP 4/4+/5 printers the most common cause of exit jams is the exit assembly. Order our 4/4+/5 Exit Jam Repair Kit. Exit jams in the fuser can be caused by a broken fuser drive gear or a broken gear on the fuser. Remove the fuser and check the gear inside the printer for broken teeth. Manually turn the gears on the fuser and check for smooth operation. Check the paper exit sensor arm for proper mounting and free movement.
- Check to make sure the rear door is closed on the printer. Open doors can cause 13 paper jam indications.
- On the 5L/6L check the registration sensor arm below the pickup roller. Also check the exit sensor arm (bottom center of the fuser). These arms frequently get stuck or dislodged clearing paper jams. On these printers, if you are experiencing frequent paper jams, order our 5L/6L Multi-Sheet/No Feed Repair Kit
Error 14 No EP cartridge
- Check that a toner cartridge is installed and fully seated.
- On HP II/III and IISi/4Si models check that at least one sensitivity tab is installed on the right side of the toner cartridge. If you see 2 holes and no square plastic tabs sticking in at least one of them, the printer will not see the cartridge. If one tab is installed and the printer still doesn’t recognize the cartridge, try popping out the tab and putting it in the other position.
- On HP 4/4+/5 printers the high voltage contacts can be dirty or misaligned. If contacts are ok, replace the high voltage power supply.
Error 16 Toner low
- Toner cartridge is low on toner. Try gently rocking the cartridge to redistribute the toner. This will buy you 50-100 pages. Get a new cartridge as soon as possible.
- Dirty or misaligned contacts on the high voltage power supply.
- On the HP II/III printers it can be a loose connector on DC controller see tweaking for instructions on how to repair it.
- On the HP 4/4+/5 printers there is a potentiometer adjustment on the left side of the printer. You have to remove the left panel and you’ll see it. It’s located at about the exact center of the printer.
Error 18 MIO Not Ready
- The printer is not connected to a Lan.
- The MIO (Jet Direct) card is defective or not seated correctly. Reseat or replace it. If you have another printer with the same card, try swapping them. Always turn printer power off when removing or inserting cards.
Error 20 Memory Overflow
- Print job has exceeded the memory capacity of the printer. Simplify the print job, reduce the dpi setting or install additional memory. See our specials page for memory.
Error 21 Print Overrun
- See error 20
Error 22 I/O Configuration
- Printer or computer I/O configuration is incorrect
- I/O cable is wrong or damaged
- The computer is switched off
- I/O port on printer is damaged. Replace the formatter.
Error 23 I/O Not Ready
- I/O card can’t accept data or isn’t connected to the network. Check card seating (with power off) and replace if necessary.
Error 24 Job Memory Full
- Too much data or too complex data for printer memory. See error 20.
Error 25 XXX Memory Full
- Too much data or too complex data for printer memory. See error 20.
Error 30 PS Error 16
- I/O time out. Printer got tired of waiting for user interaction like a manual feed. Check the I/O connections. Check display panel for media request.
Error 30 PS Error 22/25
- Postscript error. Replace the Postscript SIMM module
Error 30 PS Error (all others)
- A PCL file was sent to the printer while it was in Postscript mode.
Error 30.1.1 Disk Failure
- 5si/8000 optional hard drive has crashed. Press select to continue.
Error 40 Data Transfer Error
- Printer and computer may be set to different baud rates.
- The computer is turned off.
- The MIO card is defective or improperly seated.
- Press continue or go on the printer to clear message.
Error 41 (temporary print engine error)
- Temporary error has occurred. Press Go or Continue. Power cycle the printer.
- On IIP/IIP+/IIIP with lower cassette option order our 41 Service Error Repair Kit
Error 41.1 41.2 41.3
- Defective connections. Reseat J205,206,207 and laser scanner connectors.
- Paper multifeed or wrong size paper being used.
- Paper size selection doesn’t match the paper being used.
- Cassette is overfull or improperly adjusted.
Error 41.4 or 41.5
- Formatter PCA or DC controller is defective.
Error 50 (fuser malfunction)
- HP II/III series most likely cause is the ac power module is defective. Order the HP II/III Service 50 Error Repair Kit. If the quartz fuser lamp is burned out, order the replacement fuser on specials page. Slight possibility of loose connector on DC controller. See tweaking page DC controller could also be defective, but this is very rare.
- HP IIP/IIP+/IIIP most likely cause is burned out quartz lamp. Order the HP IIP/IIIP 50 Service Error Repair Kit. Could also be a failure of the power supply.
- HP 4/4+/5 most likely cause is burned out quartz lamp. Order the HP 4 Service 50 Error Repair Kit. Could also be a failure of the power supply.
- HP 4L/4P/5L/5P/6L/6P most likely cause is a bad ceramic heating element.
- All other printers most likely cause is burned out quartz lamp. In rare instances the ac power supply has failed. Even rarer, the DC controller is defective.
Error 51 (beam detect error)
- HP II/III series see tweaking page. Check the tab on the bottom of the toner cartridge facing you as you open the printer. If it’s broken off it won’t open the laser shutter. Check fiber optic cable for kinks or other damage.
- HP IIP/IIP+/IIIP could be either the laser pca or the scanner motor. Listen for erratic sounding scanner motor. There is a tab on the front of the toner cartridge that could also cause the problem. If its damaged or worn, it won’t open the laser shutter. Check fiber optic cable for kinks or other damage.
- All other printers, replace laser scanner assembly.
Error 52 (scanner motor malfunction)
- HP II/III series see tweaking page.
- HP IIP/IIP+/IIIP order the 52 Service Error Repair Kit.
- All other printers, replace laser scanner assembly.
Error 53 (accessory memory error)
- All printers replace bad memory board or defective SIMM. See specials page.
Error 54
- Defective duplexer.
Error 55 (internal communication problem)
- On the HP 2 series you have to replace both the dc controller and formatter boards. On all other printers it can be several things: DC controller, formatter, main motor
Error 56
- On the IID/IIID the output selector knob on the rear assembly is not in the duplex position. On the IIISi/4Si a command was sent to print envelopes while the printer was in duplex mode.
Error 57
- 6L/5L Memory card incompatibility – 1,2,4,8 MB, 5 volt, 70 nanosecond or faster
- 6P/5P/5 Improper main motor function, check gear train for binding. Check DC controller connections – replace main motor
- 4L/4 Main motor problem, check gear train for binding. Replace main motor
- IIIP/IIP+/IIP Error 57-1 Incompatible memory can be either in the top or bottom slot. Also check motor cable connections. Replace main motor. Can also be a defective DC controller.
- 5Si/4+/4Si/IIISi (X=2, 3 or 4) Fan motor is defective, check fan number X or duplexer fan and replace as necessary
- 5 Main motor failure – replace main motor
- 4+ 57.1 Gears are seized, main motor is bad or DC controller is bad
- 4Si/IIISi 57.1 Gears seized, defective top cover switch, faulty AC interlock switch, J010 loose or faulty, bad main motor PCA
Error 58
- 4/4L/4P/4V/5/5P Check the fan cable – reseat the cable or replace the fan
- 4V/4MV Defective DC controller board – replace dc controller
- 4Si/IIISi 58.1/58.2 Paper cassette is impoperly inserted
- 5Si 58.X Tray/Lifter Malfunction if X=1: Tray 2 lifter, X=2: Tray 3 lifter, X=3: Tray 1 lifter, X=4: Tray 4 lifter Press SELECT to continue
Error 59 Add Memory
- 4Si/IIISi Not enough memory for PostScript option. Verify SIMM’s are seated properly, replace any defective SIMMS
- 5Si 59.X Main motor malfunciton X=1: Main motor startup failure, X=2: Main motor rotation failure Error 62.X
62.0 Service, 62.1-4 Service, 62.5 Service, 62.6 Service All Printers
- 1. Improperly seated SIMMs or font cartridge – remove, check and clean the contacts, re-install and try again.
- 2. Defective Internal Memory – Replace the Formatter PCA.
Error 67 Defective formatter PCA
- 2/2D/2P/2P+/3/3D/3P/4/4+/4P – Defective formatter board, try reseating the connectors and any accessories you may have plugged in to it, turn power off first!
- On the 4Si it could be a temporary error which can be corrected by cycling the power
- 4V/4MV – Most common cause is a defective paper guide plate assembly.
- 5Si The field replaceable units (FRU’s) not installed correctly. Check and reinstall.
Error 79
- Software/drivers, Memory PCA’s, Font-Macro-Personality Cartridges, option I/O Cards. Defective toner cartridge in the Laserjet 4 Plus only. Remove any accessories (font cartridges, memory PCA’s, SIMMs, etc.) plugged into the formatter card and try again. If the problem persists and is application specific, verify proper setup with application vendor.
- Defective Formatter PCA – Replace with known operational board and try again.
Error 80
- Improper MIO connection – look at pins on formatter MIO connection
- Defective MIO Card – Replace card
- Defective Formatter Card – Replace card
Error 89
- The PostScript ROM’s have bent or broken pins inspect the pins and reseat if necessary
- Check to see that the ROM SIMM’s are in the proper location and oriented properly
- This can also be a temporay error, try power cycling the printer
- The PostScript ROM’s/SIMM are defective
Printers are a necessity today. Whether it is office, home or other institutes, you need a printer to complete multiple activities in the day to day life. From printing your holiday tickets to office documents, our printers are continuously working. And just like any other device there can be issues coming with the printer as well. The very first step to resolve any printer problem is to understand the issue itself. Let’s check out some of the printer error codes that are commonly seen and the quick steps to resolve the issue. No matter, which printer you have, these are the common printer error codes that can come up on your screen.

Printer Error Code: E50
This error indicates a malfunction of the fuser unit of the printer. The fuser is the part in the machine that gets hot to bond the paper with the printer. When there is a problem with the temperature then this error code comes up. The issue can be both, too much of heating or heating not happening properly.
Solution: If you’re getting the printer error code E50, then switch off the machine for 5 minutes and then back on again. Leave the machine in this state for 10 minutes and let it recover. This helps in resetting the temperature. If the fault continues, then you may need to replace your printer.
This indicates a malfunction of the laser unit of the printer. The laser unit is the part of that helps in writing the information on the drum surface. What this error code indicates is that the laser beam is not being detected.
Solution: To fix this issue, once more switch off the printer and back on again. This should resolve the problem and you can once more enjoy printing documents.
Printer Error 54
This printer error code indicates a malfunction of the main motor. It is the main motor that is responsible for driving all the other functions of the printer. If there is a problem suspected in this segment, then there can be problems in the other components as well.
Solution: The first thing to do is switch the printer off and then back on again. If the error is still there, then try to switch on the printer without the toner unit and check if the motor turns. If you see the motor is functioning, the replace the toner unit and the problem will be resolved. If the error continues, then change the main motor.
Printer Error E60
This is common printer error and is seen quite often as well. This indicates a malfunction of the fan. The printer has four cooling fans and if there is a fault in even one of the fans, then this error code flashes up.
Solution: The first thing to do is switch off the printer and then switch it on back again. This in most cases, should resolve the issue. However, if you still get the same printer error, then you may need an engineer to check which fan is causing the issue.
Printer Error Replace PF Kit
If you are seeing this error code on your printer, then it means that the paper pick up rollers and the separation pads have completed their expected life cycle. It indicates that the paper feed kit needs replacing. It is also possible that you may experience paper jams in this scenario. To resolve this issue, you will need printer support from an expert.
Solution: Get in touch with printer support and take his assistance to change the paper feed kit.
Printer Error Code 20, 21, 22, 23
These printer error codes indicate laser Diode failure. The work of the laser diodes write the information to be printed on the drum surfaces and the error indicates that one of them has failed.
Solution: To resolve the issue, switch the printer off and then back on again. If the error code continues, then it indicates that the laser unit needs to be replaced.
Image Rate Error
This is a common printer error and it occurs when the printer speed settings are not within the acceptable range of the label.
Solution: The simple way to resolve this printer issue is to change the image buffer or the print speed settings. Now Press ‘Continue’ to clear the error. You can also try to increase the number of image bands. If you are still stuck with the same problem, you need to seek the printer support from an expert.
Printer error: Printer taking long to print
Slow print time is something that is seen often and is generally caused by high resolution settings, or a memory issue or some selection in the choice of drivers.
Solution : Sometimes, high resolution images consume more data from the PC and the printer takes time to process it. This slows down the print time. To resolve the issue, select draft, standard or normal mode for your office documents. However, when it comes to presentations and formal pieces, then you can switch back to high quality. On the other hand, if printing large files that has complex images is a part of your regular workflow, then you should consider adding memory to keep your printer giving prints at a high speed.
Another solution that you can try out is move from two side printing to simplex mode. One sided printing takes considerably less time.
The last thing to consider is the driver installed. High end laser printers as well as few inkjet printers come with a choice of drivers that include PostScript, PCL or other manufacture host-based driver. PCL is among the faster office printing and PostScript is for improved graphics intensive applications.
Conclusion : There are multiple types of printers including both inkjet as well as laser printers. Selecting the right printer is of utmost importance if you want to get the best results for your printing job. However, at the same time, printers can run into trouble. These were few of the common printer error code. To resolve other printer issues, you can get printer support round the clock and keep your printer in the running condition at all times.
List of Printer Error Codes :-
| Dell Printer Error 1203 | Dell Printer Error 016302 |
| Dell 944 Printer Error 1102 | 900 Firmware Error Lexmark Printer |
| How To Find Dell Printer Ip Address | Brother Printer Error B200 |
| Brother Printer J125 Error Af | Brother Printer Error 50 |
| Brother Printer Error A5 | Hp Printer Not Printing Error |
| Brother Printer Error Tw006 | Brother Printer Error Ts-05 |
| Brother Printer 0x803c010b | Ricoh Printer Error J001 |
| Ricoh Printer Error Sc542 | Ricoh Printer Error Sc 315 |
| Ricoh Printer Error Sc 899 | Ricoh Printer Error Access |
| Ricoh Printer Error Sc400 | Ricoh Printer Error 91 |
| Ricoh Aficio 220 Printer Error | Install Kodak Verité 55 printer |
| Printer HP K7100 Error | HP Z6100 Printer Error 79-04 |
| HP Printer Error Oxc19a0042 | Printer Error HP Oxc19a0020 |
| HP Printer Error Oxc19a0040 | HP Printer Error 0xc18a0206 |
| HP Printer Error 0xc18a0001 | HP Printer Error 0x61011beb |
| HP K8600 Printer Error | HP Printer General Error 0x61000f6 |
| HP Printer Error C4eba341 | HP Printer Error B0605 |
| HP Psc 2355 Printer Error | HP Printer Error 0xc19a0003 |
| HP Printer Error 82.0180 | HP Printer F2280 Error E |
| HP Printer Error Symbols | Dot4_001 Error In HP Printer |
| HP Printer Error Oxc4eb9343 | HP Printer Error 60.02 |
| HP F4280 Printer Error E | HP Printer Error 59.F0 |
| HP Printer Error 49.38.07 | HP 2515 Printer Error C |
| Printer HP K209a Error E | HP Printer Error B200 |
| Epson Printer Error Message | Epson Printer Error-01 |