Правила форума
Как правильно оформить вопрос.
Прежде чем начать настройку роутера, представьте, как это работает. Попробуйте почитать статьи об устройстве интернет-сетей. Убедитесь, что всё, что Вы задумали выполнимо вообще и на данном оборудовании в частности.
Не нужно изначально строить Наполеоновских планов. Попробуйте настроить простейшую конфигурацию, а усложнения добавлять в случае успеха постепенно.
Пожалуйста, не игнорируйте правила русского языка. Отсутствие знаков препинания и неграмотность автора топика для многих гуру достаточный повод проигнорировать топик вообще.
1. Назовите технологию подключения (динамический DHCP, L2TP, PPTP или что-то иное)
2. Изучите темку «Действия до настройки роутера».
viewtopic.php?f=15&t=2083
3. Настройте согласно выбранного Вами мануала
4. Дочитайте мануал до конца и без пропусков, в 70% случаев люди просто не до конца читают статью и пропускают важные моменты.
5. Если не получается, в Winbox открываем терминал и вбиваем там /export hide-sensitive. Результат в топик под кат, интимные подробности типа личных IP изменить на другие, пароль забить звездочками.
6. Нарисуйте Вашу сеть, рисунок (схему) сюда. На словах может быть одно, в действительности другое.
-
mirage
- Сообщения: 12
- Зарегистрирован: 15 сен 2016, 14:49
Добрый день
Может быть я чего-то не понимаю, почему в src-adress можно задавать диапазон ip адресов — 192.168.3.1-192.168.3.12
а через запятую пишет ошибку : Error in Src. Address — IP address expected!
Как поступать если нужно указать в правиле в Src. Address пять разных ip адресов.???? Или создавать для каждого своё правило???
Спасибо
-
KARaS’b
- Сообщения: 1199
- Зарегистрирован: 29 сен 2011, 09:16
27 сен 2016, 14:09
Для указания нескольких адресов, не последовательных и не подсеть, есть замечательная опция — «адреслист».
Hello All,
I’m working in a RB2011UAS-RM (the later version of the hardware that has POE out on ETH10) on a pretty straightforward config for an edge router that uses some VLAN’s with several networks, some bridged some NAT’d.
In any event, when I try to add 10.10.22.0/22 to:
IP-Firewall-Filter Rules
IP-Firewall-NAT
IP-Firewall-Address List
or Queues
(possibly more areas?)
I get an «Error in Address — ip address expected».
I can put 10.0.0.0/22, and other IP’s with a subnet that large or larger in those areas just fine but I can’t put 10.10.22.0/22, or 10.10.22.0/21, 192.168.1.0/22, /21, /20, ect. I also tried variations of that IP such as 10.10.21.0/22 and others to no avail.
I can add 10.10.22.0/22 to IP — Address’ just fine and it populates a route that works for the whole /22, but otherwise I have to put 2 /23 rules in everywhere to effectively cover the entire range with filter rules, NAT rules, ect.
This address exists on ETH10 as a VLAN but I can duplicate this on other 2011’s and an x86 config. that is not running VLAN’s. I’m running RouterOS 6.27 (on all tested devices)
Can anyone else replicate this issue, is it perhaps a known issue, can anyone think of why it may not be working?
Best Regards,
Chris
На чтение 10 мин Просмотров 1.2к. Опубликовано 08.08.2020
Содержание
- Содержание
- Введение
- Через графический интерфейс
- Через консоль
- Проверка
- Быстрая настройка
- Дополнительные настройки DHCP сервера.
- Привязка клиентов по MAC адресу
- Настройка options
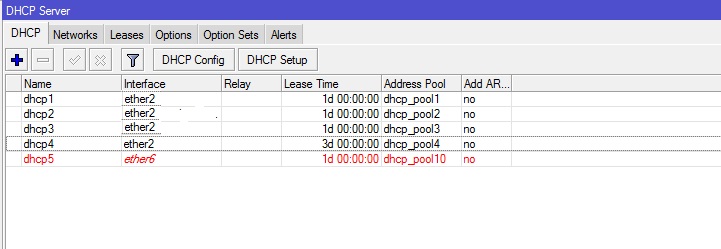
Что можно делать встроенным DHCP сервером Mikrotik? Вот не полный список того что он позволяет: осуществлять привязку MAC адреса узла к IP адресу, совместно с настройками ARP организовывать MAC фильтрацию пользователей, раздавать WINS, NTP, WEB, SMTP, IRC, POP3 сервера, индивидуально каждому клиенту устанавливать время ареды, выполнять скрипты при обнаружении не авторизованного DHCP в сети, выступать в сети авторизованным/дополнительным сервером раздачи адресов, раздавать параметры для компьютеров загружаемых с сети, добавлять IP пользователей в списки firewall, распространять статические маршруты, передавать многие другие настройки через Option. Сегодня раскажу на что влияют некоторые параметры в настройках DHCP сервера всеми нами любимого маршрутизатора Mikrotik.
Итак произведём ручную настройку DHCP сервера Mikrotik и рассмотрим возможности заложенные в нём. Создадим пул IP адресов которые будут присваиваться клиентам, для этого зайдём в IP/Pool и плюсиком создадим интервал 10.24.3.162-10.24.3.190:

Создадим сам DHCP сервер AlenNet на интерфейсе AlenaNet нажав плюсик в окне IP/DHCP server/DHCP:

lease Time — Время аренды IP адреса клиентом
Address pool — диапазон IP адресов, которые будет раздавать сервер
Add ARP For Leases — Создаёт в таблице ARP записей cопостовление MAC — IP для клиентов получивших аренду у DHCP и позволяет совместно с IP/ARP организовывать MAC фильтрацию на микротик.
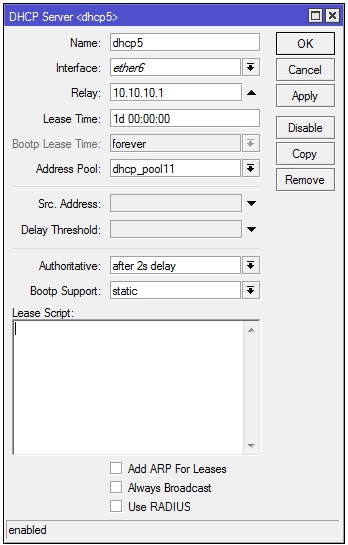
Authoritative может быть:
Yes — если клиент запросит IP адрес, микротик ему сразу же ответит. Причём если клиент ранее получал IP адресс с другого DHCP в сети, то микротик пошлёт ему пакет DHCPNAK заставляющий обновить ему свой IP.
No — если клиент ранее получавший IP адресс с другого DHCP запросит адресс у микротика то он его проигнорирует
After 2s delay — если клиент запросит IP адрес недоступный на DHCP Mikrotik он будет его игнорировать 2 секунды, а далее пошлёт DHCPNAK и присвоит IP адрес из своего диапазона. Своим клиентам DHCP микротик отвечает мгновеенно.
After 10s delay — если клиент запросит IP адрес недоступный на DHCP Mikrotik он будет его игнорировать 10 секунд, а далее пошлёт DHCPNAK и присвоит IP адрес из своего диапазона. Своим клиентам DHCP микротик отвечает мгновенно.
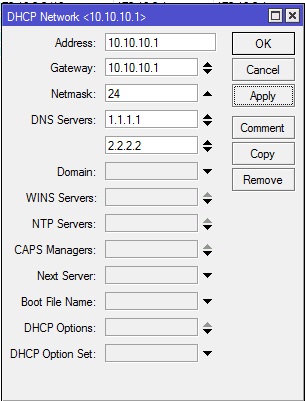
Перейдём на вкладку Networks и создадим список клиентов 10.24.3.160/27 для которого будут раздаваться все остальные настройки. Интересно то что вы можете отдельно каждому клиенту раздавать настройки указав его IP в строке Address:

Gateway — основной шлюз (может быть несколько)
NetMask — маска подсети для раздаваемых IP
DNS servers — сервера имён (может быть неколько)
WINS servers — сервера имён Windows используются для работы сетевого окружения. (может быть несколько)
NTP servers — сервера времени (может быть несколько)
DHCP Option — дополнительные параметры такие как SMTP, POP, WEB, SWAP сервера передаваемые по DHCP. Требует настройки в Options
Перейдём на вкладку Leases (Аренды)

Здесь можно сопоставить раздаваемые клиентам IP адреса с их MAC. Щёлкаем для этого по клиенту и нажимаем кнопку Make Static. Дополнительно можно выбрать список firewall в который нужно добавить клиента запросившего адрес у DHCP. Для этого выбираем в Address List нужный вам список IP адресов.
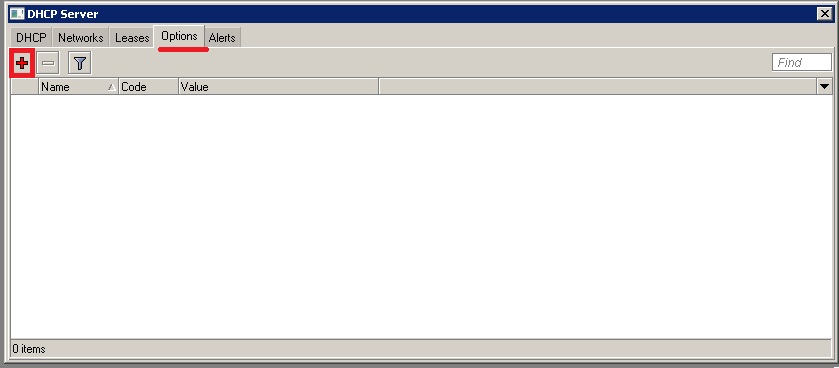
Отдельного внимания заслуживает наборы Options где вы можете указать дополнительные параметры раздаваемые c помощью DHCP:

В раделе Alerts указываются скрипты выполняемые микротиком в случае если в сети обнаружится неавторизованный DHCP

Interface — интерфейс на котором происходит зондирование.
Alert timeout — интервал зондирования или выполнения скрипта
Содержание
Введение
Есть два способа создания DHCP-сервера на маршрутизаторах MikroTik:
- С помощью мастера создания DHCP-сервера
- Пошаговая настройка каждого элемента
Мы предпочитаем использовать второй способ, т. к. он предоставляет возможности более тонкой настройки.
Через графический интерфейс
Создание пула адресов. Первым делом надо создать пул адресов из которого будут раздаваться адреса в аренду. Выберем диапазон: 192.168.15.101 — 192.168.15.200

Создание DHCP-сервера. Далее создадим сам DHCP-сервер, укажем для него созданный на предыдущем шаге пул, укажем срок аренды три дня и выберем интерфейс с которого будут раздаваться адреса.
Примечание: Обратите внимание, что в вашей сети может использоваться другой интерфейс.

Задание настроек. И в конце зададим настройки, которые должен раздавать наш DHCP-сервер: шлюз, DNS и WINS-серверы. 
Через консоль
/ip pool
add name=dhcp-pool1 ranges=192.168.15.101-192.168.15.200
/ip dhcp-server
add address-pool=dhcp-pool1 disabled=no interface=ether1-LAN1 lease-time=3d name=dhcp-server1
/ip dhcp-server network
add address=192.168.15.0/24 dns-server=192.168.15.10 gateway=192.168.15.1 netmask=24 wins-server=192.168.15.10
Проверка
Проверка работоспособности DHCP-сервера простая. Достаточно подключиться компьютером к заданному интерфейсу. Выставить в его настройках получение IP-адреса с помощью DHCP-сервера. И проверить получены ли заданные нами настройки.
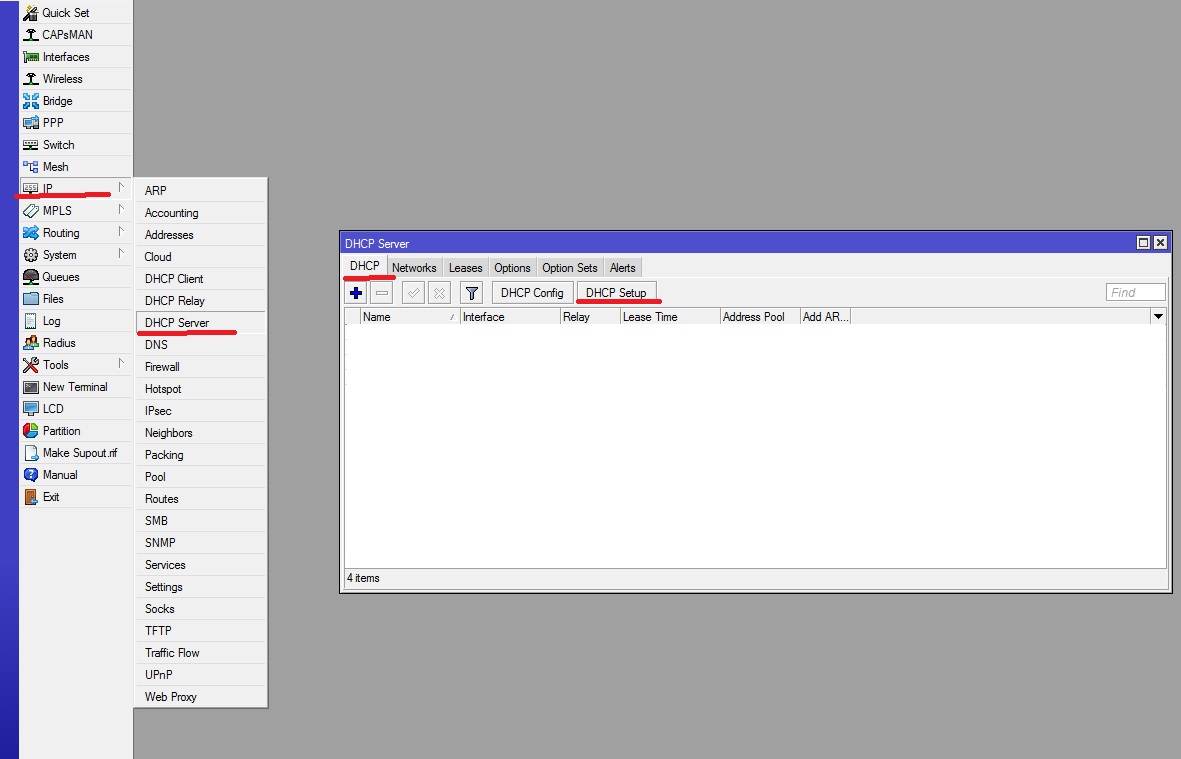
Для того что бы устройства подключенные в локальную сеть могли получать ip адреса автоматически, необходимо настроить DHCP сервер.
Быстрая настройка
Подключаемся к маршрутизатору через winbox. Открываем вкладку IP->DHCP Server. В появившемся окне, во вкладке DHCP нажимаем кнопку DHCP Setup.
Откроется следующее окошко
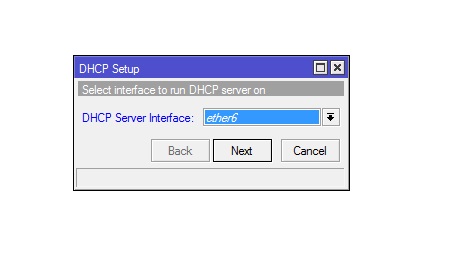
Здесь мы выбираем локальный интерфейс, на котором будет работать ЛВС, если интерфейсы объединены в bridg то выбираем этот бридж.
Также если необходимо настроить сервер на vlan, то выбираем нужный vlan. После выбора интерфейса нажимаем Next. В следующем окне вводим нашу локальную сеть.

Прописываем шлюз по умолчанию который будет выдаваться клиентам.

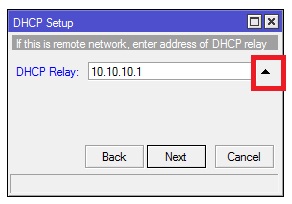
На следующей странице прописываем DHCP Relay. Relay-это ip DHCP сервера, если бы у нас в качестве сервера выступал бы другой Микротик или отдельный компьютер, то здесь нужно было бы прописать его ip. У нас маршрутизатор Mikrotik является server, поэтому Relay нам не нужен и мы просто нажимаем стрелку вверх справа от окошка ввода.
Выбираем пул диапазона range ip адресов, которые будут выдаваться клиентам.
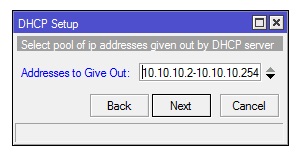
Здесь будут выдаваться ip с 10.10.10.2 по 10.10.10.254
В следующем окне вводим DNS сервера, если в Микротике настроено кэширование ДНС, то вводим ip роутера.
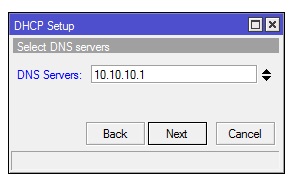
Или другие ДНС, для добавления ДНС нажмите стрелку вниз с левой стороны от окна ввода.
Нажимаем Next. Осталось указать время аренды ip адресов Lease Time.

В примере ip будут выдаваться на один день, т.е. 24 часа. Можно сделать аренду 72 часа, для этого введите строку 3d 00:00:00.
Нажимаем Next. Если все сделали правильно, то появится окошко.
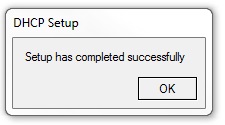
После нажатия кнопки в списке DHCP появится созданный сервер, Если что, то настроено не правильно, строка будет гореть красным цветом.
Например, если на порту не настроен ip адрес.
На этом быстрая настройка сервера Микротик закончена. Таким образом, можно настроить несколько серверов для разных пулов. Например, настроить два DHCP, один будет выдавать адреса для пользователей, а другой для локальных ресурсов внутри сети.
Дополнительные настройки DHCP сервера.
Для дополнительных настроек кликните два раза по созданному серверу, в результате откроется окно где можно изменить или добавить дополнительные настройки.
Рассмотрим настраиваемые здесь опции.
Name-Любое имя
Interface – сетевой интерфейс на котором настроен сервер, может быть как физическим так и vlan или bridge.
Lease Time – Время аренды ip, по истечении которого сетевому устройству будет выдан новый.
Address Pool — диапазон из которого будут выдаваться ip для сетевых устройств, настраивается в IP->Pool.
Src.Address – используется если на интерфейсе настроено несколько ip, здесь прописываем рабочий DHCP.
authoritative принимает следующие параметры
yes — если клиент запросит IP, Микротик ему сразу же ответит. Причём если устройство ранее получало IP другого DHCP в сети, то Микротик пошлёт ему пакет DHCPNAK заставляющий обновить ему свой IP
No — если клиент ранее получавший IP с другого DHCP запросит адрес у Микротика то он его проигнорирует
After 2s delay — если клиент запросит IP недоступный на Mikrotik он будет его игнорировать 2 секунды, а далее пошлёт DHCPNAK и присвоит IP из своего диапазона. Своим клиентам Микротик отвечает мгновенно.
After 10s delay — если клиент запросит IP адрес недоступный на Mikrotik он будет его игнорировать 10 секунд, а далее пошлёт DHCPNAK и присвоит IP адрес из своего диапазона. Своим клиентам Микротик отвечает мгновенно.
Bootp Support – принимает значения
none — не реагировать на запросы BOOTP
static — предлагать только статические лизинг для BOOTP
dynamic — предлагать статическую и динамическую аренду для BOOTP
lease—script – в этом окне можно добавить исполняемый скрипт, например при подключении компьютера заносить всю информацию в лог.
add arp for leases — автоматически заполняет ARP таблицу, соответствием MAC — IP.
always broadcast — Всегда отправляйте широковещательные пакеты, даже если IP-адрес назначения известен. При включении этой опции возможна дополнительная нагрузка на сеть L2.
Use Radius — Указывает использовать ли RADIUS server для аккаунтинга и аренды адресов.
На Вкладке Networks, кликаем два раза по созданному серверу и рассмотрим опции.
Address – здесь все понятно, ip Микротика
Gateway – шлюз выдаваемый сетевым устройствам
Netmask – маска сети
DNS Servers – ДНС выдаваемые сетевым устройствам
Domain – Имя домена сети
Boot File Name – имя загрузочного файла, используется если включена загрузка по сети через tftp.
Options – дополнительные опции, как настроить рассмотрим ниже.
Привязка клиентов по MAC адресу
Если необходимо что бы клиент получал всегда один и тот же ip, то можно зарезервировать ip адрес за MAC адресом, для этого переходим во вкладку IP->DHCP Server, в открывшемся окне выбираем вкладку Leases, у нас откроется список клиентов.
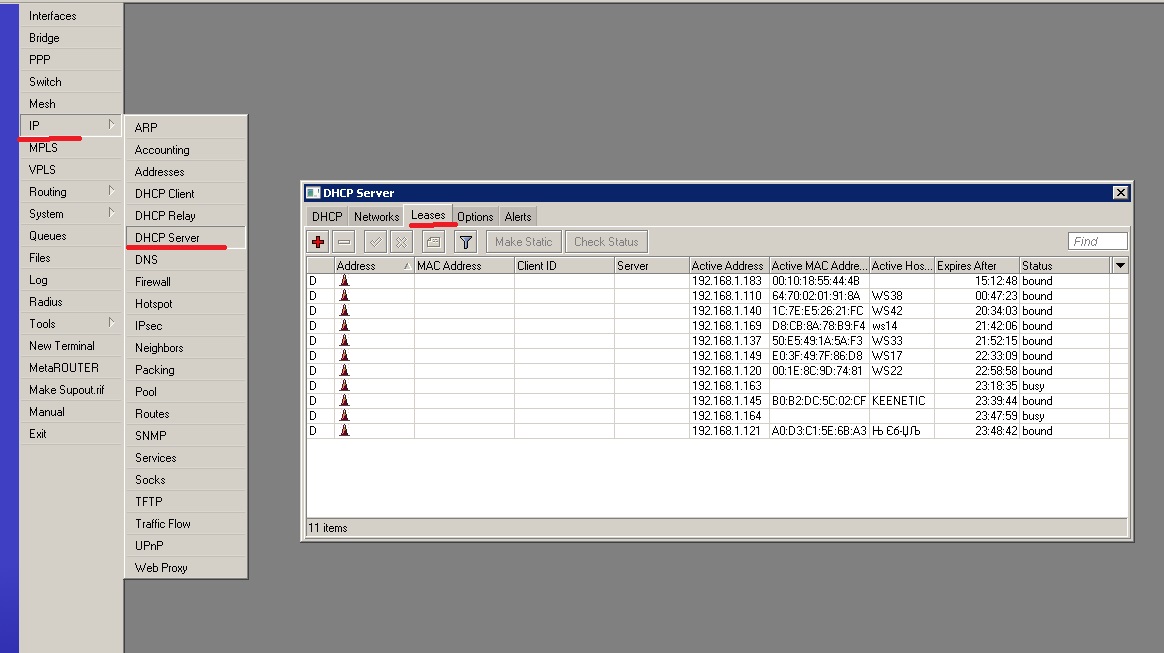
Кликаем левой кнопкой мыши по нужной записи и нажимаем кнопку Make Static.
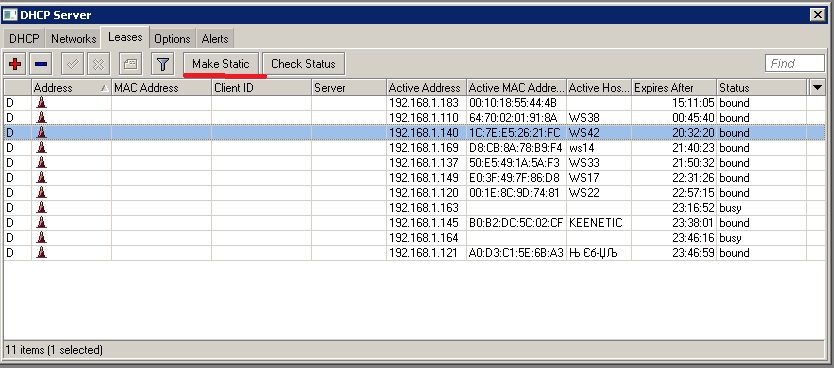
После этого буква D напротив этого клиента должна исчезнуть.
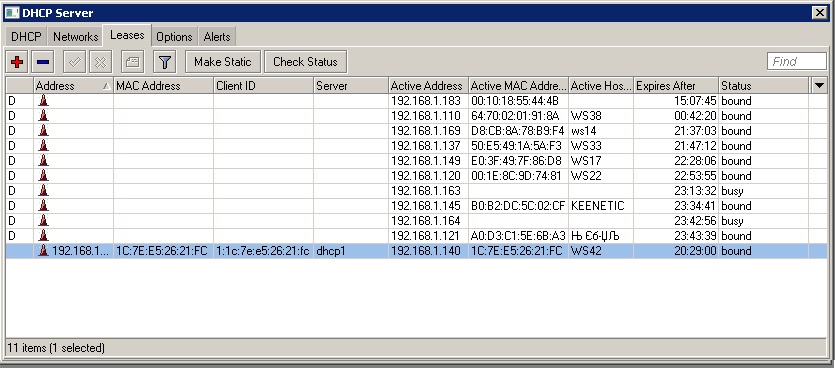
Теперь MAC клиента будет привязан к постоянному ip.
На этой вкладке также можно узнать и о статусе подключенных пользователей
waiting — пользователь не в сети, ожидается подключение.
testing — проверка использования этого адреса или нет (только для динамической аренды) путем опроса его с тайм-аутом 0,5 с
authorizing — ожидание ответа от сервера радиуса
busy — этот адрес назначается статически клиенту или уже существует в сети, поэтому он не может быть арендован, например если на компьютере настроить ip вручную.
offered — сервер предложил адрес пользователю, но не получил подтверждение от пользователя.
bound — адрес назначен пользователю и используется, будет освобожден по истечении времени аренды.
Настройка options
Если необходимо настроить опции, например option 82 использующаяся для привязки IP к порту, или option 66 указывающая ip tftp сервера.
Для настройки переходим на вкладку «Options» и жмем кнопку добавить (красный крест)
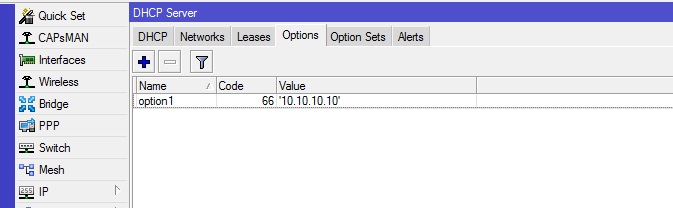
Заполняем поля открывшегося окошка.

Name-название, вводим любое имя
Code – код опции, 66, 82 и т.д.
Value – адрес ресурса, например tftp сервера
Важно: проверьте версию RouterOS, от этого будет зависеть синтаксис данной настройки.
Для версий с 6.0 -6.7, значение IP нужно вводить, используя одинарные ковычки — ’10.10.10.10’
Для версий от 6.8, значение IP нужно вводить, используя следующий синтаксис — s’10.10.10.10’
После нажатия кнопки Apply полу Raw Value заполнится автоматически, жмем OK, должна появится строчка нашей опции
Теперь переходим вкладку «Networks» и два раза кликаем по нужному серверу.
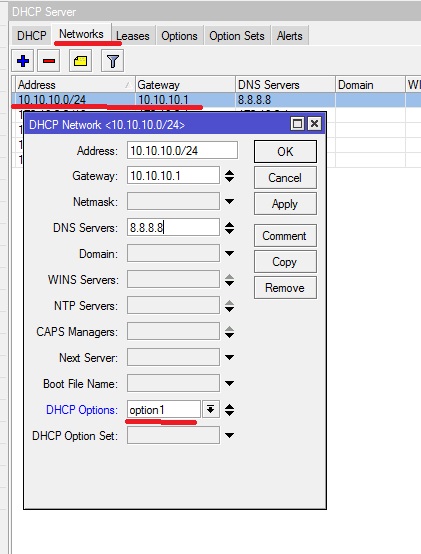
В открывшемся окне, в пункте Options, выбираем нужную нам опцию, созданную на первом шаге. После чего нажимаем кнопку ОК и настройка опции на этом закончена.
Обучающий курс по настройке MikroTik
Нужно разобраться с MikroTik, но не определились с чего начать? В курсе «Настройка оборудования MikroTik» все по порядку. Подойдет и для начала работы с этим оборудованием, и для того, чтобы систематизировать знания. Это видеокурс из 162 уроков и 45 лабораторных работ, построен на официальной программе MTCNA. Проходить можно, когда удобно и пересматривать по необходимости – материалы курса выдаются бессрочно. Также есть 30 дней на личные консультации с автором. На пробу выдают 25 уроков бесплатно, заказать их можно на странице курса.
Если вы нашли ошибку, пожалуйста, выделите фрагмент текста и нажмите Ctrl+Enter.
Содержание
- Error in src address ip address expected
- Re: issues with DNS
- Re: issues with DNS
- Re: issues with DNS
- Re: issues with DNS
- Error in src address ip address expected
- Re: IPv6 Ping does not work with domain names
- Re: IPv6 Ping does not work with domain names
- Re: IPv6 Ping does not work with domain names
- Re: IPv6 Ping does not work with domain names
- Re: IPv6 Ping does not work with domain names
- Re: IPv6 Ping does not work with domain names
- Re: IPv6 Ping does not work with domain names
- Re: IPv6 Ping does not work with domain names
- Re: IPv6 Ping does not work with domain names
- Re: IPv6 Ping does not work with domain names
- Re: IPv6 Ping does not work with domain names
- Re: IPv6 Ping does not work with domain names
- Re: IPv6 Ping does not work with domain names
- Re: IPv6 Ping does not work with domain names
- Re: IPv6 Ping does not work with domain names
- ros code
- Re: IPv6 Ping does not work with domain names
- Re: IPv6 Ping does not work with domain names
- Re: IPv6 Ping does not work with domain names
- Re: IPv6 Ping does not work with domain names
- Re: IPv6 Ping does not work with domain names
- Re: IPv6 Ping does not work with domain names
- Re: IPv6 Ping does not work with domain names
- Re: IPv6 Ping does not work with domain names
- Re: IPv6 Ping does not work with domain names
- Re: IPv6 Ping does not work with domain names
- Re: IPv6 Ping does not work with domain names
- Re: IPv6 Ping does not work with domain names
- Re: IPv6 Ping does not work with domain names
- Re: IPv6 Ping does not work with domain names
- Re: IPv6 Ping does not work with domain names
- Re: IPv6 Ping does not work with domain names
- Re: IPv6 Ping does not work with domain names
- Re: IPv6 Ping does not work with domain names
- Re: IPv6 Ping does not work with domain names
- Re: IPv6 Ping does not work with domain names
- Re: IPv6 Ping does not work with domain names
- Re: IPv6 Ping does not work with domain names
- Re: IPv6 Ping does not work with domain names
- Re: IPv6 Ping does not work with domain names
- Re: IPv6 Ping does not work with domain names
- Re: IPv6 Ping does not work with domain names
Mon Sep 23, 2013 6:07 am
We received our new CCR1016-12G (with 6.4 loaded on it) Friday and wanted to program it for our hotspot today. Connect our computer to the router, reset with NO DEFAULT CONFIG. Connect ETH1 to ISP and set to DHCP CLIENT. Pulls an IP, etc. I connect to WINBOX on my client PC through MAC address on ETH12 and when I test a ping using http://www.google.com or google.com I get «error in ping to — ip address expected.»
I can set static IP address, routes & DNS and still cannot ping FQDNs but I can ping 8.8.8.8 or 4.2.2.2 which means something is going on with DNS. I can connect a 450G setup as DHCP client on ETH1 with the same (6.4 router OS) and ping http://www.google.com & google.com.
Like I said, we reset with NO DEFAULT CONFIG. several times and just statically assigned IP info, or DHCP client and still cannot PING a FQDN. I cannot surf the web behind the mikrotik by FQDN but can hit a web page via IP Address.
Can someone help me get this resolved? Please and thank you in advance for your help.
Re: issues with DNS
Mon Sep 23, 2013 9:00 am
Re: issues with DNS
Tue Sep 24, 2013 2:21 am
We actually applied this STATICALLY and does not work still. We even tried the same settings on a 450G with the same OS version 6.4 and it works. We have hundreds of 4xx series RouterBoards out there and this is the first time on the Cloud Core and cannot get DNS working. so we are a little frustrated.
Re: issues with DNS
Wed Sep 25, 2013 9:06 pm
Can anyone help with this? I mean this cloud core router is a paper weight if I cannot get it to work. Please help.
Thanks in advance.
Re: issues with DNS
Thu Sep 26, 2013 3:31 am
Issue is resolved. This is what I did to correct DNS.
/ip firewall nat
add action=masquerade chain=srcnat comment=”Internet Access”
Источник
Error in src address ip address expected
Sun Dec 05, 2010 3:20 am
I tried to Ping ipv6.google.com from the Ping tool without success.
I got the error «Error in Ping To — ip address expected» from winbox, or from the command line :
ping address=ipv6.google.com
while resolving ip-address: could not get answer from dns server
Same try from a Linux machine on the same network as this router is working without problem. So i’m sure there is no problem with our DNS servers :
PING ipv6.google.com(2a00:1450:8002::63) 56 data bytes
64 bytes from 2a00:1450:8002::63: icmp_seq=0 ttl=53 time=48.8 ms
64 bytes from 2a00:1450:8002::63: icmp_seq=1 ttl=53 time=45.8 ms
64 bytes from 2a00:1450:8002::63: icmp_seq=2 ttl=53 time=46.0 ms
64 bytes from 2a00:1450:8002::63: icmp_seq=3 ttl=53 time=44.4 ms
If i ping directly the IP address 2a00:1450:8002::63 it’s working :
ping address=2a00:1450:8002::63
HOST SIZE TTL TIME STATUS
2a00:1450:8002::63 56 55 58ms echo reply
2a00:1450:8002::63 56 55 57ms echo reply
2a00:1450:8002::63 56 55 57ms echo reply
2a00:1450:8002::63 56 55 57ms echo reply
2a00:1450:8002::63 56 55 56ms echo reply
Seems like there is a problem with IPv6 AAAA pointers resolution.
There is no problem with IPv4 pointers : pinging google.com does work from the ping tool.
ping google.com
HOST SIZE TTL TIME STATUS
74.125.230.81 56 58 46ms
74.125.230.81 56 58 46ms
74.125.230.81 56 58 45ms
74.125.230.81 56 58 44ms
I tried to enter our IPv6 DNS server addresses in the DNS setup, to see if direct resolution on a IPv6 enabled DNS server was working, but this does not help.
Mikrotik can you correct this for 5.0 rc6 because it is a fondamental tool for IPv6 tests. Don’t forget that the end of IPv4 pool is 03 march 2011. Only four monthes. We have now less than one year to fully test and deploy IPv6.
Direct resolution on IPv6 enabled DNS servers is important too because futur clients near 2012 and later will not have access to IPv4 DNS servers. (they will get IPv6 only addresses so they will not be able to contact IPv4 DNS server to get AAAA records).
Re: IPv6 Ping does not work with domain names
Mon Dec 06, 2010 9:57 am
Re: IPv6 Ping does not work with domain names
Thu Apr 21, 2011 1:31 am
Hello, It seems the problem is still there.
I upgraded to ROS 5.1 and set DNS (ip->DNS) and added HE.net anycast ipv6 dns server but from mikrotik itself it doesn’t resolve any domain into ipv6 address. (ipv6.google.com).
But any machine in the networks resolves very good.
What’s the problem?
Re: IPv6 Ping does not work with domain names
Thu Apr 21, 2011 2:58 am
Same problem here with 5.1.
I can’t understand how Mikrotik can get positiv results here.
Mikrotik, did you try through a PPPoE IPv6 connection, or Ethernet IPv6 ?
I’m trying through PPPoE.
Perhaps that binding to PPPoE interfaces does not work from the router ? Missing glue code ??
Resolving ipv6.google.com from other machines on the Network works without problems.
Re: IPv6 Ping does not work with domain names
Thu Apr 21, 2011 3:37 pm
I recall it never working on any version of RouterOS.
Re: IPv6 Ping does not work with domain names
Wed Jun 15, 2011 7:58 pm
Testing on 5.4 but not functional yet regular.
[admin@mikrotik] > :put [:resolve ipv6.google.com]
failure: dns name exists, but no appropriate record
on linux behind this MT resolv works good.
Re: IPv6 Ping does not work with domain names
Tue Dec 13, 2011 11:21 pm
Testing on 5.4 but not functional yet regular.
[admin@mikrotik] > :put [:resolve ipv6.google.com]
failure: dns name exists, but no appropriate record
on linux behind this MT resolv works good.
Re: IPv6 Ping does not work with domain names
Wed Dec 14, 2011 12:06 pm
Re: IPv6 Ping does not work with domain names
Wed Dec 14, 2011 12:44 pm
But i did not see this syntax in the Wiki :
Woud be simpler to have a ping6 tool or a parameter for ping.
Re: IPv6 Ping does not work with domain names
Tue Dec 20, 2011 6:15 am
Re: IPv6 Ping does not work with domain names
Wed Dec 21, 2011 1:22 pm
Re: IPv6 Ping does not work with domain names
Fri Oct 12, 2012 11:38 pm
Re: IPv6 Ping does not work with domain names
Thu Nov 15, 2012 1:45 pm
Re: IPv6 Ping does not work with domain names
Thu Nov 15, 2012 2:39 pm
Re: IPv6 Ping does not work with domain names
Thu Dec 13, 2012 9:59 am
Re: IPv6 Ping does not work with domain names
Thu Dec 13, 2012 10:18 am
ros code
Re: IPv6 Ping does not work with domain names
Tue Sep 30, 2014 6:15 pm
Re: IPv6 Ping does not work with domain names
Mon Jan 26, 2015 2:57 am
Re: IPv6 Ping does not work with domain names
Tue Jan 27, 2015 4:37 pm
Re: IPv6 Ping does not work with domain names
Tue Jan 27, 2015 8:55 pm
Re: IPv6 Ping does not work with domain names
Wed Jan 28, 2015 4:30 pm
For every complex problem, there is a solution that is simple, neat, and wrong.
MikroTik. Your life. Your routing.
Re: IPv6 Ping does not work with domain names
Sat Jan 31, 2015 9:38 am
Re: IPv6 Ping does not work with domain names
Sat Jun 11, 2016 9:44 pm
Re: IPv6 Ping does not work with domain names
Fri Jul 29, 2016 6:15 pm
[admin@MikroTik Router] > ping nextbigfuture.com
invalid value for argument address:
invalid value of mac-address, mac address required
invalid value for argument ipv6-address
failure: dns name exists, but no appropriate record
is this the same problem? anyone know if nextbigfuture.com is using an ipv6 address now?
Re: IPv6 Ping does not work with domain names
Fri Jul 29, 2016 11:43 pm
[admin@MikroTik Router] > ping nextbigfuture.com
invalid value for argument address:
invalid value of mac-address, mac address required
invalid value for argument ipv6-address
failure: dns name exists, but no appropriate record
is this the same problem? anyone know if nextbigfuture.com is using an ipv6 address now?
Re: IPv6 Ping does not work with domain names
Sun Jun 25, 2017 3:03 am
Although /ping [:resolve ipv6.google.com] works. From my point of view, for the ping cmd it should not matter, if a host is ipv4 or ipv6.
Additionally a parameter for choosing to ping a host by it’s v4 or v6 would be nice.
Re: IPv6 Ping does not work with domain names
Mon Jun 26, 2017 6:23 am
Re: IPv6 Ping does not work with domain names
Wed Jun 28, 2017 3:50 pm
Re: IPv6 Ping does not work with domain names
Thu Jun 29, 2017 6:41 am
I guess, let’s start by making sure we’ve got the right issue. I understand you don’t have a plan to fix a preference for IPv6 over IPv4. Is that the same answer for this level of basic functionality?
This probably extends into the tools as well. I just checked /tool traceroute. It works with www.google.com which works (has an A record) and doesn’t work with ipv6.google.com (no A record but has a AAAA record).
Re: IPv6 Ping does not work with domain names
Thu Jun 29, 2017 11:54 am
Re: IPv6 Ping does not work with domain names
Thu Jun 29, 2017 2:15 pm
Re: IPv6 Ping does not work with domain names
Thu Jul 06, 2017 5:55 pm
Re: IPv6 Ping does not work with domain names
Fri Mar 09, 2018 3:39 pm
Re: IPv6 Ping does not work with domain names
Fri Mar 09, 2018 4:03 pm
Re: IPv6 Ping does not work with domain names
Sun Dec 02, 2018 1:52 am
Re: IPv6 Ping does not work with domain names
Fri Dec 21, 2018 4:25 am
RouterOS 6.43.7 on all devices.
I have exactly the same problem with Mikrotik unable to resolve AAAA records from a hostname.
My test Mikrotik LtAP device gets CGNAT protected private IPv4 address of 100.64.0.0/18 from the mobile operator. There is no inbound access to that.
The same Mikrotik LtAP device gets dynamic and changing IPv6 address address and IPv6 prefix, which is nice. That IPv6 address is accessible from the Internet.
The «/ip cloud» DDNS hostname now has both A and AAAA records, which is nice. The X.sn.mynetname.net gets updated with the CGNAT external A-record and the native IPv6 address. Nice.
When I am on Mikrotik CLI elsewhere in the world, there is no way to use IPv6 when saying «/system ssh 123456789.sn.mynetname.net».
One of the listed «solutions» 6 years ago was » /ping [resolve ipv6.google.com]» . That only works when the hostname has only the AAAA record, but no A record.
The X.sn.mynetname,net addresses have both A and AAAA records. And again, Mikrotik will only resolve to a lonely A record, if that is available. Another example of the same thing is when user says «/ping [:resolve google.com]», resolving allways to IPv4-only. «google.com» hostname has the AAAA record, Mikrotik is never bothered to ask that, ever.
Even when the Mikrotik DNS cache has the target hostname and its AAAA record already known and cached (and no A record cached), Mikrotik resolver will still A-record query the outside DNS resolvers, and force using the A record for everything. Not good.
This seems to be really unwanted issue to fix in Mikrotik.
For the easiest solution, could Mikrotik implement a new «:resolve» function with name of «:resolve6»? That «:resolve6» will only query AAAA recods (and follow CNAMES of course). A matching «:resolve4» would be important to have too, forcing query of the plain A records (and following the CNAMEs). And still now, the funny plain stupid-vanilla «:resolve» thingie can stay as it is and as it wants to [not]work.
This suggestion does not break anything, all systems and scripts will work exactly as before. Now the users who have to use hostnames and forcing IPv6 addresses, can say «/ping [:resolve6 google.com]» and get the functionality and results they need.
Re: IPv6 Ping does not work with domain names
Fri Dec 21, 2018 6:59 am
RouterOS 6.43.7 on all devices.
I have exactly the same problem with Mikrotik unable to resolve AAAA records from a hostname.
My test Mikrotik LtAP device gets CGNAT protected private IPv4 address of 100.64.0.0/18 from the mobile operator. There is no inbound access to that.
The same Mikrotik LtAP device gets dynamic and changing IPv6 address address and IPv6 prefix, which is nice. That IPv6 address is accessible from the Internet.
The «/ip cloud» DDNS hostname now has both A and AAAA records, which is nice. The X.sn.mynetname.net gets updated with the CGNAT external A-record and the native IPv6 address. Nice.
When I am on Mikrotik CLI elsewhere in the world, there is no way to use IPv6 when saying «/system ssh 123456789.sn.mynetname.net».
One of the listed «solutions» 6 years ago was » /ping [resolve ipv6.google.com]» . That only works when the hostname has only the AAAA record, but no A record.
The X.sn.mynetname,net addresses have both A and AAAA records. And again, Mikrotik will only resolve to a lonely A record, if that is available. Another example of the same thing is when user says «/ping [:resolve google.com]», resolving allways to IPv4-only. «google.com» hostname has the AAAA record, Mikrotik is never bothered to ask that, ever.
Even when the Mikrotik DNS cache has the target hostname and its AAAA record already known and cached (and no A record cached), Mikrotik resolver will still A-record query the outside DNS resolvers, and force using the A record for everything. Not good.
This seems to be really unwanted issue to fix in Mikrotik.
For the easiest solution, could Mikrotik implement a new «:resolve» function with name of «:resolve6»? That «:resolve6» will only query AAAA recods (and follow CNAMES of course). A matching «:resolve4» would be important to have too, forcing query of the plain A records (and following the CNAMEs). And still now, the funny plain stupid-vanilla «:resolve» thingie can stay as it is and as it wants to [not]work.
This suggestion does not break anything, all systems and scripts will work exactly as before. Now the users who have to use hostnames and forcing IPv6 addresses, can say «/ping [:resolve6 google.com]» and get the functionality and results they need.
Re: IPv6 Ping does not work with domain names
Fri Dec 21, 2018 7:52 am
RouterOS 6.43.7 on all devices.
I have exactly the same problem with Mikrotik unable to resolve AAAA records from a hostname.
My test Mikrotik LtAP device gets CGNAT protected private IPv4 address of 100.64.0.0/18 from the mobile operator. There is no inbound access to that.
The same Mikrotik LtAP device gets dynamic and changing IPv6 address address and IPv6 prefix, which is nice. That IPv6 address is accessible from the Internet.
The «/ip cloud» DDNS hostname now has both A and AAAA records, which is nice. The X.sn.mynetname.net gets updated with the CGNAT external A-record and the native IPv6 address. Nice.
When I am on Mikrotik CLI elsewhere in the world, there is no way to use IPv6 when saying «/system ssh 123456789.sn.mynetname.net».
One of the listed «solutions» 6 years ago was » /ping [resolve ipv6.google.com]» . That only works when the hostname has only the AAAA record, but no A record.
The X.sn.mynetname,net addresses have both A and AAAA records. And again, Mikrotik will only resolve to a lonely A record, if that is available. Another example of the same thing is when user says «/ping [:resolve google.com]», resolving allways to IPv4-only. «google.com» hostname has the AAAA record, Mikrotik is never bothered to ask that, ever.
Even when the Mikrotik DNS cache has the target hostname and its AAAA record already known and cached (and no A record cached), Mikrotik resolver will still A-record query the outside DNS resolvers, and force using the A record for everything. Not good.
This seems to be really unwanted issue to fix in Mikrotik.
For the easiest solution, could Mikrotik implement a new «:resolve» function with name of «:resolve6»? That «:resolve6» will only query AAAA recods (and follow CNAMES of course). A matching «:resolve4» would be important to have too, forcing query of the plain A records (and following the CNAMEs). And still now, the funny plain stupid-vanilla «:resolve» thingie can stay as it is and as it wants to [not]work.
This suggestion does not break anything, all systems and scripts will work exactly as before. Now the users who have to use hostnames and forcing IPv6 addresses, can say «/ping [:resolve6 google.com]» and get the functionality and results they need.
Re: IPv6 Ping does not work with domain names
Fri Dec 21, 2018 10:27 am
Re: IPv6 Ping does not work with domain names
Fri Dec 21, 2018 8:27 pm
Solution 1: A quick and easy way is to implement the following commands. These do not break existing scritps:
— :resolve6 = resolves to AAAA records, following CNAME’s of course
— :resolve4 = resolves A records, following CNAME’s of course
Re: IPv6 Ping does not work with domain names
Wed Dec 26, 2018 10:30 pm
Re: IPv6 Ping does not work with domain names
Sun Jan 20, 2019 12:13 pm
I didn’t realize there was a thread that was this old about frustration with the RFC-noncompliant nature of DNS resolution in RouterOS. I think @alaine was on the right track in 2015 when they suggested that the best angle to take is a backward-compatible improvement to :resolve. Anyone still following this thread (maybe even from Mikrotik) might want to take a look at my proposal for :resolve improvements over here. The exact same behaviors I suggest could be used implicitly behind the scenes to make :ping work like you expect.
Here is a relevant snippet:
1. Continue the default behavior to only return one record, but provide an option full-answer=true|false to return the full answer.
The :resolve command is used for both debugging and scripting purposes and this change benefits both purposes. Since RouterOS has DNS server functionality, it’s always frustrating to debug DNS-related issues when the router itself doesn’t have a good DNS client. Currently, the only recourse is to use dig or nslookup from a client device and then inspect :ip dns cache on the router to see what happened. From a scripting perspective, it would be nice to be given all of the answers for a query for round-robin connections, health checks, etc.
2. Provide an option in :ip dns called client-behavior: prefer-v4|dual-stack
prefer-v4 preserves the legacy behavior and will return A record(s) if both A and AAAA are available. Since some users are undoubtedly relying on this quirk, this can remain the RouterOS default for several versions to give them time to migrate.
dual-stack follows RFC 8305 and attempts dual-stack resolution like a standard DNS client. If both address families are present and RouterOS has a configured IPv6 address it can use as a source, the AAAA record(s) are returned. After a sufficient amount of time, this should become the RouterOS default.
The fact that RouterOS unconditionally prefers IPv4 makes it ill-suited as a modern dual-stack client. I don’t fully understand why the choice was made in the first place. Although not in my ask here (because of the amount of work that would be involved), I do hope that RouterOS 7 has a proper RFC-8305-compliant control plane for any connections the router makes.
Источник
Содержание
- Исправление ошибок базовой конфигурации mikrotik
- Ip address expected mikrotik ошибка
- Re: issues with DNS
- Re: issues with DNS
- Re: issues with DNS
- Re: issues with DNS
- Ip address expected mikrotik ошибка
- Re: Static IP for Clients and Bandwidth control Help
- Static IP for Clients and Bandwidth control Help
- Re: Static IP for Clients and Bandwidth control Help
- MikroTik.by
- WiFi на Mikrotik RB952 Guest не получает IP на подключаемом устройстве
- WiFi на Mikrotik RB952 Guest не получает IP на подключаемом устройстве
- Re: WiFi на Mikrotik RB952 Guest не получает IP на подключаемом устройстве
- Re: WiFi на Mikrotik RB952 Guest не получает IP на подключаемом устройстве
- Re: WiFi на Mikrotik RB952 Guest не получает IP на подключаемом устройстве
- Re: WiFi на Mikrotik RB952 Guest не получает IP на подключаемом устройстве

В прошлой статье https://www.1spla.ru/blog/nastroyka-interneta-na-mikrotik я рассказал как настроить на нашем новом роутере интернет, в этой статье я покажу что нужно сделать чтобы исправить некоторые проблемы стандартной конфигурации.
Сразу приведу список проблем, а потом пошагово разберём то, как эти проблемы устранять.
- Пустой пароль администратора.
- Открытый в интернет DNS-сервер (ваш микротик могут использовать для усиления DDoS-атак).
- Открыты в интернет сервисы для управления микротиком.
- После обновления прошивки микротик автоматически не обновляет загрузчик.
Итак, пойдём по порядку.
Пароль администратора задать совсем просто, для этого нужно зайти в меню System, подменю Users.

В открывшемся окне кликнуть правой клавишей мыши по пользователю admin и выбрать кнопку Password.

В открывшемся окне 2 раза вписываем новый пароль и нажимаем «OK».
Теперь можно закрыть DNS сервер от злоумышленников.
Вариантов это сделать есть два:
- Отключить удалённые запросы к DNS на микротик (IP-DNS, снять галку Allow Remote Requests), но делать мы так не будем, т.к. выдаём собственный DNS в локальную сеть.
- Закрыть доступ к DNS извне нашей локальной сети.
Для этого нам потребуется зайти в IP – Firewall.

Нажимаем на + и создаём ещё одно правило, запрещающее входящий трафик (Chain: input) по протоколу UDP (Protocol: udp) на 53й порт (Dst. Port: 53) интерфейса провайдера (In. Interface: ether1).

На вкладке Action выбираем действие drop.

Нажимаем «ОК» и перетаскиваем его мышкой на 2ю позицию, т.к. правила firewall применяются по порядку, сверху вниз, пока пакет не попадёт под условия одного из правил.

Ещё одна неприятная вещь закрыта.
Теперь займёмся лишними сервисами. Идём в меню IP – Services, тут мы видим все доступные в данный момент сервисы и порты, на которых они работают.

Кроме winbox нам другие сервисы в принципе не нужны, можно выделить их и нажать красный крест в верхней части окна, что отключит их.

При желании, можно кликнуть на сервис winbox и выполнить тонкую настройку данного сервиса (изменить порт, задать список ip-адресов или подсетей из которых к нему можно подключаться).
Итак, последний пункт нашей сегодняшней статьи – обновление загрузчика нашего оборудования.
Идём в пункт System – Routerboard.

Тут мы видим модель нашей железки, её серийный номер и версии загрузчика (заводская, текущая и та, на которую можно обновиться).
К сожалению, у меня не было под рукой оборудования с не обновлённым загрузчиком, поэтому просто скажу, что нужно нажать на кнопку Upgrade в правой части окна и через некоторое время просто перезагрузить роутер.
В следующей статье я расскажу, как включить и правильно настроить WiFi на нашем роутере.
Если вам нужна помощь в настройке оборудования или серверов, наши специалисты всегда готовы вам помочь.
Статью подготовил технический директор компании Первый Сервисный Провайдер Гавриш Артём.
Источник
Ip address expected mikrotik ошибка
Mon Sep 23, 2013 6:07 am
We received our new CCR1016-12G (with 6.4 loaded on it) Friday and wanted to program it for our hotspot today. Connect our computer to the router, reset with NO DEFAULT CONFIG. Connect ETH1 to ISP and set to DHCP CLIENT. Pulls an IP, etc. I connect to WINBOX on my client PC through MAC address on ETH12 and when I test a ping using http://www.google.com or google.com I get «error in ping to — ip address expected.»
I can set static IP address, routes & DNS and still cannot ping FQDNs but I can ping 8.8.8.8 or 4.2.2.2 which means something is going on with DNS. I can connect a 450G setup as DHCP client on ETH1 with the same (6.4 router OS) and ping http://www.google.com & google.com.
Like I said, we reset with NO DEFAULT CONFIG. several times and just statically assigned IP info, or DHCP client and still cannot PING a FQDN. I cannot surf the web behind the mikrotik by FQDN but can hit a web page via IP Address.
Can someone help me get this resolved? Please and thank you in advance for your help.
Re: issues with DNS
Mon Sep 23, 2013 9:00 am
Re: issues with DNS
Tue Sep 24, 2013 2:21 am
We actually applied this STATICALLY and does not work still. We even tried the same settings on a 450G with the same OS version 6.4 and it works. We have hundreds of 4xx series RouterBoards out there and this is the first time on the Cloud Core and cannot get DNS working. so we are a little frustrated.
Re: issues with DNS
Wed Sep 25, 2013 9:06 pm
Can anyone help with this? I mean this cloud core router is a paper weight if I cannot get it to work. Please help.
Thanks in advance.
Re: issues with DNS
Thu Sep 26, 2013 3:31 am
Issue is resolved. This is what I did to correct DNS.
/ip firewall nat
add action=masquerade chain=srcnat comment=”Internet Access”
Источник
Ip address expected mikrotik ошибка
Sat Mar 31, 2012 6:32 pm
Dear Experts, Need your help.
1. I want to assign static IP to some of the clients. How can I do that?
2. I want to configure bandwidth control as below. How can I achieve?
192.168.9.2-192.168.9.100 — 64/32 (download/upload)
192.168.9.101-192.168.9.200 — 128/64 (download/upload)
192.168.9.201-192.168.9.254 — 256/64 (download/upload)
Please guide stepwise as I am newbee .
Many Thanks
Awaiting for assistance.
Re: Static IP for Clients and Bandwidth control Help
Sat Mar 31, 2012 7:33 pm
Static IP for Clients and Bandwidth control Help
Sun Apr 01, 2012 1:23 am
You could manually fill the dhcp-leases table with ip’s and specify the required rate-limit to each entry. That way queues will automatically be created on ipaddr issue time.
But I suppose you probably don’t want to add static dhcp entries for each of these ip’s in specified ranges? Looks like hell of a lot of them. Besides rate-limit creates queues that limits up/down rates equally.
In that case, you probably need to use separate addr pools and somehow define queue rules for them. Though I’m not sure how to easily assign queues for every separate ip.
Re: Static IP for Clients and Bandwidth control Help
Sun Apr 01, 2012 8:37 am
You could manually fill the dhcp-leases table with ip’s and specify the required rate-limit to each entry. That way queues will automatically be created on ipaddr issue time.
But I suppose you probably don’t want to add static dhcp entries for each of these ip’s in specified ranges? Looks like hell of a lot of them. Besides rate-limit creates queues that limits up/down rates equally.
In that case, you probably need to use separate addr pools and somehow define queue rules for them. Though I’m not sure how to easily assign queues for every separate ip.
Many Thanks for the help. I have gone thru wiki on rate-limit. However, am little confused on how to apply. Wiki says:
[ Format is: rx-rate[/tx-rate] [rx-burst-rate[/tx-burst-rate] [rx-burst-threshold[/tx-burst-threshold] [rx-burst-time[/tx-burst-time]]]]. All rates should be numbers with optional ‘k’ (1,000s) or ‘M’ (1,000,000s). If tx-rate is not specified, rx-rate is as tx-rate too. Same goes for tx-burst-rate and tx-burst-threshold and tx-burst-time. If both rx-burst-threshold and tx-burst-threshold are not specified (but burst-rate is specified), rx-rate and tx-rate is used as burst thresholds. If both rx-burst-time and tx-burst-time are not specified, 1s is used as default]
For example I want to assign192.168.9.201speed of 256/64, In the DHCP Server window, in rate limit- do i need to enter as ‘256000/64000’. Please guide?
Источник
MikroTik.by
For every complex problem, there is a solution that is simple, neat, and wrong.
WiFi на Mikrotik RB952 Guest не получает IP на подключаемом устройстве
WiFi на Mikrotik RB952 Guest не получает IP на подключаемом устройстве
Сообщение hulk » 11 янв 2020, 19:00

Re: WiFi на Mikrotik RB952 Guest не получает IP на подключаемом устройстве
Сообщение Chupaka » 12 янв 2020, 19:59
Re: WiFi на Mikrotik RB952 Guest не получает IP на подключаемом устройстве
Сообщение hulk » 13 янв 2020, 18:12
RouterOS 6.46.1
# model = RB952Ui-5ac2nD
/caps-man channel
add band=2ghz-b/g/n extension-channel=XX frequency=2412,2437,2462,2427,2447 name=channel-2
add band=5ghz-a/n/ac frequency=5180,5240 name=channel-5
add band=2ghz-g/n frequency=2412 name=channel-2-1
add band=2ghz-g/n frequency=2462 name=channel-2-11
add band=2ghz-g/n frequency=2437 name=channel-2-6
/interface bridge
add arp=reply-only comment=guest name=bridge-guest
add admin-mac=C4:AD:***:A1 auto-mac=no comment=LAN name=bridge-lan
/interface ethernet
set [ find default-name=ether1 ] name=ether1-inet
/caps-man datapath
add bridge=bridge-lan client-to-client-forwarding=yes name=datapath
add bridge=bridge-guest client-to-client-forwarding=no name=datapath-guest
/caps-man security
add authentication-types=wpa2-psk encryption=aes-ccm group-encryption=aes-ccm name=security-Work passphrase=»*******»
add authentication-types=wpa2-psk encryption=aes-ccm group-encryption=aes-ccm name=security-Guest passphrase=*******
/caps-man configuration
add channel=channel-2 comment=2.4 datapath=datapath mode=ap name=cfg2 rx-chains=0,1,2,3 security=security-Work ssid=
Ch***Service tx-chains=0,1,2,3
add channel=channel-5 comment=5 datapath=datapath mode=ap name=cfg5 rx-chains=0,1,2,3 security=security-Work ssid=
Ch***Service-5 tx-chains=0,1,2,3
add channel=channel-2 channel.tx-power=17 comment=Guest-2 datapath=datapath-guest hw-protection-mode=rts-cts mode=ap name=cfg2-guest
rx-chains=0,1,2,3 security=security-Guest ssid=GuestCES tx-chains=0,1,2,3
/interface list
add comment=defconf name=WAN
add comment=defconf name=LAN
/interface wireless channels
add band=2ghz-g/n extension-channel=Ce frequency=2412 list=1 name=ch1 width=20
/interface wireless security-profiles
set [ find default=yes ] supplicant-identity=MikroTik
add authentication-types=wpa2-psk eap-methods=»» mode=dynamic-keys name=CES supplicant-identity=»» wpa2-pre-shared-key=»*******»
add authentication-types=wpa2-psk eap-methods=»» mode=dynamic-keys name=GUEST supplicant-identity=»» wpa2-pre-shared-key=*******
/interface wireless
# managed by CAPsMAN
# channel: 2412/20-Ce/gn(30dBm), SSID: Ch***Service, CAPsMAN forwarding
set [ find default-name=wlan1 ] antenna-gain=0 band=2ghz-b/g/n channel-width=20/40mhz-XX comment=wlan country=no_country_set
distance=indoors frequency-mode=manual-txpower hw-protection-mode=rts-cts mode=ap-bridge security-profile=CES ssid=
Ch***Service wireless-protocol=802.11 wps-mode=disabled
# managed by CAPsMAN
# channel: 5180/20-Ceee/ac(17dBm), SSID: Ch***Service-5, CAPsMAN forwarding
set [ find default-name=wlan2 ] antenna-gain=0 band=5ghz-a/n/ac comment=wlan-5 country=no_country_set distance=indoors
frequency-mode=manual-txpower mode=ap-bridge security-profile=CES ssid=Ch***Service-5 wireless-protocol=802.11 wps-mode=
disabled
add keepalive-frames=disabled mac-address=C6:AD:***:A6 master-interface=wlan1 multicast-buffering=disabled name=wlan3
security-profile=GUEST ssid=GuestCES wds-cost-range=0 wds-default-cost=0 wps-mode=disabled
/interface wireless manual-tx-power-table
# managed by CAPsMAN
# channel: 2412/20-Ce/gn(30dBm), SSID: Ch***Service, CAPsMAN forwarding
set wlan1 comment=wlan
# managed by CAPsMAN
# channel: 5180/20-Ceee/ac(17dBm), SSID: Ch***Service-5, CAPsMAN forwarding
set wlan2 comment=wlan-5
/interface wireless nstreme
# managed by CAPsMAN
# channel: 2412/20-Ce/gn(30dBm), SSID: Ch***Service, CAPsMAN forwarding
set wlan1 comment=wlan
# managed by CAPsMAN
# channel: 5180/20-Ceee/ac(17dBm), SSID: Che***Service-5, CAPsMAN forwarding
set wlan2 comment=wlan-5
/ip hotspot profile
set [ find default=yes ] html-directory=flash/hotspot
/ip pool
add name=dhcp ranges=192.168.81.10-192.168.81.200
add name=dhcp-guest ranges=192.168.34.100-192.168.34.150
/ip dhcp-server
add add-arp=yes address-pool=dhcp disabled=no interface=bridge-lan name=LAN
add add-arp=yes address-pool=dhcp-guest disabled=no interface=bridge-guest name=WiFi-Guest
/queue type
add kind=pcq name=pcq-download-3M pcq-classifier=dst-address pcq-dst-address6-mask=64 pcq-rate=3M pcq-src-address6-mask=64
add kind=pcq name=pcq-upload-3M pcq-classifier=src-address pcq-dst-address6-mask=64 pcq-rate=3M pcq-src-address6-mask=64
/queue simple
add limit-at=10M/10M max-limit=10M/10M name=WiFi-Guest-3M queue=pcq-upload-3M/pcq-download-3M target=192.168.34.0/24
/caps-man access-list
add action=reject allow-signal-out-of-range=10s disabled=no mac-address=00:00:00:00:00:00 signal-range=-120..120 ssid-regexp=»»
add action=accept allow-signal-out-of-range=10s disabled=no mac-address=00:00:00:00:00:00 signal-range=-80..120 ssid-regexp=»»
/caps-man manager
set enabled=yes
/caps-man manager interface
add forbid=yes interface=ether1-inet
/caps-man provisioning
add action=create-dynamic-enabled hw-supported-modes=gn master-configuration=cfg2 name-format=identity slave-configurations=
cfg2-guest
add action=create-dynamic-enabled hw-supported-modes=ac,an master-configuration=cfg5 name-format=identity
/interface bridge filter
# no interface
add action=drop chain=forward in-interface=*E
# no interface
add action=drop chain=forward out-interface=*E
# no interface
add action=drop chain=forward in-interface=*F
# no interface
add action=drop chain=forward out-interface=*F
/interface bridge port
add bridge=bridge-lan interface=ether2
add bridge=bridge-lan interface=ether3
add bridge=bridge-lan interface=ether4
add bridge=bridge-lan interface=ether5
add bridge=bridge-lan comment=wlan interface=wlan1
add bridge=bridge-lan comment=wlan-5 interface=wlan2
add bridge=bridge-guest comment=wlan-guest interface=wlan3
/ip neighbor discovery-settings
set discover-interface-list=LAN
/interface list member
add interface=bridge-lan list=LAN
add interface=ether1-inet list=WAN
/interface wireless cap
#
set discovery-interfaces=bridge-lan enabled=yes interfaces=wlan1,wlan2
/ip address
add address=192.168.81.1/24 comment=LAN interface=bridge-lan network=192.168.81.0
add address=192.168.34.1/24 comment=Guest interface=wlan3 network=192.168.34.0
/ip cloud
set update-time=no
/ip dhcp-client
add comment=INET disabled=no interface=ether1-inet
/ip dhcp-server network
add address=192.168.34.0/24 comment=Guest dns-server=8.8.8.8 gateway=192.168.34.1 netmask=24
add address=192.168.81.0/24 comment=LAN dns-server=8.8.8.8 gateway=192.168.81.1 netmask=24
/ip dns
set allow-remote-requests=yes servers=8.8.8.8
/ip dns static
add address=192.168.81.1 comment=defconf name=router.lan
add action=masquerade chain=srcnat comment=»defconf: masquerade» out-interface-list=WAN
Re: WiFi на Mikrotik RB952 Guest не получает IP на подключаемом устройстве
Сообщение Chupaka » 13 янв 2020, 20:10
Перенесите IP-адрес с wlan3 на bridge-guest.
У вас cfg2-guest навешен на какой-нибудь CAP-интерфейс? Этот интерфейс в бридже?
Re: WiFi на Mikrotik RB952 Guest не получает IP на подключаемом устройстве
Сообщение hulk » 14 янв 2020, 11:03
Источник