В ходе установки обновления Google Chrome процесс может прерваться ошибкой 0x80040902. Чаще с ней сталкиваются в 64-разрядной версии браузера. Среди причин – зависшие процессы Chrome, которые не могут установить соединение с сервером загрузки Google. В этом случае устранить проблему удается путем перезапуска или командами, которые принудительно завершат процессы.

Если антивирус обнаружил угонщика браузера (Browser Hijackers) или аналогичную вредоносную программу, вполне возможно, что он отправил некоторые файлы на карантин, используемые при обновлении. Нужно полностью удалить браузер мощным деинсталлятором, который способен очищать оставшиеся файлы, а затем установить последнюю версию Chrome вручную. Иногда связь с сервером Google может быть ошибочно заблокирована антивирусом, поэтому нужно добавить Chrome в список исключений антивирусной программы.
Принудительное завершение зависших процессов
Самой распространенной причиной ошибки 0x80040902 являются зависшие процессы Chrome, которые препятствуют обновлению браузера. Как оказалось, сбой происходит, когда пользователи включают гибернацию или спящий режим вместо обычного завершения работы.
В этом попробуйте перезагрузить компьютер в обычном режиме, потребуется также отключение быстрого запуска, если он используется.
Если продолжаете сталкиваться с ошибкой, используйте команду taskkill, чтобы принудительно закрыть каждый процесс Chrome. В первую очередь проверьте, что Google Chrome и все связанные вкладки полностью закрыты.
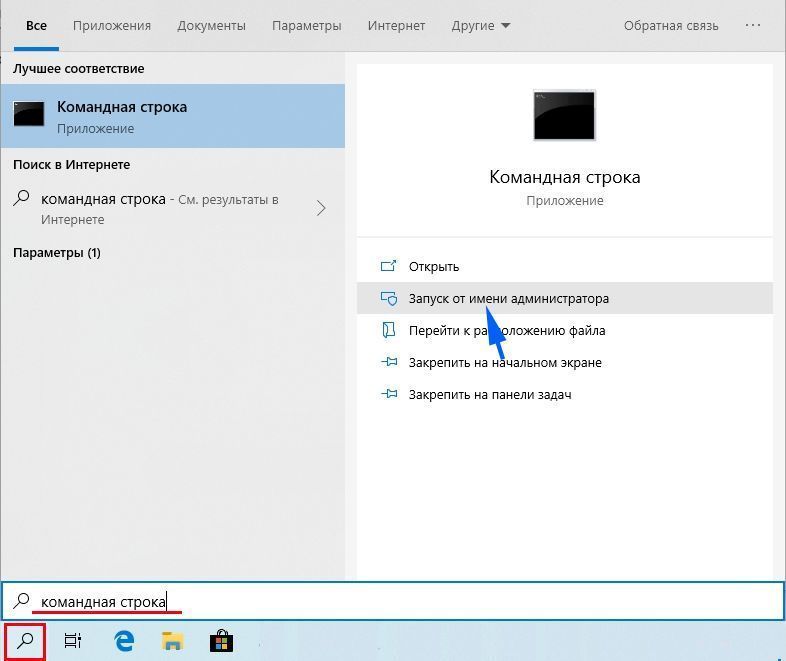
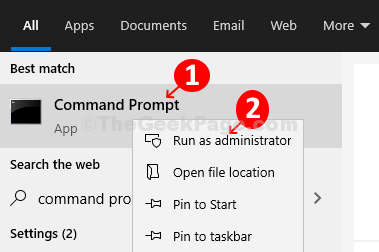
Откройте командную строку с правами администратора с помощью поиска Windows. Если отобразится запрос контроля учетных записей пользователей, подтвердите его нажатием кнопки «Да».
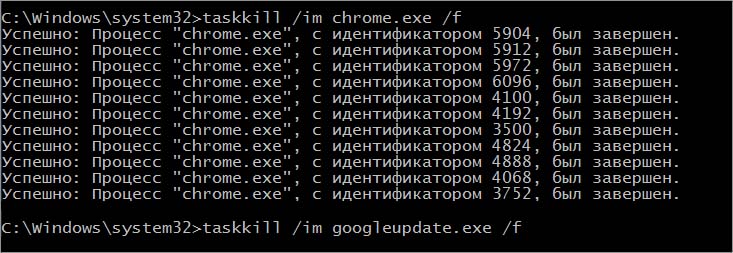
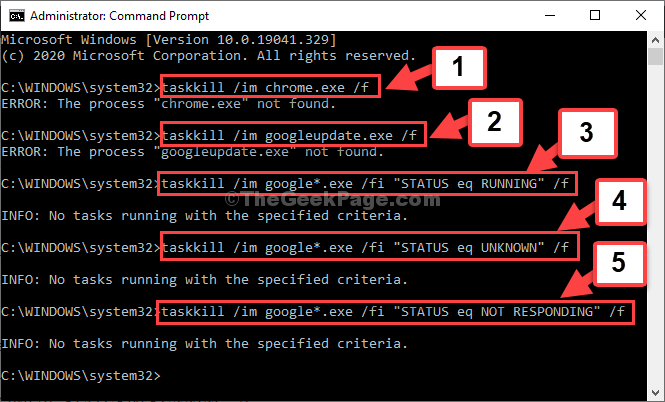
В консоли выполните по очереди команды, подтверждая запуск каждой на Enter, чтобы завершить все процессы Chrome:
- taskkill /im chrome.exe /f
- taskkill /im googleupdate.exe /f
- taskkill /im google*.exe /fi «STATUS eq RUNNING» /f
- taskkill /im google*.exe /fi «STATUS eq UNKNOWN» /f
- taskkill /im google*.exe /fi «STATUS eq NOT RESPONDING» /f
После успешной обработки закройте командную строку. Запустите Google Chrome и повторите попытку обновления, которое не удавалось из-за ошибки 0x80040902.
Использование стороннего деинсталлятора
Обновление может завершиться неудачно из-за некоторых поврежденных или отсутствующих файлов Chrome. В ходе проверки компонентов браузера, антивирус перемещает инфицирование файлы на карантин, что в конечном итоге приводит к ошибкам, включая 0x80040902.
В этом случае нужно полностью удалить Chrome с помощью стороннего деинсталлятора, прежде чем выполнить чистую установку последней версии. Для решении используем программу Revo Uninstaller.
Перейдите на официальный сайт Revo Uninstaller и загрузите бесплатную версию. Имейте в виду, что нужно отказаться от загрузки портативной версии, поскольку она не так эффективна в сравнении со стандартной. Затем запустите загруженный файл и следуйте инструкциям на экране до завершения установки.
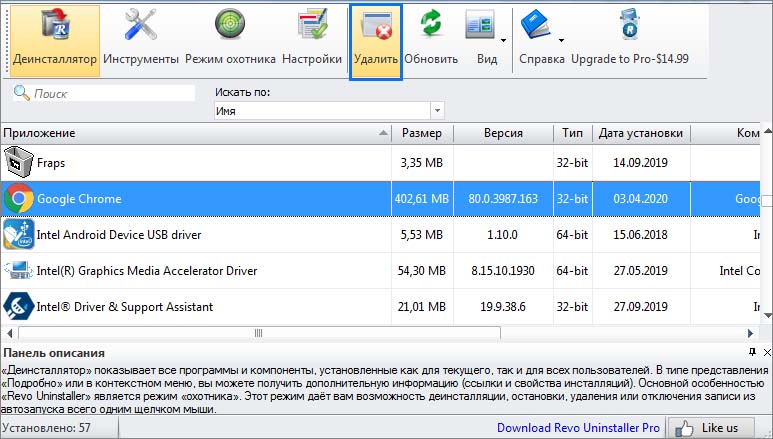
Откройте приложение и на вкладке «Деинсталлятор» прокрутите список установленных приложений, пока не найдете запись Google Chrome. Отметьте эту запись и кликните на кнопку «Удалить» в верхнем меню приложения.
В следующем окне будет создана точка восстановления, а затем запустится процесс удаления. После завершения выберите опцию «Продвинутый» и кликните на «Сканировать», чтобы очистить оставшиеся файлы и записи в реестре.

После перезагрузите компьютер, затем перейдите в другом браузере на сайт Chrome и загрузите установщик. Затем запустите установку. На этот раз она не должна быть прервана кодом ошибки 0x80040902.
Отключение антивирусной защиты
Иногда сбой может произойти из-за блокировки антивирусом соединения с сервером Google. В этом случае добавьте процессы Chrome в список исключений программы защиты. Либо полностью удалите его и рассмотрите установку другого пакета безопасности, например, Защитника Windows.
Сначала попробуйте отключить защиту в реальном времени перед обновлением. Это можно сделать из меню Панели задач. Щелкните на значок антивируса правой кнопкой мыши и выберите пункт, который отвечает за отключение защиты.
Если эта опция отсутствует временно удалите антивирус или после обновления замените его на другой.
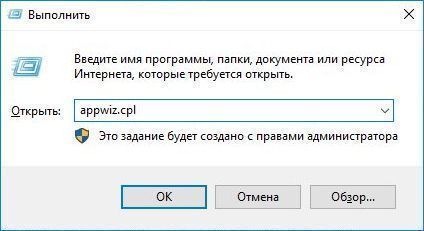
Откройте вкладку «Программы и компоненты» командой appwiz.cpl из окна Win + R.
Нажмите правой кнопкой мыши на Google Chrome и удалите.
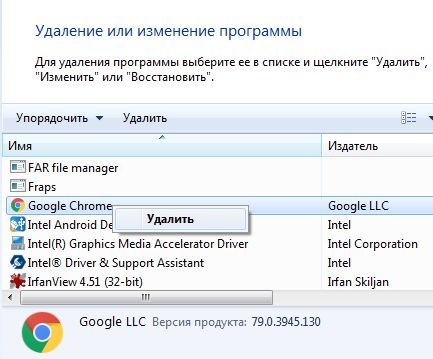
Следуйте инструкциям до завершения, затем перезагрузите компьютер. Попробуйте обновить приложение и проверьте, прерывается ли кодом 0x80040902.
Некоторые пользователи Windows видят код ошибки 0x80040902 при попытке обновить Google Chrome до последней версии. В большинстве случаев проблема возникает с 64-разрядной версией Chrome.
Chrome Error 0x80040902
В некоторых случаях эта проблема возникает из-за зависания ряда процессов Chrome, которые не могут установить соединения с сервером загрузки Google. В этом случае перезапуск или серия команд, которые убьют каждый вовлеченный процесс, должны решить проблему.
Если ваше A / V-решение недавно устранило угрозу угонщика браузера (или аналогичное вредоносное ПО, укорененное в вашем браузере), возможно, оно также в конечном итоге изолировало некоторые файлы, используемые в процессе обновления. Если этот сценарий применим, вы должны использовать мощный деинсталлятор, чтобы удалить все оставшиеся файлы, а затем установить последнюю версию Chrome вручную.
Kaspersky AV и некоторые другие сторонние A / V могут блокировать связь с сервером обновлений Google из-за ложного срабатывания. В этом случае устранение проблемы должно быть занесено в белый список процессов Chrome или удалена избыточная защита.
Как выясняется, одним из наиболее распространенных случаев, запускающих этот процесс, является выбор застрявших процессов Chrome, которые будут препятствовать способности браузера обновляться. Обычно это отображается для пользователей, которые используют режим гибернации или спящий режим вместо обычного выключения.
В этом случае вы можете начать с простой перезагрузки и попытаться выполнить обновление после завершения следующего запуска.
Если это не вариант или проблема по-прежнему сохраняется, вам следует продолжить, используя команду taskkill в окне CMD с повышенными правами, чтобы принудительно закрыть каждый процесс Chrome, который может зависнуть.
Вот краткое руководство по использованию команды taskkill для закрытия каждого процесса Chrome:
- Убедитесь, что Google Chrome и все связанные экземпляры полностью закрыты.
- Нажмите клавишу Windows + R, чтобы открыть диалоговое окно «Выполнить». Затем введите «cmd» в текстовом поле и нажмите Ctrl + Shift + Enter, чтобы открыть окно командной строки с повышенными правами.
Запуск командной строки
Примечание. Когда вы увидите UAC (Контроль учетных записей), нажмите Да, чтобы предоставить административные привилегии.
- Как только вы окажетесь внутри CMD с повышенными правами, выполните следующие команды по порядку и нажимайте Enter после каждой, чтобы убить все вовлеченные процессы Chrome: taskkill / im chrome.exe / f
taskkill / im googleupdate.exe / f
taskkill / im google * .exe / fi «STATUS eq RUNNING» / f
taskkill / im google * .exe / fi «STATUS eq UNKNOWN» / f
taskkill / im google * .exe / fi «Статус не отвечает» / f - После успешной обработки каждой команды закройте запрос CMD с повышенными правами, откройте Google Chrome и повторите попытку обновления, чтобы убедиться, что проблема решена.
Если вы все еще видите код ошибки 0x80040902 при попытке обновить браузер Google Chrome, перейдите к следующему возможному исправлению ниже.
Способ 2. Использование программного обеспечения для удаления
Как выясняется, эта конкретная проблема также может возникать из-за некоторых поврежденных данных Chrome, которые мешают функции обновления. Обычно это происходит после того, как программное обеспечение A / V успешно обнаруживает и удаляет детали из браузера Chrome, чтобы содержать инфекцию, вызванную угонщиком браузера.
В этом случае рекомендуемое исправление состоит в том, чтобы использовать мощное программное обеспечение для удаления, чтобы удалить Google Chrome вместе со всеми остатками данных, а затем выполнить чистую установку последней версии Chrome. Когда дело доходит до этого, есть несколько сторонних инструментов, которые вы можете использовать. IObit Uninstaller, CCleaner и Revo Uninstaller,
Мы использовали Revo Uninstaller в руководстве ниже, но не стесняйтесь использовать любое программное обеспечение для удаления, которое вам наиболее удобно
Вот краткое пошаговое руководство по выполнению мощной деинсталляции в Google Chrome и установке последней версии:
- Посетите эту ссылку (Вот) и загрузите последнюю бесплатную версию Revo Uninstaller, нажав кнопку «Загрузить».
Загрузка последней версии Revo Uninstaller
Примечание. Избегайте переносной версии, поскольку она не так эффективна, как обычная версия.
- После загрузки исполняемого файла установщика дважды щелкните его и следуйте инструкциям на экране для завершения установки.
Установка Revo Uninstaller
Примечание. Нажмите «Да» в окне «Контроль учетных записей», чтобы предоставить администратору доступ к программе установки.
- Как только вы окажетесь в приложении Revo Uninstaller, выберите вкладку Uninstaller и прокручивайте список установленных приложений, пока не найдете запись Google Chrome.
- Найдя правильную запись, выберите Google Chrome и нажмите кнопку «Удалить» в верхней части приложения.
Удаление приложения Chrome
- В следующем окне дождитесь создания точки восстановления, затем выберите «Дополнительно» в режимах сканирования и нажмите «Сканировать», чтобы удалить все оставшиеся файлы.
Удаление Google Chrome
- Следуйте инструкциям, чтобы завершить установку, а затем перезагрузите компьютер вручную.
- После завершения следующей последовательности запуска перейдите по этой ссылке (Вот) с Edge или IE и нажмите Download Chrome, чтобы получить последнюю версию.
Загрузка Google Chrome
- После загрузки установщика откройте его и следуйте инструкциям на экране, чтобы установить последнюю доступную версию Google Chrome.
Если тот же код ошибки 0x80040902 все еще сохраняется, перейдите к следующему исправлению ниже.
Способ 3: отключить или удалить сторонний пакет (если применимо)
По мнению некоторых уязвимых пользователей, код ошибки обновления 0x80040902 в Chrome также может быть вызван излишним набором антивирусных программ. Чаще всего сообщается, что Антивирус Касперского блокирует функцию обновления в Chrome, но могут быть и другие решения AV, демонстрирующие такое же поведение.
Если этот сценарий применим к вашей текущей ситуации, у вас есть два варианта:
- Добавьте в белый список каждый процесс Chrome от стороннего антивируса или брандмауэра, чтобы он не мешал функции обновления.
- Удалите сторонний антивирус и перейдите к более строгому набору средств безопасности (Защитник Windows или другой сторонний AV)
Вариант 1 зависит от того, какой AV-инструмент вы используете. Вы можете выполнить онлайн-поиск шагов, которые позволят вам это сделать, или отключить постоянную защиту при обновлении Google Chrome.
Большинство сторонних AV-пакетов позволит вам отключить защиту в реальном времени прямо из меню панели задач. Просто щелкните правой кнопкой мыши значок AV и найдите параметр, который не позволяет AV активно поддерживать сетевые коммуникации. Название этой опции будет отличаться от инструмента к инструменту.
Отключение щитов Avast
Если Вариант 1 не включен, вот несколько пошаговых инструкций, которые позволят вам удалить сторонний AV или брандмауэр с вашего компьютера:
- Нажмите клавишу Windows + R, чтобы открыть диалоговое окно «Выполнить». Затем введите «appwiz.cpl» и нажмите Enter, чтобы открыть меню «Программы и компоненты».
Открытие программ и функций
- В меню «Программы и файлы» прокрутите список установленных приложений и найдите сторонний AV-пакет, который вы используете и хотите удалить. Как только вы увидите его, щелкните его правой кнопкой мыши и выберите «Удалить» из появившегося контекстного меню.
Удаление Avast Firewall
- На экране удаления следуйте инструкциям на экране для завершения удаления, а затем перезагрузите компьютер.
Примечание. Кроме того, вы можете следовать этой статье (здесь), чтобы убедиться, что вы не оставляете после себя оставшиеся данные, которые могут блокировать ваше соединение (настоятельно рекомендуется для брандмауэров сторонних производителей) - При следующем запуске попробуйте обновить Google Chrome еще раз и посмотреть, была ли проблема решена.
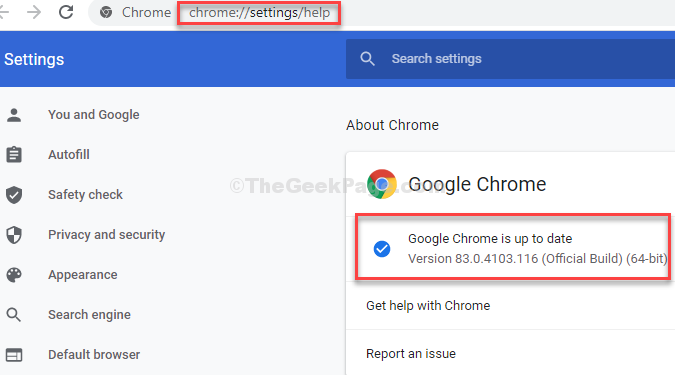
Если вы используете браузер Google Chrome, вы должны знать, что он обновляется автоматически, как только выходит новая версия. Так что вам не нужно беспокоиться об обновлении вручную. Однако при необходимости вы также можете обновить Chrome вручную через хром: // настройки / помощьраздел.
Перейдя на страницу справки Chrome, вы можете разрешить ему проверять наличие новых обновлений. Если будут обнаружены какие-либо новые обновления, он продолжит обновление браузера. Но многие пользователи видят этот код ошибки 0x80040902 при ручном обновлении браузера, что препятствует его установке и завершению обновления.
Хотя это может быть связано с некоторыми внутренними проблемами со службой обновлений Google, вы можете попробовать перезагрузить систему, чтобы проверить, установлено ли обновление. Если нет, вы можете попробовать следующее исправление.
Решение: с помощью командной строки
Шаг 1: Перейти к Начинать кнопку на рабочем столе и введите Командная строка в поле поиска. Щелкните результат правой кнопкой мыши и выберите
Запустить от имени администратора открыть Командная строка в режиме администратора.
Шаг 2: в Командная строка в окне введите команду ниже один за другим и продолжайте нажимать Входить каждый раз:
-
taskkill / им chrome.exe / f
-
taskkill / им googleupdate.exe / f
-
taskkill / im google * .exe / fi «STATUS eq RUNNING» / f
-
taskkill / im google * .exe / fi «STATUS eq UNKNOWN» / f
-
taskkill / im google * .exe / fi «STATUS eq NOT RESPONDING» / f
*Примечание: Не забудьте выйти Хром перед запуском команд.
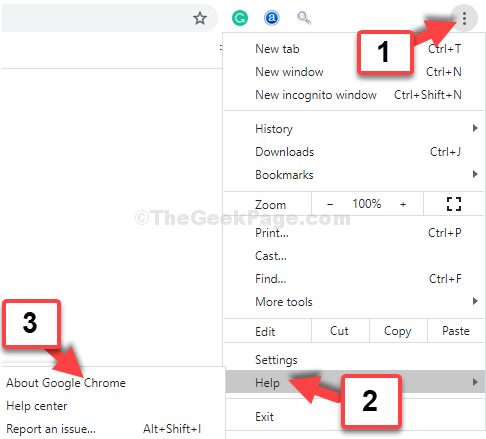
Шаг 3: Теперь откройте Гугл Хром и перейдите на страницу обновления, следуя инструкциям ниже:
- Щелкните три вертикальные точки в правом верхнем углу браузера.
- Перейти к Помощь.
- Выбирать О Google Chrome.
Шаг 4: Это приведет вас к хром: // настройки / помощь страница, на которой он начнет проверять наличие обновлений и начнет автоматическую установку обновлений.
Тогда вы узнаете, что ошибка исчезла и обновление устанавливается.
While updating Google Chrome on Windows 11/10, if you get error code 0x80040902, this article will help you fix the issue. Although it is an unusual error, you may encounter this issue on your computer with any version of Google Chrome.

The entire error message says something like this:
An error occurred while checking for updates: The installer failed to uncompress archive. Please download Google Chrome again. (error code 7: 0x80040902: 50-system level).
To fix error 0x80040902 during Google Chrome update, follow these steps:
- Close all tasks and restart Chrome
- Disable VPN and proxy
- Disable antivirus/firewall software temporarily
- Reset Google Chrome
- Reinstall Chrome
To learn more about these steps, continue reading.
1] Close all tasks and restart Chrome
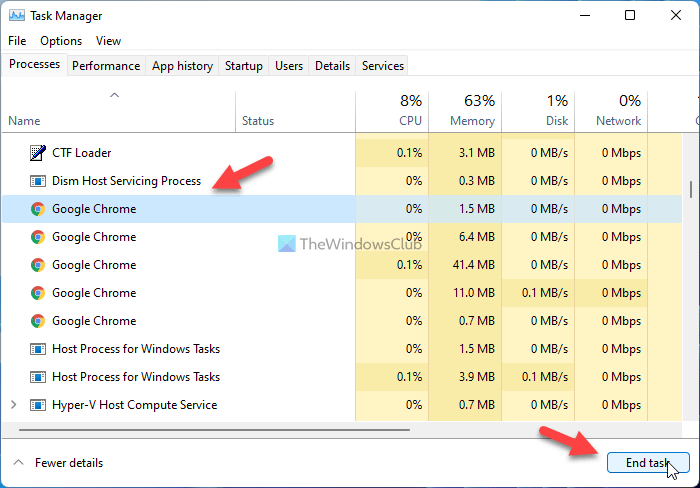
When you get error code 0x80040902 while updating the Google Chrome browser, restarting it is the first thing you need to do to get rid of the issue. However, closing the browser and starting it again is not enough. Even if you do that, Google Chrome doesn’t terminate all the background processes. For that, you need to take the help of the Task Manager. To close all tasks and restart Chrome, follow these steps:
- Press Win+X and select Task Manager from the list.
- Select one process of Chrome at a time.
- Click on the End task button.
- Open the Google Chrome browser.
Before doing this, ensure that you do not have the browser opened.
2] Disable VPN and proxy
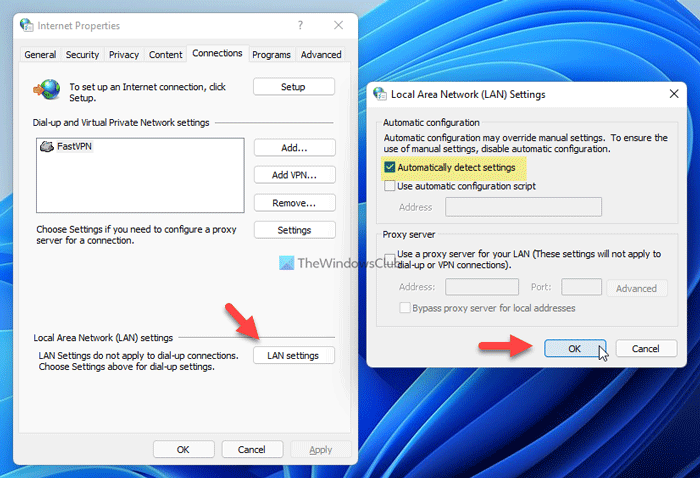
If you use a VPN or proxy on your computer, you might get this error. It happens when there is some issue with the VPN app or the proxy setting. That being said, it is recommended to turn on VPN or proxy and check if the problem remains or not. For that, you can do the following:
- Search for internet options in the Taskbar search box.
- Switch to the Connections tab.
- Click on the LAN settings button.
- Tick the Automatically detect settings checkbox.
- Click the OK button.
After that, restart the Google Chrome browser and check if you can update it or not.
3] Disable antivirus/firewall software temporarily
If you have installed a third-party antivirus or firewall software, it is recommended to disable it temporarily. At times, firewall software might block the outgoing and incoming traffic. As a result, you can find this issue on your PC.
4] Reset Google Chrome
If you installed a bunch of extensions randomly or changed different incorrect settings in the past, you might come across this error. Therefore, resetting Google Chrome should fix the issue. To reset Google Chrome on Windows 11/10, follow this detailed article.
5] Reinstall Chrome
It is the last thing you need to do in order to get rid of this updating issue on Google Chrome. If none of the aforementioned solutions worked for you, you could try out this solution. However, it is recommended to backup your bookmarks first. Then, you can use any third-party software uninstaller to remove Chrome and delete all leftovers.
Hope this guide helped you fix the error 0x80040902 while updating Google Chrome.
How do I fix Google Chrome update error?
If you can’t update Google Chrome and see Updates are disabled by your administrator error or Chrome update failed with error 4 or 10, 3, 12, 7, etc., then first, restart your computer and try again. You should also check for malware, review your firewall or antivirus settings and make sure that dl.google.com and tools.google.com addresses are not blocked. You should also disable or turn off the proxy and remove any third-party proxy service. If that doesn’t help, use the Chrome Cleanup Tool or re-install the Chrome browser.
Why can’t Chrome update to the latest version?
The reason why Chrome browser won’t update to the latest version automatically could be because of the corrupt cache and cookies, the Google Chrome Update service is not enabled, or a problem with your internet connection. In that case, you can manually update the Chrome browser. In addition to that, check if your internet connection is working fine, access the Services window, and set the Startup type for the Google Chrome Update service to Automatic. You should also clear your browser cache and cookies. If these don’t help, then reset or re-install the browser.
Read: Error code 7, 0x80072EE7 while installing or updating Google Chrome.
Error Code 7: 0x80040902 is an error code that is associated with Windows Update. It indicates that the Windows Update service is not running properly, and as a result, the user is unable to download and install updates.
In order to fix this error, the user should first check that the Windows Update service is running. To do this, the user should open the Services window by typing “services.msc” in the Run dialog box. Once the Services window is open, the user should locate the Windows Update service and check that it is running. If it is not running, the user should right-click on it and select “Start”.
If the Windows Update service is already running, the user should try resetting the Windows Update components. To do this, the user should open an elevated command prompt window by typing “cmd” in the Run dialog box and selecting “Run as administrator”. Once the command prompt window is open, the user should type “net stop wuauserv” and press Enter. After this, the user should type “net start wuauserv” and press Enter.
If the above steps do not resolve the issue, the user should try running the Windows Update Troubleshooter. This can be done by opening the Settings window and selecting “Update & Security”. Once in the Update & Security window, the user should select “Troubleshoot” and then select “Windows Update”. The user should then follow the on-screen instructions to run the troubleshooter.
If the issue persists, the user should contact Microsoft Support for further assistance.
How to Troubleshoot Error Code 7: 0x80040902 on Windows 10
Error code 7: 0x80040902 is a common issue encountered by Windows 10 users. This error code is usually caused by a corrupted system file or a missing system file. In order to troubleshoot this error, it is important to identify the root cause of the issue.
The first step in troubleshooting this error is to run the System File Checker (SFC) tool. This tool scans the system for any corrupted or missing system files and attempts to repair them. To run the SFC tool, open the Command Prompt as an administrator and type “sfc /scannow”. This will initiate the scan and repair process.
If the SFC tool does not resolve the issue, the next step is to run the DISM tool. This tool is used to repair corrupted system files and can be run by typing “DISM /Online /Cleanup-Image /RestoreHealth” in the Command Prompt.
If the issue persists, the next step is to perform a system restore. This will restore the system to a previous state before the error occurred. To perform a system restore, open the Control Panel and select “System and Security”. Then select “System” and click on “System Protection”. Select “System Restore” and follow the on-screen instructions to complete the process.
If all of the above steps fail to resolve the issue, the last resort is to perform a clean installation of Windows 10. This will completely erase all data from the system and reinstall Windows 10 from scratch. It is important to back up all important data before performing a clean installation.
By following these steps, you should be able to troubleshoot error code 7: 0x80040902 on Windows 10. If the issue persists, it is recommended to contact Microsoft Support for further assistance.
Understanding Error Code 7: 0x80040902 and Its Causes
Error code 7: 0x80040902 is an error code that is associated with Windows Update. It is a generic error code that indicates that the Windows Update service is not able to connect to the server. This error can occur when the Windows Update service is not running, or when the Windows Update service is not configured correctly.
The most common cause of this error is a problem with the Windows Update service. This service is responsible for downloading and installing updates for Windows. If the service is not running, or if it is not configured correctly, then Windows Update will not be able to connect to the server.
Another possible cause of this error is a problem with the Windows Update server. If the server is not responding, or if it is not configured correctly, then Windows Update will not be able to connect to it.
Finally, this error can also be caused by a problem with the Windows Update client. If the client is not configured correctly, or if it is not up to date, then Windows Update will not be able to connect to the server.
In order to resolve this error, it is important to first check the Windows Update service. Make sure that the service is running and that it is configured correctly. If the service is not running, then start it and try again.
If the service is running, then check the Windows Update server. Make sure that the server is responding and that it is configured correctly. If the server is not responding, then contact your system administrator.
Finally, check the Windows Update client. Make sure that the client is up to date and that it is configured correctly. If the client is not up to date, then update it and try again.
If none of these steps resolve the error, then contact Microsoft Support for further assistance.
Common Causes of Error Code 7: 0x80040902 and How to Resolve Them
Error Code 7: 0x80040902 is a common Windows error code that can occur when attempting to install or uninstall a program, or when attempting to access certain system files. This error can be caused by a variety of factors, including corrupted system files, incorrect registry settings, or a virus or malware infection. Fortunately, there are several steps that can be taken to resolve this error.
The first step is to check for any system file corruption. To do this, open the Command Prompt window and type “sfc /scannow”. This will scan the system for any corrupted files and replace them with the correct versions.
The second step is to check the registry settings. To do this, open the Registry Editor by typing “regedit” in the Run dialog box. Once the Registry Editor is open, navigate to the following key: HKEY_LOCAL_MACHINESOFTWAREMicrosoftWindowsCurrentVersionRun. If any of the values in this key are incorrect, delete them and restart the computer.
The third step is to check for any virus or malware infections. To do this, download and install a reliable anti-virus program and run a full system scan. If any malicious files are found, delete them and restart the computer.
Finally, if none of the above steps have resolved the issue, it may be necessary to reinstall the program that is causing the error. To do this, open the Control Panel and select “Uninstall a Program”. Select the program that is causing the error and click “Uninstall”. Once the program has been uninstalled, restart the computer and reinstall the program.
By following these steps, it is possible to resolve Error Code 7: 0x80040902. If the issue persists, it is recommended to contact a qualified technician for further assistance.
How to Diagnose and Repair Error Code 7: 0x80040902
Error Code 7: 0x80040902 is a Windows error code that indicates a problem with the Windows Update service. This error can prevent Windows from downloading and installing updates, which can lead to system instability and security vulnerabilities. In order to diagnose and repair this error, the following steps should be taken:
1. Check the Windows Update service: The Windows Update service must be running in order for Windows to download and install updates. To check the status of the service, open the Run dialog box (Windows + R) and type “services.msc”. In the Services window, scroll down to the Windows Update service and check its status. If it is not running, right-click on it and select “Start”.
2. Check for pending updates: If the Windows Update service is running, there may be pending updates that need to be installed. To check for pending updates, open the Run dialog box (Windows + R) and type “wuapp.exe”. In the Windows Update window, click “Check for updates”. If there are any pending updates, they will be listed and can be installed by clicking “Install updates”.
3. Reset the Windows Update components: If there are no pending updates and the Windows Update service is running, the Windows Update components may need to be reset. To reset the Windows Update components, open the Command Prompt (Admin) and type the following commands:
• net stop wuauserv
• net stop cryptSvc
• net stop bits
• net stop msiserver
• ren C:WindowsSoftwareDistribution SoftwareDistribution.old
• ren C:WindowsSystem32catroot2 Catroot2.old
• net start wuauserv
• net start cryptSvc
• net start bits
• net start msiserver
4. Run the Windows Update Troubleshooter: If the above steps do not resolve the issue, the Windows Update Troubleshooter can be used to diagnose and repair the problem. To run the Windows Update Troubleshooter, open the Settings app (Windows + I) and go to “Update & Security”. In the “Troubleshoot” section, click “Windows Update” and then click “Run the troubleshooter”. Follow the on-screen instructions to complete the troubleshooting process.
By following these steps, Error Code 7: 0x80040902 can be diagnosed and repaired. It is important to note that this error can be caused by a variety of issues, so if the above steps do not resolve the issue, it is recommended to contact Microsoft Support for further assistance.
What to Do When You Encounter Error Code 7: 0x80040902
Error code 7: 0x80040902 is an error code that can occur when attempting to access certain Windows applications. This error code is typically caused by a corrupted or missing system file, or by a conflict between two or more programs.
If you encounter this error code, there are several steps you can take to try and resolve the issue.
First, you should check to make sure that all of your system files are up to date. To do this, open the Control Panel and select “System and Security”. Then, select “Windows Update” and click “Check for Updates”. If any updates are available, install them and then restart your computer.
Next, you should check to make sure that all of your programs are up to date. To do this, open the Control Panel and select “Programs and Features”. Then, select the program that is causing the error and click “Uninstall/Change”. If an update is available, install it and then restart your computer.
Finally, you should check to make sure that there are no conflicts between two or more programs. To do this, open the Control Panel and select “System and Security”. Then, select “Administrative Tools” and click “Task Scheduler”. Check to make sure that no two programs are scheduled to run at the same time. If they are, you should adjust the schedule so that they do not conflict.
If none of these steps resolve the issue, you may need to contact a professional for assistance.
How to Prevent Error Code 7: 0x80040902 from Occurring
Error Code 7: 0x80040902 is a common error that can occur when attempting to access certain Windows applications. This error can be caused by a variety of factors, including corrupted system files, outdated drivers, or incorrect system settings. Fortunately, there are several steps that can be taken to prevent this error from occurring.
The first step is to ensure that all of the system files are up to date. This can be done by running a system scan with an antivirus program. This will help to identify any corrupted files that may be causing the error. Additionally, it is important to keep all of the drivers on the system up to date. Outdated drivers can cause conflicts with the system, leading to the error.
The next step is to check the system settings. This can be done by accessing the Control Panel and navigating to the System and Security section. Here, it is important to ensure that all of the settings are correct. If any of the settings are incorrect, they should be adjusted accordingly.
Finally, it is important to ensure that the system is free of any malware or viruses. Malware and viruses can cause conflicts with the system, leading to the error. To check for any malicious software, it is recommended to run a full system scan with an antivirus program.
By following these steps, it is possible to prevent Error Code 7: 0x80040902 from occurring. It is important to keep the system up to date and free of any malicious software in order to ensure that the system is running optimally.
Tips for Resolving Error Code 7: 0x80040902 Quickly
Error Code 7: 0x80040902 is a common Windows error that can occur when attempting to install or uninstall a program. This error can be caused by a variety of issues, including corrupted system files, incorrect registry settings, or a virus infection. Fortunately, there are several steps you can take to resolve this error quickly.
1. Run a System Scan: The first step in resolving Error Code 7: 0x80040902 is to run a system scan. This will help identify any potential issues that may be causing the error. To do this, open the Start menu and type “cmd” into the search bar. Right-click on the “Command Prompt” option and select “Run as Administrator.” Then, type “sfc /scannow” and press Enter. This will scan your system for any potential issues and repair any that it finds.
2. Uninstall and Reinstall the Program: If the system scan does not resolve the issue, the next step is to uninstall and reinstall the program that is causing the error. To do this, open the Start menu and type “appwiz.cpl” into the search bar. This will open the Programs and Features window. Find the program causing the error and select “Uninstall.” Once the program is uninstalled, reinstall it from the original source.
3. Check for Viruses: If the program is still causing the error, it is possible that your system is infected with a virus. To check for viruses, open the Start menu and type “Windows Defender” into the search bar. This will open the Windows Defender Security Center. Select “Virus & Threat Protection” and then “Scan Now.” This will scan your system for any potential viruses and remove any that it finds.
By following these steps, you should be able to quickly resolve Error Code 7: 0x80040902. If the issue persists, it is recommended that you contact a professional for further assistance.
How to Fix Error Code 7: 0x80040902 at the System Level
Error Code 7: 0x80040902 is a system-level error that can occur when attempting to access certain files or applications. This error can be caused by a variety of issues, including corrupted system files, incorrect permissions, or a damaged registry. Fortunately, there are several steps that can be taken to resolve this issue.
The first step is to check the system for any corrupted files. To do this, open the Command Prompt window and type “sfc /scannow”. This will scan the system for any corrupted files and attempt to repair them. If this does not resolve the issue, the next step is to check the permissions of the file or application that is causing the error. Right-click on the file or application and select “Properties”. Select the “Security” tab and ensure that the user has the correct permissions to access the file or application.
If the permissions are correct, the next step is to check the registry for any errors. To do this, open the Registry Editor by typing “regedit” in the Command Prompt window. Navigate to the key that is causing the error and check for any errors. If any errors are found, they should be corrected.
Finally, if none of the above steps have resolved the issue, it may be necessary to perform a system restore. This will restore the system to a previous state and may resolve the issue. To perform a system restore, open the Control Panel and select “System and Security”. Select “System” and then “System Protection”. Select “System Restore” and follow the on-screen instructions.
By following these steps, it is possible to resolve Error Code 7: 0x80040902 at the system level. If the issue persists, it is recommended to contact a qualified technician for further assistance.
What Are the Best Practices for Dealing with Error Code 7: 0x80040902?
Error code 7: 0x80040902 is a common Windows error code that can occur when attempting to access certain files or applications. To ensure that this error does not occur, it is important to follow best practices when dealing with this issue.
First, it is important to identify the cause of the error. This can be done by running a system scan to detect any potential issues. Additionally, it is important to check for any recent changes to the system, such as software or hardware updates, that may have caused the error.
Once the cause of the error has been identified, it is important to take the necessary steps to resolve the issue. This may include updating drivers, reinstalling applications, or running a system restore. Additionally, it is important to ensure that the system is free of any malware or viruses that may be causing the error.
Finally, it is important to ensure that the system is kept up to date with the latest security patches and updates. This will help to prevent any future errors from occurring. Additionally, it is important to regularly back up important files and data to ensure that they are not lost in the event of an error.
By following these best practices, it is possible to reduce the chances of encountering error code 7: 0x80040902. Additionally, it is important to contact a professional if the issue persists, as they will be able to provide more detailed advice on how to resolve the issue.
Q&A
Q1: What is Error Code 7: 0x80040902?
A1: Error Code 7: 0x80040902 is an error code that indicates a problem with the Windows operating system. It is typically caused by a corrupted system file or a missing system component.
Q2: How can I fix Error Code 7: 0x80040902?
A2: To fix Error Code 7: 0x80040902, you can try running the System File Checker (SFC) tool to repair any corrupted system files. You can also try reinstalling any missing system components.
Q3: What are the symptoms of Error Code 7: 0x80040902?
A3: Symptoms of Error Code 7: 0x80040902 can include a blue screen of death, system crashes, and other system errors.
Q4: What is the severity of Error Code 7: 0x80040902?
A4: Error Code 7: 0x80040902 is considered a system-level error, meaning it can cause serious problems with the Windows operating system. It is important to address this error as soon as possible to avoid further damage to the system.