Обновлено сентябрь 2023: остановите эти сообщения об ошибках и устраните распространенные проблемы с помощью этого инструмента. Получить сейчас в эту ссылку
- Скачайте и установите программного обеспечения.
- Он просканирует ваш компьютер на наличие проблем.
- Затем инструмент исправить проблемы которые были найдены.
Установка нового обновления или конфигурации Windows 10 имеет много преимуществ, но также может быть проблематичной из-за ошибки 0x80190001, которая не позволяет пользователю загружать файлы. Это распространенная проблема, с которой сталкиваются пользователи из-за несовместимости и проблем безопасности с драйверами.
Этот код ошибки может привести к следующему сообщению об ошибке: «Что-то пошло не так или возникла непредвиденная ошибка при попытке загрузить файлы, необходимые для обновления». В этой статье описаны некоторые эффективные средства, которые помогут вам устранить этот код ошибки. Ниже приведены пошаговые инструкции по устранению ошибки.
Содержание:

Прежде чем вы сможете исправить ошибку 0x80190001, вам необходимо определить причину проблемы. Есть несколько причин, по которым эта ошибка может возникнуть на ПК с Windows. Причины этой проблемы перечислены ниже:
- Интерфейс антивируса.
- Поврежденные системные файлы.
- Неверная дата и время.
- Поврежденные профили Windows.
- Недостаточно свободного места на зарезервированном системном разделе.
Теперь, когда мы знаем все возможные причины ошибки 0x80190001, попробуйте следующие решения ниже.
Как решить ошибку 0x80190001
Запустите средство устранения неполадок обновления Windows

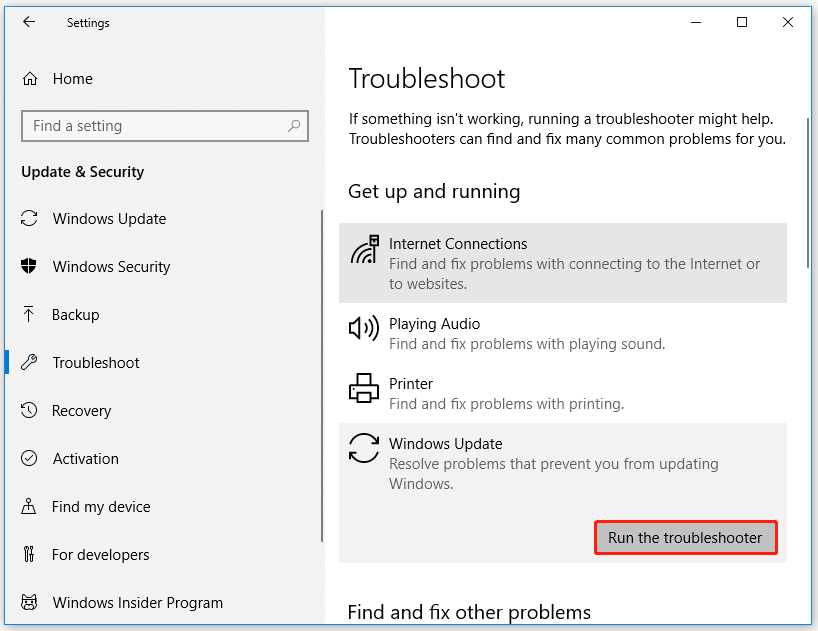
Если у вас возникли проблемы с Центром обновления Windows, не беспокойтесь — вы можете использовать средство устранения неполадок Центра обновления Windows, чтобы устранить проблему. Вот пошаговое руководство по запуску средства устранения неполадок:
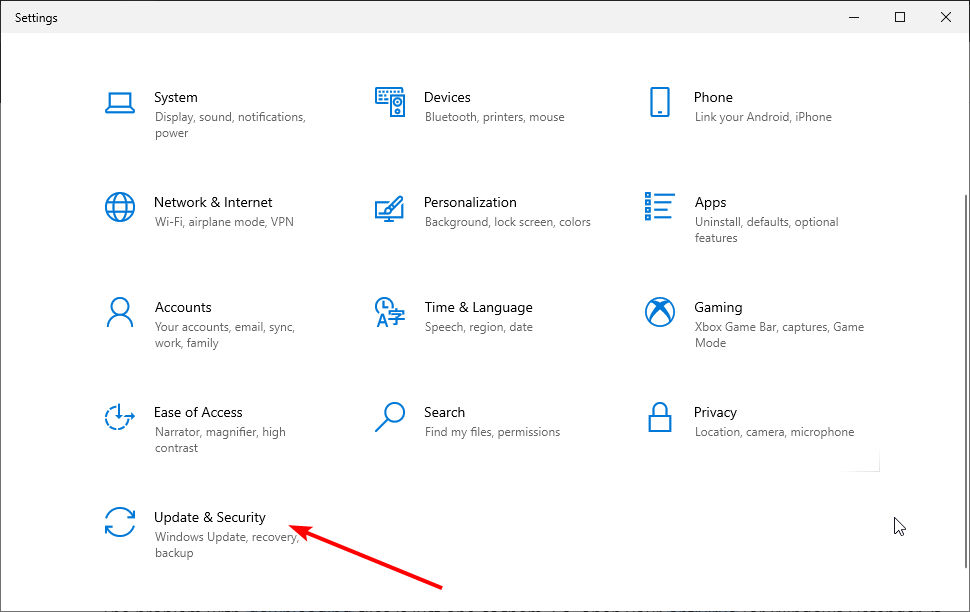
- Перейдите в Настройки> Обновление и безопасность.
- Под заголовком «Устранение неполадок» нажмите «Центр обновления Windows».
- Нажмите «Запустить средство устранения неполадок».
- Теперь средство устранения неполадок просканирует вашу систему на наличие проблем с Центром обновления Windows. Если он их найдет, он попытается исправить проблемы автоматически.
- После завершения устранения неполадок перезагрузите компьютер и повторите попытку обновления.
Обновлено: сентябрь 2023 г.
Этот инструмент настоятельно рекомендуется, чтобы помочь вам исправить вашу ошибку. Кроме того, этот инструмент обеспечивает защиту от потери файлов, вредоносных программ и аппаратных сбоев, а также оптимизирует работу вашего устройства для достижения максимальной производительности. Если у вас уже есть проблема с компьютером, это программное обеспечение может помочь вам решить ее и предотвратить повторение других проблем:
- Шаг 1: Установите инструмент восстановления и оптимизации ПК. (Виндовс 10, 8, 7, ХР, Виста).
- Шаг 2: Нажмите Начать сканирование чтобы определить, какие проблемы вы испытываете с вашим компьютером.
- Шаг 3: Нажмите Починить всечтобы решить все проблемы.

Запустить сканирование SFC
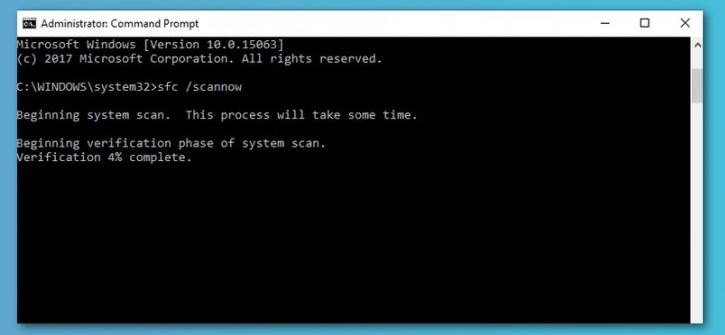
В Windows 10 есть встроенный инструмент для сканирования и восстановления поврежденных системных файлов, который называется средством проверки системных файлов (SFC). SFC — это утилита командной строки, которую можно использовать для сканирования всех защищенных системных файлов и замены их рабочими копиями, если они будут повреждены. Вот как запустить SFC в Windows 10:
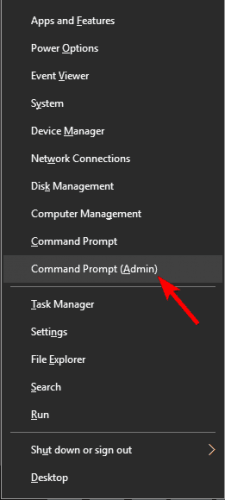
- Нажмите клавишу Windows + X, чтобы открыть меню «Опытный пользователь», а затем нажмите «Командная строка (Администратор)».
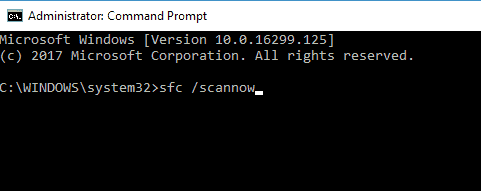
- В окне командной строки введите следующую команду и нажмите Enter: sfc /scannow
- Теперь начнется сканирование SFC. В зависимости от количества файлов, которые необходимо отсканировать и восстановить, процесс может занять от нескольких минут до часа и более.
- После завершения сканирования перезагрузите компьютер и повторите попытку обновления.
Запустите инструмент DISM

Запуск инструмента DISM в Windows 10 — относительно простой процесс, который можно выполнить всего за несколько шагов.
- Сначала откройте командную строку, нажав клавишу Windows + X, а затем выбрав «Командная строка» в меню.
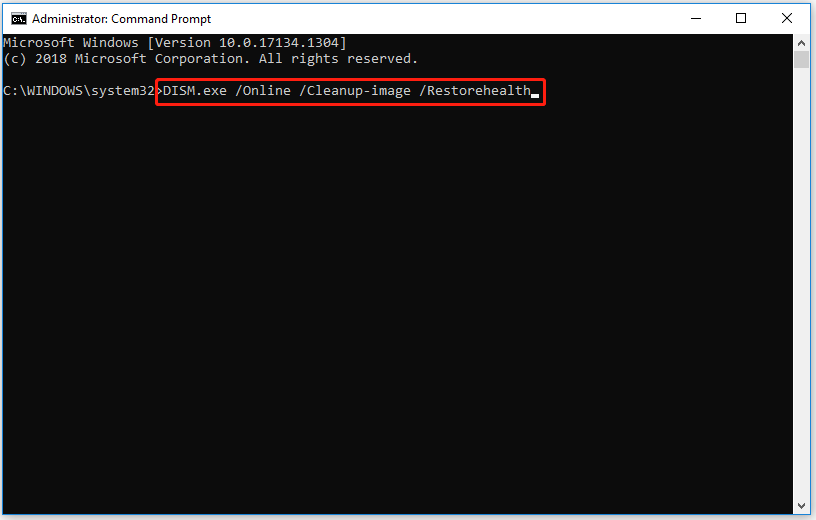
- Затем введите «DISM.exe/Online/Cleanup-image/Restorehealth» в командную строку и нажмите Enter. Теперь инструмент DISM начнет сканирование вашей системы на наличие ошибок и попытается их исправить.
- После завершения процесса необходимо перезагрузить компьютер, чтобы все изменения вступили в силу.
Запуская инструмент DISM на регулярной основе, вы помогаете поддерживать работоспособность и отсутствие ошибок в установке Windows 10.
Отключить антивирус

Windows 10 включает встроенную функцию безопасности под названием Защитник Windows, которая помогает защитить ваше устройство от вирусов и других вредоносных программ. В некоторых случаях вам может потребоваться временно отключить эту функцию, например, при установке нового программного обеспечения или запуске программы, которая, как известно, вызывает проблемы с Защитником. Вот шаги, которые необходимо выполнить, чтобы отключить Защитника в Windows 10:
- Откройте Центр безопасности Защитника Windows. Вы можете сделать это, выполнив поиск «Защитник» в меню «Пуск».
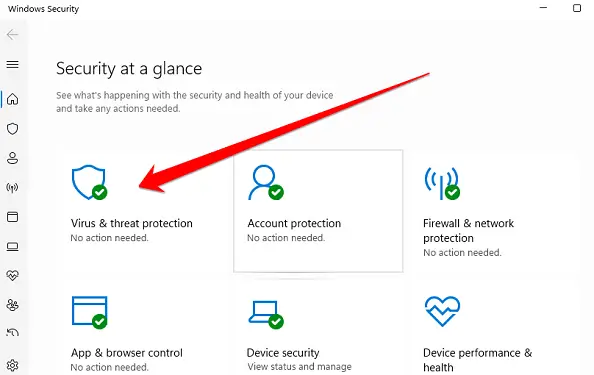
- Нажмите на значок «Защита от вирусов и угроз».
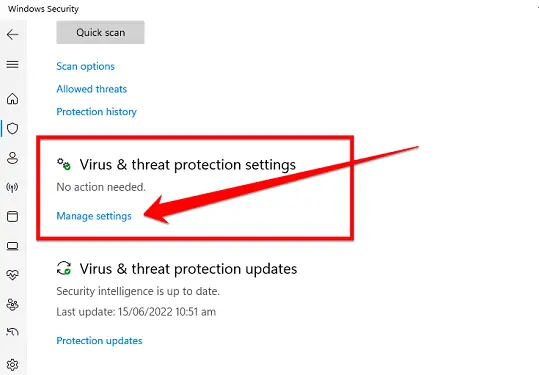
- В разделе «Настройки защиты от вирусов и угроз» нажмите ссылку «Управление настройками».
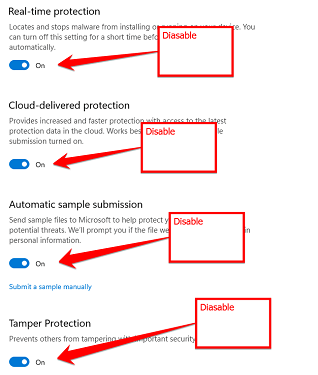
- Установите переключатель «Постоянная защита» в положение «Выкл.».
- Нажмите на кнопку «ОК», чтобы сохранить изменения.
Эти шаги отключат защиту Defender в режиме реального времени, которая является его наиболее важным компонентом. Имейте в виду, что это означает, что ваше устройство будет более восприимчиво к вирусам и другим вредоносным программам. Поэтому важно отключать Защитника только в случае крайней необходимости и снова включать его как можно скорее.
Установите время автоматически
Чтобы автоматически установить время в Windows 10, выполните следующие действия:
- Перейдите в меню «Пуск» и щелкните значок шестеренки «Настройки».
- В окне «Настройки» нажмите «Время и язык».
- В левой части окна «Время и язык» нажмите «Дата и время».
- В разделе «Установить время автоматически» установите переключатель в положение «Вкл.».
- В разделе «Установить часовой пояс автоматически» установите переключатель в положение «Вкл.».
- Нажмите кнопку «ОК», чтобы сохранить изменения.
После выполнения этих шагов часы вашего компьютера теперь должны быть установлены в правильном часовом поясе и автоматически обновляться, когда начинается или заканчивается переход на летнее время.
ОДОБРЕННЫЙ: Чтобы исправить ошибки Windows, нажмите здесь.
Часто задаваемые вопросы
Ошибка 0x80190001 — это особый код ошибки Windows 10, который указывает на проблему со способом подключения вашего компьютера к Интернету. Это может быть вызвано рядом факторов, таких как поврежденные системные файлы, неверные дата и время или брандмауэр, блокирующий доступ Центра обновления Windows к Интернету.
Есть несколько способов исправить ошибку 0x80190001 на вашем компьютере с Windows 10. К ним относятся запуск средства сканирования SFC, использование средства DISM или временное отключение антивирусного программного обеспечения.
Ошибка 0x80190001 может возникать по ряду причин, но чаще всего она вызвана поврежденными системными файлами или брандмауэром, который блокирует доступ Центра обновления Windows к Интернету.
Сообщение Просмотров: 1,096
Are you getting error code 0x80190001 while installing a feature update in Windows 11 or Windows 10? If you encounter this error, then you can refer to the solutions provided in this article from MiniTool Partition Wizard.
According to the user reports, error code 0x80190001 often occurs while they update Windows. Error 0x80190001 can prevent you from downloading new updates, which can cause compatibility and security issues.
Here is a user report from the Microsoft forum:
Upgrading to Windows 10 from Windows 7 pro. Repeatedly getting error code 0x80190001 after waiting a long time for the download. There is also a message to check network settings. Troubleshooter couldn’t find any problems so I removed myself from the home group. Made no difference.https://answers.microsoft.com/en-us/windows/forum/all/
What Causes Error Code 0x80190001?
Before solving the error 0x80190001, it’s important to figure out what causes the problem. There are several reasons why this error might appear on Windows 10 and Windows 11. The following are the reasons for this issue:
- Incorrect date and time.
- Antivirus interface.
- Corrupted system files.
- Corrupted Windows profiles.
- Insufficient free space on the system reserved partition
- …
Now that we know all the potential causes of the 0x8019001 error, please try the following solutions.
Before you start troubleshooting, make sure your Internet connection is working. If the network connection is not working, run the network troubleshooter.
Solution 1: Run the Update Troubleshooter
Run this built-in Windows Update troubleshooter to fix the most common update issues on Windows 10. Please follow the guidelines below:
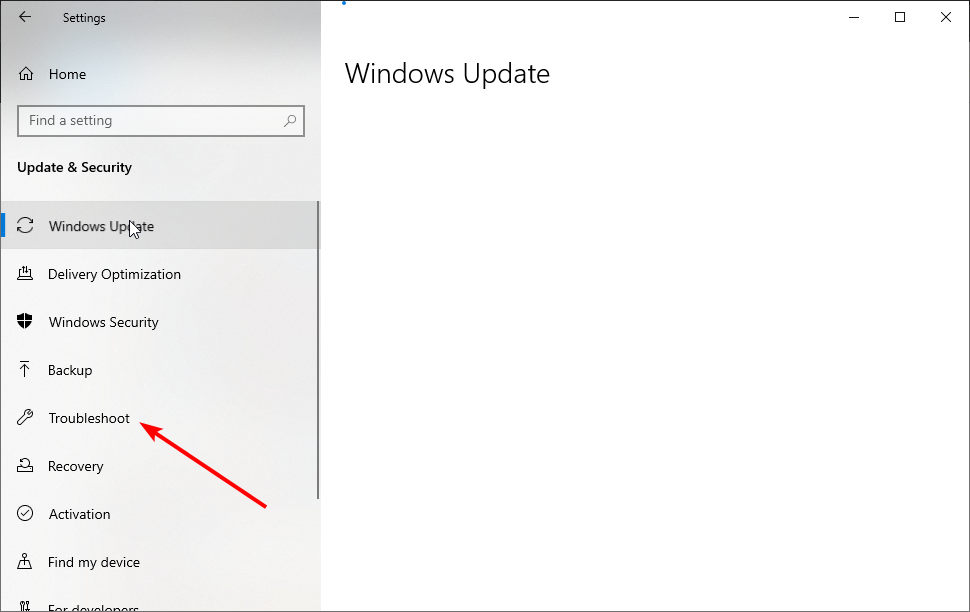
Step 1: Press the Win + I key to open Settings, and navigate to the Update & Security > Troubleshoot option.
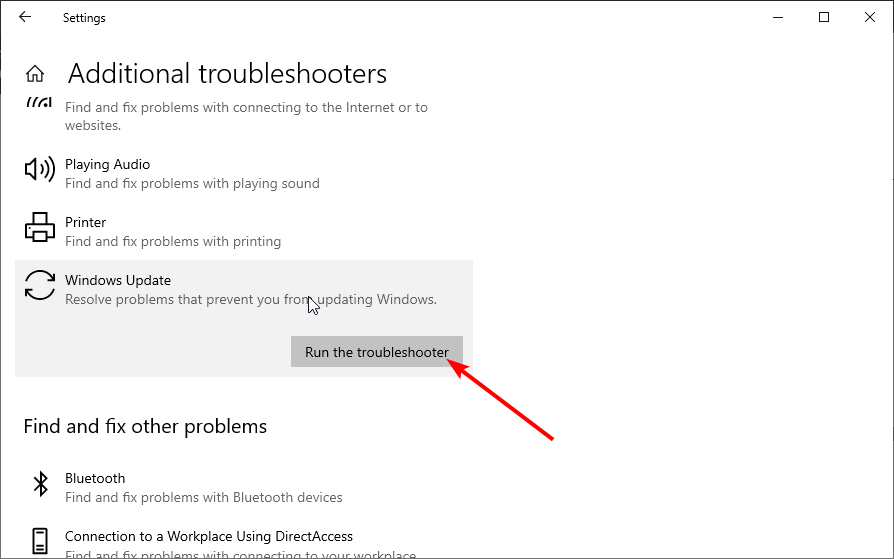
Step 2: Under the Get up and running section, click on the Windows Update option and select the Run the troubleshooter button from the extended pane. For Windows 11, there are a little difference.
Step 3: Follow the on-screen instructions. And when you see the Apply this fix option in the window, click on it to fix this error.
Step 4: Restart your computer.
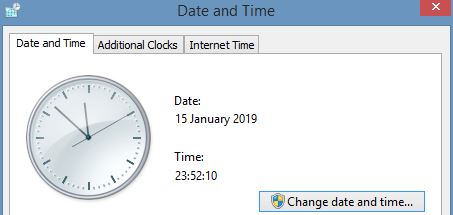
Solution 2: Check the Date and Time Settings
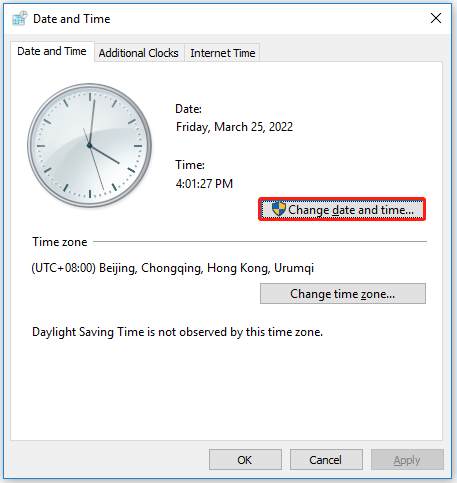
Some users reported error code 0x80190001 due to incorrect date and time on their PC. So, you can fix this by simply correcting the date and time. It’s easy, you can follow these steps:
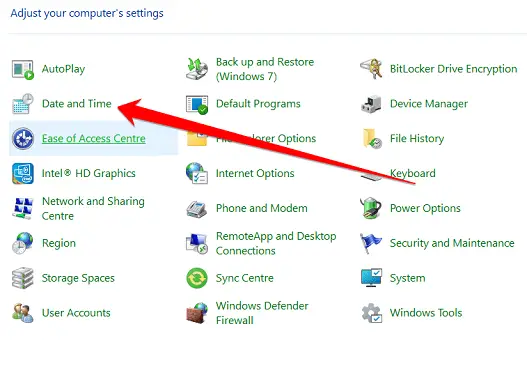
Step 1: Click the search box at the taskbar of Windows 10, and type control panel. Then choose the best-matched result open Control Panel.
Step 2: Select the Date and Time option.
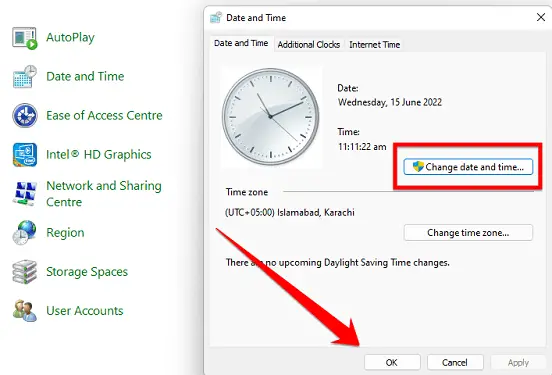
Step 3: In the pop-up window, click on Change date and time.
After all the processes are complete, you can restart your computer and run Windows Update again to check if the 0x80190001 error is resolved.
Solution 3: Disable Antivirus During Setup
If Windows cannot be updated due to error 0x80190001, the problem may be with your antivirus software. Although antivirus tools provide protection, they often interfere with your system and cause various errors to occur. To fix this, you can disable antivirus and security software. Here is the guide:
Step 1: Open Windows Settings, and then click on Update & Security > Windows Security > Virus & threat protection.
Step 2: Locate the Virus & threat protection settings section in the right window, and then click on Manage settings.
Step 3: Turn off the Real-time protection if off, leaving your device vulnerable option.
Solution 4: Delete Junk Files with Disk Cleanup
If the above methods didn’t help you remove the error code 0x80190001, you should try running the Disk Cleanup tool to clear any temporary or junk files, including your browser cache and cookies. Here are the detailed steps:
Step 1: Press the Win + E key to open the File Explorer.
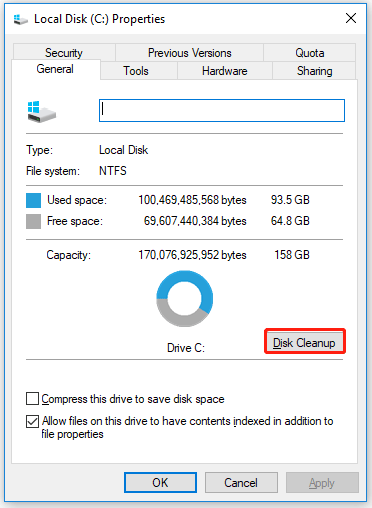
Step 2: Click on This PC, and then right click on your system drive and select the Properties option.
Step 3: In the next pop-up window, click on the Disk Cleanup button.
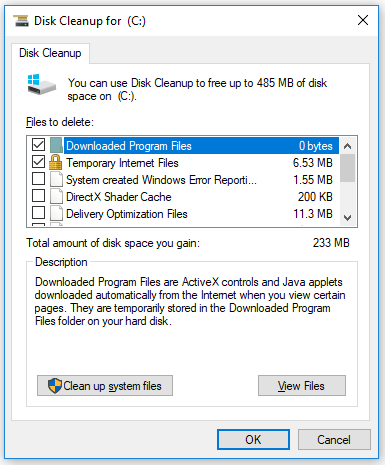
Step 4: In the new window, select the files you want to delete and then click OK.
If you encounter the Windows Update Cleanup stuck issue while running the Disk Cleanup tool, you can refer to this article: Top 7 Fixes to Disk Cleanup Stuck on Windows Update Cleanup
After clearing the junk files, you can try installing the update and check if the error 0x80190001 disappears.
Solution 5: Repair System Files
Another reason for error 0x80190001 can be file corruption. If your system files are damaged, you will need to use an SFC scan to repair them. Here is the guide:
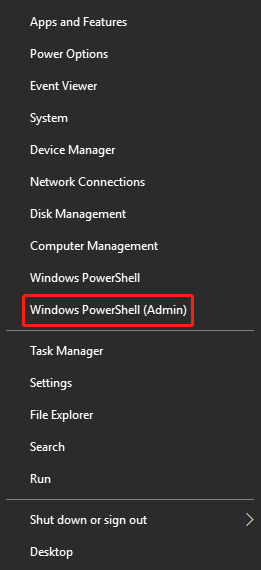
Step 1: Press the Win + X key to open the WinX menu, and then select the Windows PowerShell (Admin) option from the list. When the UAC prompts, click on the Yes button to open the Windows PowerShell. You can also run Command Prompt as administrator to repair system files.
Step 2: When the Windows PowerShell starts, enter the sfc /scannow command.
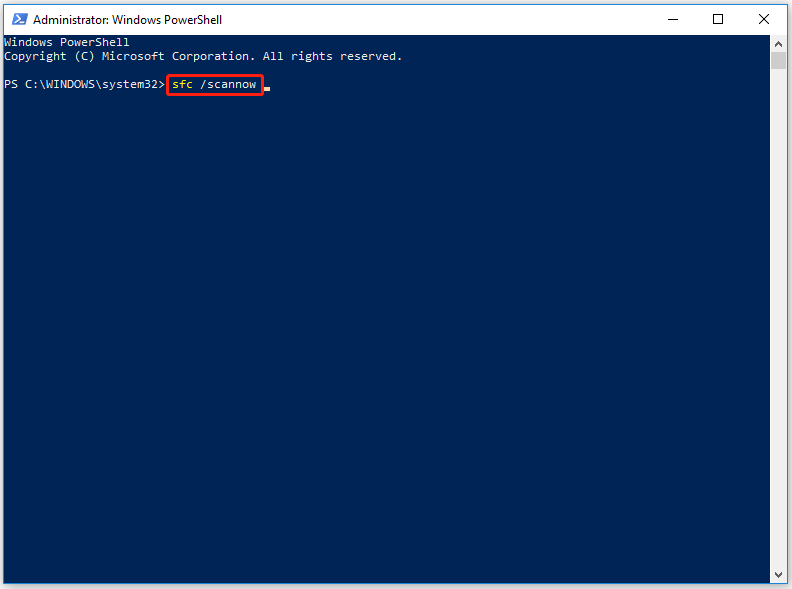
Step 3: The SFC scan will now start and the SFC scan may take 10-15 minutes, so don’t interfere with it.
After completing the SFC scan, check to see if the error 0x80190001 persists. If the issue persists, or you cannot run or complete an SFC scan, you will need to use a DISM scan instead.
So, you can open the Command Prompt as administrator, and type DISM.exe /Online /Cleanup-image /Restorehealth. Then press Enter.
After the scanning process is complete, restart your computer to check if the error 0x80190001 has been solved.
Recommended article: [Fixed] WinX Menu Not Working In Windows 10
Solution 6: Extend the System Reserved Partition
Some users have reported that Windows update error 0x80190001 is caused by insufficient free space on the system reserved partition on the hard drive. Well, extending the partition can solve this problem. In this case, you should extend the system reserved partition.
However, as we all know, Disk Management cannot help you to resize the system reserved partition. If you need to extend the system reserved partition, you can use the professional partition manager MiniTool Partition Wizard to do so.
MiniTool Partition Wizard is a professional partition manager for Windows users. It can help you better manage disks and partitions such as Copy System Disk, Migrate OS to SSD/HDD, Recover Data, and so on.
To extend system reserved partition, here is the guide:
Note: To ensure that your computer can boot successfully and avoid damage to the system or data loss after resizing the system reserved partition, it is highly recommended to use the Mini Tool Partition Wizard Bootable Edition.
MiniTool Partition Wizard DemoClick to Download100%Clean & Safe
Step 1: Click on the download button above and run MiniTool Partition Wizard to get its interface.
Step 2: Click on the Bootable Media icon and connect the USB drive to your computer to create a bootable drive.
Note: MiniTool Bootable Media Builder will format the USB flash drive when building the MiniTool Boot Flash Drive. So, make sure the USB flash drive doesn’t contain any important files.
Step 3: Connect the bootable media to your computer and boot from it.
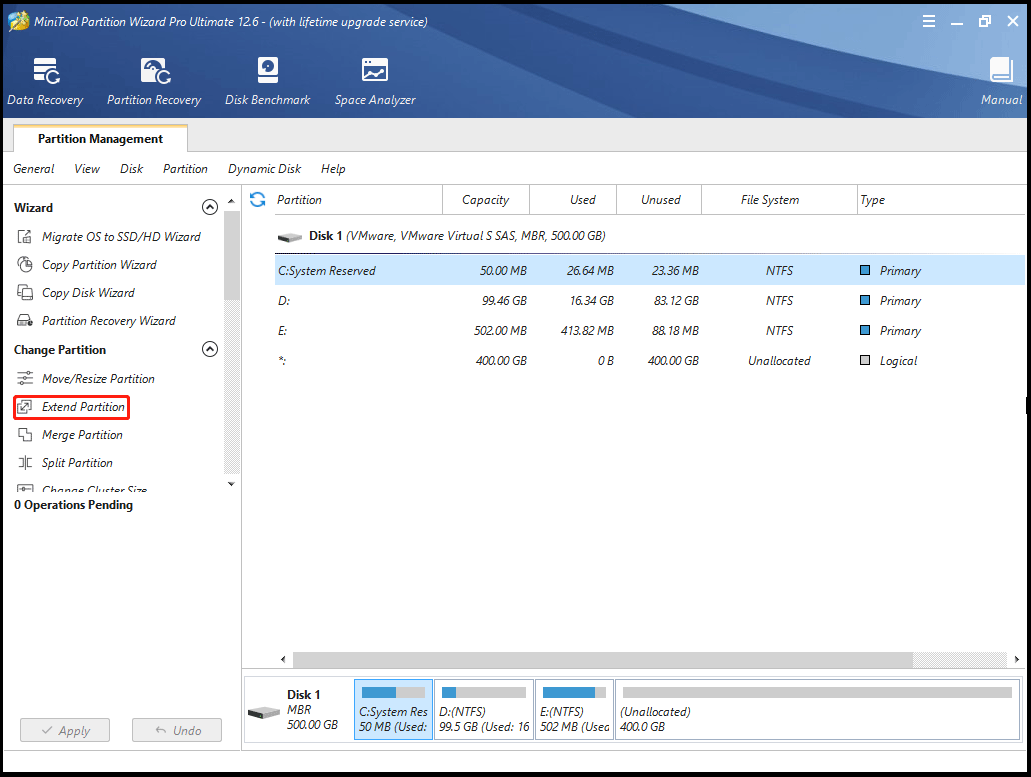
Step 4: Select the system drive and click on Extend Partition on the left operation panel.
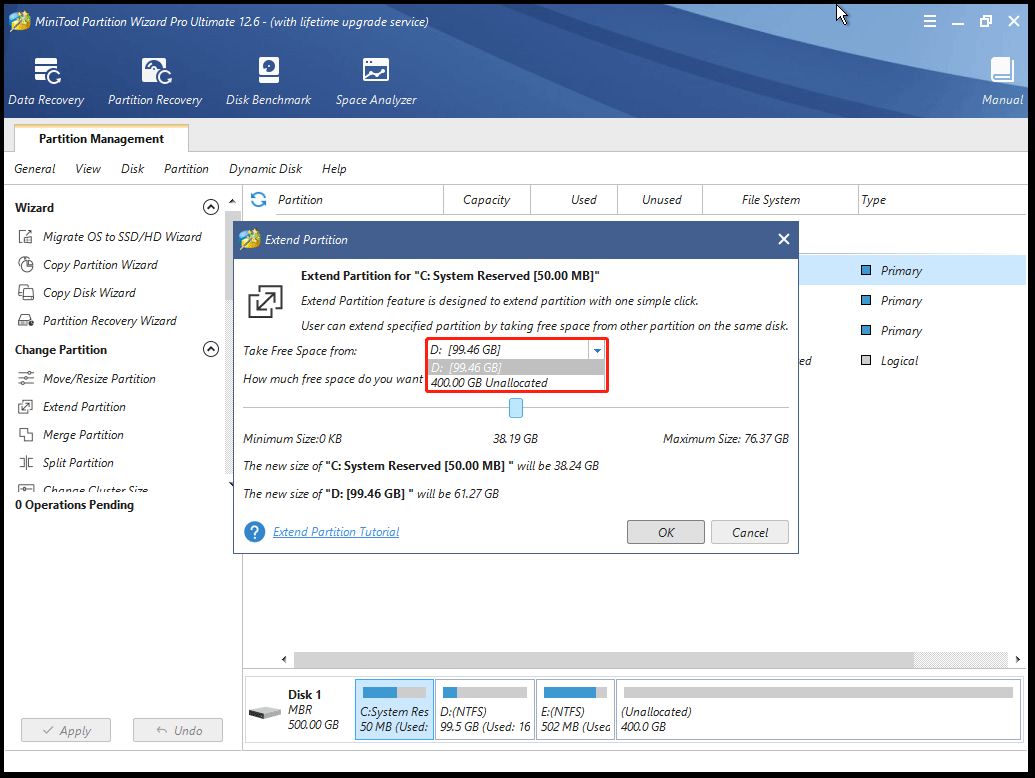
Step 5: In the drop-down menu, select where to take free space. Then drag the light blue block to decide how much free space you want to take. Finally, click on the OK button.
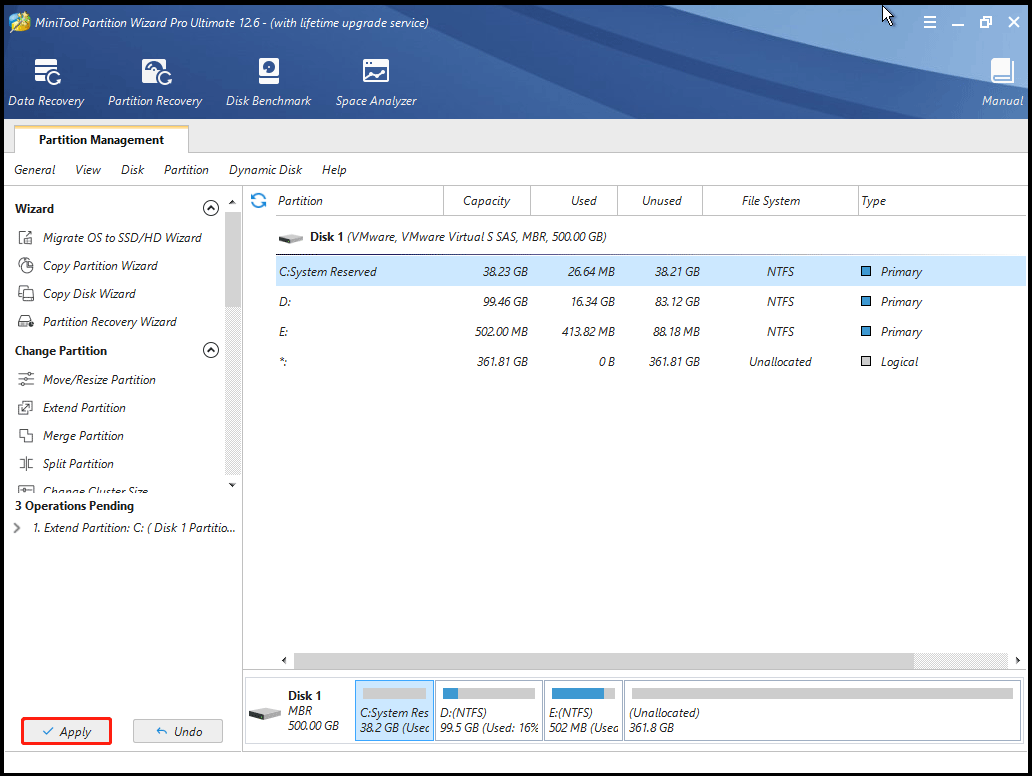
Step 6: Click on the Apply button to execute the operation.
Solution 7: Restart Windows Update Services
To fix Windows updates error code 0x80190001, you can restart Windows update services.
Step 1: Open Command Prompt as administrator.
Step 2: Enter the following commands in sequence, pressing Enter after each command:
- net stop wuauserv
- net stop cryptSvc
- net stop bits
- net stop msiserver
Step 3: When the services have been disabled, type the following commands and press Enter after each one to rename the SoftwareDistribution:
- ren C:WindowsSoftwareDistribution SoftwareDistribution.old
- ren C:WindowsSystem32catroot2 Catroot2.old
Step 4: Type the following commands to restart BITS, Cryptographic, MSI Installer, and Windows update services:
- net start wuauserv
- net start cryptSvc
- net start bits
- net start msiserver
Step 5: Restart your computer and try updating Windows to see if the 0x80190001 error is fixed.
Solution 8: Run a Clean Boot
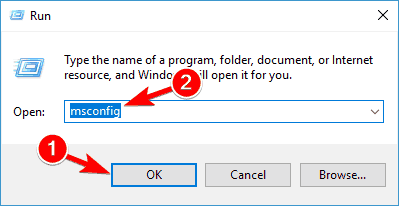
Step 1: Press the Win + R key to open the Run dialog. Then type msconfig in the box and press Enter.
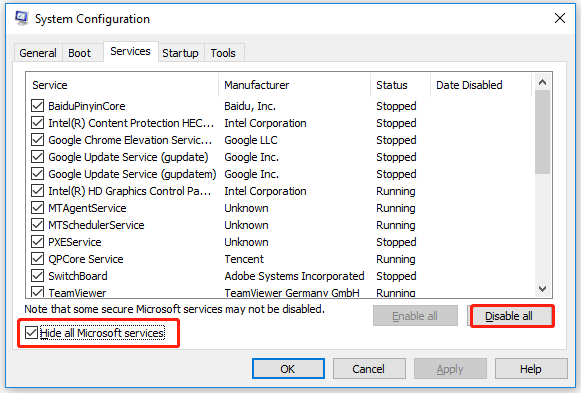
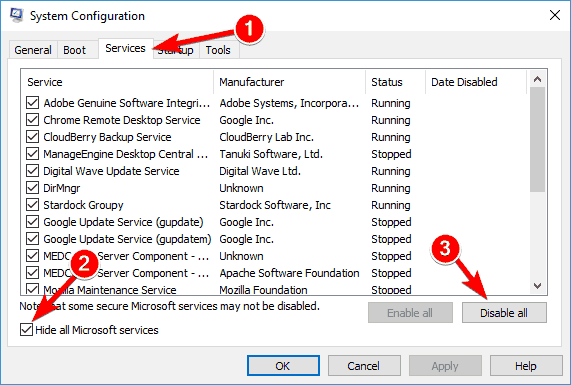
Step 2: Switch to the Services tab, and check the Hide all Microsoft services box. Then click on the Disable all button.
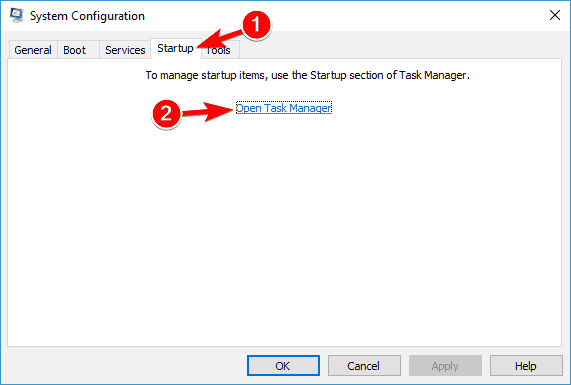
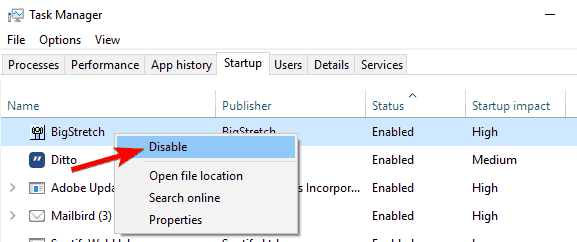
Step 3: Switch to the Startup tab and click on Open Task Manager.
Step 4: Click the startup program that may interfere with Windows 10 update and click on Disable. Then repeat this step to disable all suspected programs.
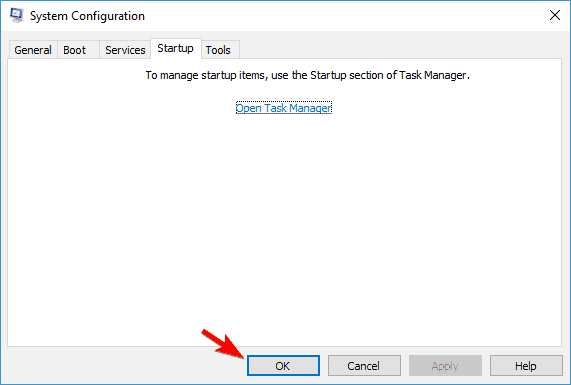
Step 5: Close Task Manager and click on the OK button in System Configuration.
After that, restart your computer to check if the Windows updates error code 0x80190001 exists.
You can also use the Media Creation Tool to install Windows 10 updates. Here are the detailed steps:
Step 1: Navigate to Windows 10 download page and download the Media Creation Tool.
Tip: For Windows 11, you can download the Media Creation Tool.
Step 2: Run the Media Creation Tool as administrator and click on Accept on the first screen.
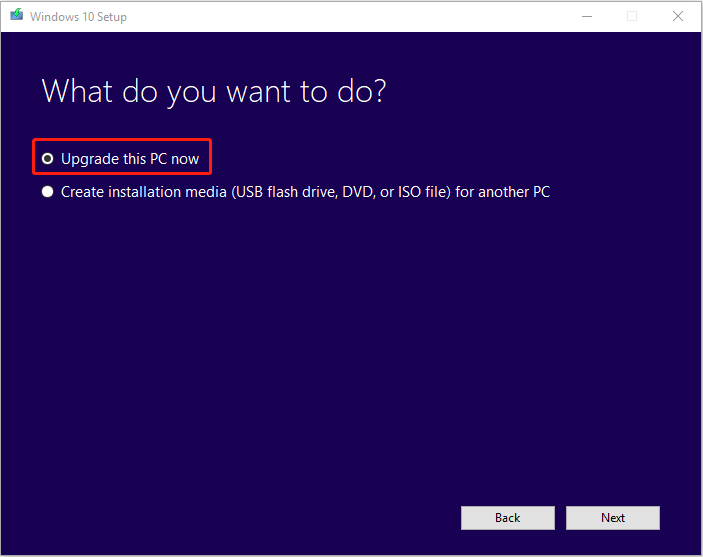
Step 3: On the What do you want to do page, select the Update this PC now option. Then click on Next.
Step 4: Wait till Windows downloads all the necessary files and follow the on-screen instructions to finish the operation.
Step 5: Restart your PC once finished.
I am looking for solutions to solve the Windows update error 0x80190001. This article provides full solutions and successfully helps me out.Click to Tweet
Bottom Line
To sum up, this article has introduced the cause of the error 0x80190001 and how to solve the Windows update problem with several solutions. If you have the same problems, try these methods.
Or, if you have any better solution to the error 0x80190001, you can share it in the following comment zone.
If you need any help while using MiniTool Partition Wizard, you are welcome to send us an email at [email protected].
При установке обновления компонента в Windows 10, если вы получите код ошибки 0x80190001, это означает, что есть некоторые проблемы с установочными файлами. Либо они повреждены, либо некоторые файлы не загружаются. Это может быть проблема с драйвером. Сообщение об ошибке, связанное с этим сообщением, сообщает либо Что-то пошло не так или возникла непредвиденная ошибка при попытке загрузить файлы, необходимые для обновления, В этом руководстве мы расскажем, как вы можете исправить код ошибки 0x80190001.

Исправить код ошибки 0x80190001
Прежде чем начать, убедитесь, что ваше интернет-соединение работает. Если необходимо, запустите Network Troubleshooters.
1] Очистка временных и нежелательных файлов
Windows 10 поставляется с функцией Storage Sense, которая может автоматически очищать все временные файлы с вашего компьютера, или вы можете сделать это вручную.
Когда вы запустите его вручную, он сканирует хранилище и предложит список файлов, которые вы можете удалить. Однако обязательно проверяйте папки, такие как загрузка, где вы продолжаете загружать файлы. Это позволит вам не удалять важные файлы.
2] Удаление файлов из папки распространения программного обеспечения
Следуйте этой процедуре, чтобы очистить содержимое папки SoftwareDistribution. После этого попробуйте снова установить обновление.
3] Запустите средство устранения неполадок Windows Update
Запустите этот встроенный инструмент устранения неполадок Windows Update, чтобы устранить наиболее распространенные проблемы с обновлением в Windows 10. Он очистит временные файлы, связанные с обновлением Windows Update, очистит содержимое папки распространения программного обеспечения, восстановит и обновит компоненты Центра обновления Windows, проверьте состояние связанных с Windows Update Услуги, проверка ожидающих обновлений и многое другое.
4] Отключить антивирус во время установки
Этот код ошибки был отмечен как часто вызываемый внешними инструментами. Возможно, что ваши файлы просто прекрасны, и причиной этого является Антивирус. Вы можете отключить программное обеспечение Антивируса и Безопасность всякий раз, когда обновление не будет плавным. Вы можете отключить такое программное обеспечение или полностью удалить их, пока не исправите проблемы с обновлением.
5] Использовать инструмент создания носителя или ISO
Если это не поможет, мы рекомендуем вам использовать средство создания носителя или Windows 10 ISO для установки обновления функции.
Всего наилучшего!
Похожие сообщения:
- Ошибка установки, обновления или обновления Windows 10
- Временные файлы Windows — все, что вы хотите знать
- Быстрое обновление до последнего обновления Windows 10 с помощью средства создания носителя
- Лучшие бесплатные загрузки программного обеспечения для Windows 10/8/7
- Как ИТ-администраторы могут устранить ошибки обновления Windows 10
Рекомендуемые:
Исправить ошибку 0x80200056 во время обновления или обновления Windows 10

Это окончательное исправление поможет вам разрешить Windows Upgrade или Update error 0x80200056 в Windows 10. Все, что вам нужно — это перезагрузка или в случае повреждения папки обновления, запустите эти инструменты, чтобы исправить эту проблему.
Исправить код ошибки обновления Windows 10 0x80d02002

Если возникли проблемы с установкой Feature или Windows Update с кодом ошибки 0x80d02002, то это рабочее решение поможет вам исправить эту проблему точно.
Исправить ошибку 0x80072ee7 во время обновления или обновления Windows 10

Если вы получили что-то пошло не так, не удалось загрузить Windows 10, проверьте настройки сети и попробуйте еще раз, код ошибки 0x80072ee7, см. Это.
Исправить код ошибки x80070005 во время активации Office

Если вы получите Извините, что-то пошло не так, и мы не можем сделать это за вас прямо сейчас. Повторите попытку позже (0x80070005), см. Этот пост.
Исправить код ошибки 0x80070017 во время установки, обновления, восстановления системы

Если вы получаете код ошибки 0x80070017 во время установки Windows, обновления или восстановления системы, это обычно происходит из-за отсутствия или повреждения системных файлов. Вот работающие исправления!
One of the most frustrating things when you’re trying to use your computer, is encountering an error code. The 0x80190001 error code can occur for various reasons, and it can be extremely frustrating to figure out what is causing it.
In this article, we’ll take a look at what the 0x80190001 error code means and some of the potential causes for it.
What Does Error Code 0x80190001 Mean?
The 0x80190001 error code typically indicates a problem with your computer’s registry. The registry is a database that stores all of the settings and options for your computer, and your computer needs to be able to run smoothly.
However, the registry can become corrupt or damaged over time, leading to errors like the 0x80190001. Many different things can cause the registry to become corrupt or damaged, including outdated or missing drivers, malware infections, and even simple things like power surges.
So if you face this issue with your PC, you may need to read this article and follow the methods below to fix the 0x80190001 error in PCs.
Method 1: Clean Up Temporary and Junk Files
Your computer is constantly creating temporary files as you use it. These files are supposed to be deleted when you’re done with them, but sometimes they get left behind. Over time, these junk files can take up a lot of space on your hard drive and slow down your computer.
They can also cause problems with your software, leading to errors like 0x80190001.
The good news is that cleaning up these junk files is easy. You can do it manually or use a software program like CCleaner or any other software you may like to install and use for PC cleaning. But I prefer you to use Windows by default temporary and junk files cleaning method.
Follow these steps and clean up temporary and junk files from your PC in seconds.
- Open the Setting by pressing Windows+I and then click on the System.
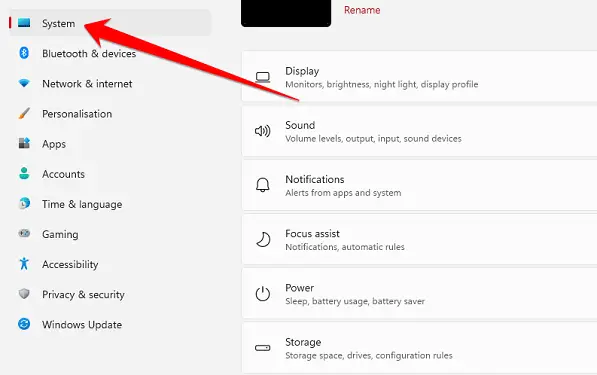
- Now click on the Storage option from the System options list.
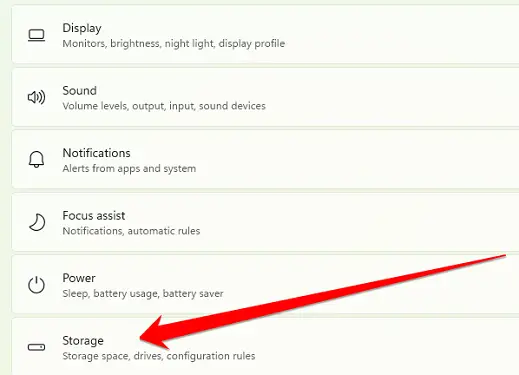
- Here under Local Disk, you will find some more options from which you will have the option to delete junk and downloaded files from your computer system. But from here, you have to click on Temporary files.
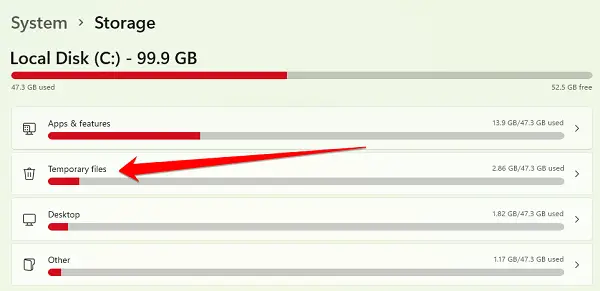
- Clicking on the Temporary files option will bring up more options, but you must click the “Remove Files” option.
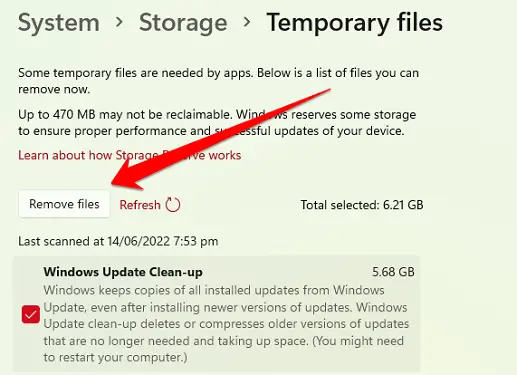
This process will take you a few minutes to remove your PC’s Temporary Files from the system to improve your system performance and also help to fix such errors.
Method 2: Run the Update Troubleshooter
The 0x80190001 error is a common Windows Update error. It usually pops up when there’s a problem with your internet connection or your computer’s security settings are preventing Windows Update from running correctly.
To fix the 0x80190001 error, you can run the Update Troubleshooter. This is a built-in Windows tool that can help fix a variety of update-related issues.
- To run the Update Troubleshooter, go to settings by pressing the Windows+I key.
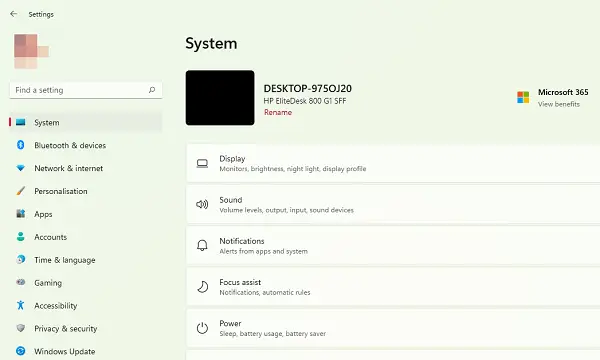
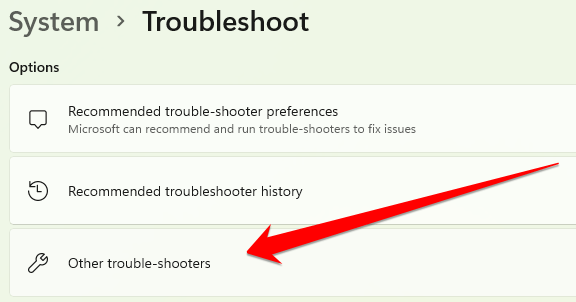
- In the list of options in the System section, you have to click on the “Troubleshoot” option.
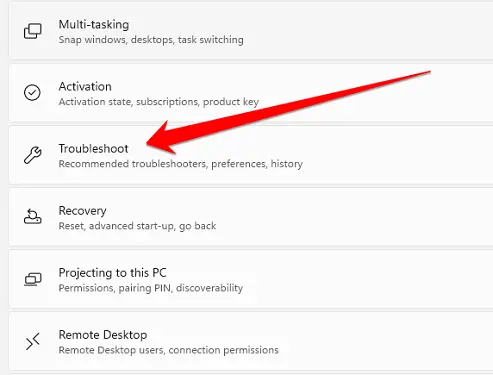
- After entering the Troubleshoot section, you have to click on the “Other Troubleshooters” option.
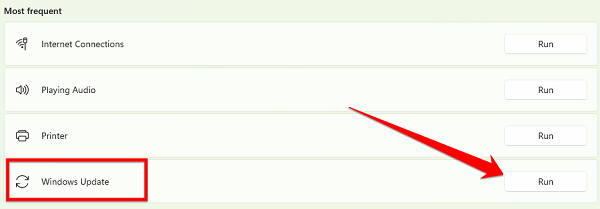
- In the Other Troubleshooters portion, you will find the Windows Update option. You have to click on the “Run” option in front of this option. This method will check your system and help you fix the error of 0x80190001.
Method 3: Repair Your System Files
One of the most common errors that Windows users may encounter is the 0x80190001 error. This can occur for several reasons, but most often, it is due to system files that have become corrupted. Fortunately, there are a few things you can do to try and fix this error.
The first thing you can try is running a system file checker tool. This will scan your system for corrupt or damaged files and attempt to repair them. So follow the steps given below and fix this issue in a few minutes.
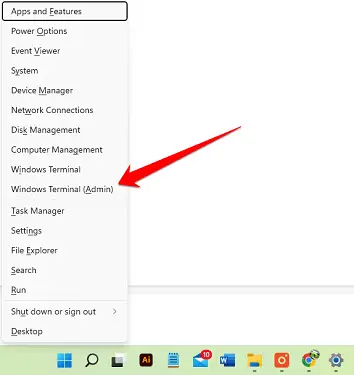
- Press the Windows+X button together from the keyboard to open the System Options menu from the taskbar. And then click on the Windows Terminal option.
- Now simply type the following command in the Windows terminal.
sfc /scannow- Be aware that the SFC scan may take a while, depending on which kind of scan you’re having, so do not try doing anything else during that time and do not operate other applications that may interfere.
If the SFC scan is finished, ensure the issue remains. If the issue still exists, or if you cannot complete the SFC scan, you should consider performing the DISM scan instead.
Method 4: Check the Date and Time Settings
If all of the above methods do not fix this issue, then you need to follow this method. If you’re seeing the 0x80190001 error code on your Windows PCs repeatedly, it could be due to an incorrect date or time setting on your PC.
This is a relatively easy problem to fix, but it’s important to follow the steps below carefully to ensure that your computer’s date and time are set correctly.
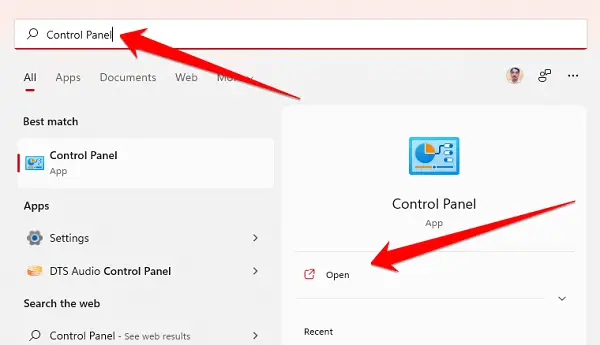
- First, open the Control Panel on your computer. You can do this by clicking on the Start menu and then typing “Control Panel” into the search bar.
- Once the Control Panel window opens, click the “Date and Time” option.
Next, check to ensure the date and time are set correctly on your computer. If not, adjust them by clicking on the “Change date & time” option. So that they are correct, click the “OK” button.
Finally, restart your computer for the changes to take effect. Once your computer restarts, try again opening the file or program that was giving you the 0x80190001 error code.
Method 5: Disable Windows Security During Setup
If you disable Windows antivirus during setup, you can fix 0x80190001. One of users’ most common error codes when installing Windows is 0x80190001.
Several factors can cause this error, but one of the most common is a conflict between your antivirus software and the Windows installer. To resolve this issue, you’ll need to disable your antivirus software before beginning the installation process. Here’s how:
- First, click on the “Show hidden icon” option from the taskbar.
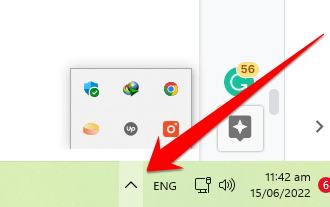
- When the hidden icon show, then you may need to click on Windows antivirus.
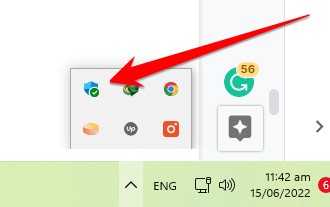
- After opening the antivirus, click the “Virus & Threat Protection” option.
- You will now see a list of additional options, from which you have to click on the Manage settings option in the “Virus & threat protection settings” section.
- After going to the Antivirus Management Settings, you will be presented with some options which will be enabled. You have to disable all these options for a while.
Finally, after disabling all these options, update your system, and after updating, you have to restart your computer once. After reopening, check your computer to see if this error has been fixed.
Frequently Asked Questions
What is Error 0x80190001?
The error 0x80190001 is a common error that can occur when trying to update Windows. There are a few different reasons this error might occur, but the most likely cause is a corrupt file in the Windows Updates component.
This component is responsible for downloading and installing updates for Windows, so if it is corrupted, it can prevent updates from being installed correctly. In some cases, you might be able to fix the problem by simply deleting the corrupt file and allowing Windows to download a new copy.
However, if the problem persists, you will need to use the Windows Update troubleshooter to fix it. This tool can automatically identify and fix problems with the Windows Update component.
What Causes The 0x80190001 Error?
The 0x80190001 error is a common Windows error that can be caused by a variety of issues. Sometimes this error is caused by a corrupt or damaged file or hardware problems. In any case, the 0x80190001 error can be a frustrating issue to deal with.
One of the most common causes of the 0x80190001 error is a corrupt or damaged system file. When this happens, Windows cannot load the file correctly and will generate the 0x80190001 error.
To fix this issue, you will need to replace the damaged file with a working copy. Another common cause of this error is outdated or incompatible drivers. Drivers are small pieces of software that help Windows communicate with your hardware.
If these drivers are outdated or incompatible with your version of Windows, it can cause the 0x80190001 error.
You can use Device Manager or visit your manufacturer’s website to update your drivers.
Finally, hardware issues can also cause the 0x80190001 error. If your computer’s RAM is faulty or your hard drive fails, it can prevent Windows from loading properly and cause the 0x80190001 error. If you suspect your hardware is to blame, you can run a diagnostic tool to check for errors.
Is it Safe to Clean Up Junk Files?
As anyone who has ever used a computer knows, junk files are a fact of life. Over time, every system accumulates a certain amount of temporary files, error logs, and other detritus. These files usually serve no purpose and can safely be deleted.
However, there are a few exceptions to this rule. First, it’s important to make sure that you know what a junk file is before you start deleting things. Many operating systems include files automatically created for temporary storage or crash recovery.
If these files are deleted, it can cause problems. Additionally, some applications create their own temporary files; generally, it’s best to leave these alone unless you’re sure the application doesn’t need them anymore.
Finally, it’s always a good idea to create a backup before you start deleting anything, just in case. With these caveats in mind, cleaning up junk files on your computer is generally safe. Doing so can reclaim valuable disk space and help keep your system running smoothly.
How Do I Run the Windows Update Troubleshooter From the Command Line?
The Windows Update troubleshooter helps fix problems with Windows Update. You can run the troubleshooter from the command line.
To do this, open a Command Prompt as administrator. Then, type the following commands:
DISM.exe /Online /Cleanup-image /Restorehealth
sfc /scannow
Dism.exe /online /enable-feature /featurename:NetFramework3.5
Type each command and press Enter. The first two commands will take some time to run. After the DISM and SFC commands finish, you can run the Windows Update troubleshooter from the Command-Line.
What Does the SFC Command Do?
SFC, or the System File Checker, is a Windows utility that allows users to scan and restore corrupted system files. The utility scans all of the protected system files on your computer and compares them to the original files stored in the %windir%\System32 folder.
If any files are found to be missing or corrupt, SFC will replace them with the correct version from the %windir%\System32 folder. SFC can be run from the Command Prompt or PowerShell.
The SFC command is a vital tool for keeping your Windows installation healthy. Whenever you install an update or hotfix, it’s a good idea to run SFC to ensure that all your system files are up-to-date and free of corruption. You can also use SFC to scan for and fix problems with your registry.
Type the following command at the Command Prompt or PowerShell and press Enter.
sfc /scannowThe scan may take a few minutes to complete, but ensuring that your system is running smoothly is worth it.
Final Thoughts
I hope this article helped explain how to fix the 0x80190001 error and help you fix this issue by following methods. If you followed our instructions and solved this issue, then I ask that you share this article with your friends on social media.
Thanks for reading!
Your antivirus software might be interfering with the PC update
by Madalina Dinita
Madalina has been a Windows fan ever since she got her hands on her first Windows XP computer. She is interested in all things technology, especially emerging technologies… read more
Updated on
- Error code 0x80190001 is one of the most common Windows update failures from older Windows OS to the latest.
- The error can prevent you from downloading new updates, leading to compatibility and security issues.
- One of the quick ways to fix the issue is to disable your antivirus software when updating your PC.

XINSTALL BY CLICKING THE DOWNLOAD FILE
To fix Windows PC system issues, you will need a dedicated tool
SPONSORED
Fortect is a tool that does not simply clean up your PC, but has a repository with several millions of Windows System files stored in their initial version. When your PC encounters a problem, Fortect will fix it for you, by replacing bad files with fresh versions. To fix your current PC issue, here are the steps you need to take:
- Download Fortect and install it on your PC.
- Start the tool’s scanning process to look for corrupt files that are the source of your problem
- Right-click on Start Repair so the tool could start the fixing algorythm
- Fortect has been downloaded by 0 readers this month, rated 4.4 on TrustPilot
Installing the latest updates on your Windows computer may take longer than expected.
That happens because various technical issues and errors can either block or limit the update process. Regarding update errors, we have provided fixes for notable ones like Windows 10 update error 0x8007042B.
Now, it is another notorious one in error 0x80190001 that is hindering Windows users from updating their PCs. Here’s how one user describes it:
Upgrading to windows 10 from windows 7 pro. Repeatedly getting error code 0x80190001 after waiting a long time for the download. There is also a message to check network settings.
Troubleshooter couldn’t find any problems so I removed myself from the home group. Made no difference.
This error affects every version of Windows. For example, many users have reported that error 0x80190001 blocks the Creators Update install.
Error 0x80190001 can prevent you from downloading new updates, leading to compatibility and security issues. This guide will show you to fix the error with ease.
How do I fix the error code 0x80190001?
- How do I fix the error code 0x80190001?
- 1. Run the Update Troubleshooter
- 2. Repair your system files
- 3. Disable your Internet connection
- 4. Check your antivirus
- 5. Disconnect all peripherals
- 6. Download and install the update manually
- 7. Make sure your date and time are correct
- 8. Perform a Clean boot
- 9. Perform an in-place upgrade
- How can I fix error code 0x80190001 on Windows 11?
- Why does the Windows Update error 0x80190001 appear?
- How do I do a factory reset with Windows 10?
1. Run the Update Troubleshooter
- Press the Windows key + I to open the Settings app.
- Now go to the Update & Security section.

- Select Troubleshoot from the menu on the left.
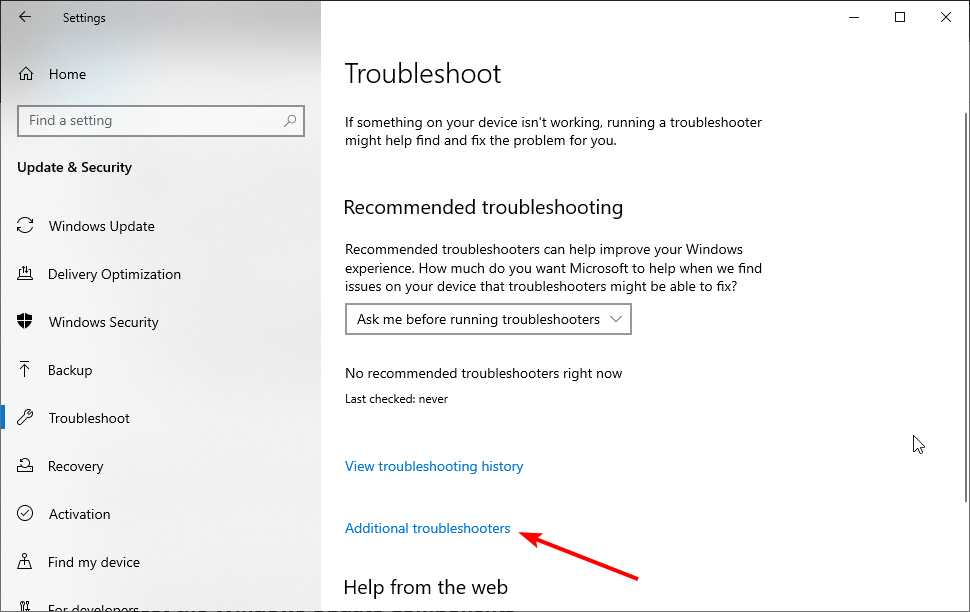
- Choose the Additional troubleshooters option.
- Now, select Windows Update.

- Finally, click the Run the troubleshooter button.
- Follow the instructions on the screen to complete the process.
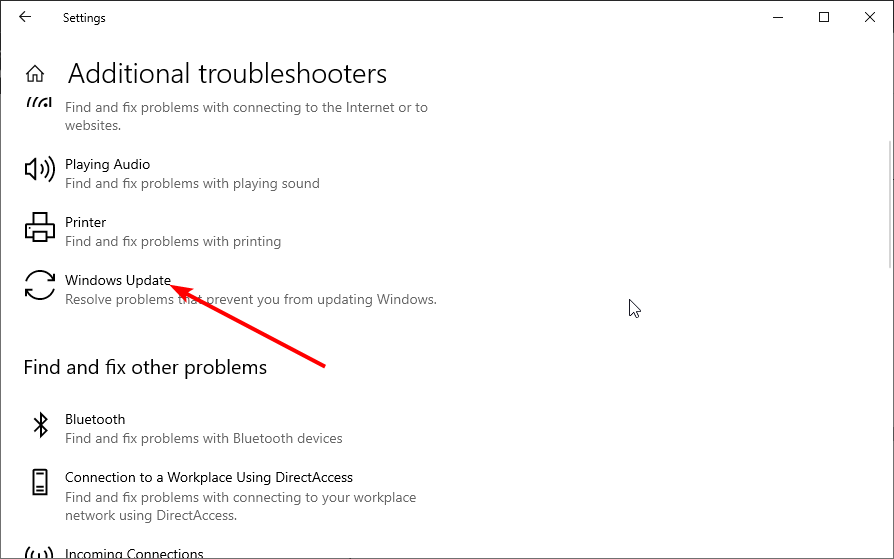
The Windows Update troubleshooter is one of the built-in tools to fix update errors like 0x80190001. Once the troubleshooter is finished, try to update Windows again and check if the problem is still there.
2. Repair your system files
- Press Windows key + X and choose Command Prompt (Admin) or Powershell (Admin).

- When Command Prompt starts, run the sfc /scannow command.

- SFC scan will now start. Remember that an SFC scan can take up to 10-15 minutes, so don’t interfere with it, and don’t run any other applications in the background.
Another cause for error 0x80190001 can be file corruption, and if your system files are damaged, you need to repair them using an SFC scan.
Once the SFC scan is finished, check if the problem is still there. If the issue persists or you could not run or complete the SFC scan, you need to use the DISM scan instead.
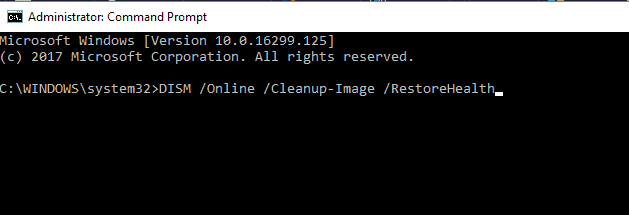
To do that, start Command Prompt as administrator and run the command below: DISM /Online /Cleanup-Image /RestoreHealth
This should fix the damaged files and solve any issue with the SFC scan
However, instead of going through the stress of repairing files manually, we recommend using a third-party repair application, Fortect.
If your system files are faulty or missing, the software can replace them, restore your registry, and even do a comprehensive hardware analysis of your Windows PC.
It repairs and reverses damage on your Windows OS by replacing damaged and removed files with new Windows files and components from the constantly updated online database.

Fortect
It enhances performance, prevents PC freezes and system crashes, plus fixes Windows update errors.
3. Disable your Internet connection
According to users, you might be able to fix error 0x80190001 simply by disabling your Internet connection. Make sure that your update is downloaded and installed.
During the installation process, disable your Internet connection. After doing that, follow the instructions on the screen to complete the installation. Of course, this isn’t the best solution, but few users claim it works, so you might want to try it out.
4. Check your antivirus
The problem might be your antivirus software if you can’t update Windows due to error 0x80190001.
Although antivirus tools offer protection, they can often interfere with your system and cause various errors.
To fix this problem, many users suggest temporarily disabling some features or your antivirus. However, if removing the antivirus solves the issue, you should consider switching to a different antivirus solution.
There are many error-free antivirus options like the ESET NOD32 on the market. This software is your best bet to prevent future issues and keep your system running smoothly, as it is an antivirus with low CPU usage.
5. Disconnect all peripherals
If you have problems with error 0x80190001, the issue might be your USB devices. Sometimes USB devices can interfere with your system, leading to similar problems.
However, you might be able to fix the problem simply by disconnecting all USB devices before trying to install the update.
Disconnect all USB devices except for your mouse and keyboard. Once everything is disconnected, try to install the update again.
This isn’t the most efficient solution, but several users reported it works, so feel free to try it.
6. Download and install the update manually
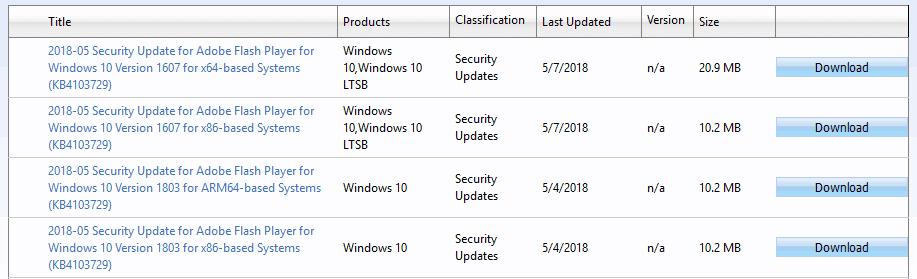
- Find the KB number of the problematic update. You can do that from the Windows Update section or the Update History website.
- Once you get the KB number, go to Microsoft’s Update Catalog website and enter the KB number.
- A list of results will appear. Download the update that matches your system architecture and install it.

Several users reported successfully circumventing error 0x80190001 simply by manually downloading the update. However, we must mention that this isn’t a permanent solution, and the issue might reappear when you try to update your system.
7. Make sure your date and time are correct
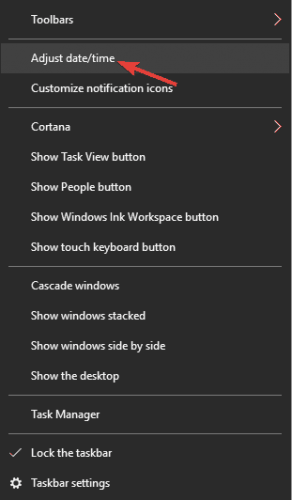
- Right-click the clock in the bottom right corner and select Adjust the date/time.

- Toggle switch for the Set time automatically option backward to disable it.
- Wait for a few moments and then turn it back on again.


A couple of users reported that error 0x80190001 occurred due to incorrect date and time on their PC. Adjusting your time and date should fix the issue in this case.
After following the steps above, the date and time will be readjusted and synchronized. You can also click the Change button and manually adjust the date and time if you want.
- Fix Windows 10/11 error 0x800F0955 to proceed with updates
- Fix: Error code 0x0 during Windows 10 upgrade
- What to do if Windows 10/11 update deletes all your files
- FIX: Windows Installer Service could not be accessed
8. Perform a Clean boot
- Press Windows key + R, enter msconfig, and click OK.

- Click the Services tab.
- Check the box for Hide all Microsoft services.
- Now, click the Disable all button.

- Go to the Startup tab and click Open Task Manager.
- Right-click on each application there and choose Disable from the menu.

- Go back to the System Configuration window and click Apply, followed by OK, to save the changes.
This issue can sometimes occur due to third-party applications and services. However, you can fix that by performing a Clean boot. Then, make sure you restart your PC and check if the issue is resolved.
9. Perform an in-place upgrade
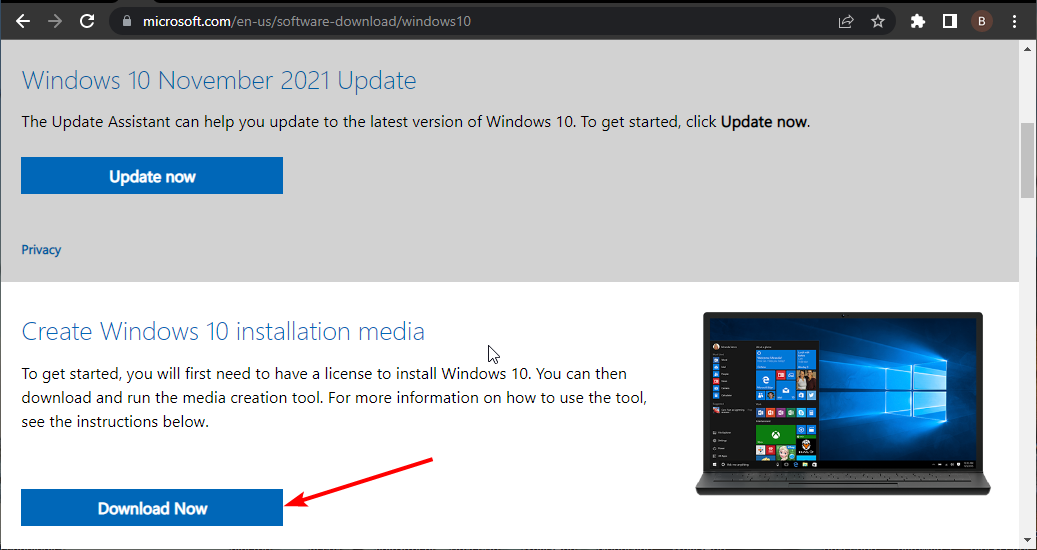
- Go to Microsoft’s Windows 10 upgrade website.
- Click the Download Now button under the Create Windows 10 Installation Media option.

- Now, click the downloaded tool and Accept the license terms.
- Then, select Upgrade this PC now and click Next.
- Check the Keep personal files and apps option to keep your apps, files, and settings.
- Click Install to launch the upgrade process.
According to users, sometimes you can fix this problem simply by performing an in-place upgrade. However, performing an in-place upgrade will force Windows 10 to update to the latest version.
Once the setup is finished, you’ll have the latest version of Windows installed, and the problem will be resolved.
How can I fix error code 0x80190001 on Windows 11?
The main reason you are experiencing the update error 0x90190001 on Windows 11 is interference from your antivirus. You can solve this by disabling your antivirus or obliterating it.
Another known cause of the issue is incorrect time and date. We have shown how to change this earlier in this guide. Finally, you can use our other solutions to fix this error, as the causes are similar on all Windows PC.
- Adding layers in Windows 11’s Paint greatly increases RAM usage
- How to copy texts from images with Snipping Tool’s Text Action
- The Windows 11’s weather widget now offers a detailed weather forecast
Why does the Windows Update error 0x80190001 appear?
As mentioned earlier, there are various versions of this error, each with varying causes. Below are some of the popular ones:
- Windows 10 upgrade failed – If your Windows 10 upgrade fails due to this error code, try some of our solutions and check if that solves the problem.
- 0x80190001 Creators Update, Windows 10 – Many users reported this error while trying to install Creators Update. Bear in mind that this issue can affect any Windows 10 update, but in most cases, you can solve this problem by disabling your antivirus.
How do I do a factory reset with Windows 10?
- Press the Windows key + I to open the Settings app.
- Choose the Update & Security option.
- Click Recovery in the left pane.
- Click the Get Started button under the Reset this PC option.
- Choose to keep your files or wipe everything and click the Next button.
- Now, follow the simple onscreen instructions to complete the process.
If you encounter this issue, the standard solutions listed above will assist you in resolving the Windows 10 update error code 0x80190001.
You should also verify the product key to determine if it is a valid version because this problem might occur even if you use a copy of Windows.
If you are facing other issues like the Windows 10 update error 0x800f0900, check our easy guide to fix it quickly.
Feel free to let us know in the comments below if any of our fixes helped you solve the issue.
![]()