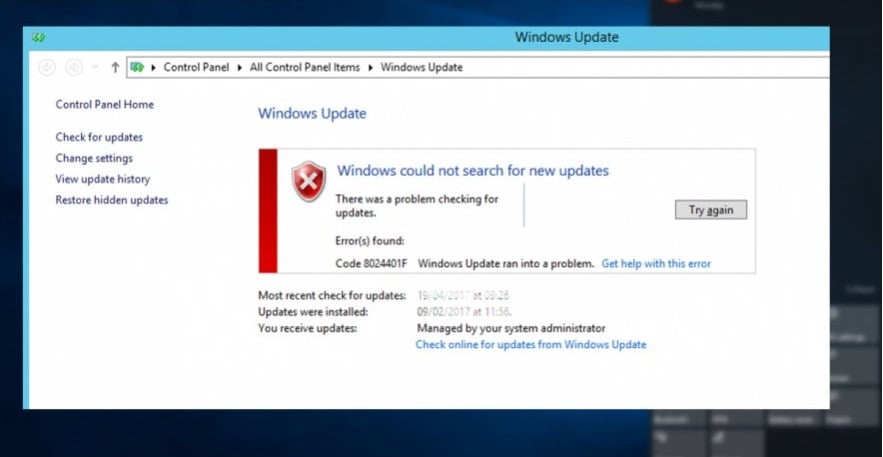
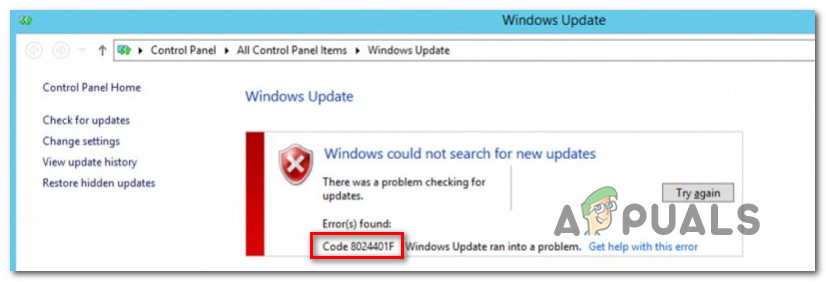
Пользователи Windows сталкиваются с ошибкой 0x8024001F во время установки отложенного ранее обновления для системы. Некоторые утверждают, что подобная ошибка возникает лишь с определенными обновлениями, другие — со всеми отложенными апдейтами.
К сожалению, ошибка 0x8024001F способна появляться на всех современных версиях ОС Windows, начиная от уже старенькой «семерки» и заканчивая самыми последними сборками Windows 10. В сегодняшней статье мы посмотрим, как избавиться от этой ошибки.
Причины ошибки 0x8024001F
- Самый обычный баг в работе Центра обновления Windows.
- Повреждение системных файлов Windows.
- Вмешательство стороннего антивируса в процесс обновления.
Как исправить ошибку 0x8024001F?
Метод №1 Используем встроенное средство устранения неполадок
В Windows можно найти системное средство устранения неполадок. К сожалению, подобное средство от Майкрософт не часто выполняет возложенную на него задачу, тем не менее временами оно все же может помочь разрешить возникшую проблему.
Для запуска средства устранения неполадок вам понадобится сделать следующее (пример для Windows 10):
- нажмите Windows+I на клавиатуре для открытия Параметров системы;
- далее откройте раздел «Обновление и безопасность»;
- перейдите в подраздел «Устранение неполадок» в левой части окна;
- кликните на пункт «Центр обновления Windows» и нажмите на кнопку «Запустить средство устранения неполадок»;
- подождите, пока средство просканирует вашу систему, а затем следуйте инструкциям на экране.
Применив предложенное решение, проверьте, получится ли у вас обновить Windows и появится ли ошибка 0x8024001F.
Метод №2 Запускаем в работу SFC и DISM
Возможно, вы не можете нормально обновить Windows по причине повреждения системных файлов. Тут вам на выручку идут System File Checker и DISM. Эти средства несколько отличаются по своему функционалу, но, проще говоря, они помогут вам вернуть прежнюю работоспособность системы.
Чтобы использоваться SFC и DISM, вам необходимо придерживаться следующих шагов:
- кликните на панель задач правой кнопкой мыши и выберите пункт «Командная строка (администратор)»;
- выполните следующие две команды:
- Dism.exe /online /cleanup-image /scanhealth
- Dism.exe /online /cleanup-image /restorehealth
- перезагрузите свой компьютер;
- снова откройте Командную строку;
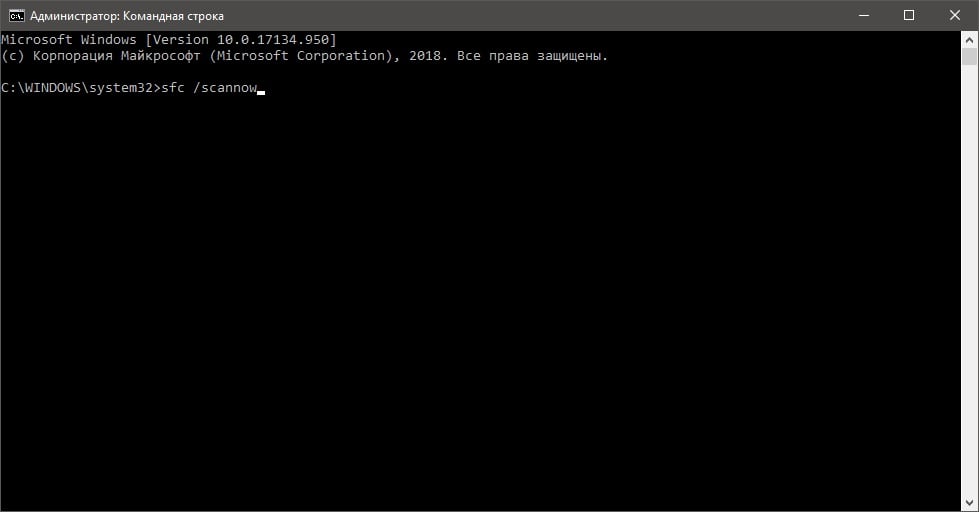
- пропишите команду «sfc /scannow» и нажмите Ввод;
- еще раз перезагрузите компьютер по окончанию работы средства.
Воспользовавшись услугами SFC и DISM, попробуйте обновить свою Windows. На этот раз ошибки 0x8024001F может и не быть.
Метод №3 Удаляем сторонний антивирус (если применимо)
А вы знали, что некоторые антивирусные программы могут препятствовать различным операциям в Windows? Например, сторонние антивирусы могут запросто блокировать процесс загрузки и установки обновлений для системы. К подобным антивирусам можно причислить McAfee, AVAST, Sophos и другие. Мы рекомендуем вам отключить или же и вовсе удалить свой антивирус, а затем посмотреть, изменится ли ситуация с ошибкой.
Метод №4 Восстановление системы (для Windows 10)
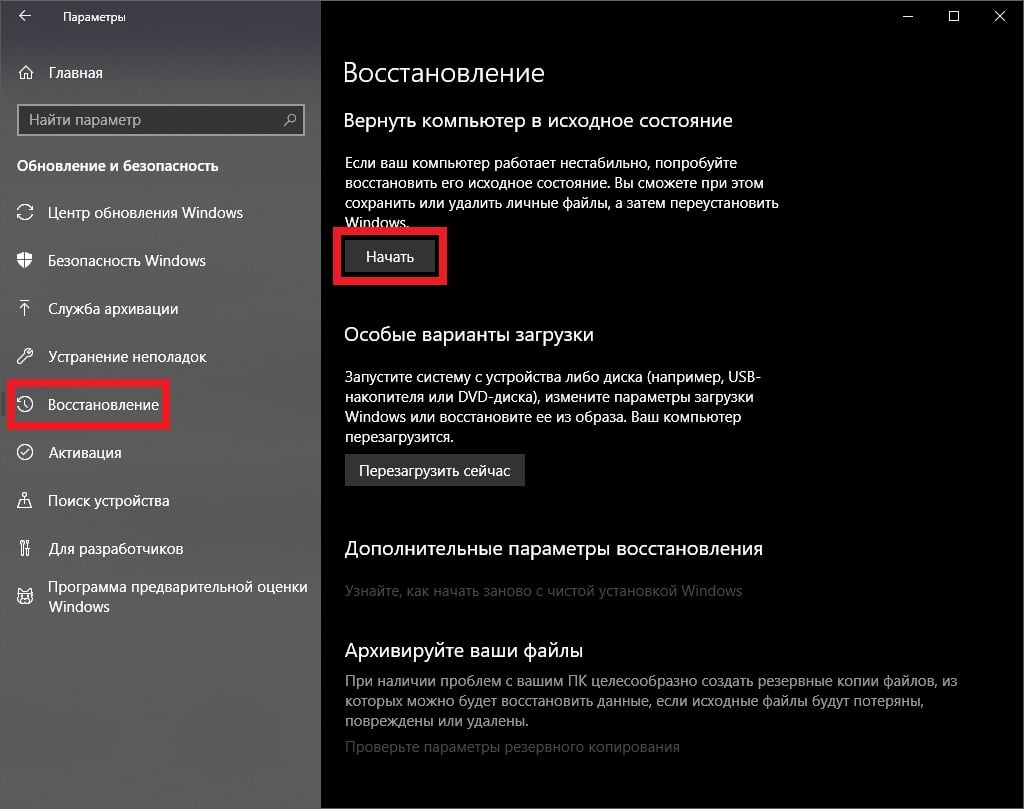
Если вам так и не удалось избавиться от ошибки при обновлении системы, то мы рекомендуем воспользоваться возвратом компьютера в исходное состояние. Проще говоря, вы можете переустановить свою ОС Windows 10, не удаляя при этом своих личных данных. Выполняется эта операция следующим образом:
- нажмите Windows+I;
- откройте раздел «Обновление и безопасность»;
- перейдите в раздел «Восстановление»;
- кликните на кнопку «Начать» в разделе «Вернуть компьютер в исходное состояние»;
- далее выберите опцию «Сохранить мои файлы»;
- и наконец-то, нажмите на кнопку «Сброс».
Подождите возвращения вашего ПК в исходное состояние. Войдя в Windows, проверьте, была ли устранена ошибка 0x8024001F.
by Madalina Dinita
Madalina has been a Windows fan ever since she got her hands on her first Windows XP computer. She is interested in all things technology, especially emerging technologies… read more
Updated on
- The 0x8024001F error message is mainly noticed when you try to install a pending Windows update.
- The most effective solution to repairing this error is to use the Windows Update troubleshooter. The Windows repair tool may also help you to automatically scan and repair your OS.
- Unfortunately, Windows Update came with an abundance of errors. But let the fixing job to us because we have a Windows Update Errors section for that.
- For any other Windows errors, a good start would be to consult our Windows 10 Errors Hub.

XINSTALL BY CLICKING THE DOWNLOAD FILE
Get rid of malfunctioning drivers on your PC
SPONSORED
Drivers can often become corrupt as they can interfere with malfunctioning system files, thus arriving to be installed but not running correctly. To keep your drivers running smoothly, your Windows OS must run even smoother. Get it in perfect shape by following the steps below:
- Download Fortect and install it on your PC.
- Start the tool’s scanning process to look for corrupt files that are the source of your problem
- Right-click on Start Repair so the tool can start the fixing algorithm
- Fortect has been downloaded by 0 readers this month, rated 4.4 on TrustPilot
Worried about the Windows update error 0x8024001F message? This annoying error is mainly noticed when trying to install a pending Windows update.
The issue may often escalate as many users describe the error code as recurring with every Windows updatethat they wish to install.
Moreover, the computer might fall into a reboot loop and continuously restart from Windows sign-in screen to the computer’s boot screen.
This can eventually restrict or limit user access to Windows before the machine restarts.
If you want to learn about the solutions to fix the Windows update error 0x8024001F, keep on reading the lines below.
They will show you some feasible methods precisely for this job.
To avoid conflicts, we suggest performing the actions in exactly the same order as they are presented.
How can I fix Windows update error 0x8024001F?
1. Run the Windows update troubleshooter

- Open Control Panel and click Troubleshooting.
- In the Windows Update troubleshooter, click Advanced.
- Then, click Run as administrator and then Next.
- Wait patiently until the initial scan is finished.
- If a viable fix is identified, you’ll see a new window that will prompt you to Apply this fix if a recommended strategy is identified.
- Let the process finish and restart your computer.
First, the most effective solution to repairing this error involves the usage of the Windows Update troubleshooter.
Windows Update provides the mechanism to download and install quality updates, but it isn’t flawless.
The Windows repair tool may step in to automatically scan and repair the integrity of your operating system when running into issues such as the Windows update error 0x8024001F.
You can find step-by-step instructions detailed above.
Outdated drivers are the main reason for errors & system issues. If some of your drivers are missing or needs updating, an automated tool like OutByte Driver Updater can solve these problems in just a couple of clicks. Plus, it’s also lightweight on your system!
If the Troubleshooter stops before completing the process, fix it with the help of this complete guide.
2. Disable/Uninstall 3rd party antivirus or firewall

- Firstly, press the Windows logo key + R keyboard hotkey to open up a Run dialog box.
- Type appwiz.cpl into the Run dialog and press Enter.
- You may also open the Control Panel and go to Programs and Features.
- You will be presented with a list of all the programs installed on your computer. Select the program you want to uninstall, then right-click on it and click on Uninstall.
- Follow the on-screen steps to uninstall the program.
- You may need to restart your computer for the changes to take effect.
Second, there are times when third-party security programs interfere with other elements on your computer and create problems.
3. Check your computer for driver updates

Have you considered outdated hardware and drivers as the core of this Windows update error 0x8024001F?
Check your computer for driver updates and update all out-of-date drivers or visit your computer manufacturer’s website.
While there, you need to locate your model number and find all the drivers for your computer. If this rather sounds too much for you, then try out an updating tool instead.
Looking for the best driver updating software? Here are our top picks.
4. Launch the System File Checker

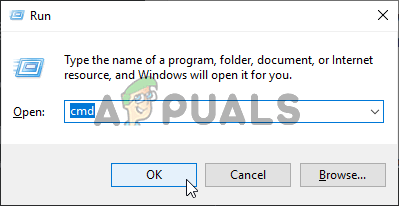
- To do this, open up a Run dialog box by pressing Windows key + R.
- You may now type cmd inside the text box and press Ctrl + Shift + Enter to open up a Command Prompt with admin access.
- When prompted, click Yes to run with elevated privileges.
- First, run the DISM tool before launching System File Checker.
- Type the following commands, then press Enter:
Dism.exe /online /cleanup-image /scanhealth
Dism.exe /online /cleanup-image /restorehealth - Once the DISM scan is finalized, restart your computer.
- Then, it’s time to type the next command and press Enter to initiate the SFC scan:
sfc /scannow - It may take several minutes for the command operation to end. When it does, restart your computer once again and see if the Windows update error 0x8024001F is still present in the next system startup.
SFC, which stands for System File Checker, is known as a useful built-in administrative tool ready to verify the integrity of operating system files and to repair corrupt, damaged, or changed files.
All you need to do is to apply the above steps in the given order.
- Fix potential Windows Update database error detected
- Windows 11 23H2: Top Features, coming September 26
- Adding layers in Windows 11’s Paint greatly increases RAM usage
- How to copy texts from images with Snipping Tool’s Text Action
- The Windows 11’s weather widget now offers a detailed weather forecast
5. Reset Windows Update Service

- Start the procedure by booting into your computer with full administrative rights.
- Up next, press Windows key + R, type Services.msc and click on OK.
- Once Services loads up, right-click on Windows Update.
- Finally, it’s best practice to restart your computer.
One of the many reasons for this error is that the Windows Update service may have crashed.
Thus, a restart is required for it to work again. You may do so without restarting the entire operating system.
Errors like 0x8024001F are sometimes hard to fix. Hopefully, you found help through this guide.
If you have any other ideas or suggestions you want to share, feel free to leave a comment.
- How can I fix Windows update error 0x8024001F?
- How do I fix Windows Update corruption?
Still experiencing troubles? Fix them with this tool:
SPONSORED
Some driver-related issues can be solved faster by using a tailored driver solution. If you’re still having problems with your drivers, simply install OutByte Driver Updater and get it up and running immediately. Thus, let it update all drivers and fix other PC issues in no time!
![]()
Содержание
- Что вызывает код ошибки 0x8024001f в Windows?
Несколько пользователей Windows обращались к нам с вопросами после просмотра 8024001f код ошибки при попытке установить ожидающее обновление Windows. Хотя некоторые пользователи сообщают, что эта проблема возникает только с обновлением или около того, другие затронутые пользователи говорят, что этот код ошибки повторяется с каждым обновлением WIndows, которое они пытаются установить. Оказывается, проблема не только в Windows 10, так как она также встречается в Windows 10, Windows 8.1 и Windows 7.

Мы исследовали эту конкретную проблему, просмотрев различные пользовательские отчеты и стратегии восстановления, которые обычно используются другими затронутыми пользователями для решения этой проблемы. Как оказалось, этот код ошибки может возникнуть в нескольких разных сценариях. Вот краткий список виновников, которые могут вызвать эту ошибку:
- Обычный глюк WU — В большинстве случаев этот конкретный код ошибки возникает из-за сбоя, о котором инженеры MS уже знают. Для таких общих ситуаций, как эта, вы сможете решить проблему, просто запустив средство устранения неполадок Центра обновления Windows и применив рекомендованное исправление.
- Повреждение системного файла — Также возможно, что вы столкнулись с этой проблемой, потому что компонент WU или какая-либо зависимость повреждены. Если этот сценарий применим, вы сможете решить проблему, запустив серию утилит, способных устранить повреждение системных файлов (DISM и SFC).
- Вмешательство стороннего AV — Если вы используете стороннюю антивирусную программу для защиты своего компьютера, возможно, вы выбрали чрезмерно защитный пакет, который блокирует соединение между вашим компонентом WU и серверами Microsoft. В этом случае вы можете решить проблему, отключив защиту в реальном времени во время установки обновления или полностью удалив сторонний пакет.
- Основная проблема коррупции — В более серьезных случаях вы можете столкнуться с более серьезной проблемой коррупции, которую нельзя устранить обычным способом. В такой ситуации единственное жизнеспособное решение — сбросить все компоненты ОС. Вы можете сделать это, выполнив ремонтную установку (ремонт на месте) или чистую установку.
Если вы в настоящее время пытаетесь устранить это сообщение об ошибке, эта статья предоставит вам несколько шагов по устранению неполадок, которые в конечном итоге должны решить проблему. Ниже вы найдете набор потенциальных исправлений, которые другие пользователи, которых затронула проблема, успешно использовали для решения проблемы. Работоспособность каждого из представленных ниже методов подтверждена как минимум одним затронутым пользователем.
Для достижения наилучших результатов мы советуем вам следовать приведенным ниже методам в том же порядке, в котором мы их разместили. В конце концов, вы должны наткнуться на исправление, которое решит проблему независимо от виновника, вызвавшего проблему.
Давай начнем!
Метод 1. Запустите средство устранения неполадок Центра обновления Windows.
Прежде чем мы перейдем к более сложным стратегиям, вам следует начать с проверки того, не способна ли ваша установка Windows решить проблему автоматически. Если проблема, с которой вы сталкиваетесь, является обычной, скорее всего, вы сможете решить ее, просто запустив средство устранения неполадок Центра обновления Windows.
Эта встроенная утилита содержит набор стратегий восстановления, которые будут автоматически применяться, если сканирование обнаружит ситуацию, которая уже покрыта включенным исправлением.
Несколько пользователей Windows, которые также столкнулись с этой проблемой, сообщили, что им удалось решить проблему на неопределенный срок после запуска средства устранения неполадок Центра обновления Windows. Вот краткое руководство по запуску средства устранения неполадок Центра обновления Windows для устранения 8024001f Код ошибки Центра обновления Windows:
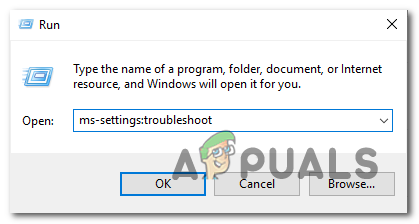
- Откройте Бегать диалоговое окно, нажав Клавиша Windows + R. После этого введите «ms-settings-Troubleshoot » и нажмите Войти открыть Исправление проблем вкладка Настройки приложение.

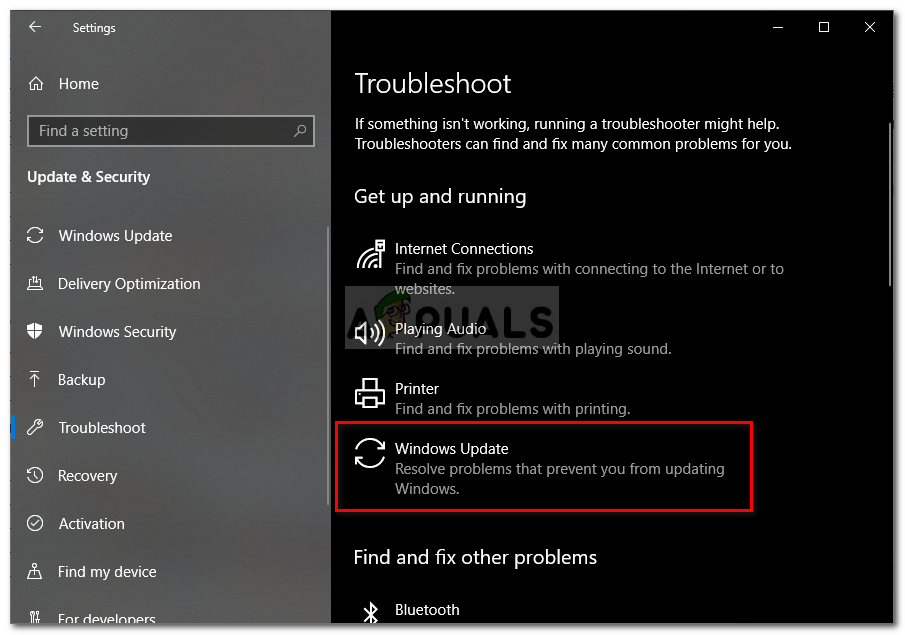
- Как только вы окажетесь внутри Исправление проблем перейдите на правую панель экрана настроек, затем перейдите к окну Getup.Вставай и работай раздел. Добравшись до места, нажмите Центр обновления Windows, затем щелкните Запустите средство устранения неполадок из появившегося контекстного меню.
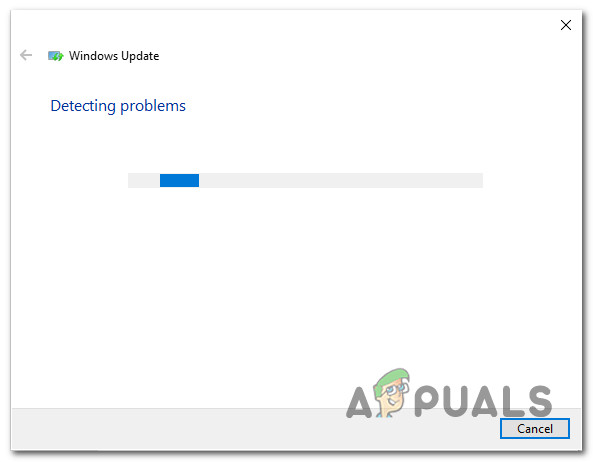
- После того, как вам удастся запустить утилиту, терпеливо дождитесь завершения первоначального сканирования. Это определит, применима ли какая-либо из стратегий ремонта к вашей текущей ситуации.
- Если найдено жизнеспособное исправление, вы увидите новое окно, в котором вам будет предложено Применить это исправление если рекомендованная стратегия определена. Если вы видите «Применить это исправление‘, Нажмите на нее и следуйте инструкциям на экране, чтобы применить исправление, если потребуются другие шаги.
- После успешного применения рекомендованного исправления перезагрузите компьютер и посмотрите, 8024001f Ошибка Центра обновления Windows устраняется при следующем запуске системы.


Если вы по-прежнему сталкиваетесь с той же проблемой, перейдите к следующему способу ниже.
Метод 2: запустить сканирование DISM и SFC
Согласно различным отчетам пользователей, эта конкретная проблема также может возникать из-за некоторой степени повреждения системного файла. Имейте в виду, что Центр обновления Windows (WU) полагается на множество зависимостей, поэтому существует множество системных файлов, которые могут вызвать такое поведение, если определенные системные папки испорчены из-за повреждения.
Как оказалось, в подобных ситуациях вы сможете решить проблему, запустив пару утилит, способных исправить логические ошибки и повреждение системы. DISM (Обслуживание образов развертывания и управление ими) и SFC (проверка системных файлов).
Оба инструмента способны устранять ошибки такого рода, но делают это по-разному — DISM полагается на WU для загрузки исправных копий файлов, которые необходимо заменить, в то время как SFC использует локально кэшированную копию для извлечения необходимых файлов.
Имейте в виду, что хотя DISM — более новая утилита, SFC лучше исправляет логические ошибки, поэтому официальная рекомендация — запустить оба сканирования. Вот краткое руководство по запуску сканирований SFC и DISM из окна CMD с повышенными правами, чтобы решить 8024001f Ошибка Центра обновления Windows:
- Откройте Бегать диалоговое окно, нажав Клавиша Windows + R. Оказавшись внутри только что открытого окна, введите «Cmd» внутри текстового поля и нажмите Ctrl + Shift + Enter , чтобы открыть командную строку с правами администратора.
Примечание: Если вы видите UAC (Контроль учетных записей пользователей) подсказка, нажмите да для предоставления административного доступа.
- Внутри окна CMD с повышенными правами выполните следующую команду и нажмите Войти чтобы запустить сканирование DISM:
Dism.exe / онлайн / cleanup-image / scanhealth Dism.exe / онлайн / cleanup-image / restorehealth
Примечание: Помните, что DISM требуется надежное подключение к Интернету для загрузки исправных копий для замены поврежденных файлов, вызывающих проблемы. Первая команда (сканирование здоровья) запустит сканирование для поиска несоответствий в системе, а вторая команда (восстановить здоровье) заменит несоответствия, обнаруженные при первом сканировании.
- После завершения сканирования DISM перезагрузите компьютер и продолжайте выполнять следующие действия.
Примечание: Даже если ошибки не были исправлены, вы должны продолжить сканирование SFC. - В следующей последовательности запуска выполните первый шаг еще раз, чтобы открыть другую командную строку с повышенными привилегиями. Затем введите следующую команду и нажмите Войти для запуска сканирования SFC:
sfc / scannow
Примечание: Не прерывайте процесс SFC после запуска начального сканирования. Это может привести к появлению в вашей системе других логических ошибок, которые могут вызвать другие подобные проблемы в будущем.
- После завершения сканирования SFC перезагрузите компьютер еще раз и посмотрите, будет ли проблема решена при следующем запуске системы.

Если вы все еще сталкиваетесь с 8024001f Ошибка Центра обновления Windows при попытке установить обновление Windows, перейдите к следующему способу ниже.
Метод 3: отключение / удаление стороннего AV (если применимо)
Если вы используете сторонний антивирус или брандмауэр для защиты от заражения вредоносным ПО, скорее всего, вы столкнулись с 8024001f ошибка, потому что ваше решение безопасности чрезмерно защищает. Есть несколько сторонних пакетов (McAfee, AVAST, Sophos и некоторые другие), которые затронутые пользователи выделяют как вызывающие эту проблему.
Если этот сценарий применим к вашей текущей ситуации, вы можете решить проблему, отключив защиту в режиме реального времени или удалив чрезмерно защитный пакет безопасности и вернувшись к встроенной утилите (Windows Security, бывший Защитник Windows).
Если вы в настоящее время используете сторонний пакет, который, как вы подозреваете, может нести ответственность за появление 8024001f код ошибки, вам следует отключить защиту в реальном времени пакета безопасности и попытаться выполнить обновление еще раз.
Но имейте в виду, что шаги по отключению защиты AV в реальном времени будут разными в зависимости от того, какой пакет безопасности вы используете. Но в большинстве случаев у вас должна быть возможность отключить активную защиту прямо из меню панели задач.
После отключения защиты в реальном времени проверьте, решена ли проблема, еще раз попытавшись установить обновление, которое ранее не удавалось.
Если та же ошибка все еще возникает, и вы используете AV-клиент со встроенным брандмауэром, скорее всего, правила безопасности остались в силе даже после того, как вы отключили защиту в реальном времени. В этом случае вам нужно будет полностью удалить программу, чтобы убедиться, что она не вызывает прерывание работы WU.
Чтобы удалить активный сканер безопасности и убедиться, что вы не оставляете после себя каких-либо оставшихся файлов, которые могут вызывать такое же поведение, следуйте этой пошаговой статье (Вот).
После удаления стороннего AV перезагрузите компьютер и посмотрите, будет ли проблема решена при следующем запуске системы.
Если то же самое 8024001f код ошибки все еще возникает, перейдите к следующему способу ниже.
Способ 4. Выполните ремонтную установку
Если ни один из перечисленных ниже методов не позволил вам решить проблему, скорее всего, вы имеете дело с основной проблемой повреждения системы, которую нельзя решить традиционным способом. Если этот сценарий применим, единственное жизнеспособное решение — сбросить все компоненты вашей установки ОС Windows.
Несколько затронутых пользователей сообщили, что им удалось решить проблему на неопределенный срок, выполнив ремонтную установку или выполнив чистую установку.
Если вы ищете быстрый маршрут, вам следует выбрать чистая установка. Это очень простой метод обновления каждого компонента ОС, но его основным недостатком является то, что вы потеряете все личные файлы, включая приложения, игры, личные медиа и пользовательские настройки.
А ремонт установить (ремонт на месте) должен быть предпочтительным подходом, поскольку он позволит вам сохранить все ваши данные. Конечно, процедура немного более утомительна, но вы сможете сохранить большинство пользовательских настроек, личных медиа, приложений и игр.
Several Windows users have been reaching us with questions after seeing the 8024001f error code when trying to install a pending Windows Update. While some user reports that this issue only occurs with an update or so, other affected users are saying that this error code is recurring with every WIndows update that they try to install. As it turns out, the issue is not exclusive to Windows 10 as it’s also reported to occur on Windows 10, Windows 8.1 and Windows 7.
What’s causing the Error Code 0x8024001f on Windows?
We investigated this particular issue by looking at various user reports and at the repair strategies that are commonly being used by other affected users to fix this problem. As it turns out, several different scenarios might end up producing this error code. Here’s a shortlist of culprits that might spawn this error:
- Common WU glitch – In most cases, this particular error code will occur due to a glitch that is MS engineers are already aware of. For generic situations like this one, you should be able to resolve the issue simply by running the Windows Update Troubleshooter and applying the recommended fix.
- System File corruption – It’s also possible that you’re encountering this issue because a WU component or some dependency is affected by corruption. If this scenario is applicable, you should be able to resolve the issue by running a series of utilities capable of resolving system file corruption (DISM and SFC).
- Interfering 3rd party AV – If you’re using a 3rd party AV to secure your computer, you may have picked an overprotective suite that’s blocking the connection between your WU component and Microsoft’s servers. In this case, you can resolve the issue by disabling the real-time protection while the update is being installed or by uninstalling the 3rd party suite altogether.
- Underlying corruption issue – In more severe cases, you might be dealing with a more severe corruption issue that cannot be removed conventionally. In a situation like this, the only viable fix is to reset every OS component. You can do this either by performing a repair install (in-place repair) or a clean install.
If you’re currently struggling to resolve this error message, this article will provide you with several troubleshooting steps that should end up resolving the issue. Down below, you’ll find a collection of potential fixes that other affected users have successfully used to get the issue resolved. Each of the methods featured below is confirmed to work by at least one affected user.
For the best results, we advise you to follow the methods below in the same order that we arranged them in. Eventually, you should stumble upon a fix that will resolve the issue regardless of the culprit that’s causing the problem.
Let’s begin!
Method 1: Run the Windows update troubleshooter
Before we advance to more complicated strategies, you should start by testing is your Windows installation is not capable of resolving the issue automatically. If the issue you’re facing is common, chances are you will be able to resolve the issue simply by running the Windows Update troubleshooter.
This built-in utility contains a selection of repair strategies that will automatically be applied if the scan reveals a situation that is already covered by an included fix.
Several Windows users that were also encountering this issue have reported that they managed to resolve the issue indefinitely after running the Windows Update troubleshooter. Here’s a quick guide on running the Windows Update Troubleshooter to resolve the 8024001f Windows Update error code:
- Open up a Run dialog box by pressing Windows key + R. After you do this, type “ms-settings-troubleshoot” and press Enter to open up the Troubleshooting tab of the Settings app.

Opening the Troubleshooting tab of the Settings app via a Run box - Once you’re inside the Troubleshooting tab, move over to the right-hand pane of the Settings screen, then move down to the GetupGet up and running section. After you get there, click on Windows Update, then click Run the Troubleshooter from the newly appeared context menu.

Running Windows Update Troubleshooter - After you manage to start the utility, wait patiently until the initial scan is finished. This will determine whether any of the repair strategies apply to your current situation.

Detecting problem with Windows Update - If a viable fix is identified, you’ll see a new window which that will prompt you to Apply this fix if a recommended strategy is identified. If you see the ‘Apply this fix‘ button, click it and follow the on-screen instructions to enforce the fix if other steps are needed.

Apply this fix - Once the recommended fix is successfully applied, restart your computer and see if the 8024001f Windows Update error is resolved at the next system startup.

If you’re still encountering the same issue, move down to the next method below.
Method 2: Run DISM and SFC scans
According to various user reports, this particular problem can also occur due to some degree of System File corruption. Keep in mind that Windows Update (WU) relies on a lot of dependencies, so there are a lot of system files that might end up triggering this behavior if certain system folders are tainted by corruption.
As it turns out, in situations like this you should be able to resolve the issue by running a couple of utilities capable of fixing logical errors and system corruption DISM (Deployment Image Servicing and Management) and SFC (System File Checker).
Both tools are capable of resolving errors of this kind, but they go about it in different ways – DISM relies on WU to download healthy copies for the files that need to be replaced, while SFC uses a locally cached copy to fetch the required files.
Keep in mind that while DISM is a newer utility, SFC is better at fixing logical errors, so the official recommendation is to run both scans. Here’s a quick guide on running both SFC and DISM scans from an elevated CMD window to resolve the 8024001f Windows Update error:
- Open up a Run dialog box by pressing Windows key + R. Once you’re inside the newly opened window, type “cmd” inside the text box and press Ctrl + Shift + Enter to open up a Command Prompt with admin access.

Running Command Prompt Note: If you see the UAC (User Account Control) prompt, click Yes to grant administrative access.
- Inside the elevated CMD window, enforce the following command and press Enter to initiate a DISM scan:
Dism.exe /online /cleanup-image /scanhealth Dism.exe /online /cleanup-image /restorehealth
Note: Keep in mind that DISM needs a reliable internet connection to download healthy copies to replace corrupted files that are causing issues. The first command (scanhealth) will initiate a scan to look for system inconsistencies, while the second command (restorehealth) will replace inconsistencies found with the first scan.
- Once the DISM scan is complete, restart your computer and continue with the steps below.
Note: Even if no errors were fixed, you should continue with the SFC scan. - At the next startup sequence, follow the first step once again to open up another elevated command prompt. Next, type the following command and press Enter to initiate an SFC scan:
sfc /scannow
Note: Don’t interrupt the SFC process after you start the initial scan. Doing so might expose your system to other logical errors that might trigger other similar issues in the future.
- After the SFC scan is complete, restart your computer once again and see if the issue is resolved at the next system startup.
If you’re still encountering the 8024001f Windows Update error when you try to install a Windows update, move down to the next method below.
Method 3: Disabling / Uninstalling 3rd party AV (if applicable)
If you’re using a 3rd party AV or firewall to protect you for malware infections, chances are you’re encountering the 8024001f error because your security solution is overprotective. There are several 3rd party suites (McAfee, AVAST, Sophos and a few more) that are singled out by affected users for causing this problem.
If this scenario applies to your current situation, you can resolve the issue by either disabling the real-time protection or by uninstalling the overprotective security suite and reverting to the built-in utility (Windows Security, former Windows Defender).
In case you’re currently using a 3rd party suite that you suspect might be responsible for the apparition of the 8024001f error code, you should disable the real-time protection of the security suite and attempt to do the update again.
But keep in mind that the steps of disabling the real-time protection of the AV will be different depending on which security suite you’re using. But in most cases, you should be able to disable the active protection directly from the taskbar menu.

Once the real-time protection is disabled, see if the issue is resolved by trying to install the update that was previously failing once again.
If the same error is still occurring and you’re using an AV client with an included firewall, chances are the security rules have remained in place even after you disabled the real-time protection. In this case, you’ll need to uninstall the program altogether to confirm that it’s not causing the WU interruption.
To uninstall your active security scanner and ensure that you’re not leaving behind any leftover files that might still cause the same behavior, follow this step-by-step article (here).
Once the 3rd party AV is removed, restart your computer and see if the issue is resolved at the next system startup.
If the same 8024001f error code is still occurring, move down to the next method below.
Method 4: Perform a repair install
If none of the methods below have allowed you to resolve the issue, chances are you’re dealing with an underlying system corruption issue that cannot be resolved conventionally. If this scenario is applicable, the only viable fix is to reset every component of your Windows OS installation.
Several affected users have reported that they managed to resolve issue indefinitely either by performing a repair install or by doing a clean install.
If you’re looking for a quick route, you should go for a clean install. This is a super straightforward method of refreshing every OS component, but the major downside is that it will make you lose all personal files including apps, games, personal media, and user preferences.
A repair install (in-place repair) should be the preferred approach since it will allow you to keep all your data. Sure, the procedure is a little more tedious, but you’ll be allowed to keep most user preferences, personal media, applications, and games.