The Destiny 2 Beaver error might just be the scariest enemy in the game right now. It’s a universe filled with all sorts of terrifying aliens, horrific weapons, and intimidating raid bosses that want to crush you under their feet. Yet the most horrific of all these beasts is the seemingly ubiquitous bug, otherwise known as Error Code: Beaver. This glitch has plagued Destiny 2 for ages. It often appears at the worst times, too, such as during Trials of Osiris or when gathering bounties in the Tower. Given the frequency of Beaver errors, especially on PC, one has to wonder if there’s any way to minimize its appearance.
What is a Destiny 2 Beaver Error?
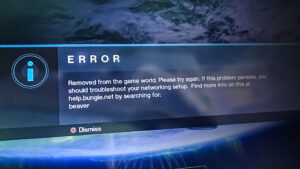
According to Bungie’s website, a Beaver error is “caused by a failure to connect your console to another player via the internet.” Bungie explains that it could be due to packet loss, specific Wi-Fi setups, ISP saturation, internet congestion, network or router configuration issues… The list goes on and isn’t terribly helpful. In the post, the dev explained that multiple consoles connecting to the internet through a single router is the most common issue. You can check your NAT type and router ports by going to Settings and then Gameplay. At the bottom, you will see the Network Data subheading, along with your connection information.
I can hear you furiously typing in the comments section about how your connection is fine. This doesn’t happen anywhere else! If you’ve checked your router, internet connection, and speed, then you’re right. The problem is most likely on Bungie’s end. Ever since the game moved to Steam, there have been a high number of reports about Beaver errors. The game’s Steam Discussion page is filled to burst with users discussing the frequency of this error code appearance.
One factor could be that Destiny uses a peer-to-peer connection, rather than dedicated servers like a lot of other big games. There’s also the sheer volume of cheaters using DDoS attacks during more competitive modes such as Trials of Osiris. Bungie acknowledges the rather high rate of Beaver codes popping up on PC. According to weekly updates, the team has been investigating it for months now. Though there haven’t been any significant changes. I recommend keeping an eye on Bungie Help to always see when the team is working on the game.
How to Avoid the Destiny 2 Beaver Error
Many players report getting the Beaver bug most frequently in the Tower. Anecdotally, we’ve gotten it there a lot, too. That’s not great since you need to hit the Tower frequently to gather bounties, complete quests, check your inbox, and more. It’s also not exclusive to that area. We’ve gotten the glitch in the Tangled Shore, jumping into Gambit, and more. There really doesn’t seem to be much rhyme or reason.
One tiny way to help useful is using an out-of-game application or the Destiny 2 app. We recommend Destiny Item Manager for… managing your Destiny items. That way you can reduce the amount of time you spend on the Tower, going through your inventory there. Not to mention external apps like this are a lot better than manually moving your gear around in Destiny 2 anyway.

Can I Fix the Beaver Error?
There are a few ways you can try and mitigate Beaver errors. Unfortunately, they’re not guaranteed to work. One method is enabling the UPnP settings on your router. This method requires you to log onto your router’s control panel and located the UPnP setting, which is typically under Firewall or LAN. Once you enable UPnP, disconnect and reconnect all your devices. It’s a hassle!
Given the sheer number of different router types, we won’t go into detail for each one. The steps for accessing the UPnP setting will most likely be slightly different for each router. Make sure to consult Bungie’s website on UPnP if you run into any issues trying to enable it. Keep in mind that you shouldn’t enable Port Forwarding and UPnP at the same time.
Speaking of Port Forwarding, this is the second method Bungie recommends. However, it’s a very lengthy process. Similar to UPnP, the process depends on your router. If you follow this method I strongly recommend visiting this link, which gives a more in-depth breakdown of this specific steps you need to take on any given box. Again, the steps may be slightly different depending on your router, so you’ll most likely need to do a little independent research if you run into issues.
Altogether this appears to be an issue with Destiny 2 and Steam itself. The Beaver error codes rarely appeared on Blizzard’s Battle.net system. I only recommend the above steps if they are extremely persistent, otherwise, you may need to wait until Bungie manages to fix any errors happening on their end.
Код ошибки Beaver в Destiny возникает, когда ваша сеть не работает оптимально для Destiny (например, настройки DNS вашего устройства). Более того, неправильная конфигурация маршрутизатора (например, защита от флуда или QoS) также может вызвать проблему.
Пользователь сталкивается с кодом ошибки Beaver в Destiny при запуске (или во время игры) игры Destiny.
Код ошибки Бобер в Destiny
Вы можете исправить код ошибки Beaver с помощью решений, описанных ниже, но перед этим проверьте, решает ли проблема перезапуск игры / программы запуска или устройства. Также убедитесь, что вы используете проводное подключение к устройству (Destiny «ненавидит» подключения к Wi-Fi). Кроме того, проверьте, установлен ли тип NAT в игре на открытие. Убедитесь, что в вашей системе применены все обновления Destiny. Кроме того, проверьте, решает ли проблему выход вашего маршрутизатора из режима моста.
Пользователи сообщают о временном обходном пути для решения проблемы, вы можете проверить, решит ли это проблему для вас:
- Выберите пункт назначения (например, башню) и при появлении проверьте, отображаются ли другие игроки (или NPC).
- Если нет, то подождите (не трогайте ни один из контроллеров), пока не отобразятся другие игроки, и, как только другие игроки отобразятся, проверьте, можете ли вы играть в Destiny без появления ошибки Beaver.
1. Обновите IP-адрес вашего устройства.
Вы можете столкнуться с кодом ошибки Beaver в Destiny, если IP-адрес вашего устройства помечен серверами Destiny как небезопасный. В этом случае обновление IP-адреса вашего устройства может решить проблему. Для разъяснения мы проведем вас через процесс сброса и изменения IP-адреса для устройства Windows.
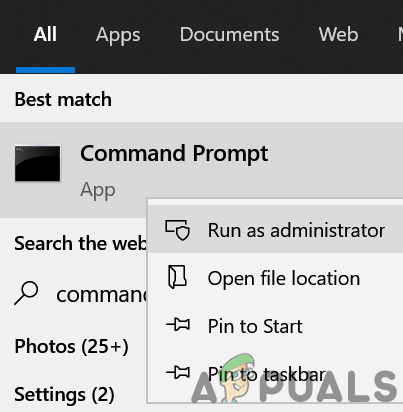
- Щелкните Windows, введите: Командная строка, щелкните правой кнопкой мыши Командную строку и выберите Запуск от имени администратора.
Откройте командную строку от имени администратора
- Теперь по очереди выполните следующие командлеты: ipconfig / release ipconfig / Renew.
Выпуск и обновление IP-адреса ПК с Windows 10
- После обновления IP-адреса убедитесь, что в Destiny отсутствует код ошибки Beaver.
Если нет, вы можете проверить, решает ли проблема Destiny перезагрузка устройства и сетевого оборудования. Если вы используете статический IP-адрес, вы можете обратиться к своему интернет-провайдеру, чтобы обновить свой IP-адрес.
2. Измените настройки DNS вашей системы.
Destiny может показать код ошибки Beaver, если настройки DNS вашей системы не оптимальны для Destiny. В этом контексте изменение настроек DNS вашей системы для использования другого DNS-сервера (например, Google DNS) может решить проблему. Но прежде чем продолжить, убедитесь, что для вашего устройства установлено значение MTU 1460. Для пояснения мы обсудим процесс редактирования настроек DNS для ПК с Windows.
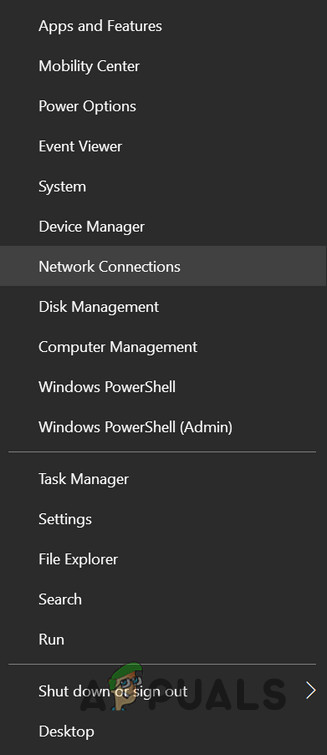
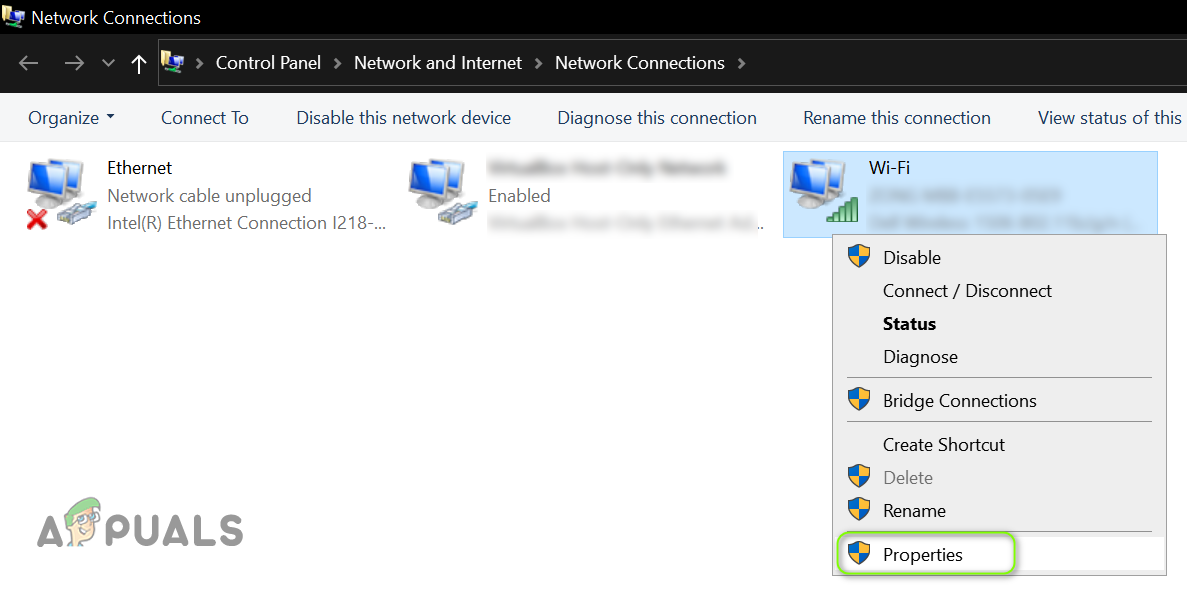
- Щелкните правой кнопкой мыши Windows и откройте «Сетевые подключения».
Открытые сетевые подключения
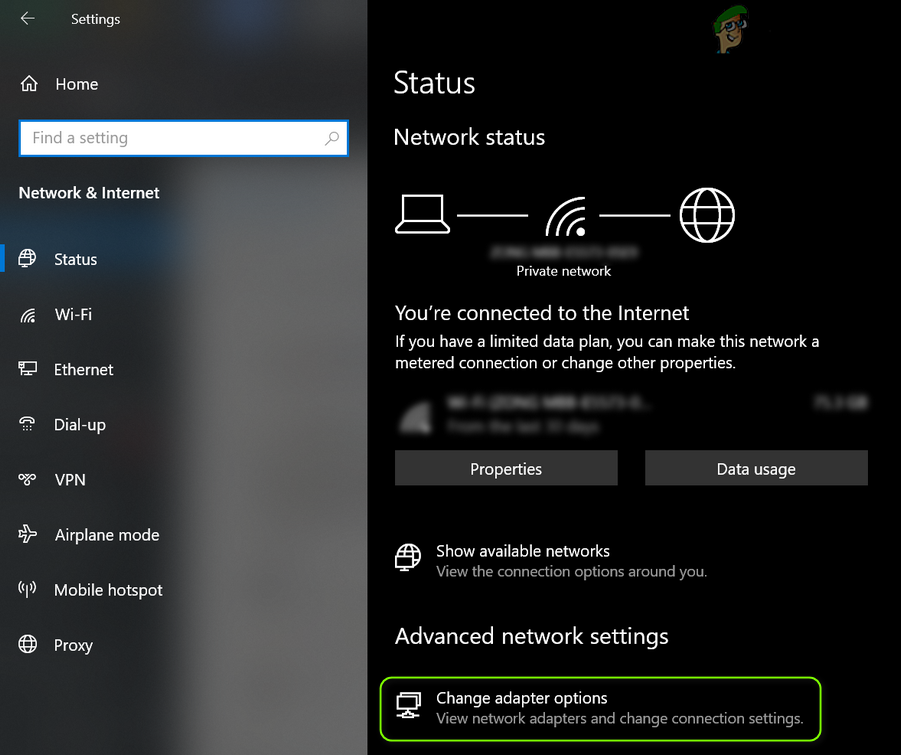
- Теперь откройте «Изменить параметры адаптера» (в разделе «Дополнительные параметры сети») и щелкните правой кнопкой мыши свое сетевое подключение.
Открыть параметры смены адаптера
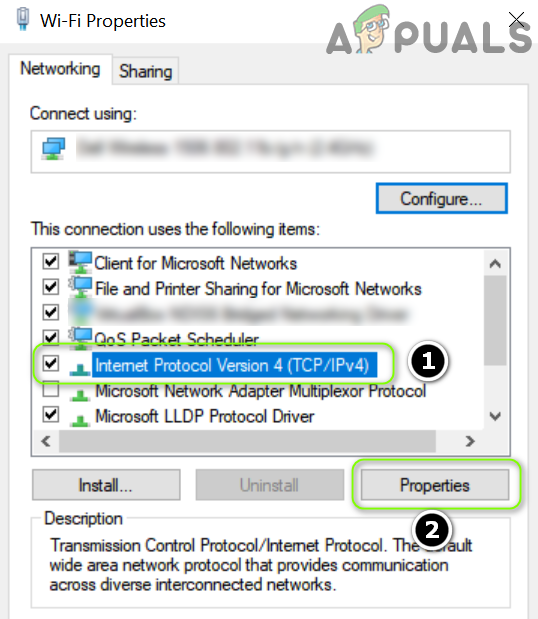
- Затем в показанном меню выберите «Свойства» и в окне свойств сети выберите TCP / IPv4.
Откройте свойства сетевого адаптера
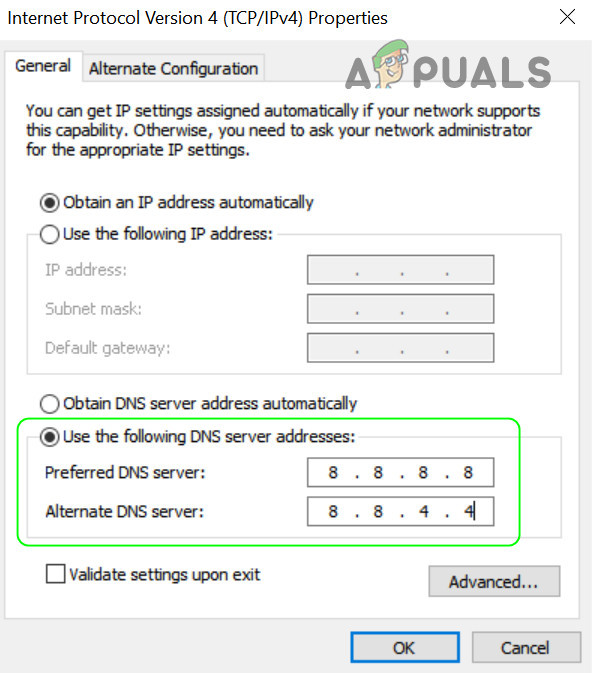
- Теперь нажмите кнопку «Свойства» и установите переключатель «Использовать следующие DNS-серверы».
Откройте свойства интернет-протокола версии 4 (TCP IPv4)
- Затем введите следующие значения: Предпочитаемый DNS-сервер: 8.8.8.8 Альтернативный DNS-сервер: 8.8.4.4
Измените DNS-сервер вашего ПК
- Теперь примените ваши изменения и перезагрузите устройство, чтобы проверить, нет ли на нем кода ошибки Beaver.
3. Включите бета-версию клиента Steam.
Технологии развиваются быстрыми темпами, и, чтобы не отставать от них, Steam и Bungie регулярно выпускают новые обновления, а бета-версия обычно является первой версией, которая выходит за пределы внутреннего круга тестирования и получает последние обновления. В этом контексте включение бета-версии клиента Steam может решить проблему с Destiny.
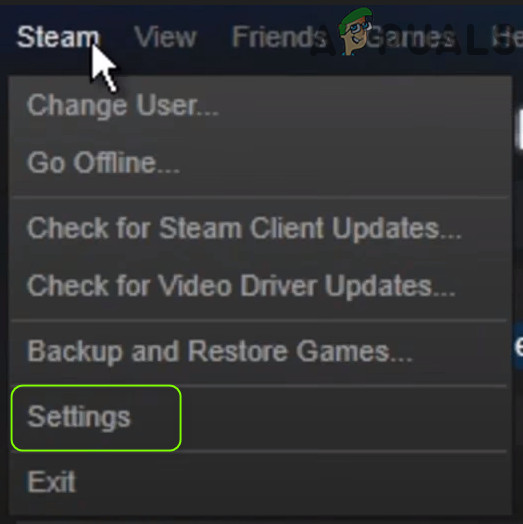
- Запустите клиент Steam и разверните меню Steam (в левом верхнем углу).
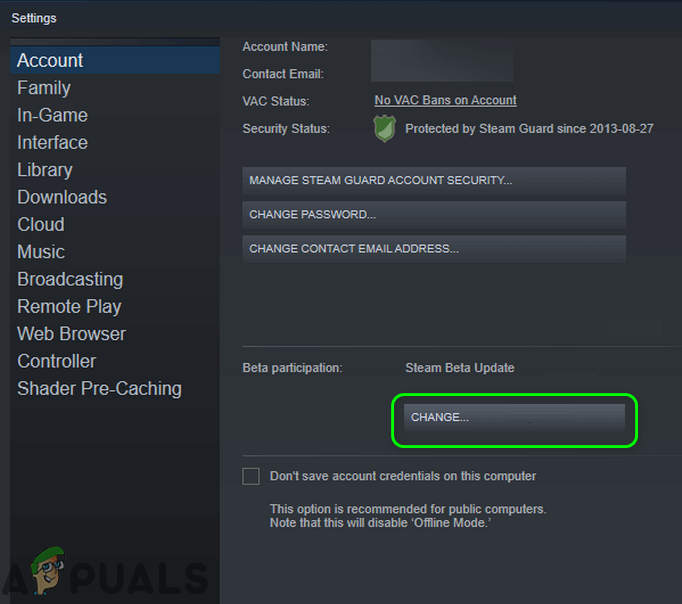
- Теперь выберите «Настройки» и нажмите «Изменить» (в разделе «Участие в бета-тестировании»).
Откройте настройки клиента Steam.
- Затем выберите «Обновление бета-версии Steam» и нажмите кнопку «ОК», чтобы применить изменения.
Нажмите кнопку “Изменить”, чтобы принять участие в бета-тестировании Steam.
- Теперь нажмите «Перезагрузить Steam» и после перезапуска проверьте (возможно, вам придется немного подождать загрузки и установки бета-обновлений), не содержит ли код ошибки Beaver.
4. Попробуйте другую сеть
Ограничения вашего интернет-провайдера также могут вызвать код ошибки Beaver в Destiny, и попытка использования другой сети может решить проблему (временно).
- Отключите устройство от текущей сети и подключитесь к другой сети (например, к точке доступа вашего мобильного телефона).
Включите точку доступа вашего телефона
- Теперь запустите Destiny и проверьте, все ли работает нормально.
Если это так, то проблема связана с ограничениями интернет-провайдера, неправильной конфигурацией вашего маршрутизатора (обсуждается далее в этой статье) или блокировкой вашего IP-адреса серверами Destiny.
5. Измените настройки маршрутизатора.
Код ошибки Beaver в Destiny может быть результатом неправильной настройки параметров вашего маршрутизатора (например, QoS), и правильная настройка параметров маршрутизатора (например, отключение защиты от наводнения) может решить проблему. Прежде чем двигаться дальше, убедитесь, что переключение между настройками DNS вашего маршрутизатора из Auto Detect и Google DNS (или любого другого) решает проблему для вас. Имейте в виду, что приведенные ниже инструкции немного отличаются для разных маршрутизаторов из-за их марки и модели, и вам, возможно, придется копнуть глубже, чтобы заставить его работать на вас.
5.1 Включение QoS в настройках маршрутизатора
- Во-первых, выйдите из Destiny и завершите ее задачи (если таковые имеются) в диспетчере задач вашей системы.
- Затем запустите веб-браузер и перейдите на портал администратора вашего маршрутизатора, например, 192.168.10.1 (возможно, вам придется войти в систему, используя свои учетные данные).
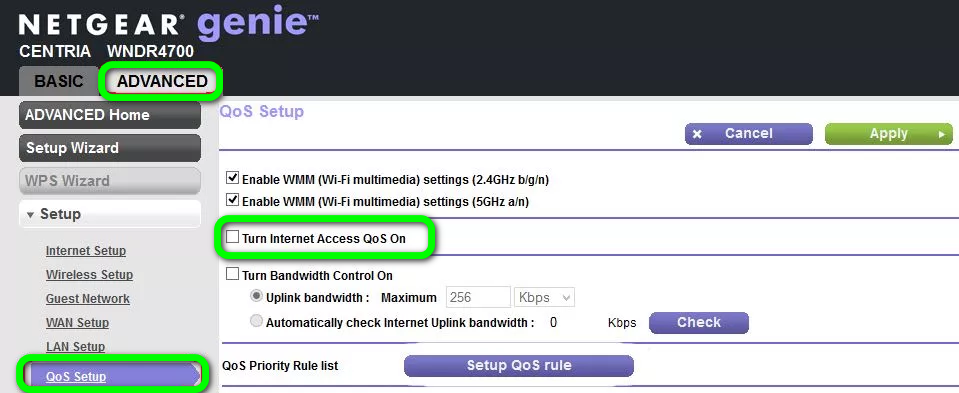
- Теперь найдите Advanced Network Settings (Setup или Wireless Settings) и проверьте, присутствует ли там QoS Setup.
Включите QoS в настройках маршрутизатора
- Если да, то включите QoS и настройте правило QoS, чтобы расставить приоритеты для трафика Destiny.
- Затем примените изменения и запустите Destiny, чтобы проверить, нет ли ошибки Бивера.
Если это не помогло, то проверьте, разрешает ли включение прокси-сервера ICMP (если ваш маршрутизатор его поддерживает, например, маршрутизатор Net Duma) в настройках маршрутизатора проблему для вас.
5.2 Отключение функции защиты от наводнений (или защиты от DoS)
- Перейдите на портал администратора вашего маршрутизатора с помощью браузера и войдите в систему, используя свои учетные данные.
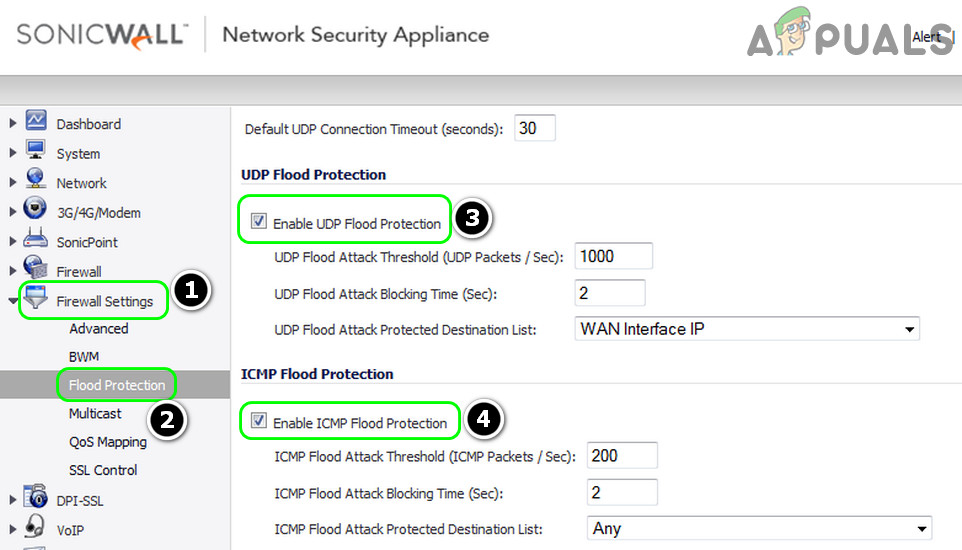
- Теперь разверните Параметры брандмауэра и перейдите на вкладку Защита от наводнения.
- Затем снимите флажки Enable UDP Flood Protection и Enable ICMP Flood Protection.
Отключить защиту от флуда в настройках роутера
- Теперь сохраните изменения и запустите Destiny, чтобы проверить, решена ли проблема с кодом ошибки Beaver.
Если нет, то проверьте, решает ли включение / выключение режима фильтрации (например, Geo-Filter в маршрутизаторе Net Duma) проблему Destiny.
5.3 Включение UPnP в настройках маршрутизатора
- Перейдите на портал администратора вашего маршрутизатора с помощью веб-браузера и войдите в систему, используя свои учетные данные.
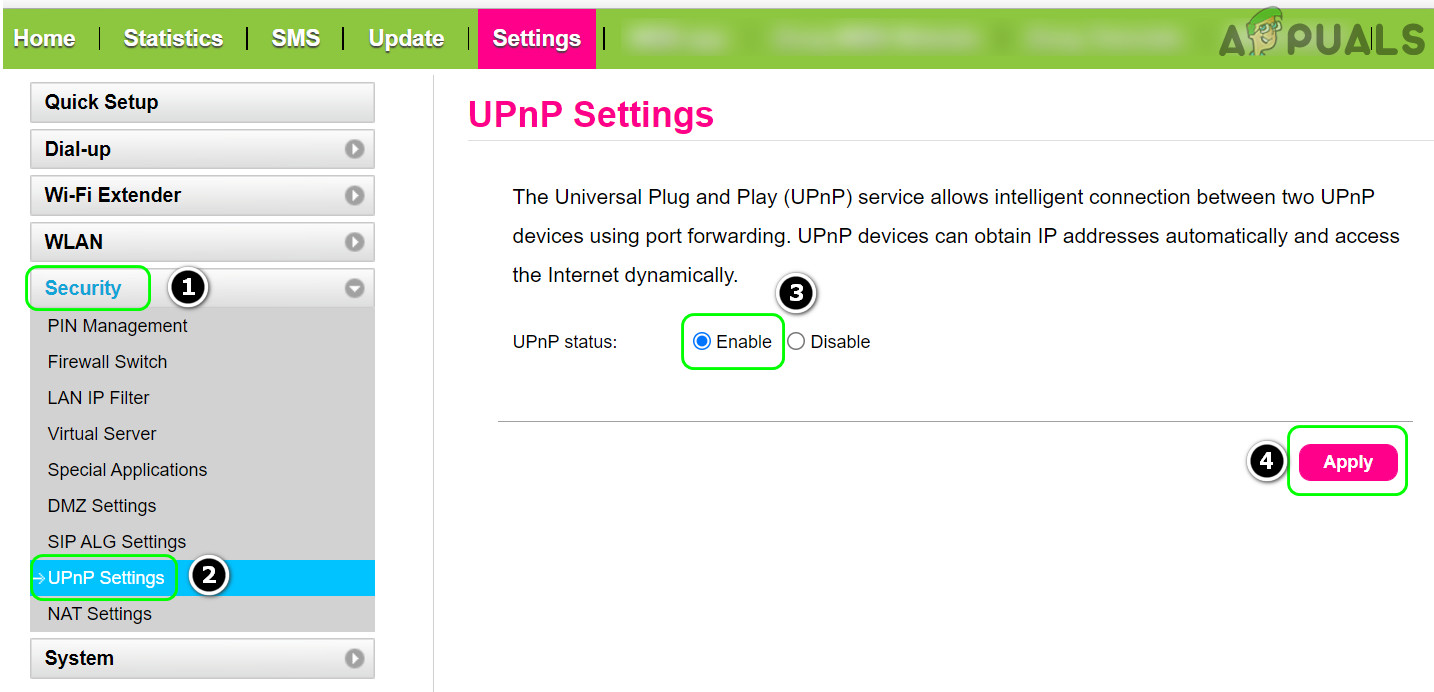
- Теперь разверните Безопасность и перейдите к настройкам UPnP.
- Затем включите UPnP и примените свои изменения.
Включите UPnP в настройках маршрутизатора
- Теперь откройте Destiny и проверьте, не содержит ли код ошибки Beaver.
Если проблема не исчезнет, проверьте, решает ли включение DMZ и указание ее на свое устройство проблему за вас. Если это не помогло, возможно, вам придется перенаправить порты на маршрутизатор в соответствии с инструкциями Bungie.
5.4 Сброс маршрутизатора до заводских настроек по умолчанию
- Запустите веб-браузер, перейдите на портал администратора маршрутизатора и войдите в систему, используя свои учетные данные.
- Затем разверните вкладку «Система» (или вкладку «Общие») и перейдите на вкладку «Восстановить настройки по умолчанию».
Восстановите настройки маршрутизатора по умолчанию ‘
- Теперь нажмите кнопку «Восстановить» (на правой панели), а затем подтвердите восстановление маршрутизатора.
- Затем запустите Destiny, и, надеюсь, Destiny избавится от ошибки Бобра.
Если у вас возникла проблема с поиском параметра сброса маршрутизатора на портале администрирования, вы можете использовать переключатель на маршрутизаторе (на задней или нижней части маршрутизатора), чтобы перезагрузить маршрутизатор.
Destiny 2 has been around for years and over time, it has built up quite the rogue’s gallery of error codes. You need to be connected to Destiny 2’s servers at all times in order to play (whether it’s alone or with friends) and that means problems can arise ranging from simple glitches to you not being able to log in at all. Don’t worry, though, most, if not all, of the error codes and issues have simple explanations, and none should completely block you from accessing the game permanently. Here’s a list of all of the most common error codes in Destiny 2 and how to fix them.
Note there are actually hundreds of error codes in Destiny 2. However, this list will focus on the most common ones that people will actually encounter.
Arugula
What Error Code Arugula Means – Arugula means you’re experiencing a general networking issue. This could be your internet connection, your connection to the Destiny 2 servers, or an issue with your Internet Service Provider (ISP).
How to Fix Error Code Arugula – Try restarting your router and/ or plugging your console/ PC directly into your router with an ethernet cable. If the problem persists, you might need to wait a little bit and try again. Failing that, it may be worth investigating whether your NAT Type is set to Open.
Baboon
What Error Code Baboon Means – Baboon is a result of packet loss or disconnections between your home network and Bungie. It can also be caused by certain WiFi setups, like mobile hotspots where connection blips or random dropouts are more frequent.
How to Fix Error Code Baboon – Bungie recommends switching from WiFi to a wired connection, linking your router to your console/ PC with an Ethernet cable. You’ll also want to force quit Destiny by completely closing the game and relaunching it. This should resolve any errors preventing you from logging into the servers at all.
Beaver
What Error Code Beaver Means – Beaver is a connectivity issue that occurs when consoles fail to connect to each other.
How to Fix Error Code Beaver – Outside of just waiting and trying again, if you’re constantly getting Beaver or Flatworm errors Bungie suggests following their guide for improving latency and packet loss and seeing if that improves the situation for you.
Bee
What Error Code Bee Means – Bee is an error code similar to that of Fly and Lion and indicates that there’s a ‘general disconnection between you and the various routes your traffic takes across the internet to get to Bungie,’ according to the official FAQ. This can include packet loss or general disconnections between your home network and Bungie.
How to Fix Error Code Bee – Try disconnecting other devices from your network, restarting your router, and if all else fails, switching to a wired connection with an Ethernet cable.
Boar
What Error Code Boar Means -The Boar error code indicates that there may be a networking issue with your console or PC when trying to connect to the Destiny 2 servers.
How to Fix Error Code Boar – Alongside switching to a wired connection with an Ethernet cable and restarting your router, you may also need to check that PlayStation Network or Xbox Live isn’t down, your ISP isn’t having any issues and that there isn’t a region mismatch issue. We’ve got a full breakdown of all of this in our Destiny 2 Boar error code guide.
Cabbage
What Error Code Cabbage Means – Cabbage a general connectivity error that occurs when there are connection or firewall issues with your router.
How to Fix Error Code Cabbage – Ensure that you’re connected to the internet. If you are, try resetting your router. If that fails too, access your router’s setting and enable UPnP, disable Extended Security, and disable Assigned Games & Applications settings.
Cat
What Error Code Cat Means – You normally get Cat in Destiny 2 if you are playing after a hotfix or update has been deployed.
How to Fix Error Code Cat – Simply exit your game, download the latest update, and you should be good to go.
Chicken
What Error Code Chicken Means – When you get Chicken, it usually means that you’re unable to connect to the game because of internet issues on your end.
How to Fix Error Code Chicken – Check your internet connection, reset your router, and try to use a wired connection if possible. If your internet is down, well, wait that out.
Chive
What Error Code Chive Means – The Chive error code is seemingly exclusive to the PC platform and is to do with graphics failing to initialize.
How to Fix Error Code Chive – Bungie recommends updating your graphics card drivers as a first port of call, as having outdated ones can cause you all kinds of strange issues. For those whose PC is running on Windows 7, you’ll also need to manually install Microsoft Update KB 2670838, as this has been reported to fix the problem by other players. Finally, if all else fails, try uninstalling and reinstalling the game.
Endive
What Error Code Endive Means – You can’t log on because of maintenance for Destiny 2
How to Fix Error Code Endive – Unfortunately you can’t! You’ll just need to wait it out until the platform you’re looking to play on is no longer under maintenance.
Honeydew
What Error Code Honeydew Means – Error code Honeydew happens when Bungie is having issues on their end with players connecting, such as when a new update or expansion hits and everyone is trying to get on at the same time.
How to Fix Error Code Honeydew – Another one where there is not much you can really do. Stay tuned to Bungie Help and wait it out.
Moose
What Error Code Moose Means – If you’re being faced with the Moose error code while playing you’ll have noticed that the game describes it as a “general networking error.”
How to Fix Error Code Moose – If you keep being greeted by this error code, simply close the application and restart it.
Olive
What Error Code Olive Means – Olive is a general error message that appears when there’s an issue connecting, either on Bungie’s end or yours.
How to Fix Error Code Olive – Most of the time Olive is fixed in Destiny 2 by just restarting the game or console.
Sheep
What Error Code Sheep Means – Sheep means that there’s a player in your fireteam that doesn’t have the most recent update downloaded and it’s preventing you from connecting to the servers and activities.
How to Fix Error Code Sheep – Tell your teammate to get their stuff together. Either they go update their game or you drop ’em from your team.
Stingray
What Error Code Stingray Means – Stingray is somewhat common for console issues and generally occurs when Xbox or PlayStation is undergoing maintenance on their end.
How to Fix Error Code Stingray – Not really much you can do, just have to wait it out and try again later. Make sure at least that you have the latest version of your console’s firmware in the meantime.
Weasel
What Error Code Weasel Means – Weasel like Chicken and Olive in Destiny 2 can mean a bunch of things. Usually, it’s related to network issues on either your or Bungie’s end, but it can sometimes be the message you get when you’re suspended or banned.
How to Fix Error Code Weasel – If you’re not doing anything shady, and your internet connection is good, it’s very likely a problem on Bungie’s end that you have to wait out. Restart your PC/console and try again to be sure.
That’s all you need to know for how to fix the most common error codes in Destiny 2. As more common Destiny 2 error codes appear, we’ll be sure to update this post.

Ed McGlone
Ed McGlone was with Twinfinite from 2014 to 2022. Playing games since 1991, Ed loved writing about RPGs, MMOs, sports games and shooters.
More Stories by Ed McGlone
Error code Beaver in Destiny occurs when your network is not working optimally for Destiny (like the DNS settings of your device). Moreover, the wrong configuration of the router (like Flood Protection or QoS) may also cause the issue at hand.
The user encounters the error code Beaver in Destiny when launching (or playing) the Destiny game.
You can fix the error code Beaver by the solutions discussed below but before that, check if restarting the game/launcher or device sorts out the issue. Also, make sure you are using a wired connection to the device (Destiny “hates” Wi-Fi connections). Moreover, check if the in-game NAT type is set to open. Make sure all the Destiny updates are applied to your system. Additionally, check if getting your router out of the bridge mode sorts out the issue.
There is a temporary workaround reported by users to solve the issue, you may check if that sorts out the issue for you:
- Pick your destination (e.g., tower) and when you spawn, check if other players (or NPCs) are shown.
- If not, then wait (do not touch any of the controllers) till other players are shown and once other players are shown, check if you can play Destiny without getting the Beaver error.
1. Renew the IP Address of Your Device
You may encounter the error code Beaver in Destiny if the IP address of your device is marked as unsafe by the Destiny servers. In this scenario, renewing the IP of your device may solve the problem. For elucidation, we will guide you through the process of resetting and changing the IP address for a Windows device.
- Click Windows, type: Command Prompt, right-click on Command Prompt, and select Run as Administrator.

Open Command Prompt as Administrator - Now execute the following cmdlets one by one:
ipconfig /release

ipconfig /renew

Release and Renew IP of the Windows 10 PC - Once the IP address is renewed, check if Destiny is clear of the error code Beaver.

If not, you may check if restarting your device and networking equipment solves the Destiny issue. If you are using a static IP, then you may contact your ISP to renew your IP Address.
2. Edit the DNS Settings of Your System
Destiny may show the error code Beaver if the DNS settings of your system are not optimal for Destiny. In this context, editing the DNS settings of your system to use another DNS server (like Google DNS) may solve the problem. But before proceeding, make sure your device’s MTU is set to 1460. For elucidation, we will discuss the process for editing the DNS settings for a Windows PC.
- Right-click Windows and open Network Connections.

Open Network Connections - Now open Change Adapter Options (under Advanced Network Settings) and right-click on your network connection.

Open Change Adapter Options - Then, in the menu shown, select Properties, and in the network properties window, select TCP/IPv4.

Open Properties of the Network Adapter - Now click on the Properties button and select the radio button of Use the Following DNS Servers.

Open Properties of Internet Protocol Version 4 (TCP IPv4) - Then enter the following values:
Preferred DNS Server: 8.8.8.8

Alternate DNS Server: 8.8.4.4

Change the DNS Server of Your PC - Now apply your changes and reboot your device to check if it is clear of the error code Beaver.
3. Enable the Beta Version of the Steam Client
Technology is evolving at a rapid pace and to keep up with it, Steam and Bungie release new updates regularly and the beta version is usually the first one outside the internal testing ring to get the latest updates. In this context, enabling the Beta version of the Steam client may solve the Destiny issue.
- Launch the Steam client and expand the Steam menu (near the top left).
- Now select Settings and click on Change (in the Beta participation section).

Open the Steam Client Settings - Then select Steam Beta Update and click on the OK button to apply your changes.

Click on the Change Button for the Beta Participation of Steam - Now click on Restart Steam and once relaunched, check (you may have to wait a bit for the downloading and installing of the beta updates) if it is clear of the error code Beaver.
4. Try Another Network
Restrictions from your ISP may also cause the error code Beaver in Destiny and trying another network may solve the issue (temporarily).
- Disconnect your device from the current network and connect to another network (like your mobile phone’s hotspot).

Enable Hotspot of Your Phone - Now launch Destiny and check if it is operating fine.

If so, then the issue is the result of ISP restrictions, misconfiguration of your router (discussed later in this article), or Destiny servers’ blocking your IP address.
5. Edit the Router Settings
Error code Beaver in Destiny could be the result of a misconfiguration of your router settings (like QoS) and properly configuring the router settings (like disabling Flood Protection) may solve the problem. Before moving on, check if switching between the DNS setting of your router from Auto Detect and Google DNS (or any other) sorts out the issue for you. Keep in mind the undermentioned instructions slightly differ for different routers due to their make and model and you may have to dig deeper to make it work for you.
5.1 Enable QoS in the Router Settings
- Firstly, exit Destiny and end its tasks (if any) in the Task Manager of your system.
- Then launch a web browser and steer to the admin portal of your router e.g., 192.168.10.1 (you may have to log in using your credentials).
- Now look for Advanced Network Settings (Setup, or Wireless Settings) and check if QoS Setup is present there.

Enable QoS in the Router’s Settings - If so, then enable QoS and set up a QoS rule to prioritize the Destiny traffic.
- Then apply your changes and launch Destiny to check if it is clear of Beaver error.
If that did not do the trick, then check if enabling ICMP proxy (if your router supports it, like Net Duma router) in the router settings sorts out the issue for you.
5.2 Disable the Flood Protection (or DoS Protection) Feature
- Navigate to the admin portal of your router by using a browser and log in using your credentials.
- Now expand Firewall Settings and head to the Flood Protection tab.
- Then uncheck the checkboxes of Enable UDP Flood Protection and Enable ICMP Flood Protection.

Disable Flood Protection in the Router’s Settings - Now save your changes and launch Destiny to check if the error code Beaver issue is resolved.
If not, then check if enabling/disabling filter mode (like Geo-Filter in Net Duma’s router) solves the Destiny issue.
5.3 Enable UPnP in the Router Settings
- Navigate to the admin portal of your router by using a web browser and log in using your credentials.
- Now expand Security and steer to the UPnP Settings.
- Then Enable UPnP and apply your changes.

Enable UPnP in the Router Settings - Now open Destiny and check if it is clear of the Beaver error code.
If the issue persists, then check if enabling DMZ and pointing it to your device solves the issue for you. If that did not work, then you may have to forward the ports on the router as per the Bungie instructions.
5.4 Reset Your Router to the Factory Defaults
- Launch a web browser, steer to the router’s admin portal, and log in using your credentials.
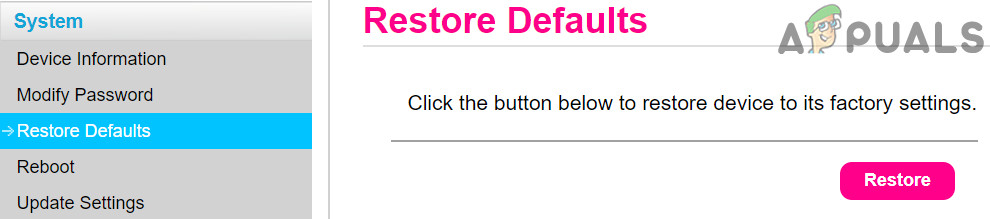
- Then expand the System tab (or General tab) and head to the Restore Defaults tab.

Restore Your Router to Default Settings’ - Now click on the Restore button (in the right pane) and then confirm to restore the router.
- Then launch Destiny and hopefully, Destiny is clear of the Beaver error.
If you are having an issue finding the router reset option in the admin portal, you may use the switch on the router (at the back or bottom of the router) to reset the router.

Kevin Arrows
Kevin Arrows is a highly experienced and knowledgeable technology specialist with over a decade of industry experience. He holds a Microsoft Certified Technology Specialist (MCTS) certification and has a deep passion for staying up-to-date on the latest tech developments. Kevin has written extensively on a wide range of tech-related topics, showcasing his expertise and knowledge in areas such as software development, cybersecurity, and cloud computing. His contributions to the tech field have been widely recognized and respected by his peers, and he is highly regarded for his ability to explain complex technical concepts in a clear and concise manner.
В этом уроке мы покажем вам, как исправить ошибку кода ошибки Destiny 2 Beaver. Эта многопользовательская онлайн-игра относится к жанру стрелялки от первого лица. Продолжение Destiny (2014), игра состоит из многопользовательской среды «общего мира» с некоторыми компонентами ролевых игр. Кроме того, в игре есть два игровых режима — «Игрок против игрока» и «Игрок против окружающей среды», последний состоит из ударов для трех игроков и рейдов для шести игроков. В игре также есть несколько новых заданий, испытаний и квестов.
Несомненно, они довольно интригующие и интересные, однако дело в том, что подавляющее большинство пользователей не могут наслаждаться этим захватывающим игровым процессом. Причина в том, что их встречают с ошибкой или двумя, будь то во время запуска или между самой игрой. Среди них код ошибки Beaver в игре Destiny 2 кажется наиболее распространенным. В этом руководстве мы рассмотрим причины, по которым эта ошибка возникает в первую очередь, и, что более важно, как мы можем исправить эту ошибку. Итак, без лишних слов, давайте начнем с руководства.

Оглавление
-
1 Что такое код ошибки Destiny 2 Beaver? Как исправить?
- 1.1 Включить UPnP
- 1.2 Изменение типов NAT
- 1.3 Проверьте подключение к Интернету
- 1.4 Проблемы с сервером
- 2 Вывод
Что такое код ошибки Destiny 2 Beaver? Как исправить?
По словам разработчиков игры, ошибки BEAVER (или FLATWORM и LEOPARD) возникают из-за невозможности подключения вашей консоли к консоли другого игрока через Интернет. Это может быть вызвано проблемами качества соединения (такими как потеря пакетов, насыщение интернет-провайдера или общая перегрузка интернета). Это может быть даже вызвано определенными настройками WiFi или неисправной домашней проводкой. Однако большая часть ошибок Destiny 2 Beaver обычно вызвана проблемами конфигурации маршрутизатора или сети. Теперь, когда вы знаете причину этой ошибки, давайте рассмотрим связанные с ней исправления.

Включить UPnP
Большинство ошибок, с которыми сталкиваются пользователи, — это те, кто играет в игру через свои маршрутизаторы. В таком случае вам следует рассмотреть возможность включения UPnP или Universal Plug and Play. У разных маршрутизаторов могут быть разные методы для этого. Например, если вы используете маршрутизатор Dlink, введите его IP-адрес, то есть 192.68.0.1, и войдите в него. Затем перейдите в раздел «Инструменты» и нажмите «Разное». Затем в настройках UPnP включите переключатель и нажмите Применить. Для других пользователей маршрутизатора простой поиск в Google может сделать эту работу за вас.
Изменение типов NAT
Если тип NAT установлен на строгий, вы можете столкнуться с трудностями при подключении и игре с друзьями. NAT или преобразование сетевых адресов присутствует в каждом маршрутизаторе. Итак, откройте его настройки и в разделе Тип NAT измените его на наименее строгий.
Вы также можете попробовать перенаправить порт на своем маршрутизаторе. Следующие порты должны быть открыты для игры:
| Платформа | Порты назначения TCP | Порты назначения UDP |
| PlayStation 4 | 80, 443, 1935, 3478-3480 7500-7509 30000-30009 |
2001, 3074-3173, 3478-3479 |
| Xbox One | 53, 80, 443, 3074 7500-7509 30000-30009 |
53, 88, 500, 3074, 3544, 4500, 1200-1299, 1001 |
| ПК | 80, 443, 1119-1120, 3074, 3724, 4000, 6112-6114 7500-7509 30000-30009 |
80, 443, 1119-1120, 3074, 3097-3196, 3724, 4000, 6112-6114 27015-27200 |
| PlayStation 3 | 80, 443, 5223, 3478-3480, 8080 7500-7509 30000-30009 |
3478-3479, 3658 3074, 1001 |
| Xbox 360 | 53, 80, 443, 3074 7500-7509 30000-30009 |
53, 88, 3074, 1001 |
С другой стороны, следующие порты должны быть настроены на ПЕРЕАДРЕСАЕМЫЙ:
| Платформа | Порты назначения TCP | Порты назначения UDP |
| PlayStation 4 | 1935, 3478-3480 | 3074, 3478-3479 |
| Xbox One | 3074 | 88, 500, 1200, 3074, 3544, 4500 |
| ПК | Нет данных | 3074, 3097 |
| PlayStation 3 | 3478-3480, 5223, 8080 | 3074, 3478-3479, 3658 |
| Xbox 360 | 3074 | 88, 3074 |
Проверьте подключение к Интернету
Если у вас плохое беспроводное соединение, скорее всего, вы столкнетесь с ошибкой Beaver в игре Destiny 2. Поэтому всегда рекомендуется использовать проводное соединение, а не беспроводное. В этом отношении вы также можете попробовать использовать кабель Ethernet. Или, если ничего не получается, вы можете также купить сетевой усилитель. Но оставьте это как последний вариант.
Проблемы с сервером
Если ничего не работает, это может быть проблема на стороне сервера. В результате, если это произойдет, вы пока ничего не сможете сделать. Лучший способ проверить это через их Twitter обрабатывать себя. Они не только публикуют сообщения о текущих сбоях сервера, но и публикуют исправления, если таковые есть с вашей стороны.
Завтра (20 мая) в 10:00 по московскому времени в Destiny 2 будет проходить техническое обслуживание. Никаких простоев не ожидается.
Это подготовит нас к выпуску исправления 2.8.1.3 21 мая, которое решит проблему с квестом «Ложь» при открытии двери Warmind.
Для получения дополнительной информации: https://t.co/Ocy0lEVMfq
— Помощь Bungie (@BungieHelp) 20 мая, 2020
Кроме того, они будут держать вас в курсе расчетного времени прибытия этого исправления ошибки. Точно так же люди также публикуют сообщения о таких проблемах в соответствующей ветке Reddit, как можно увидеть ниже. Однако это не официальная информация, но она должна дать вам пару идей, поскольку эта ошибка возникает не только у вас.
Код ошибки: Бобр от DestinyTheGame
Вывод
На этом мы завершаем руководство о том, как исправить код ошибки Destiny 2 в Beaver. В большинстве случаев это можно легко исправить с вашей стороны, включив UPnP, изменив типы NAT, переадресацию портов или переключив ваше соединение на проводное из беспроводного. Однако в некоторых случаях это может быть результатом проблемы на стороне сервера. В более поздних случаях следите за официальным дескриптором Twitter. В завершение вот Советы и хитрости iPhone, Советы и хитрости для ПК, а также Советы и хитрости для Android некоторые, которые не нуждаются в исправлении как таковые!