
![]() ard » Пт окт 14, 2011 1:20 pm
ard » Пт окт 14, 2011 1:20 pm
Последний раз редактировалось ard Пт окт 14, 2011 1:26 pm, всего редактировалось 1 раз.
- За это сообщение автора ard поблагодарил:
- serviceallex
-

ard
- Собрал картридж
-
![]()
![]() ZZet » Пт окт 14, 2011 1:25 pm
ZZet » Пт окт 14, 2011 1:25 pm
-

ZZet
- Заправил чернильницу
-

![]()
![]() Иван Сусанин » Пт окт 14, 2011 7:51 pm
Иван Сусанин » Пт окт 14, 2011 7:51 pm


И что он там увидит?
Правильная команда, это U251.
-
Иван Сусанин
- Добрался до абсорбера
-
![]()
-
-
Taskalfa 180 ошибка «Е» и «Встряхните картр. с тонером»
manik.76 в форуме Принтеры, МФУ, копиры формата A3
- 3
- 9935
dviz

Пн фев 20, 2017 1:35 pm
-
Taskalfa 180 ошибка «Е» и «Встряхните картр. с тонером»
-
-
Kyocera taskalfa 3501 «открыта крышка основного блока»
Юрий Яраскин в форуме Принтеры, МФУ, копиры формата A3
- 3
- 3070
Goldwater
Пт сен 10, 2021 1:31 pm
-
Kyocera taskalfa 3501 «открыта крышка основного блока»
-
-
Черная заливка после смены барабана kyocera taskalfa 1800
djo-1 в форуме Принтеры, МФУ, копиры формата A3
- 4
- 3161
info@printercart.ru
Пт авг 07, 2020 11:29 pm
-
Черная заливка после смены барабана kyocera taskalfa 1800
-
-
Kyocera Taskalfa 1800 стал очень сильно пачкать
Сержавый в форуме Принтеры, МФУ, факсы, копиры формата A4
- 21
- 5751
Goldwater
Вт фев 16, 2021 2:02 pm
-
Kyocera Taskalfa 1800 стал очень сильно пачкать
-
-
kyocera TASKalfa 3551ci: чернит при печати более 2х листов
loneperson в форуме Принтеры, МФУ, копиры формата A3
- 4
- 1075
Andreyak777
Пт июл 02, 2021 1:52 pm
-
kyocera TASKalfa 3551ci: чернит при печати более 2х листов
Вернуться в Принтеры, МФУ, копиры формата A3
Кто сейчас на форуме
Сейчас этот форум просматривают: нет зарегистрированных пользователей и гости: 12
На чтение 7 мин Просмотров 6к. Опубликовано 28.08.2020
Cервисные команды для Kyocera Mita KM-1650/KM-2020/KM-2035/KM-2050 и Taskalfa 180/181
![]()
Компания Kyocera давно завоевала лидирующие позиции на рынке оргтехники благодаря высокому качеству свой продукции. Особенно радует модульность принтеровкопиров.
Для обслуживания аппаратов используются следующие команды:
U110 обнуление счётчика барабана
U251 -обнуление счётчика техобслуживания
U167 -обнуление счетчика печки
U130 -подкачка тонера
U000 — х2 «start» — логи.
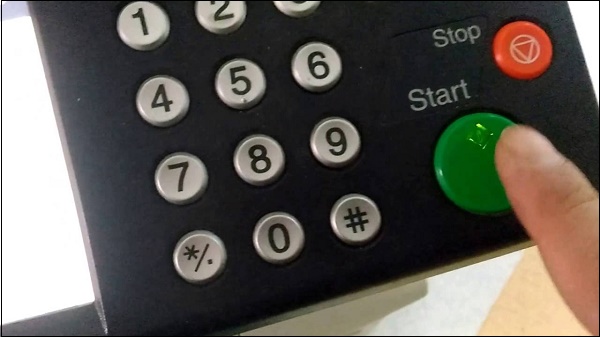
Для того, чтобы выполнить вход в сервис меню необходимно набрать следующий код на цифровой панели аппарата — 10871087.
Выбираем сервисную команду — курсором вверх/вниз ( KM-2030), кнопкой масштабирования «+/-» (KM-1530), или кнопками количества копий. Ввод данных осуществляется кнопкой «Start«.
Сброс печных ошибок и ошибки Zero Cross осуществляется сервисной командой 163, «Start», выбираем «Execute» (только для KM-2030), нажимаем «Start».
Сброс маслёнки: сервисной командой 251, кнопкой выбора контрастности выбираем позицию 3 контрастности, нажимаем «Start».
Для выхода из сервисного режима — у некоторых машин таких как, например, KM-16201650 надо ввести 001, затем нажать кнопку «Start». У большинства других — нажать кнопку «Сброс» или просто выклвкл аппарат.
Стоит отметить принцип навигации и команды подходят для более новых моделенй, например — Taskalfa 180 и 181.
Нашли ошибку в тексте? Выделите фрагмент текста и нажмите Ctrl+Enter
Аналогичные аппараты: Kyocera TASKalfa 180 / TASKalfa 220
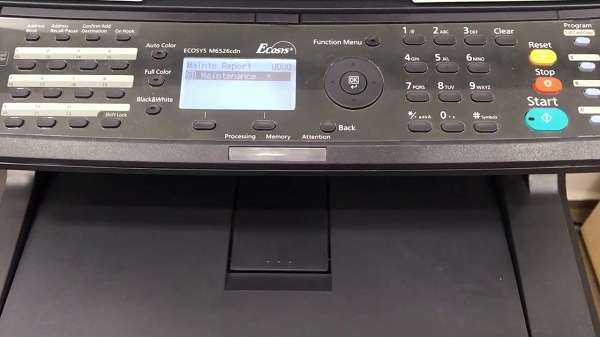
Режим Обслуживания (Maintenance mode)
1. Введите «10871087«
2. При помощи клавиш масштаба +/- или цифровых клавиш — введите номер технического обслуживания.
3. Нажмите кнопку Start.
4. Для выхода из Режима Обслуживания введите «001» и нажмите Start.
Номера Режима Обслуживания
Главные:
000 — Outputting an own-status report (отчет о состоянии)
001 — Exiting the maintenance mode (выход из режима обслуживания)
002 — Setting the factory default data (установка заводских настроек)
004 — Checking the machine number (проверка номера аппарата)
005 — Copying without paper (копирование без бумаги)
019 — Displaying the ROM version (отображение версии ROM)
Инициализация:
020 — Initializing all data (инициализация всех данных)
021 — Initializing memories (инициализация памяти)
Двигатель и транспортировочная система:
030 — Checking motor operation (проверка работы двигателя)
031 — Checking switches for paper conveying (проверка выключателей для транспортировки бумаги)
032 — Checking clutch operation (проверка муфты)
034 — Adjusting the print start timing (настройки бумаги)
035 — Setting folio size (установка размера)
051 — Adjusting the deflection in the paper (регулировка бумаги)
053 — Performing fine adjustment of the motor speed (регулировка скорости вращения двигателя)
Оптика:
060 — Adjusting the scanner input properties (настройка свойств сканера)
061 — Turning the exposure lamp on (включение экспозиции лампы)
063 — Adjusting the shading position (настройка затенения)
065 — Adjusting the scanner magnification (настройка увеличения сканера)
066 — Adjusting the scanner leading edge registration (регулировка передней кромки регистрации для сканирования оригинала)
067 — Adjusting the scanner center line (настройка центральной линии для сканирования оригинала)
068 — Adjusting the scanning position for originals from the DP (настройка сканирования для оригиналов с автоподатчика)
070 — Adjusting the DP magnification (настройка увеличения DP)
071 — Adjusting the DP scanning timing (настройка сканирования DP)
072 — Adjusting the DP center line (настройка центральной линии DP)
073 — Checking scanner operation (проверка работы сканера)
074 — Adjusting the DP input light luminosity (настройка входного света DP)
076 — Adjusting the DP automatically (автоматическая настройка DP)
087 — Setting DP reading position modification operation (режим настройки сканирования DP)
088 — Setting the input filter (настройка входного фильтра)
089 — Outputting a MIP-PG pattern (вывод шаблона MIP-PG)
092 — Adjusting the scanner automatically (автоматическая настройка сканера)
093 — Setting the exposure density gradient (установка плотности градиента)
099 — Adjusting original size detection (проверка формата оригинала)
Высокое напряжение:
100 — Setting the main high voltage (настройка основных напряжений)
101 — Setting the other high voltages (настройка других напряжений)
110 — Checking/clearing the drum count (проверка/очистка счетчика барабана)
Девелопер:
130 — Initial setting for the developing unit (начальная настройка блока проявки)
144 — Setting toner loading operation (операция загрузки тонера)
150 — Checking sensors for toner (проверка датчиков для тонера)
157 — Checking/clearing the developing drive time
158 — Checking the developing count (проверка счетчика девелопера)
Узел закрепление:
161 — Setting the fuser control temperature (установка температуры узла закрепления)
162 — Stabilizing fuser forcibly (принудительная стабилизация узла закрепления)
163 — Resetting the fuser problem data (сброс ошибок печки)
167 — Checking the fuser count (проверка счетчика печки)
198 — Setting the fuser phase control (установка контроля узла закрепления)
199 — Checking the fuser temperature (проверка температуры узла закрепления)
Панель управления:
200 — Turning all LEDs on (включения всех светодиодов)
203 — Checking DP separately (операции DP)
204 — Setting the presence or absence of a key card or key counter (регулировка ключа-карты)
207 — Checking the operation panel keys (проверка кнопок на панели управления)
243 — Checking the operation of the DP motors (проверка двигателей DP)
244 — Checking the DP switches (проверка переключателей DP)
245 — Checking messages (проверка сообщений)
Настройка режима:
250 — Setting the maintenance cycle (настройка цикла обслуживания)
251 — Checking/clearing the maintenance count (проверка/очистка счетчика обслуживания)
252 — Setting the destination (установка региона)
253 — Switching between double and single counts (переключение между лотками)
254 — Turning auto start function on/off (автоматическое включение/выключение)
260 — Selecting the timing for copy counting
265 — Setting the destination specifications (установка назначений спецификации)
277 — Setting auto application change time
285 — Setting service status page (настройка сервис статуса)
286 — Setting the optional language (настройка дополнительного языка)
332 — Setting the size conversion factor (установка размера)
341 — Specific paper feed location setting for printing function (настройка функции печати для конкретной подачи бумаги)
342 — Setting the ejection restriction (установка ограничения выброса)
343 — Switching between duplex/simplex copy mode (переключение режимов копирования дуплекс/симлекс)
344 — Setting the low-power mode (настройка режима низкого энергопотребления)
345 — Setting the value for maintenance due indication (установка значения индикации для технического обслуживания)
Изображение:
402 — Adjusting margins of image printing (регулировка полей печати)
403 — Adjusting margins for scanning an original on the contact glass (регулировка полей для сканирования оригинала)
404 — Adjusting margins for scanning an original from the DP (регулировка полей сканирования оригинала для DP)
407 — Adjusting the leading edge registration for memory image printing (регулировка передней кромки регистрации)
Другие режимы:
901 — Checking/clearing copy counts by paper feed locations (проверка/очистка счетчика копий)
903 — Checking/clearing the paper jam counts (проверка/очистка счетчика замятия бумаги)
904 — Checking/clearing the service call counts (проверка/очистка счетчика вызова сервиса)
905 — Checking counts by optional devices (проверка счетчиков дополнительных устройств)
908 — Checking the total count (проверка общего счетчика)
910 — Clearing the black ratio data (очистка данных)
911 — Checking/clearing copy counts by paper size (проверка/очистка счетчика копий)
920 — Checking the accounting counts (проверка счетчиков учета)
927 — Clearing the all copy counts and machine life counts (очистка всех счетчиков)
928 — Checking the machine life counts (проверка счетчика срока службы)
931 — Setting the automatic toner install (настройка автоматической установки тонера)
941 — Setting the default magnification ratio of the default cassette (настройка лотка по умолчанию)
942 — Setting of amount of slack for feeding from DP (настройка DP)
955 — Setting operation panel type (настройка панели управления)
969 — Checking of toner area code (проверка кода-региона тонера)
990 — Checking/clearing the time for the exposure lamp to light (проверка/очистка времени для лампы экспозиции)
991 — Checking the scanner count (проверка счетчика сканера)
993 — Outputting a VTC-PG pattern (вывод шаблона VTC-PG)
У вас возникли проблемы с данным принтером? Надо сбросить в «завод», но из WebGUI не получается? В данной статье расскажу, как это сделать с помощью инженерного меню на самом аппарате.
Стандартный пароль на «морду»:
Возникла проблема с адресной книгой в данном аппарате. Невозможно добавить или удалить контакт. Обычный сброс не помог. Сбросилось все, кроме адресной книги.
Помогло сервисное меню. Ну и собственно небольшая инструкция как это сделать:
- Включить МФУ и дождаться окончания загрузки
- Набрать 10871087, и мы попадаем в техническое меню
- Нажимаем большую зеленую кнопку «Старт»
- Выбираем [EXECUTE] и нажимаем кнопку «Старт»
Настройки сбрасываются полностью. Все что было настроено уничтожится.
IP адрес будет установлен по DHCP
- Распечатать
Оцените статью:
- 5
- 4
- 3
- 2
- 1
(1 голос, среднее: 1 из 5)
Поделитесь с друзьями!
Содержание
- Дополнительные материалы по МФУ Kyocera:
- Что значит «Замените МК» на принтере Kyocera?
- Способ №1. Задействуйте код 10871087, чтобы сбросить сообщение
- Способ №2. Используйте стандартное меню МФУ
- Способ №3. Сбросьте в меню счётчик обслуживания
- Способ №4. Используйте опцию «Maintenance»
- Заключение
Многофункциональные устройства японской компании «Kyocera» мы можем встретить в офисах по всему миру. Совмещая в себе возможности принтера, сканера, копировального модуля и факсимильного устройства, они работают буквально каждый день, создавая десятки и сотни нужных нам документов. Но приходит время, когда ресурс МФУ (принтера) от «Kyocera» исчерпывается, и мы видим на его экране загадочную надпись «Замените МК». Что же это такое, и как сбросить сообщение на принтере Kyocera? Расскажем в нашем материале.
Дополнительные материалы по МФУ Kyocera:
Сервисное Меню в Kyocera ECOSYS M3040dn
Коды входа в меню аппаратов Kyocera
СБРОС ОШИБКИ С7990 НА АППАРАТАХ KYOCERA
Как известно, каждый девайс имеет свой гипотетический срок службы, после исчерпания которого он нуждается в капитальном ремонте, замене его основных узлов и элементов. Инженеры японской компании «Kyocera» определили срок службы своих МФУ (принтеров) в 100 тысяч копий, после которых большинству их девайсов требуется замена основных узлов. Под последними обычно понимается драм картридж и печка МФУ, которые подвергаются наиболее сильному износу.

Именно основные элементы МФУ просит заменить сообщение с упоминанием «МК», которое расшифровывается как «Maintenance Kit» – «комплект для обслуживания».

Но, как известно, раз на раз не приходится, и многие принтеры от Kyocera находятся в отличном состоянии и после производства 100 тысяч копий. В этом случае появление смс «Замените МК» на принтере Kyocera будет только раздражать, вынуждая владельца девайса как-либо избавиться от назойливого сообщения. Как же это сделать?
Учитывая, что для каждого принтера (МФУ) от Kyocera необходимы свой метод обнуления счётчика, приведём несколько способов, позволяющих сбросить сообщение «Замените МК» на принтере Kyocera.
Способ №1. Задействуйте код 10871087, чтобы сбросить сообщение
Первый из способов, позволяющий избавиться от сообщения «Замените МК» на принтере Kyocera состоит в следующем:
- Наберите на клавиатуре код 10871087, после чего вы попадёте в сервисное меню

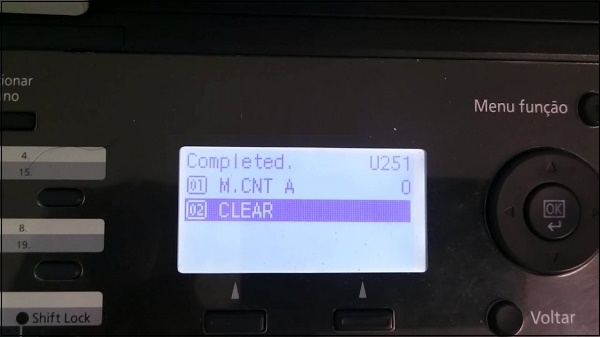
2.Откройте программу u251;
3.С помощью стрелочек на клавиатуре выберите опцию «clear»;

4.Для выхода из меню выполните программу u001. Если выход с помощью данной программы не осуществим, то просто выключите и включите ваш девайс.
Способ №2. Используйте стандартное меню МФУ
Второй способ выполнить ресет сообщения «Замените МК» на принтере Kyocera состоит в использовании доступных настроек функционального меню.
Выполните следующее:
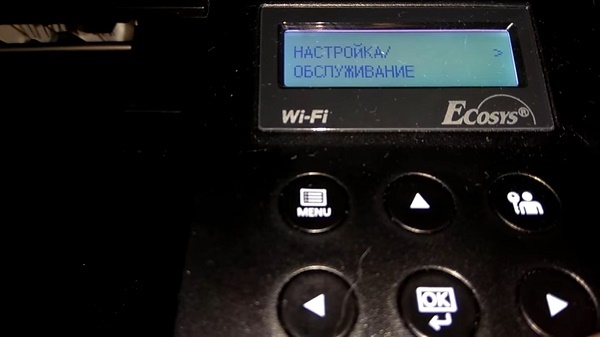
- Нажмите на клавиатуре МФУ кнопку «Меню»;
- C помощью кнопок вверх-вниз ищем опцию «Настройка/Обслуживание» и выбираем её;

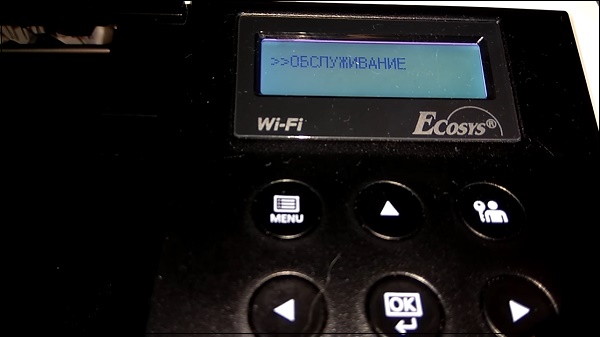
3. Далее с помощью кнопок вверх-вниз вновь ищем «Обслуживание», жмём «Ок», и подтверждаем, нажав ещё раз на «Ок»;

4. Сообщение «Замените МК» исчезнет.
Способ №3. Сбросьте в меню счётчик обслуживания
Ещё один способ, позволяющий сбросить счётчик на принтере Kyocera состоит в следующем:
- Перейдите в меню вашего МФУ;
- Выберите там «Настройка/Обслуживание»;
- Далее выберите опцию «Настройка сервиса»;
- В перечне найдите опцию «Счётчик обслуживания», выберите её, и подтвердите сброс, ответив на вопрос «Вы уверены» — «Да».
Способ №4. Используйте опцию «Maintenance»
Ну и последний из способов, позволяющий сбросить сообщение «Замените МК» на МФУ Kyocera состоит в следующем:
- Перейдите в меню вашего принтера (МФУ);
- Найдите там раздел «Service»;
- Там выберите пункт «Maintenance» (поддержка) и дважды нажмите на Enter;

4.Счётчик будет сброшен
Заключение
В нашем материале мы разобрали, как сбросить сообщение «Замените МК» на японском принтере Kyocera, и какие способы нам в этом помогут. Поскольку устройства от Kyocera по выполнении 100 тысяч копий не исчерпывают свой ресурс, рекомендуем при появлении упомянутого сообщения произвести сброс счётчика МФУ. После этого уведомление «Замените МК» перестанет вам досаждать, а вы продолжите пользоваться всеми возможностями девайса от компании «Kyocera».
Для сброса счетчиков на многофункциональных аппаратах фирмы Kyocera необходимо выполнить следующие действия:
- Осуществить вход в «Сервис меню»
Набираем на цифровой панели аппарата — 10871087. - Выбираем сервисную команду курсором вверх/вниз, кнопкой масштабирования «+/-«, или кнопками количества копий.
Ввод данных завершается кнопкой «Start».
Сброс печных ошибок и ошибки Zero Cross осуществляется сервисной командой 163, «Start», выбираем «Execute» (только для KM-2030), нажимаем «Start».
Сброс маслёнки: сервисной командой 251, кнопкой выбора контрастности выбираем позицию 3 контрастности, нажимаем «Start». - Выход из сервисного режима
У некоторых машин таких как, например, KM-16201650 надо ввести 001, затем нажать кнопку «Start». У большинства других — нажать кнопку «Сброс» или просто выклвкл аппарат.
Для обслуживания аппаратов используются следующие команды:
U110 обнуление счётчика барабана
U251 -обнуление счётчика техобслуживания
U167 -обнуление счетчика печки
U130 -подкачка тонера
U000 — х2 «start» — логи.
Многофункциональные устройства японской компании «Kyocera» мы можем встретить в офисах по всему миру. Совмещая в себе возможности принтера, сканера, копировального модуля и факсимильного устройства, они работают буквально каждый день, создавая десятки и сотни нужных нам документов. Но приходит время, когда ресурс МФУ (принтера) от «Kyocera» исчерпывается, и мы видим на его экране загадочную надпись «Замените МК». Что же это такое, и как выполнить сброс данного сообщения на принтере Kyocera? Расскажем в нашем материале.
Содержание
- Что значит «Замените МК» на принтере Kyocera?
- Способ №1. Задействуйте код 10871087, чтобы сбросить сообщение
- Способ №2. Используйте стандартное меню МФУ
- Способ №3. Сбросьте в меню счётчик обслуживания
- Способ №4. Используйте опцию «Maintenance»
- Заключение
Что значит «Замените МК» на принтере Kyocera?
Как известно, каждый девайс имеет свой гипотетический срок службы, после исчерпания которого он нуждается в капитальном ремонте, замене его основных узлов и элементов. Инженеры японской компании «Kyocera» определили срок службы своих МФУ (принтеров) в 100 тысяч копий, после которых большинству их девайсов требуется замена основных узлов. Под последними обычно понимается драм картридж и печка МФУ, которые подвергаются наиболее сильному износу.

Именно основные элементы МФУ просит заменить сообщение с упоминанием «МК», которое расшифровывается как «Maintenance Kit» – «комплект для обслуживания».
Но, как известно, раз на раз не приходится, и многие принтеры от Kyocera находятся в отличном состоянии и после производства 100 тысяч копий. В этом случае появление смс «Замените МК» на принтере Kyocera будет только раздражать, вынуждая владельца девайса как-либо избавиться от назойливого сообщения. Как же это сделать?
Учитывая, что для каждого принтера (МФУ) от Kyocera необходимы свой метод обнуления счётчика, приведём несколько способов, позволяющих сбросить сообщение «Замените МК» на принтере Kyocera.
Это полезно знать: виртуальный принтер PDF — ТОП-5.
Способ №1. Задействуйте код 10871087, чтобы сбросить сообщение
Первый из способов, позволяющий избавиться от сообщения «Замените МК» на принтере Kyocera состоит в следующем:
- Наберите на клавиатуре код 10871087, после чего вы попадёте в сервисное меню;

Введите указанный нами код - Откройте программу u251;
- С помощью стрелочек на клавиатуре выберите опцию «clear»;
- Для выхода из меню выполните программу u001. Если выход с помощью данной программы не осуществим, то просто выключите и включите ваш девайс.
Способ №2. Используйте стандартное меню МФУ
Второй способ выполнить ресет сообщения «Замените МК» на принтере Kyocera состоит в использовании доступных настроек функционального меню.
Выполните следующее:
- Нажмите на клавиатуре МФУ кнопку «Меню»;
- C помощью кнопок вверх-вниз ищем опцию «Настройка/Обслуживание» и выбираем её;
Выберите «Настройка/Обслуживание» в меню - Далее с помощью кнопок вверх-вниз вновь ищем «Обслуживание», жмём «Ок», и подтверждаем, нажав ещё раз на «Ок»;
- Сообщение «Замените МК» исчезнет.
Способ №3. Сбросьте в меню счётчик обслуживания
Ещё один способ, позволяющий сбросить счётчик на принтере Kyocera состоит в следующем:
- Перейдите в меню вашего МФУ;
- Выберите там «Настройка/Обслуживание»;
- Далее выберите опцию «Настройка сервиса»;
- В перечне найдите опцию «Счётчик обслуживания», выберите её, и подтвердите сброс, ответив на вопрос «Вы уверены» — «Да».
Способ №4. Используйте опцию «Maintenance»
Ну и последний из способов, позволяющий сбросить сообщение «Замените МК» на МФУ Kyocera состоит в следующем:
- Перейдите в меню вашего принтера (МФУ);
- Найдите там раздел «Service»;
- Там выберите пункт «Maintenance» (поддержка) и дважды нажмите на Enter;
Найдите в меню «Maintenance», и дважды нажмите на ввод - Счётчик будет сброшен.
Это интересно: тестовая страница для проверки цветного принтера.
Заключение
В нашем материале мы разобрали, как удалить сообщение «Замените МК» на японском принтере Kyocera, и какие способы нам в этом помогут. Поскольку устройства от Kyocera по выполнении 100 тысяч копий не исчерпывают свой ресурс, рекомендуем при появлении упомянутого сообщения произвести сброс счётчика МФУ. После этого уведомление «Замените МК» перестанет вам досаждать, а вы продолжите пользоваться всеми возможностями девайса от компании «Kyocera».
Опубликовано 22.08.2019 Обновлено 18.11.2020
Содержание
- 1 Принтер Kyocera не печатает: горит кнопка «Внимание»
- 2 Причины и типы горящей кнопки «Внимание» на принтере Kyocera
- 3 Способ №2. Используйте стандартное меню МФУ
- 4 Перезапуск работы принтера
- 5 Способ №1. Задействуйте код 10871087, чтобы сбросить сообщение
- 6 Использование служебной программы
- 7 Способ №3. Сбросьте в меню счётчик обслуживания
Принтер Kyocera не печатает: горит кнопка «Внимание»
Причины и типы горящей кнопки «Внимание» на принтере Kyocera
Для начала нужно понять, какие существуют варианты свечения красной кнопки на принтере Kyocera. В большинстве случаев именно определение характера свечения позволяет избавиться от проблемы, не совершая лишних действий. Каждый из этих типов относится к определенной природе проблемы, которую мы обсудим позже.
Теперь, когда вы знаете, какой тип перепрошивки вызывает какие проблемы, вы можете провести диагностику устройства и понять, какие действия следует предпринять. Тем, кто недавно заправил картридж и столкнулся с подобной проблемой, следует перезапустить принтер, о чем будет сказано ниже. Всем, кто не смог устранить ошибку самостоятельно, также рекомендуется выполнить эти шаги, а затем перейти к последнему совету, если они также окажутся неэффективными.
Способ №2. Используйте стандартное меню МФУ
Второй способ сбросить сообщение «Заменить MK» на принтере Kyocera — использовать доступные настройки меню функций.
- Нажмите кнопку «Меню» на клавиатуре МФУ »;
- С помощью кнопок вверх и вниз найдите параметр «Настройки / Сервис» и выберите его;

В меню выберите «Конфигурация / Сервис
Затем, используя кнопки «вверх» и «вниз», мы снова ищем «Service», нажимаем «Ok» и подтверждаем, снова нажимая «Ok»;

Выберите «Сервис»
Перезапуск работы принтера
Перезапуск принтера означает не только его стандартный перезапуск с помощью кнопки питания, но и сброс программных компонентов, отвечающих за подсчет израсходованных чернил и напечатанных страниц, что важно после замены картриджа или его повторной заправки. Чтобы устранить неполадки, когда загорелся индикатор «Внимание», вам необходимо по очереди выполнить до трех доступных вариантов перезапуска, отмечая, как это влияет на работу устройства. Подробные инструкции по этой теме можно найти по ссылке ниже.
Способ №1. Задействуйте код 10871087, чтобы сбросить сообщение
Первый способ сбросить сообщение «Заменить MK» на принтере Kyocera заключается в следующем:
- Введите на клавиатуре код 10871087, после чего вы попадете в сервисное меню;
Введите код, который мы предоставили - Откройте программу u251;
- Используйте стрелки на клавиатуре, чтобы выбрать опцию «удалить»;
- Для выхода из меню запустите программу u001. Если выйти из этой программы невозможно, выключите и снова включите устройство.


Использование служебной программы
Использование утилиты — отличный способ определить точную причину появления индикатора внимания, если у вас возникают трудности с его диагностикой самостоятельно и стандартные решения не приводят к желаемому результату. Через него при возникновении ошибки можно получить ее подробное описание и понять, что делать дальше.
Мы рады, что смогли помочь вам решить проблему.
Помимо этой статьи на сайте есть 12 232 инструкции.
Добавьте сайт Lumpics ru в свои закладки (CTRL + D) и мы обязательно вам пригодимся.
Способ №3. Сбросьте в меню счётчик обслуживания
Другой способ сбросить счетчик на принтере Kyocera:
- Зайдите в меню вашего МФУ;
- Выберите там «Настройка / Обслуживание»;
- Затем выберите опцию «Настройки службы»;
- Найдите в списке пункт «Счетчик обслуживания», выберите его и подтвердите сброс, ответив на вопрос «Вы уверены?» — «Да».
Источники
- https://kodyoshibok07.ru/sbros-soobshheniya-zamenite-mk-na-mfu-kyocera-ispravlenie-oshibki/
- https://computermaker.info/install-mk-kyocera-1920.html
- [https://it-doc.info/kak-sbrosit-soobshhenie-zamenite-mk-na-printere-kyocera/]
[свернуть]
Перейти к содержанию
На чтение 1 мин Просмотров 967 Опубликовано
Компания Kyocera давно завоевала лидирующие позиции на рынке оргтехники благодаря высокому качеству свой продукции. Особенно радует модульность принтеров\копиров.
Для обслуживания аппаратов используются следующие команды:
U110 обнуление счётчика барабана
U251 -обнуление счётчика техобслуживания
U167 -обнуление счетчика печки
U130 -подкачка тонера
U000 — х2 «start» — логи.
Для того, чтобы выполнить вход в сервис меню необходимно набрать следующий код на цифровой панели аппарата — 10871087.
Выбираем сервисную команду — курсором вверх/вниз ( KM-2030), кнопкой масштабирования «+/-» (KM-1530), или кнопками количества копий. Ввод данных осуществляется кнопкой «Start«.
Сброс печных ошибок и ошибки Zero Cross осуществляется сервисной командой 163, «Start», выбираем «Execute» (только для KM-2030), нажимаем «Start».
Сброс маслёнки: сервисной командой 251, кнопкой выбора контрастности выбираем позицию 3 контрастности, нажимаем «Start».
Для выхода из сервисного режима — у некоторых машин таких как, например, KM-1620\1650 надо ввести 001, затем нажать кнопку «Start». У большинства других — нажать кнопку «Сброс» или просто выкл\вкл аппарат.
Стоит отметить принцип навигации и команды подходят для более новых моделенй, например — Taskalfa 180 и 181.

Занимаюсь IT с 2007 года. Всё началось с увлечения — разгона компьютерного оборудования. Много воды и азота утекло с тех пор… Сейчас уже более 3х лет со своей командой оказываю комплексную поддержку и продвижение бизнеса: SEO, Яндекс.Директ, рассылки и удалённое обслуживание серверов. Буду рад помочь, обращайтесь!
Мы используем cookies для улучшения работы сайта, анализа трафика и персонализации. Используя сайт или кликая на Я согласен, вы соглашаетесь с нашей политикой использования персональных данных и cookies в соответствии с Политикой о персональных данных. Вы можете прочитать нашу политику здесь
Сброс информации об установленном неоригинальном тонер-картридже Kyocera
Новые модели принтеров и МФУ Kyocera (выпущенные после 2013 года) при использовании неоригинальных картриджей без чипа или заправке картриджей блокируются: — блокируется функция печати — появляется уведомление на дисплее об ошибке и/или красная световая индикация Тем не менее производитель, компания Kyocera, допускает работу с устройством и информация о сбросе ошибки указана в инструкции по эксплуатации. Необходимо выполнить одновременное нажатие на две кнопки и удержание в течение 3-4 секунд — до момента исчезновения надписи предупреждающей надписи на устройствах с экраном и/или появления зеленой индикации предупреждающих диодов.
В большинстве случаев для сброса информации об ошибке необходимо нажать кнопки [Сброс] (оранжевая) и [Ок] за исключением моделей серии Aquarius:

Сброс информации в МФУ Kyocera FS-1020mfp — кнопка [Стоп/Сброс] и кнопка выбора

Сброс информации в МФУ Kyocera FS-1025mfp, Kyocera FS-1120mfp — кнопки [Стоп/Сброс] и [OK]

Сброс информации в МФУ Kyocera FS-118MFP

Сброс информации FS-2000D

Сброс информации в принтерах Kyocera FS-1040, Kyocera FS-1060DN — кнопки [GO] и [Отмена]
Расположение кнопок в зависимости от модели устройства Kyocera:

Сброс информации в МФУ Kyocera M3040DN, M3540DN

Сброс информации в МФУ Kyocera M2030DN, M2035DN, M2535DN

Сброс информации в принтерах Kyocera FS-2100DN, FS-4100DN, FS-4200DN

Сброс информации в Ecosys P2035d, FS-1120D, FS-1320dn, FS-1110

Сброс информации в FS-1370dn, P2135dn


Сброс информации в M5021cdn/M5021cdw

Сброс информации в M5026cdn/M5026cdw


Информация взята с сайта:
29 лет на рынке расходных
материалов и офисной техники
-
Премьер дилер по продажам МФУ Toshiba e-Studio в г. Рязань
Авторизованный сервисный центр по ремонту и техническому обслуживанию МФУ Toshiba e-Studio
-
Авторизованный дилер по продажам документ-систем SHARP в Российской Федерации
-
Авторизованный сервисный центр по ремонту и техническому обслуживанию LED-плоттеров
и инженерных систем TERIOPRINT (Seiko I Infotec)
Дата публикации: 08.02.2021
0
11949
На большинстве картриджей разных компаний установленны чипы (микросхемы), которые служат для учета напечатанных страниц.
Некоторые устройства, когда заканчивается тонера в картридже, просто сигнализируют лампочкой или сообщением «тонер закончился», «замените картридж», но дают при этом печатать дальше.
Но есть и такие модели, где производители принтеров, намеренно устанавливают чипы, которые блокируют устройства, тем самым подталкивая вас купить оригинальный картридж.
Вариантов решения проблем с такими принтерами, несколько:
1. Купить новый картридж (оригинальный или совместимый)
2. Прошить аппарат, если это технически возможно и забыть про замену чипов.
3. Заправить картридж с заменой чипа
4. Сбросить ошибку (в основном только для Kyocera)
Как сбросить ошибку E-0001 на Kyocera мы ответим ниже.
Красная светодиодная индикация или ошибка E-0001 на Kyocera говорят нам о том, что тонер в картридже закончился (а точнее чип на картридже посчитал, что тонер закончился).
В большинстве случаев, сброс счетчика страниц происходит одновременным нажатием кнопок «OK» и «Стоп/Сброс»(оранжевая) на несколько секунд (3-4)
Разберем сброс счетчика страниц Kyocera на нескольких основных моделях:
1. Сброс счетчика страниц на Kyocera FS-2000D
2. Сброс счетчика страниц на Kyocera Ecosys P2035d

3. Сброс ошибки чипа на МФУ Kyocera FS-1125MFP

4. Сброс информации в МФУ Kyocera FS-1020MFP

5. Сброс счетчика информации на МФУ Kyocera 3140

6. Сброс ошибки чипа в МФУ Kyocera FS-1135MFP

Хотя в данных примерах далеко не все устройства приведены, но общий смысл должен быть понятен.
Есть еще некоторые модели, которые требуют дополнительного ввода ключа. В МФУ Kyocera M3145dn/M3645dn и некоторых других моделях, при включении аппарата появляется ошибка «Неоригинальный картридж с тонером». Нажимаем «Далее» и видим что от нас требуют ввести ключ, сам ключ указан в скобках (цифра). Вводим ту цифру, которая указана, жмем «OK» и МФУ продолжает работу.
Если у вас возникли проблемы со сбросом счетчика страниц или ошибки «Неоригинальный картридж с тонером» напишите нам указав модель вашего устройства и точную проблему или позвоните по контактным телефонам мы Вам поможем.
Сброс сообщения «Неоригинальный картридж с тонером» в аппаратах Kyocera
Во всех новых печатающих устройствах Kyocera на тонер-картриджах установлены чипы. Данные чипы позволяют пользователю контролировать остаток тонера, а также стимулируют к покупке новых картриджей. В этой статье описаны способы, как обойти блокировку на принтерах и МФУ компании Kyocera после заправки картриджа.
После заправки тонер-картриджа Kyocera, Ваше печатающее устройство, скорее всего выдаст сообщение: «Установлен неоригинальный картридж с тонером» или «Тонер отсутствует«. И тут большинство пользователей впадают в ступор)))
 |
Поскольку не хотят прочитать, что же написано в Справке аппарата, которую он любезно показывает совместно с ошибкой. |
А ведь Ваш аппарат Kyocera пытается Вам рассказать, что же необходимо сделать для дальнейшей работы устройства.
Для того, чтобы продолжить использовать заправленные картриджи, в большинстве случаев, необходимо на панели аппарата зажать одновременно две клавиши [СТОП] и [ОК] и подержать 3-5секунд.

Но не все советы одинаково полезны )))
На некоторых аппаратах используется другая комбинация клавиш. Найдите в списке Ваше печатающее устройство и выполните соответствующие инструкции.
Зажать красную и зеленую кнопки на корпусе принтера на 3 секунды или дольше.
Если нужно использовать установленный в настоящее время контейнер с тонером, одновременно нажмите и удерживайте клавиши [OK] и [Стоп] в течение минимум 3 с.
Внимание!!! Если после установки заправленного картриджа, аппарат выдает сообщение: «Добавьте тонер», это означает, что ваш картридж заправлен неправильно !
Можете смело предъявлять претензии заправщику, либо, как вариант, положение спасет новый картридж Kyocera TK-1200.
Внимание: у цветных принтеров и мфу Kyocera нет возможности сброса сообщения при помощи кнопок. Необходимо обязательно при заправке картриджа менять чип!
Источник
Kyocera: сброс ошибки «установлен неоригинальный картридж с тонером»
На принтерах и МФУ Kyocera после заправки картриджа может возникнуть ошибка «установлен неоригинальный картридж с тонером «. При этом аппарат отказывается печатать. Проблема легко решается либо сбросом через меню аппарата, либо установкой нового чипа на картридж.
Сброс счетчика осуществляется одновременным нажатием кнопок «Старт» и «Стоп» (либо «Сброс» и «ОК») на принтере и удержанием их в течение нескольких секунд.

Рис.1. Панель управления многофункционального устройства Kyocera M2040
На разных принтерах или мфу комбинация может отличаться. Ниже представлены некоторые из моделей.
Таблица 1. Сочетание кнопок для сброса в некоторых аппаратах Kyocera/
| FS-1020MFP | Если вы хотите использовать картридж с тонером, установленный на данный момент, одновременно нажмите Клавиша выбора режима и [Стоп/Сброс] и удерживайте не менее 3 секунд. |
| Если вы хотите использовать картридж с тонером, установленный на данный момент, одновременно нажмите [Стоп/Сброс] и [OK] и удерживайте не менее 3 секунд. | |
| Если вы хотите использовать картридж с тонером, установленный на данный момент, одновременно нажмите клавиши [GO] и [Отмена] и удерживайте не менее 3 секунд. | |
| Если требуется использовать установленный сейчас картридж с тонером, нажмите клавишу [OK] и клавишу [Стоп] одновременно и удерживайте их 3 секунды или дольше. | |
| Если вы хотите использовать установленный контейнер с тонером, одновременно удерживайте кнопки [OK] и [Отмена] на протяжении как минимум 3 секунд. | |
| ECOSYS M2135dn ECOSYS M2040dn ECOSYS M2635dn ECOSYS M2635dw ECOSYS M2540dn ECOSYS M2540dw |
Если нужно использовать установленный в настоящее время контейнер с тонером, одновременно нажмите и удерживайте клавиши [OK] и [Стоп] в течение минимум 3 с. |
| Если требуется использовать установленный сейчас картридж с тонером, нажмите клавишу [OK] и клавишу [Стоп] одновременно и удерживайте их 3 секунды или дольше. | |
| Наименование модели | Комбинация кнопок |
| FS-1020MFP | Одновременно нажмите клавишу выбора режима и [Стоп/Сброс] и удерживайте не менее 3-5 секунд. |
| FS-1025MFP | Одновременно нажмите [Стоп/Сброс] и [OK] и удерживайте не менее 3-5 секунд. |
| FS-1120MFP | |
| FS-1125MFP | |
| FS-1320MFP | |
| FS-1325MFP | |
| FS-1040 | Одновременно нажмите клавиши [GO] и [Отмена] и удерживайте не менее 3-5 секунд. |
| FS-1041 | |
| FS-1060DN | |
| FS-1061DN | |
| FS-1030MFP | Одновременно нажмите [Стоп/Сброс] и [OK] и удерживайте не менее 3-5 секунд. |
| FS-1130MFP | |
| FS-1035MFP | |
| FS-1135MFP | |
| FS-1100 | Нажать красную и зеленую кнопки на корпусе принтера на 3 секунды или дольше. |
| FS-1110 | |
| FS-1300D | |
| FS-1120D | |
| FS-1320D | |
| FS-2100D | Одновременно удерживайте кнопки [OK] и [Отмена] на протяжении как минимум 3-5 секунд. |
| FS-2100DN | |
| FS-4100DN | |
| FS-4200DN | |
| FS-4300DN | |
| ECOSYS M2135dn | Одновременно нажмите и удерживайте клавиши [OK] и [Стоп] в течение минимум 3-5 секунд. |
| ECOSYS M2040dn | |
| ECOSYS M2635dn | |
| ECOSYS M2635dw | |
| ECOSYS M2540dn | |
| ECOSYS M2540dw | |
| ECOSYS M2030dn | Нажмите клавишу [OK] и клавишу [Стоп] одновременно и удерживайте их 3 секунды или дольше. |
| ECOSYS M2035dn | |
| ECOSYS M2530dn | |
| ECOSYS M2535dn | |
| ECOSYS P2335d | Одновременно нажмите и удерживайте клавиши [OK] и [Стоп] в течение минимум 3 с. |
| ECOSYS M2835dw | |
| Ecosys M2735dn | |
| Ecosys M2235dn | |
| Ecosys P2335dn | |
| ECOSYS P2335dw |
Если указанные действия не привели к результату, необходимо заменить чип на картридже.
Обратите внимание, что у цветных принтеров Kyocera функция сброса сообщения при помощи кнопок не доступна — в данном случае поможет только замена чипа.
Источник
-
Contents
-
Table of Contents
-
Troubleshooting
-
Bookmarks
Quick Links
Related Manuals for Kyocera TASKalfa 180
Summary of Contents for Kyocera TASKalfa 180
-
Page 2
A label shown in the illustration assures that the supplies are our own brand. In this Operation Guide, Taskalfa 180/220 are referred to as 18 ppm model and 22 ppm model respectively. Included Guides The following guides are supplied with the machine. -
Page 3: Safety Conventions In This Guide
Safety Conventions in This Guide The sections of this guide and parts of the machine marked with symbols are safety warnings meant to protect the user, other individuals and surrounding objects, and ensure correct and safe usage of the machine. The symbols and their meanings are indicated below.
-
Page 4: Table Of Contents
Contents Contents Part Names Operation Panel …………. 1-2 Message Display.
-
Page 5
Contents Troubleshooting Solving Malfunctions …………8-2 Responding to Error Messages. -
Page 6
Caution / Warning Labels Caution / Warning labels have been attached to the machine at the following locations for safety purposes. Be sufficiently careful to avoid fire or electric shock when removing a paper jam or when replacing toner. Label3 Label2 Do not attempt to incinerate the toner High temperature inside this section. -
Page 7: Installation Precautions
Installation Precautions Environment CAUTION Avoid placing the machine on or in locations which are unstable or not level. Such locations may cause the machine fall down or fall over. This type of situation presents a danger of personal injury or damage to the machine.
-
Page 8: Other Precautions
• Avoid locations with direct exposure to hot or cold air. • Avoid poorly ventilated locations. If the floor is delicate against casters, when this machine is moved after installation, the floor material may be damaged. During copying, some ozone is released, but the amount does not cause any ill effect to one’s health. If, however, the machine is used over a long period of time in a poorly ventilated room or when making an extremely large number of copies, the smell may become unpleasant.
-
Page 9: Precautions For Use
Precautions for Use Cautions when using the machine WARNING Do not place metallic objects or containers with water (flower vases, flower pots, cups, etc.) on or near the machine. This type of situation presents a danger of fire or electrical shock should they fall inside. Do not remove any of the covers from the machine as there is a danger of electrical shock from high voltage parts inside the machine.
-
Page 10: Cleaning
CAUTION Do not pull the power cord when removing it from the outlet. If the power cord is pulled, the wires may become broken and there is a danger of fire or electrical shock. (Always grasp the power plug when removing the power cord from the outlet.) Always remove the power plug from the outlet when moving the machine.
-
Page 11
If toner happens to spill from the toner container or the waste toner box, avoid inhalation and ingestion, as well as contact with your eyes and skin. • If you do happen to inhale toner, move to a place with fresh air and gargle thoroughly with a large amount of water. -
Page 12: Safety Of Laser Beam
SAFETY OF LASER BEAM 1. Safety of laser beam This machine has been certified by the manufacturer to Class 1 level under the radiation performance standards established by the U.S.DHHS (Department of Health and Human Services) in 1968. This indicates that the product is safe to use during normal operation and maintenance. The laser optical system, enclosed in a protective housing and sealed within the external covers, never permits the laser beam to escape.
-
Page 13
4. Maintenance For safety of the service personnel, follow the maintenance instructions in the other section of this manual. 5. Safety switch The power to the laser unit is cut off when the front cover is opened. OPERATION GUIDE… -
Page 14: Safety Instructions Regarding The Disconnection Of Power
Safety Instructions Regarding the Disconnection of Power Caution: The power plug is the main isolation device! Other switches on the equipment are only functional switches and are not suitable for isolating the equipment from the power source. Attention: Le débranchement de la fiche secteur est le seul moyen de mettre l’appareil hors tension. Les interrupteurs sur l’appareil ne sont que des interrupteurs de fonctionnement: ils ne mettent pas l’appareil hors tension.
-
Page 15
(1) year, or 150,000 copies/prints from date of installation, whichever first occurs. In the event the MFP or an accessory is found to be defective within the warranty period, Kyocera’s only obligation and the Customer’s exclusive remedy shall be replacement of any defective parts. -
Page 16
Legal Restriction on Copying/Scanning • It may be prohibited to copy/scan copyrighted material without permission of the copyright owner. • Copying/Scanning the following items is prohibited and may be penalized by low. It may not be limited to these items. Do not knowingly copy/scan the items that are not to be copied/ scanned. -
Page 17: Legal And Safety Information
Legal and Safety Information Please read this information before using your machine. This chapter provides information on the following topics. • Legal Information …………xvi • Regarding Trade Names……….xvii • Energy Saving Control Function ……..xviii • Automatic 2-Sided Copy Function ……. xviii •…
-
Page 18: Legal Information
Legal Information Copying or other reproduction of all or part of this guide without the prior written consent of Kyocera Mita Corporation is prohibited. OPERATION GUIDE…
-
Page 19: Regarding Trade Names
ENERGY STAR is a U.S. registered mark. • KYOCERA is a trademark of Kyocera Corporation. All other brands and product names are registered trademarks or trademarks of their respective companies. The designations ™ and ® will not be used in this Operation Guide.
-
Page 20: Energy Saving Control Function
Energy Saving Control Function The device comes equipped with a Low Power Mode where energy consumption is reduced after a certain amount of time elapses since the device was last used, as well as a Sleep Mode where printer function remains in a waiting state but power consumption is still reduced to a minimum when there is no activity with the device within a set amount of time.
-
Page 21: About This Operation Guide
About this Operation Guide This Operation Guide contains the following chapters. Chapter 1 — Part Names Identifies machine parts and operation panel keys. Chapter 2 — Preparation before Use Explains adding paper, placing originals, connecting the machine, and necessary configurations before first use. Chapter 3 — Basic Operation Describes the basic procedures of simple copying and printing.
-
Page 22
OPERATION GUIDE… -
Page 23
Conventions in This Guide The following conventions are used depending on the nature of the description. Convention Description Example [Bold] Indicates the operation panel Press [OK]. keys or a computer screen. Italic Indicates a message displayed Ready to copy is displayed. on the touch panel. -
Page 24: Originals And Paper Sizes
Originals and Paper Sizes This section explains the notation used in this guide when referring to sizes of originals or paper sizes. As with A4, B5 and Letter, which may be used either in the horizontal or vertical direction, horizontal direction is indicated by an additional letter R in order to indicate the orientation of the original/paper.
-
Page 25: Part Names
1 Part Names This chapter identifies the machine parts and operation panel keys. • Operation Panel …………1-2 • Message Display…………1-4 • Machine …………….1-6 OPERATION GUIDE…
-
Page 26: Operation Panel
Part Names Operation Panel Inch specifications 13 16 Start Key (Indicator) Stop/Clear Key Reset Key Energy Saver Key Numeric keys Interrupt Key Logout Key OK Key /Auto%100% Key Paper Supply Indicator Paper Selection Key Paper Supply Level Indicator Paper Misfeed Indicator MP Indicator No.
-
Page 27
Part Names Metric specifications 13 16 Attention Indicator Error Indicator Add Toner Indicator Maintenance Indicator Image Quality Selection Key Printer Key (Indicator) Press this to switch the message display between copier mode and printer mode, when the optional printer kit is installed. 2-sided Key Mixed Original Size Key Combine Key… -
Page 28: Message Display
Part Names Message Display The message display on the operation panel shows: • Status information, the messages listed below which are displayed during normal operation. • Error codes, when the printer requires the operator’s attention, refer to Responding to Error Messages on page 8-5.
-
Page 29: Custom Sizes
Part Names Custom Sizes Paper and original sizes that are not displayed on the Operation Panel can be registered as Custom Sizes. (Entering Custom Sizes on page 5-15.) Automatic Cassette Switching Function If multiple cassettes contain the same size paper and the paper in one cassette runs out during copying, the automatic cassette switching function will switch paper feed from the empty cassette to the other cassette that still contains paper.
-
Page 30: Machine
Part Names Machine Original Cover Output Tray Operation Panel Cassette Paper Width Guides Paper Stopper Left Cover Handle MP Tray (multi-purpose tray) MP Tray Extension Paper Width Guides OPERATION GUIDE…
-
Page 31
Part Names Platen Original Size Indicator Plate Left Cover Waste Toner Box Toner Container Release Lever Toner Container Cleaning shaft Front Cover OPERATION GUIDE… -
Page 32
Part Names Handles for transport Main power switch Main power switch cover OPERATION GUIDE… -
Page 33: Preparation Before Use
2 Preparation before Use This chapter explains the preparations before using this equipment for the first time as well as the procedures for loading papers and originals. • Check bundled items …………2-2 • Loading Paper……………2-3 • Loading Originals …………2-13 OPERATION GUIDE…
-
Page 34: Check Bundled Items
Preparation before Use Check bundled items Check that the following items have been bundled. • Operation Guide (This Guide) OPERATION GUIDE…
-
Page 35: Loading Paper
Preparation before Use Loading Paper Paper can be loaded standardly in a cassette and the multi purpose tray. A paper feeder is also available as an option (refer to Appendix-5). Before Loading Paper When you open a new package of paper, fan the sheets to separate them slightly prior to loading in the following steps.
-
Page 36: Loading Paper In The Cassettes
Preparation before Use Loading Paper in the Cassettes Standard paper, recycled paper, and colored paper can be loaded into the cassette. Up to 300 sheets of standard paper (80 g/m ) or 100 sheets of thick paper (90 to 105 g/m ) can be set.
-
Page 37
Preparation before Use Using the paper length guide, move the plate to fit the paper. IMPORTANT: • Make sure that the length guide is flush against the paper. If there is space between the guide and the paper, set the length guide again. •… -
Page 38: Cassette Size Detection
Preparation before Use • If the length and width guides are not flush against the paper, a size that is different from the actual size may be displayed on the message display. • When the paper has become wrinkled from moisture and cannot be fed, set the paper so that the wrinkled side is toward the length guide.
-
Page 39: Loading Paper In The Mp Tray
Preparation before Use Press the OK key. The display will blink and copying starts. Loading Paper in the MP Tray In addition to standard paper and recycled paper, special paper (45 to 160 g/m ) can also be loaded. Up to 100 sheets of standard (80 g/m²) A4/Letter size paper (50 sheets of A5R, A6R, Statement-R, 25 sheets of the other sizes) can be set.
-
Page 40
Preparation before Use Adjust the paper width guides to the width of the paper. Insert the paper along the paper width guides into the tray until it stops. IMPORTANT: Keep the side that was closest the package seal facing up. Put only the paper on the MP tray. -
Page 41: Loading Envelopes
Preparation before Use Loading Envelopes Up to 5 envelopes may be loaded in the multi purpose tray. Acceptable envelope sizes are as follows. Acceptable Envelope Size Hagaki 148 × 100 (mm) Oufuku Hagaki 148 × 200 (mm) Youkei 2 162 × 114 (mm) Youkei 4 235 ×…
-
Page 42
Preparation before Use When loading the cardstock, open the paper stopper shown in the figure. For landscape form envelopes, close the flap. Insert the envelope all the way along the width guides, keeping the printing side face-up and the edge with the flap facing towards you. For portrait form envelopes, close the flap. -
Page 43
Preparation before Use MP Tray Size and Media Type Adjust the paper in the MP Tray, register the paper size using the Operation Panel and specify the media type. Selecting a Size from Regular Sizes Press the Paper Selection key for 3 seconds. The System Menu will be displayed. -
Page 44: Selecting Special Paper Type
Preparation before Use Envelope #9, Monarch, Envelope #6.75, Envelope C5, Envelope C4, Envelope DL, Hagaki, OufukuHagaki, Youkei 2gou, Youkei 4gou, 8k R, 16k R, 16k Metric specifications: A6 R, B5, B6 R, Ledger R, Legal R, Letter R, Letter, Statement R, Oficio 2, Executive, ISO B5, Envelope #10, Envelope #9, Monarch, Envelope #6.75, Envelope C5, Envelope C4, Envelope DL, Hagaki, OufukuHagaki, Youkei 2gou, Youkei 4gou,…
-
Page 45: Loading Originals
Preparation before Use Loading Originals Follow the steps below to load originals for copying or sending. Placing Originals on the Platen You may place books or magazines on the platen in addition to ordinary sheet originals. In addiiton, When copying from an original which cannot be set in the document processor, open the document processor and set the original directly on the platen.
-
Page 46: Loading Originals In The Document Processor
Preparation before Use Loading Originals in the Document Processor The optional document processor automatically scans each sheet of multiple originals. Both sides of two-sided originals are scanned. Originals Supported by the Document Processor The document processor supports the following types of originals. •…
-
Page 47
Preparation before Use How to Load Originals IMPORTANT: Before loading originals, be sure that there are no originals left on the original eject table. Originals left on the original eject table may cause the new originals to jam. Adjust the original width guides to fit the originals. NOTE: Before setting originals, make sure that there are no originals remaining on the original eject table. -
Page 48
Preparation before Use IMPORTANT: To keep ejected originals from falling off the machine, open the ejection extension when using large originals such as A3, B4, 11 × 17″ (Ledger), and × 14″ (Legal). When copying from 2-sided originals, the originals are temporarily ejected onto the ejection tray in order to turn them over. -
Page 49: Basic Operation
3 Basic Operation This chapter explains the following operations. • Power On/Off …………..3-2 • Low Power Mode and Auto Low Power Mode ….3-3 • Auto Sleep …………..3-4 OPERATION GUIDE…
-
Page 50: Power On/Off
Basic Operation Power On/Off Power On Turn the power of this machine on Open the main power switch cover located on the right side of the machine and turn the main power switch on ( | ). The machine starts to warm up Once warm-up is completed, the Start indicator lights up green Power Off…
-
Page 51: Low Power Mode And Auto Low Power Mode
Basic Operation Low Power Mode and Auto Low Power Mode Low Power Mode To activate Low Power Mode, press the Energy Saver key. The Energy Saver indicator lights and — is displayed on the No. of Copies/Zoom Display to save power except the Energy Saver indicator. This status is referred to as Low Power Mode.
-
Page 52: Auto Sleep
Basic Operation Auto Sleep Auto Sleep automatically switches the machine into Sleep if left idle for a preset time in the Low Power Mode. The default preset time is 1 minutes. When the machine is in sleep status, the Energy Saver indicator lights and — is displayed.
-
Page 53: Copying Functions
4 Copying Functions This chapter explains the functions available for copying. • Basic Copying Procedure …………..4-2 • Adjusting Density …………….. 4-3 • Selecting Image Quality …………… 4-4 • Zoom Copying………………4-5 • Collate Copying………………4-7 • Paper Selection………………4-8 •…
-
Page 54: Basic Copying Procedure
Copying Functions Basic Copying Procedure Follow the steps as below for basic copying. Place the originals on the platen or in the optional document processor. NOTE: For loading instructions, refer to Loading Originals on page 2-13. Select the desired copier’s functions to use. Select the copy paper.
-
Page 55: Adjusting Density
Copying Functions Adjusting Density The copy density is adjusted manually. To make the copy darker, press Density Adjustment key on the right and move the density scale to the right. To make the copy lighter, press Density Adjustment key on the left and move the exposure scale to the left.
-
Page 56: Selecting Image Quality
Copying Functions Selecting Image Quality The Image Quality can be selected to match the type of original to be copied. Press the Image Quality Selection key to light up the Image Quality Mode to be used. The table below shows the quality options. Image quality mode Description Text + Photo…
-
Page 57: Zoom Copying
Copying Functions Zoom Copying Adjust the magnification to reduce or enlarge the original image. The following zoom options are available. NOTE: When magnification ratio is larger than 201%, the images will be rotated 90° counter-clockwise prior to copying. Auto Zoom Automatically reduces or enlarges the original image suitably to the selected paper size.
-
Page 58
Copying Functions Press to change the zoom percentage, and then press the OK key. NOTE: The percentage can also be input using the numeric keys. After the zoom percentage has been confirmed the display changes back to the No. of Copies display. Press the Start key to start copying. -
Page 59: Collate Copying
Copying Functions Collate Copying Since copying in this mode is performed after multiple originals have been scanned and memorized, a required number of collated copy sets can be produced. NOTE: If the optional document processor is installed, you can select whether or not to turn on the collate mode at a default setting.
-
Page 60: Paper Selection
Copying Functions Paper Selection When Automatic Paper Selection is lit, a paper size identical to the original will be automatically selected. Press the Paper Selection key in order to select a different paper size to copy. NOTE: It is possible to turn off the Automatic Size Selection function. (Refer to Cassette Selection on page 5- 13.) It is also possible to select the cassette that is to be automatically given priority for use.
-
Page 61: Mixed Sized Originals
Copying Functions Mixed Sized Originals Using the optional document processor, the originals of different sizes can be loaded in a batch and copied. In this operation, up to 30 originals of different sizes can be placed in the document processor at the same time. Supported Combinations of Originals The supported combinations of originals are as follows.
-
Page 62: Ecoprint
Copying Functions EcoPrint Use EcoPrint to save toner when printing. Use this function for test copies or any other occasion where high quality print is unnecessary. The procedure for making copies using EcoPrint is explained below. Place the originals on the platen. Press the EcoPrint key.
-
Page 63: Combine Mode
Copying Functions Combine Mode This mode allows you to copy 2 or 4 originals combined onto a single page. 2-in-1 mode or 4-in-1 mode. The page boundary of each original can be indicated. NOTE: Both the original size and the copy paper size must be regular sizes. 2-in-1 Mode For copying two originals onto a single sheet.
-
Page 64
Copying Functions The directions for setting the original and the finished copy are as follows. When the original is set on the platen Original Setting Direction Finished Product Original Setting Direction Finished Product When the original is set in the Document Processor Original Setting Direction Finished Product Original Setting Direction… -
Page 65
Copying Functions 4-in-1 Mode For copying four originals onto a single sheet. This mode can be used with Duplex mode to copy eight originals onto one sheet. The following 4-in-1 options and output orientations are available. Original Copy Orientation of Original Platen Document processor NOTE:… -
Page 66
Copying Functions The directions for setting the original and the finished copy are as follows. When the original is set on the platen Original Setting Direction Finished Product When the original is set in the Document Processor Original Setting Direction Finished Product 4-14 OPERATION GUIDE… -
Page 67
Copying Functions Types of Page Boundary Lines The following types of the boundary lines are available. None Solid Dotted The procedure for using Combine mode copying is explained below. Place the originals on the platen. NOTE: The underside Rotate Copy can also be set in the System Menu. -
Page 68: In 1 Layout
Copying Functions Press the Combine key for 3 seconds. The System Menu will be displayed. Confirm that 45.4 in 1 Layout is displayed and 45.4 in 1 Layout then press the OK key. Portrait 1 Press to select the layout. Portrait 1 Portrait 2 The order in which pages are to be laid out is…
-
Page 69: Margin Mode
Copying Functions Margin Mode Shift the original image to make space on the copy for binding on the left (right) or top (bottom) side. The following margin widths are available. Input units Margin Width Inch Models 0.13 to 0.75″ (in 0.12″ increments) Metric Models 1 to 18 mm (in 1 mm increments) Original…
-
Page 70: Setting The Margin
Copying Functions Press the the Start key key to start copying. Setting the Margin Use the procedure given below to change the Margin. Press the Margin key for 3 seconds. The System Menu for the Margin will be displayed. Press to select the binding margin width, 43.Stitch Width and then press the OK key.
-
Page 71: Border Erase
Copying Functions Border Erase Use Border Erase to remove black shadows that appear around the outside of the original when making copies. The following options can be selected. Sheet Erase Erases black borders around the single sheet original. Original Copy Book Erase Erases black borders around the edges and in the middle of the original such as a thick book.
-
Page 72
Copying Functions Press the Border Erase key for 3 seconds. 44.Border Erase The System Menu for the Border Width will be displayed. Press to select the border width, and then press the OK key. The display will blink and the copier will return to the state where copying can be continued. -
Page 73: Duplex Copying
Copying Functions Duplex Copying Copies of both sides can be made from open-faced originals as well as from 2-in-1 originals. One-sided to Two-sided Produces two-sided copies from one-sided originals. In case of an odd number of originals, the back side of the last copy will be blank.
-
Page 74: Sided Copy Reverse Side Rotation Setting
Copying Functions The procedure for using two-sided/duplex copying is explained below. Place the originals on the platen. NOTE: The underside Rotate Copy can also be set in the System Menu. (Refer to 2-Sided Copy Reverse Side Rotation Setting on page 4-5.) The value set in the System Menu will inherit the value that is set at the time when the copy is made.
-
Page 75: Split Copying
Copying Functions Split Copying Copy books, magazines, etc. with two facing pages of an open-faced original onto separate sheets of paper. Two-sided to One-sided Copies each side of a two-sided original onto two individual sheets. The optional document processor is required.
-
Page 76: Interrupt Copying
Copying Functions Interrupt Copying This function can be used to stop copying and to make a copy of a different original at different settings. After the interrupt copy has been produced, the interrupted copying can be resumed at the same settings in effect prior to the interruption.
-
Page 77: Program Function
Copying Functions Program Function After registering sets of frequently used functions as a single program, you can simply press the program number as needed to recall those functions. You can also name the programs for easy identification when recalling. Registering Programs Use the procedure below to register a program.
-
Page 78
Copying Functions 4-26 OPERATION GUIDE… -
Page 79: System Menu
5 System Menu This chapter explains the system settings concerning the general operation of this machine. The principal settings that can be made are shown below. • System Menu …………..5-2 • Procedure for Changing the Default Settings ….5-9 OPERATION GUIDE…
-
Page 80: System Menu
System Menu System Menu The copier will enter the System Menu after warm up has been completed or when the Reset key has been pressed. The settings automatically set for the copier in the System Menu are called the Default Settings. These settings can be freely changed to match the usage of the copier.
-
Page 81
System Menu System Menu Items Description Available settings Reference Page 08.Text+Ph Dens. Adjusts the central exposure value for the copier’s 1(lightest) to 5-11 manual exposure (Text and Photo). 7(darkest) (*4) 09.Photo Density Adjusts the central exposure value for the copier’s 1(lightest) to 5-11 manual exposure (Photo). -
Page 82
System Menu System Menu Items Description Available settings Reference Page 18.PriorAutoZoom Sets whether or not to use automatic magnification On: Enabled 5-15 (zoom/reduction percentage) when a paper cassette Off: Disabled* has been selected. 19.Cassette1Size Automatically detects the paper size in the cassettes Auto Detect mm (1 to 4). -
Page 83
System Menu System Menu Items Description Available settings Reference Page 24.Custom Size 1 Sets the size to be set to the Custom size (1 to 2). [Inch specifications] 5-15 This makes it possible to set the sizes that do not A3 R 25.Custom Size 2 appear on the operation panel. -
Page 84
System Menu System Menu Items Description Available settings Reference Page 26.Casst1MedType Specifies the media type to the cassettes (1 to 4). Plain* 5-16 Cassette 2, 3 and 4 will be displayed only when the Recycled 27.Casst2MedType optional Paper Feeder is installed. Preprinted Bond 28.Casst3MedType… -
Page 85
System Menu System Menu Items Description Available settings Reference Page 45.4 in 1 Layout Sets the layout for the order in which the originals will Portrait 1* 4-14 appear in the 4-in-1 Layout mode. Portrait 2 Landscape 1 Landscape 2 46.Combine Border Selects the type of borderline to be used in the Layout Off*… -
Page 86
System Menu System Menu Items Description Available settings Reference Page 56.CoverageRepo Prints out a report that shows the number of copies 5-23 made and the average amount of toner used (blackness ratio %) for each paper size. System Menu Operation Procedures Follow the procedures listed below to operate in the System Menu. -
Page 87: Procedure For Changing The Default Settings
System Menu Procedure for Changing the Default Settings The procedure for changing each of the items in the System Menu is described below. User Status Report Outputs a list of the values set for the System Menu items. NOTE: Check to make sure that Letter/A4 size paper is loaded in the cassette. Display the System Menu.
-
Page 88: Initial Density
System Menu Press to select Text+Ph Dens, Photo Density or Text Density, and then press the OK key. The display will return to that of Step 2. Initial Density Sets the copy density at the time the copier is turned on to Manual or Automatic. Display the System Menu.
-
Page 89: Auto Density Adjustment
System Menu Press to select 1 Step, or 0.5 Step, and then press the OK key. The display will return to that of Step 2. Auto Density Adjustment Adjusts the overall density of the copy when Auto Exposure Mode is used. Display the System Menu.
-
Page 90: Original Image Quality
System Menu The display will return to that of Step 2. Text Density Adjustment Adjusts the median density value of the copy for the Text original. Display the System Menu. (Refer to System Menu Operation Procedures on page 5-7.) Press to select select 10.Text System Menu: Density, and then press the OK key.
-
Page 91: Background Adjustment
System Menu Press to select Off, Weak or Strong, and then press the OK key. The display will return to that of Step 2. Photo Processing Select the processing method for photo originals. Display the System Menu. (Refer to System Menu Operation Procedures on page 5-7.) Press to select select…
-
Page 92: Selecting Media Types For Automatic Paper Selection
System Menu The display will return to that of Step 2. Selecting Media Types for Automatic Paper Selection Specifies the type of media when the copier automatically selects the copy paper according to the size of the original. The type of media can be specified from the following types of paper supported. Plain, Transparency, Rough, Vellum, Labels, Recycled, Preprinted, Bond, Cardstock, Color (Colour), Prepunched, Letterhead, Thick paper, Envelope, High Quality and Custom 1-8 When Plain is selected in the following example, the copier looks for the cassette or MP tray in which the paper…
-
Page 93: Auto Cassette Switching
System Menu Auto Cassette Switching When the optional Paper Feeder has been installed, select whether or not to use the Auto Cassette Switching function. Display the System Menu. (Refer to System Menu Operation Procedures on page 5-7.) Press to select select System Menu: 17.AutoCassetSel, and then press the OK key.
-
Page 94
System Menu Press to select the size. The paper sizes displayed are as shown in the table below. When selecting Irregular Sizes, carry out the following procedures. In the case of the selection of other sizes, proceed to Step 7. Inch specifications Metric specifications A3 R… -
Page 95
System Menu Selecting Media Type (Cassettes 1 to 4) Specifies the media type to the cassette 1 to 4. These cassettes support the following media type. Plain, Preprinted, Bond, Recycled, Rough, Letterhead, Color (Colour), Prepunched, High Quality and Custom The setting of Cassette 1 is shown here as an example, select 27.Casst2MedType, 28.Casst3MedType and 29.Casst4MedType in the System Menu before selecting Cassette 2, 3 and 4 (option), respectively. -
Page 96: Auto Detect Originals
System Menu Press to select the desired media type, and then press the OK key. When the optional Duplex Unit is not installed, the display will return to that of Step 2. Press to select On when 2-sided Copying is to be used or Off when it is not used., and then press the OK key.
-
Page 97: Copy Limit
System Menu Copy Limit Limits the number of copies or sets of copies that can be made at one time. Display the System Menu. (Refer to System Menu Operation Procedures on page 5-7.) Press to select 41.Copy Limit, and System Menu: then press the OK key.
-
Page 98: Auto Clear Setting
System Menu Press to select On when the sets of copied documents are to be rotated and Off when no rotation is to be performed, and then press the OK key. The display will return to that of Step 2. Silent Mode Transition Time Shortens the amount of time the internal motor continues to run after the copy is produced.
-
Page 99: Auto Clear Time
System Menu Press to select select 51.Auto Sleep, System Menu: and then press the OK key. 51.Auto Sleep Press to select On in the case when the transition to Auto Sleep is to be made or Off when it is not, and then press the OK key. The display will return to that of Step 2.
-
Page 100: Sleep Mode Transition Time
System Menu Press to select select 53.LowPower System Menu: Time, and then press the OK key. 53.LowPower Time Press to select a time interval from 1 minute to 240 minutes. NOTE: The time intervals available are: 1, 5, 15, 30, 45, 60, 90, 120, 180 and 240 minutes.
-
Page 101: Checking The Total Counter
System Menu NOTE: This can be set when the Auto Sleep setting has been set to On. (Refer to Auto Sleep Setting on page 5-21.) The time intervals that can be set are 1, 5, 15, 30, 45, 60, 90, 120, 180 and 240 minutes. Press the OK key.
-
Page 102
System Menu Press the Stop/Clear key for 3 seconds. The Copy Count will be displayed on the message display. NOTE: Pressing the Start key while the Copy Count is displayed will output the Counter Report. Check to make sure that Letter/A4 paper is available in the cassette before printing out the Counter Report. -
Page 103: Job Accounting
6 Job Accounting This chapter explains the job accounting functions of this machine. The principal functions that can be set are shown below. • Overview of Job Accounting ………6-2 • Job Accounting Operation Procedures ……6-3 • Department ID Code Registration………6-4 •…
-
Page 104: Overview Of Job Accounting
Job Accounting Overview of Job Accounting Job Accounting allows you to manage the number of copies for each department through the setting of the Department ID Code separately for each department. This copier has the following features available through the Department ID Code. •…
-
Page 105: Job Accounting Operation Procedures
Job Accounting Job Accounting Operation Procedures Follow the procedures listed below to operate Job Accounting. Press the Exposure Adjustment keys on both sides for 3 seconds while pressing the Logout key. Job Accounting: will be displayed. Press to select each of the mode displays.
-
Page 106: Department Id Code Registration
Job Accounting Department ID Code Registration A Department ID Code of up to 8 digits can be entered. Display Job Accounting. (Refer to Job Accounting Operation Procedures on page 6-3.) Press to select display 02.Register Job Accounting: code, and then press the OK key. 02.Register code Enter the Department ID Code to be registered (up to a maximum of 8 digits) using numeric keys.
-
Page 107: Deleting Department Id Codes
Job Accounting Deleting Department ID Codes Deleting a registered Department ID Code. Display Job Accounting. (Refer to Job Accounting Operation Procedures on page 6-3.) Press to select display 03.Delete Job Accounting: code, and then press the OK key. 03.Delete code Enter the Department ID Code to be deleted using the numeric keys.
-
Page 108: Clearing The Job Accounting Count
Job Accounting Clearing the Job Accounting Count The Total No. of Copies Count for all departments can be cleared. Display Job Accounting. (Refer to Job Accounting Operation Procedures on page 6-3.) Press to select display 04.Count Job Accounting: Clear, and then press the OK key. 04.Count Clear Press to select Yes, and then press the…
-
Page 109: Printing The Job Accounting List
Job Accounting Printing the Job Accounting List The Total No. of Copies by department can be printed. NOTE: Check to make sure that Letter/A4 size paper is loaded in the cassette. Display Job Accounting. (Refer to Job Accounting Operation Procedures on page 6-3.) Press to select display 05.Print list, Job Accounting:…
-
Page 110: How To Set Job Accounting
Job Accounting How to set Job Accounting Set Job Accounting to enable or disable it. Display Job Accounting. (Refer to Job Accounting Operation Procedures on page 6-3.) Press to select display Job Accounting: 01.JobAccounting, and then press the OK key. 01.JobAccounting Press to select On when Job Accounting…
-
Page 111: Making Copies In Job Accounting Mode
Job Accounting Making copies in Job Accounting Mode When Job Accounting is being carried out «= = =» will be displayed in the No. of Copies display and copy operations can be carried out by entering the assigned Department ID Codes using the numeric keys. IMPORTANT: Always remember to press the Logout key after completing copying.
-
Page 112
Job Accounting 6-10 OPERATION GUIDE… -
Page 113: Maintenance
7 Maintenance This chapter describes cleaning and toner replacement. • Cleaning…………….7-2 • Toner Container and Waste Toner Box Replacement …7-6 OPERATION GUIDE…
-
Page 114: Cleaning
Maintenance Cleaning Clean the machine regularly to ensure optimum output quality. CAUTION: For safety, always unplug the power cord before cleaning the machine. Original Cover / Glass Platen Wipe the backside of the original cover, the inside of the document processor and the glass platen with a soft cloth dampened with alcohol or mild detergent.
-
Page 115
Maintenance Open the document processor and wipe the slit glass (a). Wipe the white guide (b) on the document processor. Separator Clean the separator regularly (at least monthly) to ensure optimum output quality. Open the front cover. Remove cleaning brush (blue colored). OPERATION GUIDE… -
Page 116: Transfer Roller
Maintenance Pull up and open left cover. As shown in the figure, clean dirt from the separator by moving the brush from side to side along the separator. Put away the cleaning brush, press the specified position of the front cover and left cover to close. Transfer Roller Open the front cover.
-
Page 117
Maintenance Pull up and open left cover. As shown in the figure, clean dirt from the transfer roller by moving the brush from side to side along the roller while rotating the roller by turning the gear at the left end of the roller. Put away the cleaning brush, press the specified position of the front cover and left cover to close. -
Page 118: Toner Container And Waste Toner Box Replacement
Maintenance Toner Container and Waste Toner Box Replacement When the touch panel displays Add toner, replace the toner. Every time you replace the toner container, be sure to clean the parts as instructed below. Dirty parts may deteriorate output quality. CAUTION: Do not attempt to incinerate the toner container or the waste toner box.
-
Page 119
Maintenance WARNING: High voltage is present in the charger section. Take sufficient care when working in this area, as there is a danger of electrical shock. IMPORTANT: Do not invert the old waste toner box. Use the cap attached to the center of the old waste toner box to cover the opening. -
Page 120: Cleaning Electrical Charge Section
Maintenance Place the old toner container in the plastic bag provided for disposal. Cleaning Electrical Charge Section While holding the charger cleaner rod, gently pull it out as far as it will go and push it in again. Repeat this operation two or three times. NOTE: Do not use excessive force to pull the rod or attempt to pull it out completely.
-
Page 121
Maintenance When the electrical charge section is pulled out approximately 5 cm (2 inches), remove the grid cleaner and then push back the electrical charge section all the way into the main body. IMPORTANT: After you use the grid cleaner to clean the electrical charge section, the machine can be used again after more than 5 minutes have elapsed. -
Page 122
Maintenance Insert the new toner container, and push it with both hands until it is locked. Install the new waste toner box. Close the front cover. NOTE: Return the exhausted toner container and waste toner box to your dealer or service representative. -
Page 123: Troubleshooting
8 Troubleshooting This chapter explains how to solve problems with the machine. • Solving Malfunctions ………….8-2 • Responding to Error Messages ……..8-5 • Clearing Paper Jams …………8-9 OPERATION GUIDE…
-
Page 124: Solving Malfunctions
Troubleshooting Solving Malfunctions The table below provides general guidelines for problem solving. If a problem occurs with your machine, look into the checkpoints and perform procedures indicated on the following pages. If the problem persists, contact your Service Representative. Reference Symptom Checkpoints Corrective Actions…
-
Page 125
Troubleshooting Reference Symptom Checkpoints Corrective Actions Page Printouts are too dark. Is the machine in Auto Set the correct density level for — Density mode? auto density. Is the machine in Manual Use the Image Quality selection Density mode? key to set the correct density level. When changing the default density —… -
Page 126
Troubleshooting Reference Symptom Checkpoints Corrective Actions Page Printouts are Is the paper separator of the Clean the paper separator. wrinkled. paper feed unit dirty? Is the paper damp? Replace the paper with new paper. Is the paper set in a proper Change the orientation in which the —… -
Page 127: Responding To Error Messages
Troubleshooting Responding to Error Messages If the touch panel displays any of these messages, follow the corresponding procedure. Alphanumeric Reference Display Corrective Procedure Page There is no paper in the cassette. Load paper into the Add paper cassette as displayed in place of #. in cassette #.
-
Page 128: Paper Jam
Troubleshooting Reference Display Corrective Procedure Page The left cover of the cassette is open. Close the left — Close cover as displayed in place of #. left cover #. Check the key counter and make sure it is set properly. Appendix- Insert key counter.
-
Page 129
Troubleshooting Reference Display Corrective Procedure Page The waste toner box is full. Replace it with a new waste Replace waste toner box. toner box. 250 copies have been stored on output tray. Remove — Remove paper on the paper, press the Start key and resume copying. top tray;… -
Page 130
Troubleshooting Reference Display Corrective Procedure Page “-” appears on the copy quantity The copier is in the Sleep Mode setting. Press the display. Energy saver key to exit the mode. “—” appears on the copy quantity The copier is in the Low Power mode setting. Press any display. -
Page 131: Clearing Paper Jams
Troubleshooting Clearing Paper Jams Stop copying operations when a paper misfeed occurs. When a paper misfeed occurs, the indicator for the location of the paper misfeed will light up on the Operation Panel and either “J” plus a 2-digit number will be displayed as notification of the location of the paper misfeed.
-
Page 132: Cassette/Multi Purpose Tray
Troubleshooting Cassette (J11, J21) If Paper misfeed in cassette 1. Remove paper appears and the jam location indicator shown in the illustration blinks, a paper jam has occurred in the cassette. Follow the steps below to clear paper jams in cassette 1. Pull out the cassette.
-
Page 133
Troubleshooting Multi Purpose Tray (except J10) IMPORTANT: In the case where J20 is displayed, refer to Paper misfeed in the Left Cover internal section and remove the paper. In the case where J40 is displayed, refer to Paper misfeed in the Left Cover internal section and remove the paper. -
Page 134: Paper Output Slot
Troubleshooting Paper Output Slot If Paper misfeed in Eject section Remove paper appears and the jam location indicator shown in the illustration blinks, a paper jam has occurred in the paper output slot. Follow the steps below to clear paper jams in the paper output slot.
-
Page 135
Troubleshooting Optional Document Processor (J70 to J75 and J78) When the paper misfeed has occurred in the optional Document Processor, use the procedure below to clear it Remove all of the originals remaining in the original table. Open the left cover. Remove the jammed original without tearing it. -
Page 136
Troubleshooting Turn the dial as shown in the illustration to remove the jammed original. Close the left cover to its original position. Reset all the originals and start copying again. Optional Cassette (J12 to J16, J22 to J24) When the paper misfeed has occurred in the optional cassette, use the procedure below to clear it. Remove the left cover of the cassette being used. -
Page 137
Troubleshooting Pull the cassette out. If a sheet of paper is jammed inside, remove it carefully so as not to tear it. NOTE: If the paper is torn, be sure to remove all remnants or fragments from the cassette. Gently push the cassette back into its original position. -
Page 138
Troubleshooting 8-16 OPERATION GUIDE… -
Page 139: Appendix
Appendix • Optional Equipment ………Appendix-2 • Paper ……………Appendix-5 • Specifications ……….Appendix-13 • Glossary…………Appendix-17 OPERATION GUIDE Appendix-1…
-
Page 140: Optional Equipment
Optional Equipment Overview of Optional Equipment The following optional equipment is available for the machine. Document Processor Additional Memory Duplex Unit Printer Kit Paper Feeder Print server Key Counter Appendix-2 OPERATION GUIDE…
-
Page 141: Document Processor
Document Processor Automatically scans originals. Also you can perform duplex copying and split copying. For document processor operation, refer to Loading Originals in the Document Processor on page 2-14. Paper Feeder In addition to the cassette(s) provided with the main body, a paper feeder (with cassettes that can hold 300 sheets each) can be used.
-
Page 142: Key Counter
Key Counter Use the key counter to monitor machine usage. The key counter offers a convenient solution for centralized management of copy volume for different departments in a large company. Inserting the Key Counter Insert the key counter securely into the key counter slot. NOTE: When the key counter function is activated, copies can only be made when a key counter is…
-
Page 143: Basic Paper Specifications
Paper This section explains the paper sizes and types that can be used in the paper source. Cassette and Optional paper feeder Supported types Supported paper sizes No. of sheets Plain paper (64 to 105 g/m A3, B4, A4, A4-R, B5, B5-R, A5-R, 300 (80 g/m Recycled paper (64 to 105 g/m Folio, Ledger, Legal, Letter, Letter-R,…
-
Page 144: Choosing The Appropriate Paper
Supported Paper Use standard copy paper for regular copiers or laser printers. The printing quality will be affected by the quality of paper. Poor quality paper may result in unsatisfactory output. Basic Paper Specifications The following table lists the specifications of paper that is supported with this machine. Refer to the subsequent sections for further details.
-
Page 145
Supported Paper Sizes Paper of the following sizes is supported by the machine. Measurements in the table take into account a ±0.7 mm dimensional accuracy for length and width. Corner angles must be 90° ± 0.2°. Multi Purpose Tray Cassette or Multi Purpose Tray A6-R (105 ×… -
Page 146
Thickness Avoid using paper that is too thick or thin. Signs that paper may be thin include frequent problems with paper jams or with several sheets being supplied at once. Paper jams may also indicate that the paper is too thick. The proper thickness is between 0.086 and 0.110 mm. -
Page 147: Special Paper
• Glossy paper • Watermarked paper • Paper with an uneven surface • Perforated paper Special Paper This section describes printing onto special paper and print media. The following paper and media can be used. • Transparencies • Preprinted paper •…
-
Page 148
Transparencies Transparencies must be able to withstand the heat of printing. Transparencies must meet the following conditions. Criteria Specifications Heat resistance Must withstand at least 190°C Thickness 0.100 to 0.110 mm Material Polyester Dimensional accuracy ±0.7 mm Squareness of corners 90°… -
Page 149
To prevent paper jams when printing onto multiple envelopes, do not allow more than ten envelopes remain in the output tray at once. Thick Paper Before loading thick paper in the multi purpose tray, fan it and align the edges. Some thick paper may still have rough edges developed by a paper cutter on the back side. -
Page 150: Specifications
Use label paper that conforms to the following specifications. Item Specifications Top sheet weight 44 to 74 g/m² Basis weight 104 to 151 g/m² (overall paper weight) Top sheet thickness 0.086 to 0.107 mm Overall paper thickness 0.115 to 0.145 mm Moisture content 4 to 6 % (composite) Colored Paper…
-
Page 151: Specifications
Specifications NOTE: Specifications are subject to change without notice. Machine Description Item 18 ppm model 22 ppm model Type Desktop Printing Method Electrophotography by semiconductor laser, single drum system Supported Original Types Sheet, Book, 3-dimensional objects (maximum original size: 11 × 17″/A3) Original Feed System Fixed Paper…
-
Page 152: Paper
Description Item 18 ppm model 22 ppm model Paper Cassette 300 sheets (80 g/m , all sizes), 150 sheets (90-105 g/m Capacity Multi Purpose 100 sheets (80 g/m , A4/Letter), 50 sheets (80 g/m , A5-R, A6-R, Tray Statement-R), 25 sheets (80 g/m , other sizes) Output Tray Top tray…
-
Page 153
Document Processor (option) Item Description Original Feed Automatic feed Method Supported Sheet originals Original Types Paper Size Maximum: Ledger/A3 Minimum: Statement-R/A5-R Paper Weight 45 to 160 g/m Loading Capacity 50 sheets (50 to 80 g/m ) maximum Mixed original sizes (auto selection): 30 sheets (50 to 80 g/m ) maximum Dimensions ×… -
Page 154: Additional Memory
Additional memory Item Description Memory type 100-pin DIMM Memory Capacity 16MB, 32MB, 64MB and 128MB No. of Originals 16MB: 250 sheets, 32MB: 250 sheets, 64MB: 250 sheets, 128MB: 250 sheets that can be read in (Letter, blackness ratio 6% originals) Environmental Specifications Item Description…
-
Page 155: Glossary
Glossary Auto Paper Selection A function to automatically select paper in the same size as original at printing Auto Sleep Mode A mode designed for electrical power saving, activated when the machine is left unused or data transfer for a specific period.
-
Page 156
Appendix-18 OPERATION GUIDE… -
Page 157
Index Index Page boundary lines 4-15 Copy Adjusting Density 4-3 Border erase 4-19 Alarm 5-23 Collate copying 4-7 Auto cassette switching 5-15 Duplex copying 4-21 Auto Clear function 1-4 EcoPrint 4-10 Auto clear setting 5-20, 5-22 Interrupt copying 4-24 Auto clear time 5-21 Margin mode 4-17 Auto density adjustment 5-11 Mixed sized originals 4-9… -
Page 158
Index Processor 2-14 Placing on the Platen 2-13 How to set job accounting 6-8 Original Cover Cleaning 7-2 Original image quality 5-9, 5-12 Overview of job accounting 6-2 Initial density 5-10 Installing Toner container 7-9 Wate toner box 7-9 Paper Appropriate Paper Appendix-6 Before Loading 2-3 Loading Envelopes 2-9… -
Page 159
Index Specifying the paper weight and 2-sided copying to custom paper 5-17 Removing Status Page Appendix-17 Toner Container 7-6 Status page Appendix-17 Waste Toner Box 7-6 System Menu 1-4 Replacement System menu 5-1 Toner Container 7-6 Items 5-2 Waste toner box 7-6 Operation procedures 5-8 Resolution Appendix-14 Rotate collate setting 5-19… -
Page 160
Index Index-4 OPERATION GUIDE… -
Page 164
Rev. 2 2010.1 Printed in China 302KK56012…