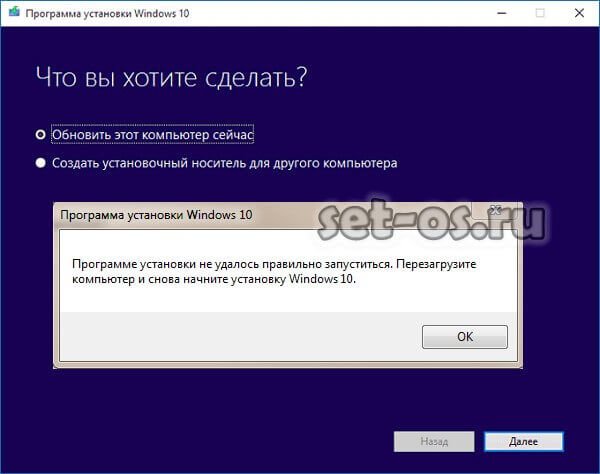
Те пользователи, которые самостоятельно скачивали официальный установочный образ операционной системы Windows 10, конечно же знакомы со специальной утилитой Media Creation Tool. Это фирменный инструмент от Microsoft, предназначенный для создания загрузочных носителей для установки и обновления операционной системы.
Но иногда у Вас может возникнуть проблема при запуске Media Creation Tool. Например, ошибка «Программе установки не удалось правильно запуститься, перезагрузите компьютер». Либо приложение вообще не стартует.
Причин такого явления может быть несколько.
Самая частая причина заключается в том, что Media Creation Tool не работает из-за того, что её неправильно распознаёт Ваша система безопасности и блокирует любую подозрительную активность. Поэтому, начать стоит с того, что отключить антивирусную программу и брандмауэр(файрвол).
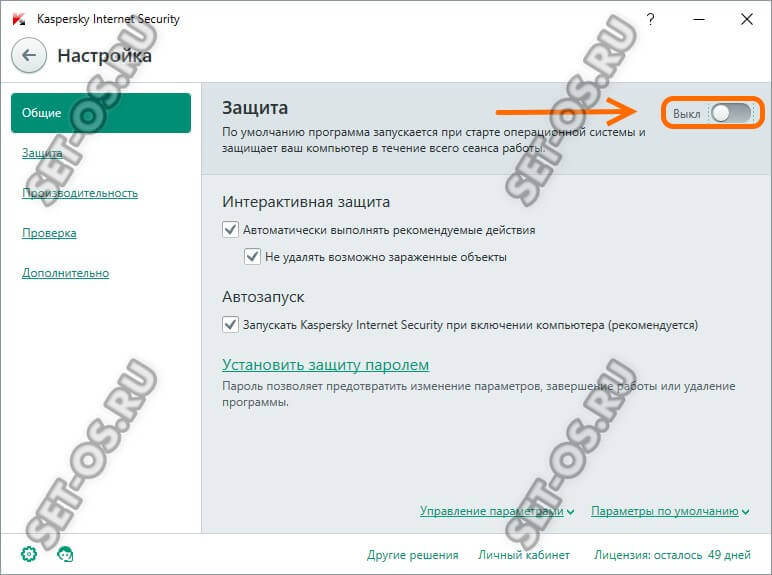
Проверяем работу Медиа Криэйшн Тул. Не помогло? Идём дальше.
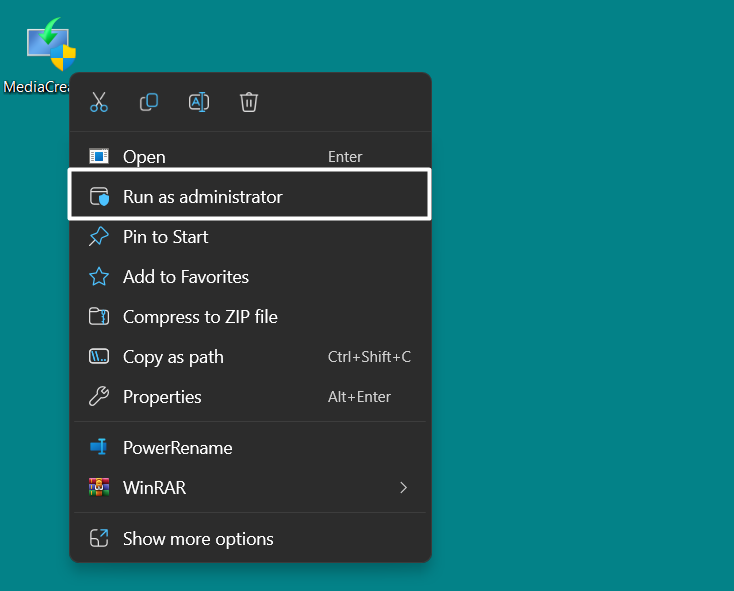
Следующая возможная причина — Вашей учётной записи не хватает прав на запуск программы. Попробуйте кликнуть на её значке правой кнопкой и в появившемся меню выберите пункт «Запуск от имени Администратора». Как вариант, можно попробовать создать ещё одну учётную запись Windows с административными правами и попробовать — запустится ли утилита теперь.
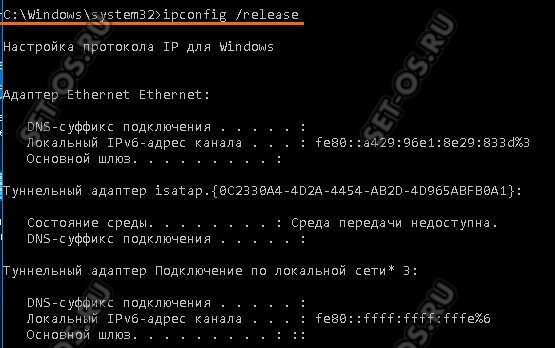
Следующая причина почему не работает Media Creation Tool — это проблемы с локальной сетью. Попробуйте сделать следующее. Запустите командную строку с правами Администратора. Затем введите по очереди следующие команды:
ipconfig/release
Освобождаем IP-адрес, если он получается от DHCP-сервера автоматически.
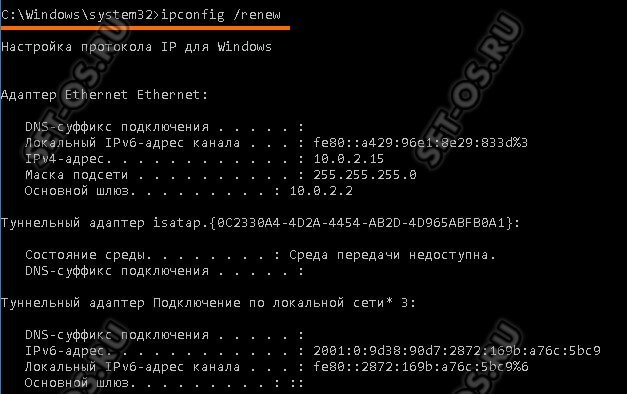
Затем:
ipconfig/renew
Этим мы обновим свой IP-адрес.
И в завершении очистим кеш ДНС:
ipconfig/flushdns
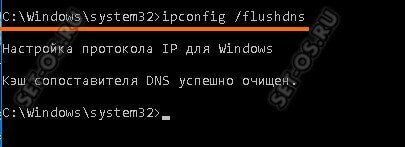
Теперь нужно проверить что есть доступ в сеть Интернет и после этого проверить работу Медиа Криэйшн Тул.
Ещё один способ, которым иногда тоже получается устранить проблему при запуске Media Creation Tool — это очистка временных файлов системы. Чтобы это сделать, надо в адресной строке проводника Windows прописать вот такой адрес:
%TEMP%
Нажимаем клавишу «Enter». Откроется папка, в которой хранятся временные файлы программного обеспечения, которое работает или работало в системе. Выглядит она примерно так:
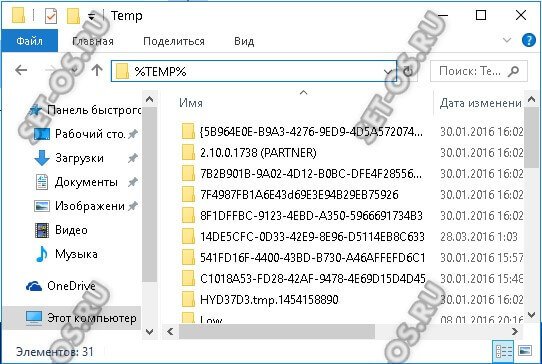
Полностью очищаем её содержимое и перезагружаемся.
Ну уж если и после этого не работает Media Creation Tool, то тогда выход один единственный — скачивать установочный образ и создавать загрузочный диск на другом компьютере, а тогда уже переходить на этот и переустанавливать ОС.
Советы подписчиков:
1. Запустите командную строку с правами Администратора. Для этого в Windows 10 нажмите правой клавишей мыши на кнопку пуск или на клавиатуре сочетание клавиш Win+X.
2. В появившемся меню выберите вариант «командная строка(администратор)» или «PowerShell(администратор)».
3. В открывшемся окне введите команду: Dism /Online /Cleanup-Image /RestoreHealth и нажмите «Enter».
4. Дождитесь результата выполнения команды.
5. Введите команду sfc /scannow и нажмите Enter.
6. Дождитесь выполнения команды и перезагрузите компьютер.
Вопрос
Проблема: как исправить ошибку Media Creation Tool «При запуске этого инструмента возникла проблема» в Windows?
У меня проблемы с обновлением до Windows 10 V1703 через Центр обновления Windows. Процесс продолжает падать, поэтому я создал загрузочный USB-накопитель. К сожалению, диск не может запустить обновление, так как он зависает с ошибкой «При запуске этого инструмента возникла проблема». Есть ли у вас идеи, в чем может быть причина и как я могу ее решить?
Решенный ответ
Если вы хотите обновить Windows 10 или исправить ошибки операционной системы с помощью Windows Media Creation Tool, поскольку другие методы не помогли работы, вы можете быть неприятно удивлены сообщением об ошибке «При запуске этого инструмента возникла проблема», которое не позволяет инструменту загружен. В этом случае владелец ПК или ноутбука может начать чувствовать себя в ловушке, поскольку не может ни исправить ошибки, ни обновить систему.
Обычно ошибка «При запуске этого инструмента возникла проблема» содержит код ошибки, например, 0x8007005-0x9002, 800704DD — 0x90016 или 0x80070015. Код может отличаться в зависимости от причины проблемы, но в большинстве случаев одни и те же исправления могут быть применены ко всем из них.
Обычно ошибка «При запуске этого инструмента возникла проблема», сопровождаемая кодом ошибки 0x80070015, возникает, когда владелец ПК пытается создайте Media Creation Tool для Windows 10 (как Anniversary, так и Creators обновления) или запустите Media Creation Tool, чтобы восстановить / обновить система.

Причин возникновения ошибки может быть множество, например отключенные процессы, неправильные языковые настройки, конфликт ОС и антивируса или неправильные записи в реестре. Поэтому попробуйте исправить ошибку «При запуске этого инструмента возникла проблема», следуя методам, приведенным ниже, по очереди.
Способ 1. Запустите Media Creation Tool от имени администратора
Исправить это сейчас!Исправить это сейчас!
Для восстановления поврежденной системы необходимо приобрести лицензионную версию Reimage Reimage.
Если вы столкнулись с ошибкой при запуске Media Creation Tool, самым примитивным решением для ошибки «При запуске этого инструмента возникла проблема» было бы запустить инструмент от имени администратора.
- Подключив загрузочный USB-накопитель с помощью Media Creation Tool, щелкните его значок правой кнопкой мыши.
- В контекстном меню выберите Запустить от имени администратора.

Способ 2. Включите необходимые службы
Исправить это сейчас!Исправить это сейчас!
Для восстановления поврежденной системы необходимо приобрести лицензионную версию Reimage Reimage.
Вы можете столкнуться с кодом ошибки 0x80070015 «При запуске этого инструмента возникла проблема», если несколько необходимых служб отключены. Поэтому перед созданием или запуском Media Creation Tool проверьте состояние следующих процессов:
- Нажмите Клавиша Windows + R, тип services.msc, и ударил Входить.
- В списке услуг найдите перечисленные ниже услуги и проверьте их статус. В Тип запуска из них все должны быть установлены на Автомат.
Центр обновления Windows
Фоновая интеллектуальная служба передачи
Сервер
Рабочая станция
TCP / IP NetBIOS Helper
Модули ключей IKE и AuthIP IPsec

- Если какой-либо из них установлен на Руководство, щелкните его правой кнопкой мыши и выберите Начинать.
- Затем установите Тип запуска к Автоматическая и закройте окно Службы.
Способ 3. Проверить языковые настройки
Исправить это сейчас!Исправить это сейчас!
Для восстановления поврежденной системы необходимо приобрести лицензионную версию Reimage Reimage.
Проблемы Windows Media Creation Tool, такие как ошибка «При запуске этого инструмента возникла проблема», могут возникнуть, если местоположение вашей системы и язык загруженного установочного файла Windows 10 не совпадают. Самый простой способ — установить на вашем компьютере или ноутбуке английский язык:
- Открытым Панель управления и выберите Часы, язык и регион.
- Под Область раздел, щелкните Изменить дату, время или числовой формат.

- Открытым Административный вкладка и выберите Изменить язык системы.
- Набор Locale к английский и нажмите В ПОРЯДКЕ.
- Вернитесь к Административный вкладка и перейдите к Копировать настройки.
- Отметьте Экран приветствия и системные учетные записи и Новые учетные записи пользователей (если не отмечены) флажки.

- Нажмите Применять и В ПОРЯДКЕ чтобы сохранить изменения.
- После этого перезагрузите систему.
Способ 4. Запустить редактор реестра
Исправить это сейчас!Исправить это сейчас!
Для восстановления поврежденной системы необходимо приобрести лицензионную версию Reimage Reimage.
Если ни один из предыдущих методов не помог, возможно, вам придется изменить реестры. Будьте очень осторожны, поскольку неточное удаление или изменение неправильного ключа может привести к серьезному повреждению ОС. Чтобы предотвратить возникновение проблем, мы настоятельно рекомендуем создать резервную копию реестра Windows, и ниже мы объясним, как это сделать:
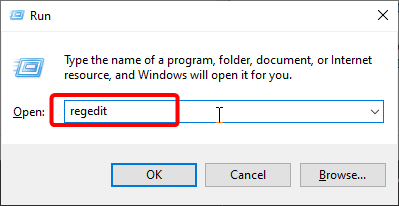
- Нажмите Клавиша Windows + R, тип regedit и ударил Входить.
- Нажмите Файл вверху окна и выберите Экспорт.
- Выберите место на левой панели.
- Введите имя резервной копии в поле Имя файла поле и щелкните Экспорт.
- Когда резервная копия будет готова, перейдите к DDHKEY_LOCAL_MACHINE \ SOFTWARE \ Microsoft \ Windows \ Current Version \ WindowsUpdate \ OSUpgrade ключ на левой панели.

- Щелкните правой кнопкой мыши пустое место и выберите Новый -> DWORD.
- Назови это AllowOSUpgrade и установите его значение на 1.
- Закройте редактор реестра и перезагрузите компьютер.
Метод 5. Отключите антивирус
Исправить это сейчас!Исправить это сейчас!
Для восстановления поврежденной системы необходимо приобрести лицензионную версию Reimage Reimage.
Если программное обеспечение конфликтует с антивирусным инструментом, могут возникать различные проблемы, в том числе ошибка «При запуске этого инструмента возникла проблема», что исказит производительность ОС. Поэтому, если ни один из вышеперечисленных методов не помог вам устранить ошибку Media Creation Tool, мы рекомендуем временно отключить антивирус. Для этого щелкните Ctrl + Alt + Delete, чтобы открыть диспетчер задач. Найдите процесс своего антивируса, щелкните по нему и выберите Завершить задачу. Найдите его значок на панели задач, щелкните его правой кнопкой мыши и выберите Запрещать.
Исправляйте ошибки автоматически
Команда ugetfix.com делает все возможное, чтобы помочь пользователям найти лучшие решения для устранения их ошибок. Если вы не хотите бороться с методами ручного ремонта, используйте автоматическое программное обеспечение. Все рекомендованные продукты были протестированы и одобрены нашими профессионалами. Инструменты, которые можно использовать для исправления ошибки, перечислены ниже:
Предложение
сделай это сейчас!
Скачать Fix
Счастье
Гарантия
сделай это сейчас!
Скачать Fix
Счастье
Гарантия
Совместим с Майкрософт ВиндоусСовместим с OS X По-прежнему возникают проблемы?
Если вам не удалось исправить ошибку с помощью Reimage, обратитесь за помощью в нашу службу поддержки. Сообщите нам все подробности, которые, по вашему мнению, нам следует знать о вашей проблеме.
Reimage — запатентованная специализированная программа восстановления Windows. Он диагностирует ваш поврежденный компьютер. Он просканирует все системные файлы, библиотеки DLL и ключи реестра, которые были повреждены угрозами безопасности.Reimage — запатентованная специализированная программа восстановления Mac OS X. Он диагностирует ваш поврежденный компьютер. Он просканирует все системные файлы и ключи реестра, которые были повреждены угрозами безопасности.
Этот запатентованный процесс восстановления использует базу данных из 25 миллионов компонентов, которые могут заменить любой поврежденный или отсутствующий файл на компьютере пользователя.
Для восстановления поврежденной системы необходимо приобрести лицензионную версию Reimage инструмент для удаления вредоносных программ.

Нажмите
Условия использования Reimage | Политика конфиденциальности Reimage | Политика возврата денег за товар | Нажмите
VPN имеет решающее значение, когда дело доходит до конфиденциальность пользователя. Онлайн-трекеры, такие как файлы cookie, могут использоваться не только платформами социальных сетей и другими веб-сайтами, но также вашим интернет-провайдером и правительством. Даже если вы примените самые безопасные настройки через веб-браузер, вас все равно можно будет отслеживать через приложения, подключенные к Интернету. Кроме того, браузеры, ориентированные на конфиденциальность, такие как Tor, не являются оптимальным выбором из-за пониженной скорости соединения. Лучшее решение для вашей максимальной конфиденциальности — это Частный доступ в Интернет — быть анонимным и безопасным в сети.
Программное обеспечение для восстановления данных — один из вариантов, который может вам помочь восстановить ваши файлы. После удаления файла он не исчезает в воздухе — он остается в вашей системе до тех пор, пока поверх него не записываются новые данные. Восстановление данных Pro это программа для восстановления, которая ищет рабочие копии удаленных файлов на вашем жестком диске. Используя этот инструмент, вы можете предотвратить потерю ценных документов, школьных заданий, личных фотографий и других важных файлов.
Your antivirus might be all that is stopping the tool from working 👾
by Aleksandar Ognjanovic
Aleksandar’s main passion is technology. With a solid writing background, he is determined to bring the bleeding edge to the common user. With a keen eye, he always… read more
Updated on
Reviewed by
Alex Serban

After moving away from the corporate work-style, Alex has found rewards in a lifestyle of constant analysis, team coordination and pestering his colleagues. Holding an MCSA Windows Server… read more
- If the Windows Media Creation Tool is not working, it might be down to your antivirus.
- You can fix this issue effortlessly by modifying your registry and restarting your PC.
- Another excellent solution is to disable your antivirus software temporarily.
Software distribution is nowadays mostly digital, and even Microsoft changed its approach with Windows 10. However, Windows 10 Media Creation Tool, the best tool for the job, isn’t as flawless as one would imagine.
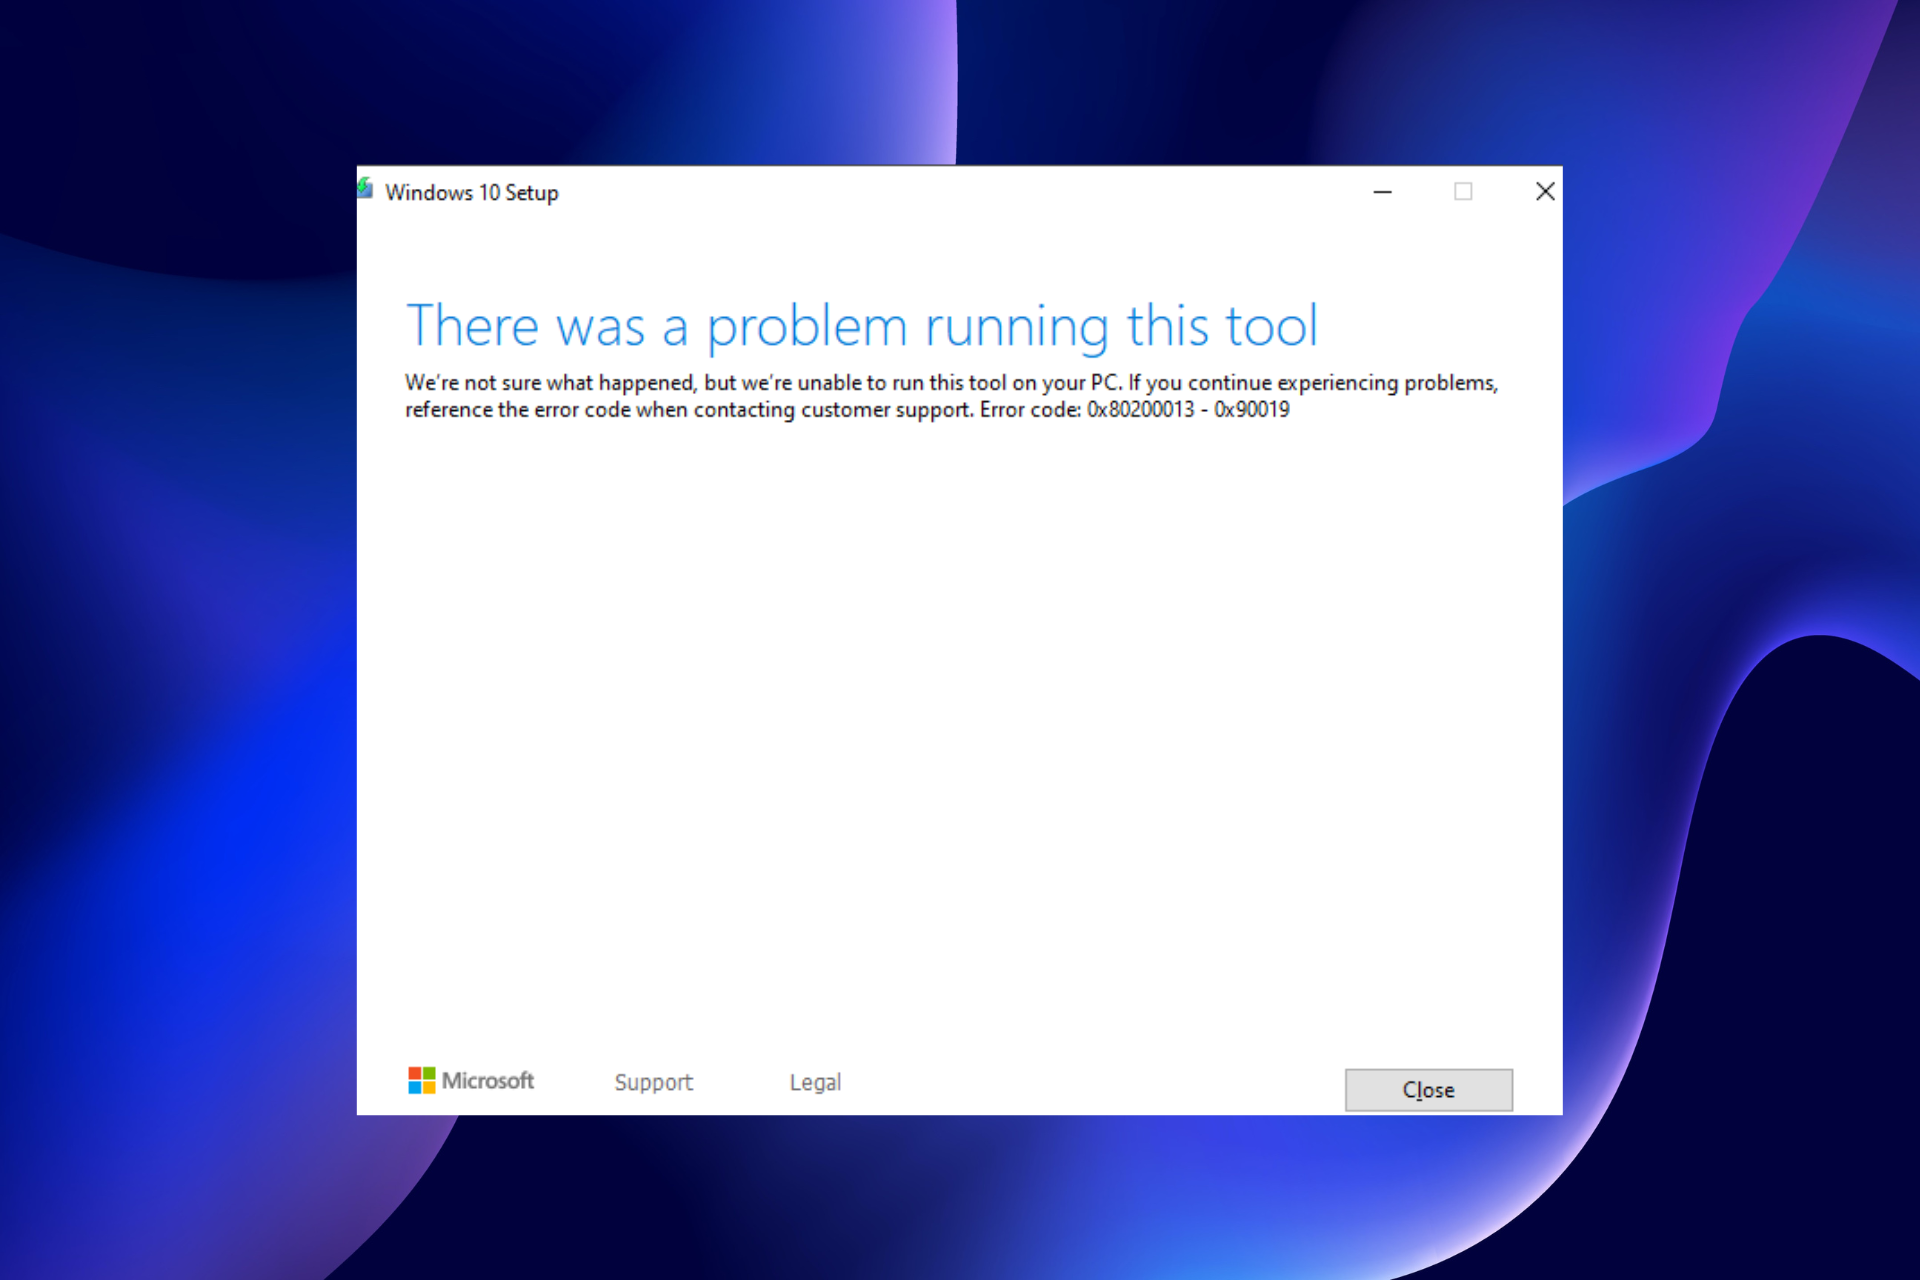
Occasionally, it prompts users with the There was a problem running this tool message in Windows 10. The error is mostly followed by the alphanumeric error code which varies.
The Windows media creation tool not working on a USB flash or the .exe file for various reasons. Some of these reasons include:
- Lack of required privilege – Some programs require administrative privileges to run. And this is one of them. So, if the Windows media creation tool is not opening, try running it as an admin.
- Interference from antivirus – Antiviruses can sometimes raise false alarms and flag a totally safe file. This might be why you are getting the Windows 10 Media Creation Tool, there was a problem running this tool error message. To solve this, you need to disable your antivirus temporarily.
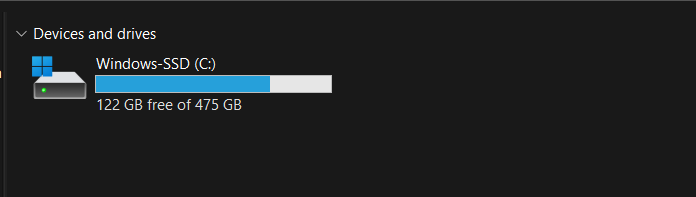
- Insufficient storage space – To make the jump to Windows 10, you need to have enough space on your PC and make sure all the requirements are met.
Moreover, here are some variations of the error that you may encounter:
- Windows 10 media creation tool not working error code 0x80072f8f – 0x20000
- Windows 10 media creation tool not compatible
- Media creation tool there was a problem running this tool
- Windows 10 media creation tool not working on Windows 7 – media creation tool 21h2 not working Windows 7
- We’re not sure what happened but we’re unable to run this tool on your pc
Why Media Creation Tool is not opening?
Problems with Media Creation Tool not opening can be caused by the error 0x80072f8f – 0x20000, which is triggered by the TLS 1.2 being turned off.
If you can’t even get the app to launch, it’s either because the app files are corrupt, in which case you’ll have to fix/restore them.
Another common issue that prevents Media Creation Tool from opening is not having the correct permissions. Some apps require admin right to run properly.
Consider changing your background apps as well. Sometimes an app may not launch because it has not closed properly and is still running in the background.
- 🔵Why is Windows Media Creation Tool not working?
- Why Media Creation Tool is not opening?
- How do I fix Windows Media Creation Tool if it’s not working?
- 1. Run the Windows Media Creation tool as Admin (worked for most users ✅)
- 2. Disable your antivirus
- 3. Enable the required services
- 4. Tweak the Registry
- 5. Try a third-party tool instead
➡️ Before exploring the fixes in this guide, don’t hesitate to precheck:
- Ensure that you have no external device connected to your PC.
- If that does not fix the issue, check that you have enough space and maybe try the Media Creation Tool on another PC.
If these do not work, you can now proceed to the fixes below.
1. Run the Windows Media Creation tool as Admin (worked for most users ✅)
Certain programs need special permission in order to access and change system-related settings. Now, even though the Media Creation Tool is provided by Microsoft, just a simple double-click won’t suffice. Especially on older Windows versions.
In order to avoid the Windows Media Creation Tool not working error code 0x80072f8f – 0x20000, ensure to run it as an administrator.
- Download the Media Creation tool installation file.
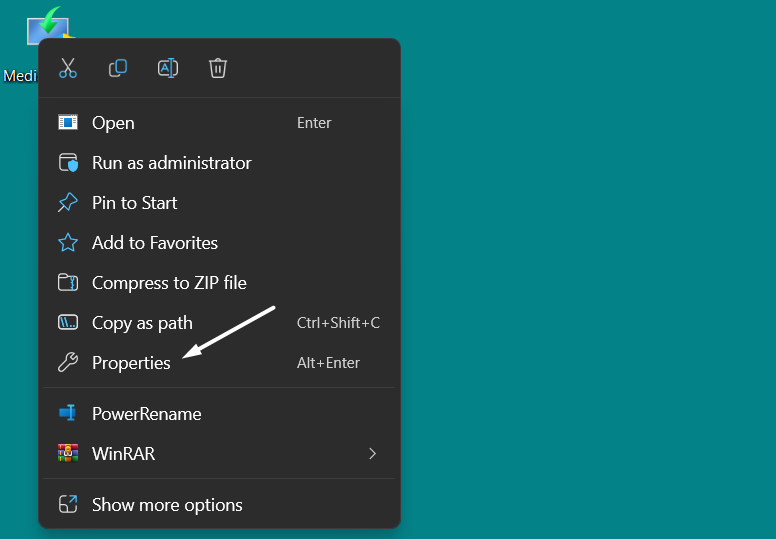
2. Right-click the setup file and open Properties.
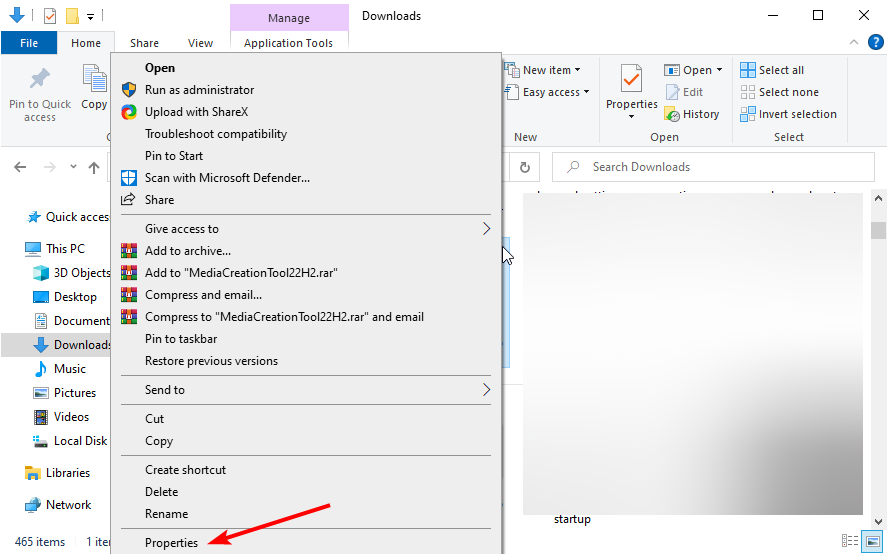
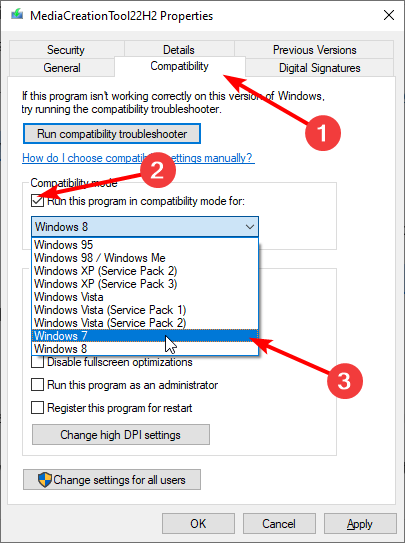
3. Click the Compatibility tab at the top and choose Run this program in compatibility mode for under Compatibility mode.
4. From the drop-down menu, choose Windows 7.
5. Now, check the Run this program as an administrator and click Apply followed by OK to save the changes.
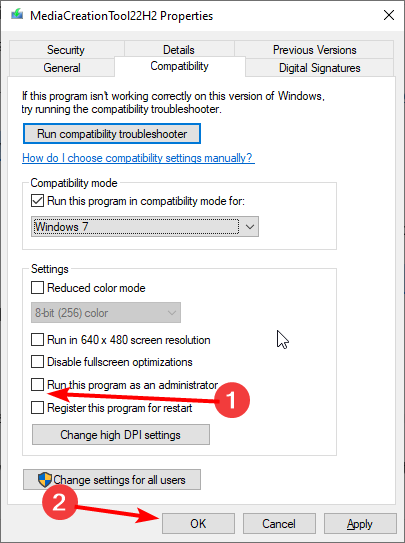
Of course, you will have to provide the administrator credentials for this solution to work.
2. Disable your antivirus
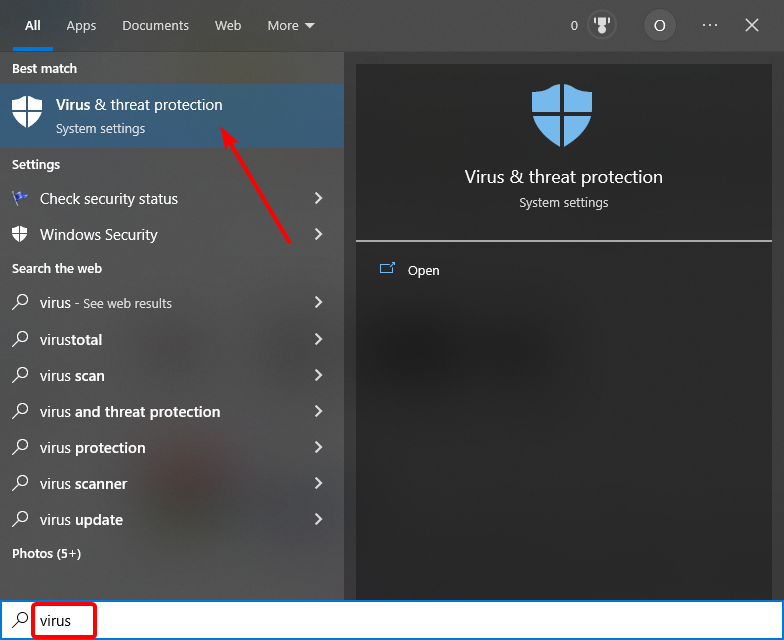
- Click the Start icon, type virus, and select Virus & threat protection.

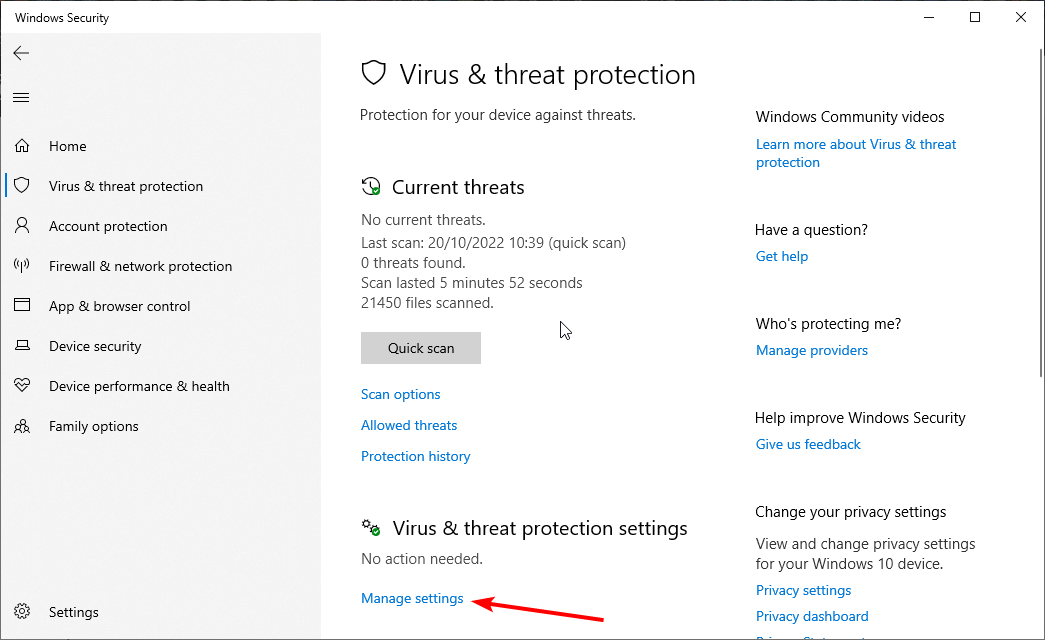
- Choose the Manage settings option.

- Now, toggle the switch for Real-time protection backward to disable it.
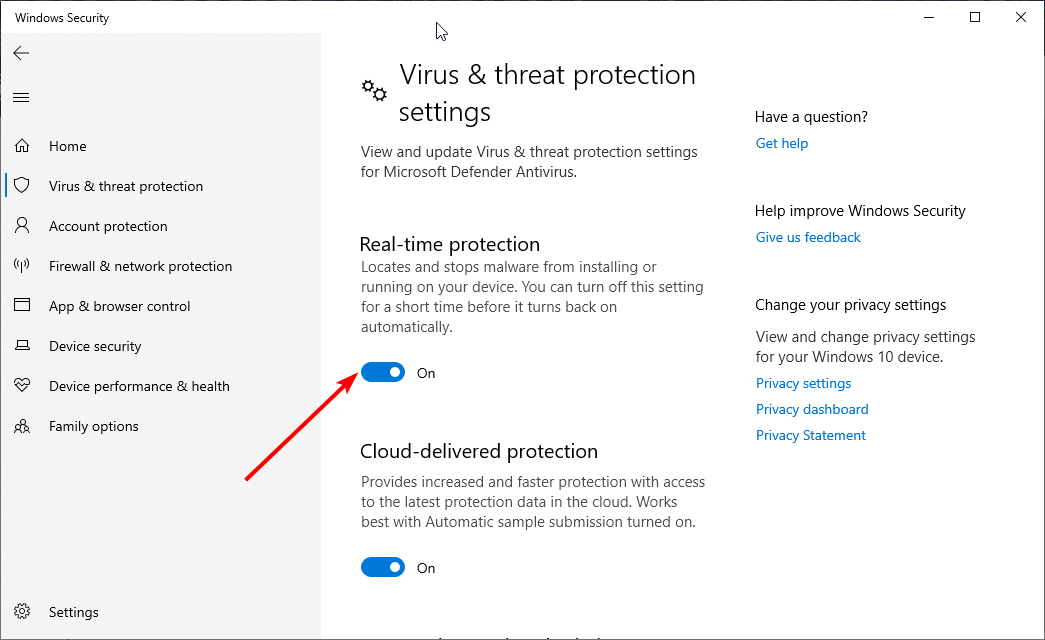
Sometimes, your antivirus might be the one preventing the Media Creation Tool from working. The steps above will help you disable the built-in security tool on Windows.
If you have a third-party antivirus, it is advised you disable it within the app or remove it completely. However, it must be noted that it is not safe to use your system without security software for long.
So, make sure you enable it as soon as you finish running the Media Creation Tool.
- How to use the Windows 11 Media Creation Tool
- Media Creation Tool: Access denied on Windows 10/11 ISO to USB
- [SOLVED] This tool can’t update your PC
3. Enable the required services
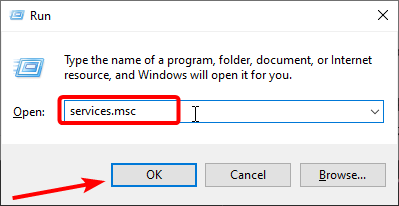
- Press the Windows key + R, type services.msc, and click OK.

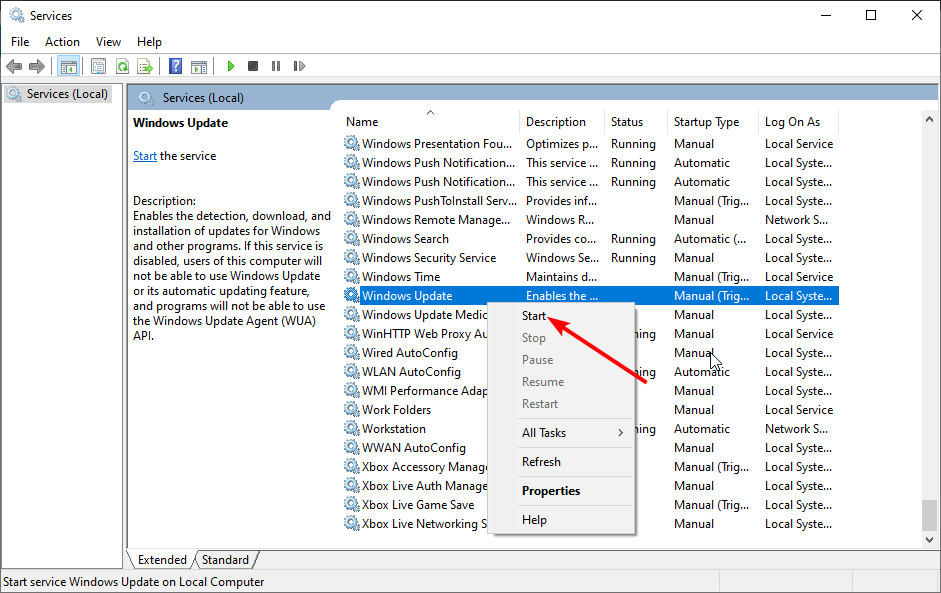
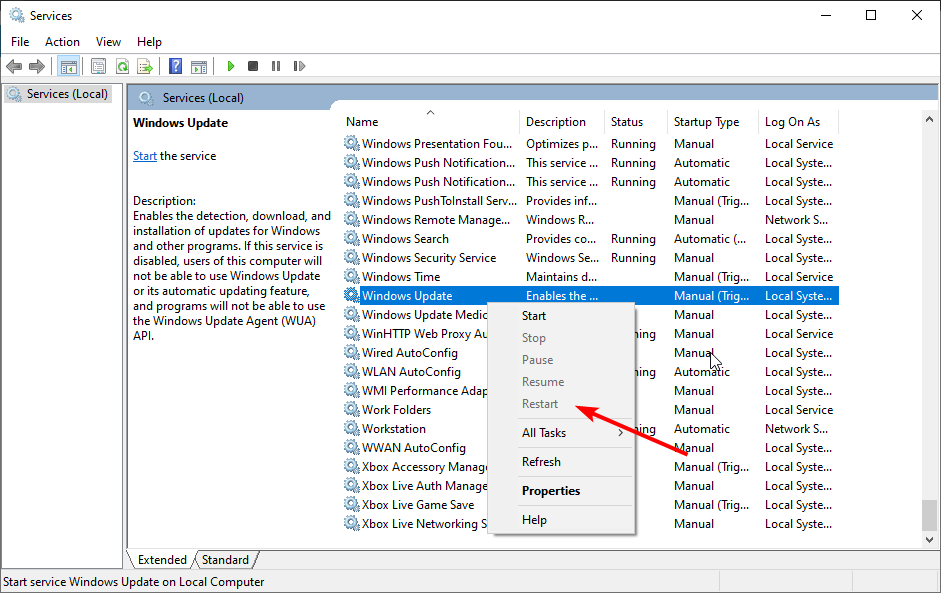
- Right-click the Windows Update service and select Start.

- If the service is running, choose the Restart option instead.
- Repeat the Steps 2 and 3 for the services below:
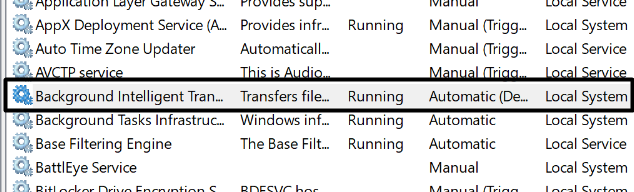
- Background Intelligent Transfer Service (BITS)
- Server
- IKE and AuthIP IPsec Keying Modules
- TCP/IP NetBIOS Helper
- Workstation
Many users turn to Media Creation Tool when they want to speed up the upgrade to a major build.
Now, this tool, just like the Windows Update feature, uses update-related services and it heavily depends on their performance. Services like BITS are of utmost importance, even for a non-native application like Media Creation Tool.
So, you need to keep these services running to prevent any issues.
4. Tweak the Registry
- Press the Windows key + R, type regedit, and hit Enter.
- Choose File in the Menu bar and click Export to backup your registry.
- Now, follow the path below in the left pane:
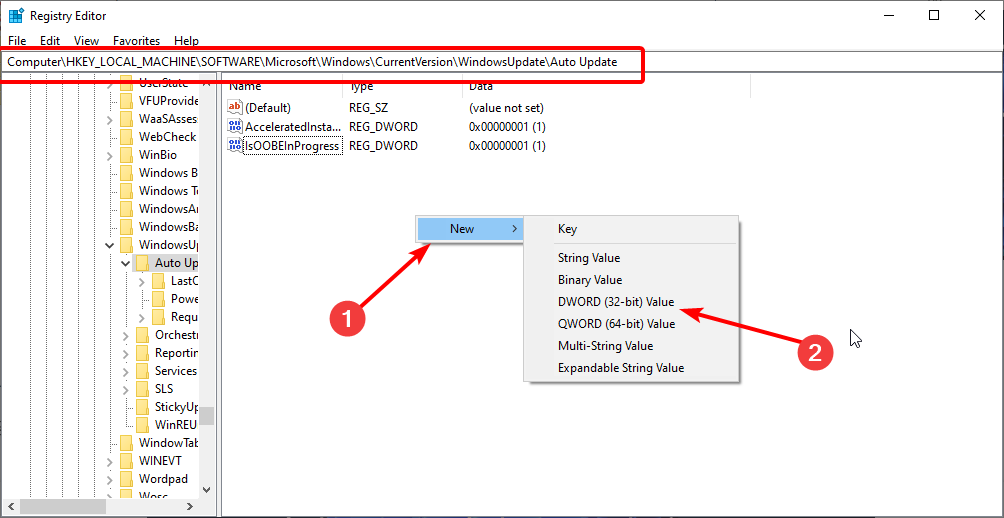
HKEY_LOCAL_MACHINE\SOFTWARE\Microsoft\Windows\Current Version\WindowsUpdate\Auto Update - Right-click on the empty space and choose New > DWORD (32-bit).

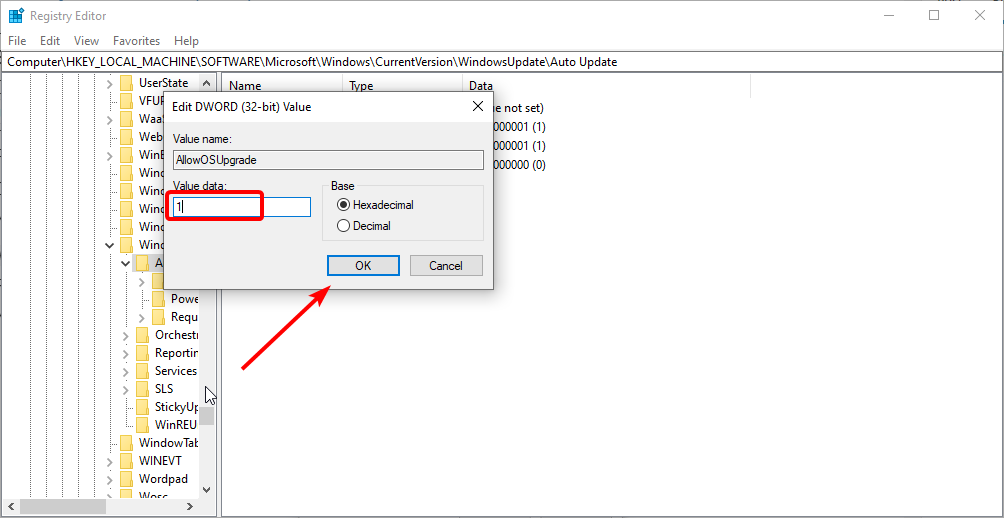
- Name the new dword AllowOSUpgrade, double-click it, and set its Value data to 1.
- Click OK and restart your PC.
Try running the Media Creation Tool again and see if it works. Follow the steps above carefully to avoid generating more errors. Corruption in the registry can cause BSoDS and app crashes.
In case something like that happens, we got you covered with our guide on how you can restore the registry without a backup. It is not difficult, but it may take some time.
5. Try a third-party tool instead
Finally, if you’re in possession of a Windows 10 ISO file, but can’t use Media Creation Tool to create bootable media, there’s always an alternative.
Most users would immediately turn to Rufus, which is a small, portable third-party tool.
With it, you should be able to create a bootable media USB and avoid the aforementioned errors with Media Creation Tool.
The Media Creation Tool is a great way to create operating system backups that will help you restore your data in case anything happens to your PC. So, when this tool stops working, it affects a lot of people.
We hope you were able to fix this problem with the solutions in this guide. Also, if you are facing the Media Creation Tool access denied ISO to USB issue, check our detailed guide to fix it quickly.
In case you have questions or alternative solutions regarding the Media Creation Tool error, it would be nice to share them with us in the comments section below.
![]()
На чтение 6 мин. Просмотров 7.3k. Опубликовано
Распространение программного обеспечения в настоящее время в основном цифровое, и даже Microsoft изменила свой подход к Windows 10. Однако Windows 10 Media Creation Tool, лучший инструмент для работы, не так безупречен, как можно себе представить.
Иногда он предлагает пользователям сообщение « Произошла ошибка при запуске этого инструмента » в Windows 10. В большинстве случаев за ошибкой следует буквенно-цифровой код ошибки, который меняется.
Поскольку эта ошибка возникает в разных сегментах, не существует единого решения для ее устранения. Решение зависит от различных факторов, таких как версия Windows, архитектура, размер USB-флешки и т. Д.
Для этого мы подготовили список возможных решений, которые должны помочь вам решить проблему с помощью этого замечательного инструмента. Если вы застряли при обновлении, обновлении или создании загрузочного носителя с помощью Media Creation Tool, обязательно проверьте перечисленные ниже решения.
Содержание
- При запуске этого инструмента возникла проблема: 6 шагов, чтобы исправить эту ошибку
- Решение 1. Запустите средство создания Windows Media от имени администратора.
- Решение 2. Отключите антивирус
- Решение 3. Попробуйте другой компьютер и проверьте место на диске
- Решение 4 – Проверьте наличие обновлений
- Решение 5 – настроить реестр
- Решение 6 – Попробуйте использовать сторонний инструмент
При запуске этого инструмента возникла проблема: 6 шагов, чтобы исправить эту ошибку
- Запустите средство создания Windows Media от имени администратора
- Отключи свой антивирус
- Попробуйте другой компьютер и проверьте место на диске
- Проверьте наличие обновлений
- Настроить реестр
- Попробуйте использовать сторонний инструмент для создания медиа
Решение 1. Запустите средство создания Windows Media от имени администратора.
Некоторым программам требуется специальное разрешение для доступа к системным настройкам и их изменения. Теперь, несмотря на то, что Microsoft Media Creation Tool предоставляет Microsoft, простого двойного щелчка недостаточно. Особенно на старых версиях Windows.
Во избежание появления ошибки обязательно запустите Media Creation Tool от имени администратора. Более того, если вы хотите использовать Media Creation Tool для обновления с Windows 7 или 8.1, стоит попробовать изменить режим совместимости.
Если вы не уверены, как это сделать, внимательно следуйте нижеприведенным инструкциям, и мы должны быть готовы:
- Загрузите установочный файл Media Creation Tool .
- Нажмите правой кнопкой мыши файл установки и откройте Свойства .
-
На вкладке Совместимость выберите «Запустить эту программу в режиме совместимости» .

- В раскрывающемся меню выберите Windows 7 .
- Теперь установите флажок «Запустить эту программу от имени администратора» .
- Подтвердите изменения и снова запустите Инструмент создания мультимедиа .

Если проблема не устранена и при каждом запуске Media Creation Tool возникает повторяющаяся ошибка, обязательно ознакомьтесь с дополнительными действиями, представленными ниже.
Решение 2. Отключите антивирус
Отношения «любовь-ненависть» между Windows 10 и сторонними антивирусными решениями хорошо документированы. А именно, с ростом мощности и возможностей Защитника Windows потребность в сторонних альтернативах неуклонно снижается.
Более того, некоторые антивирусные решения не оптимизированы для Windows 10 и могут, помимо нескольких ложных обнаружений, блокировать определенные функции Windows. В этом случае Windows Media Creation Tool и процессы, связанные с обновлением.
По сути, вам ничего не стоит временно отключить антивирус до завершения работы средства создания мультимедиа. Однако не забудьте включить его позже.
Отсутствие защиты в реальном времени в течение длительных периодов времени является довольно серьезной проблемой. Кроме того, некоторые пользователи решили проблему только путем полного удаления антивируса. Мы оставим это как последнее средство, поскольку это длительная и рискованная операция.
- ЧИТАЙТЕ ТАКЖЕ: 9 лучших антивирусных программ с шифрованием для защиты ваших данных в 2019 году
Решение 3. Попробуйте другой компьютер и проверьте место на диске
Если у вас есть несколько компьютеров дома или в офисе, и первый отказывается выполнить, попробуйте другой. Пользователи сообщали, что на компьютерах, отличных от Windows 10, возникла ошибка «После запуска этого инструмента». Это означает, что Media Creation Tool лучше всего работает в Windows 10.
Поэтому, если у вас есть альтернативный компьютер, обязательно используйте его для создания загрузочного файла USB или ISO. Кроме того, мы рекомендуем вам использовать USB-накопитель, который занимает не менее 6 ГБ дискового пространства.
Несмотря на то, что основная установка Windows 10 занимает около 4 ГБ, этого размера недостаточно для обновлений. Кроме того, если вы используете Media Creation Tool для обновления Windows 10 до последней сборки, убедитесь, что у вас достаточно места в системном разделе (C:, большую часть времени).
Наконец, некоторым пользователям удалось решить проблему, отформатировав флэш-накопитель USB в формат NTFS вместо FAT32. После этого кажется, что Media Creation Tool работал просто отлично.
Решение 4 – Проверьте наличие обновлений
Многие пользователи обращаются к Media Creation Tool, когда хотят ускорить процесс обновления или перейти на основную сборку. Теперь этот инструмент, как и функция Центра обновления Windows, использует службы, связанные с обновлениями, и сильно зависит от их производительности. Такие сервисы, как BITS, имеют огромное значение даже для не родного приложения, такого как Media Creation Tool.
Итак, вам нужно убедиться, что все службы, связанные с обновлениями, работают. Эти инструкции должны показать вам, где искать и что делать с сервисами обновлений:
- На панели поиска Windows введите services.msc и откройте Службы .
- Найдите эти службы в списке и убедитесь, что они работают:
- Фоновая интеллектуальная служба передачи (BITS)
- Сервер
- Модули ключей IKE и AuthIP IPsec
- TCP/IP NetBIOS Helper
- рабочая станция
- Центр обновления Windows или автоматические обновления
-
Если какая-либо из этих служб остановлена, нажмите правой кнопкой мыши и выберите Пуск для каждой из них в отдельности.
- Перезапустите Инструмент создания мультимедиа и найдите изменения.

Этого обходного пути может быть достаточно, чтобы избавить вас от ошибки «При запуске этого инструмента возникла проблема», но, похоже, это не всегда так. Для дальнейшего устранения неполадок вам нужно обратиться к реестру.
- ЧИТАЙТЕ ТАКЖЕ . Исправлено: не удалось подключиться к службе обновления Windows 10, ошибка
Решение 5 – настроить реестр
Реестр является опасным местом для новичков, и не рекомендуется бродить и менять значения самостоятельно. По крайней мере, если вы не уверены в своих действиях. И большинство людей не до критического сбоя системы, и ад вырвался на свободу.
Теперь, шутки в сторону, есть кое-что, что вы можете и должны изменить в реестре, чтобы, возможно, решить проблемы с обновлением с помощью Media Creation Tool. Конечно, прежде чем мы начнем, рекомендуется сделать резервную копию вашего реестра, а затем и только потом перейти к настройке.
Следуйте приведенным ниже инструкциям, чтобы внести определенные изменения в реестр:
- В строке поиска Windows введите regedit и откройте редактор реестра.
- Выберите Файл в строке меню и нажмите Экспорт .
- Экспортируйте ваш реестр для резервного копирования.
-
Теперь следуйте по этому пути:
- HKEY_LOCAL_MACHINESOFTWAREMicrosoftWindowsCurrent VersionWindowsUpdateOSUpgrade
-
Нажмите правой кнопкой мыши на пустое место и выберите Новый> DWORD . Назовите новое слово AllowOSUpgrade и установите для его значения значение 1 .
- Перезагрузите компьютер.

- ЧИТАЙТЕ ТАКЖЕ : не удается получить доступ к редактору реестра в Windows 10 [FIX]
Решение 6 – Попробуйте использовать сторонний инструмент
Наконец, если у вас есть ISO-файл Windows 10, но вы не можете использовать Media Creation Tool для создания загрузочного носителя, всегда есть альтернатива.
Большинство пользователей сразу же обратились бы к Rufus – небольшому портативному стороннему инструменту. С его помощью вы сможете создать загрузочный носитель USB и избежать вышеупомянутых ошибок с помощью Media Creation Tool. Вы можете найти и скачать Rufus, нажав на эту ссылку.
На этом шаге мы можем завершить эту статью. Если у вас есть вопросы или альтернативные решения относительно ошибки Media Creation Tool, было бы неплохо поделиться ими с нами в разделе комментариев ниже.
The Media Creation tool is a useful utility that lets you upgrade or reinstall Windows on your system’s hard disk. But like other apps, it also sometimes behaves weirdly, as it’s behaving for many users. For instance, some users aren’t able to open the Media Creation tool on their PC.
Whereas a set of users are unable to upgrade or clean install Windows using it on their system’s hard disk. If you also find yourself in a similar situation, fret not, as it’s easily fixable. Here in this guide, we’ve shared some ways that can help you fix the Media Creation tool not working issue in Windows 11.
Here are some possible reasons for the Windows Media Creation tool not working issue in Windows 11:
- Lack of Required Privileges
- Interference From Antivirus
- Insufficient Disk Space
- Disabled TLS 1.1 & TLS 1.2
- Enabled VPN
- Conflicting Programs
- The Media Creation Tool’s Executable Is Blocked
Fix the Media Creation Tool Not Working Issue in Windows 11
Here’s a compiled list of all the working solutions that can fix the Media Creation tool not working issue:
Note: Before trying the solutions below, plug the bootable USB drive into your system if you’re trying to clean install Windows.
1. Try Opening the Media Creation Tool as an Administrator
Sometimes programs fail to open because of a lack of administrative privileges, which could be the same in your case. Due to this, we suggest you open the Media Creation tool as an admin to see if it fixes the issue.
You can follow the steps right below to know how to launch the Media Creation tool as an admin:
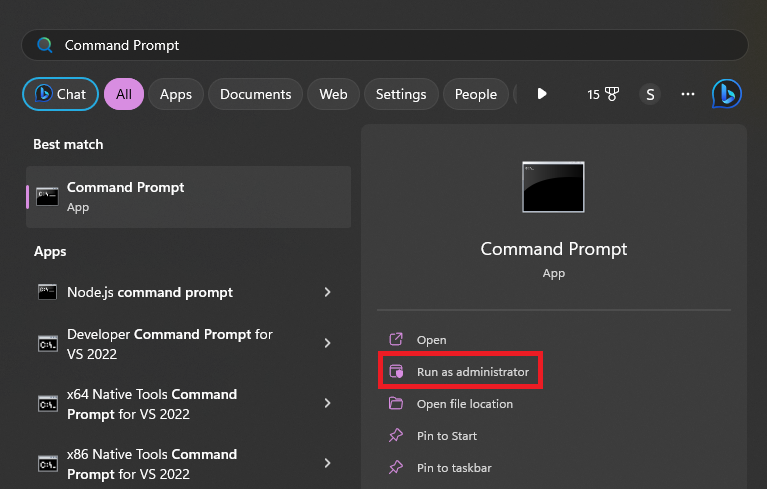
1. Press the Windows key on your keyboard to open the Windows Search Box, and type Media Creation in it.

2. Click on Run as administrator in the search results under the Media Creation tool to open it with admin rights.
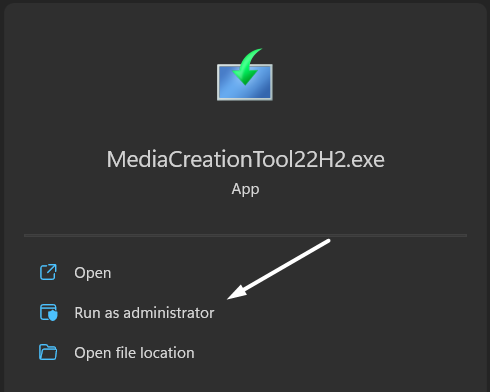
Tip: Another way to do so is by right-clicking on the Media Creation tool’s executable file and selecting the Run as administrator option from the context menu.
2. Unblock the Media Creation Tool
It could be possible that the Media Creation tool’s executable file is blocked on your PC. Due to this, it’s not opening on your system. Thus, we suggest you ensure that the file isn’t blocked on your system, and you can ensure this by following the below-listed steps:
1. Move to the location on your system where you’ve saved the Media Creation tool’s executable file.

2. Right-click on the executable file and select the Properties option from the contextual menu.
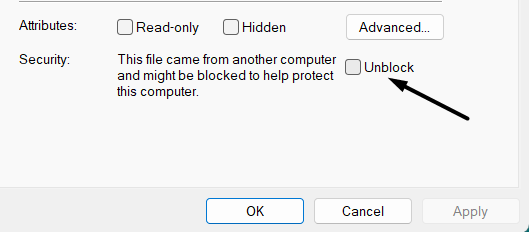
3. Ensure the checkbox next to Unblock under the Security section is unchecked.
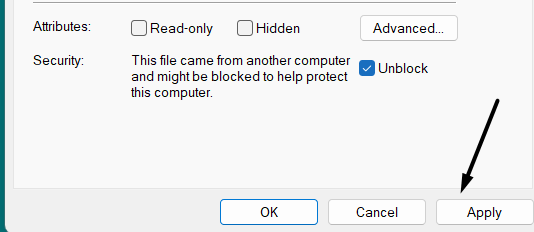
4. Lastly, click the Apply button to save the changes and then click on OK to close the box.
3. Disable VPN Client
An active VPN is one of the most common causes of the ill-functioning of the Media Creation tool. So if you’re using an external or built-in VPN, try disabling it. You can follow the below steps to turn it off:
1. Open the Windows Search Box, type VPN settings in it, and click on it in the search results.

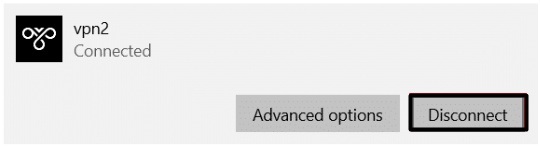
2. Click on the VPN connection that’s active and click on the Diconnect button to deactivate it right now.
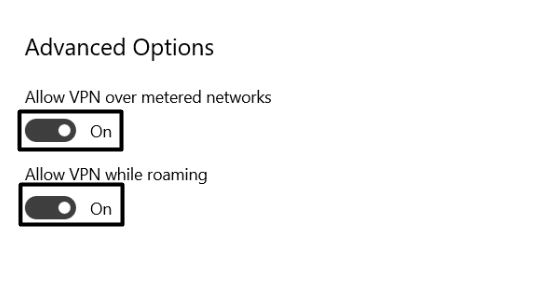
3. In the end, switch off the Allow VPN over metered networks and Allow VPN while roaming toggles.
4. Turn Off Your Antivirus
Another common cause of the “There was a problem running this tool” error is the enabled antivirus. Keeping this cause in mind, we suggest you disable your system’s integrated antivirus to check whether it’s causing this issue. You can check the below steps to switch it off:
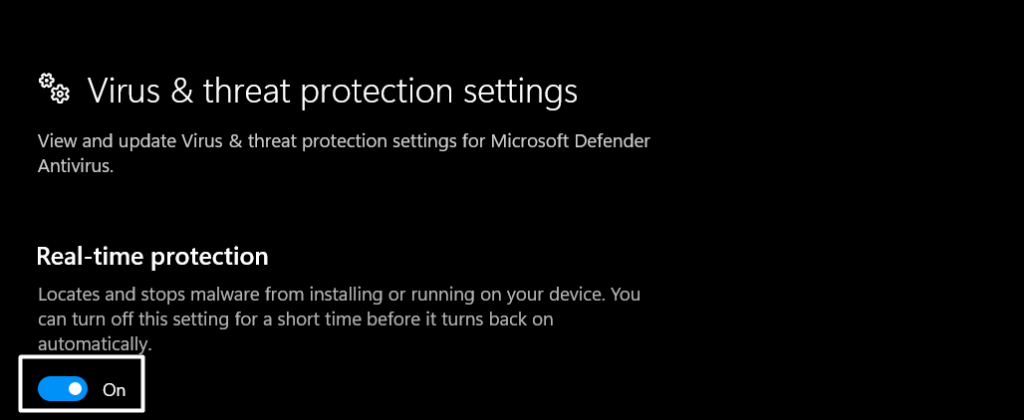
1. Open the Virus & threat protection settings on your Windows PC or laptop using the Windows Search Box.

2. Click on the Manage settings text under the Virus & threat protection settings section.

3. Disable the toggle under the Real-time protection section and then check the issue’s status.
5. Delete Conflicting Programs
In some cases, it’s found that third-party programs conflicted with the Media Creation tool, due to which they got the “There was a problem running this tool” error on their Windows PC.
This could be the same in your case, and to check this try removing potentially conflicted programs from your system.
6. Run Antivirus Scan
You may have mistakenly downloaded infectious files on your system, due to which the Media Creation Tool isn’t working. To check whether malware is causing this issue, we advise you to run a virus scan on your PC. So, here are the steps to do so:
1. Open the Windows Search Box on your PC by pressing the Windows and S keys at the same time.

2. Type Virus & threat protection in the search box, and select it from the Best match section.
3. Click the Quick scan button on the Virus & threat protection window to start the antivirus scan.
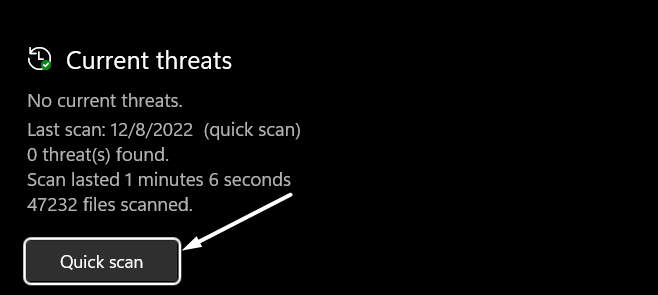
4. Once the scan is ended, check if the scan has found any suspicious files on your system. If yes, follow the on-screen instructions to remove them.
7. Enable TLS 1.1 & TLS 1.2
Transport Layer Security (TLS) is simply a security protocol that provides communications protection over a computer network. Some users said that enabling TLS 1.1 & TLS 1.2 in the system could fix the Media Creation Tool not working issue in Windows 11. So, try the same by following the below-mentioned steps and check the issue’s status:
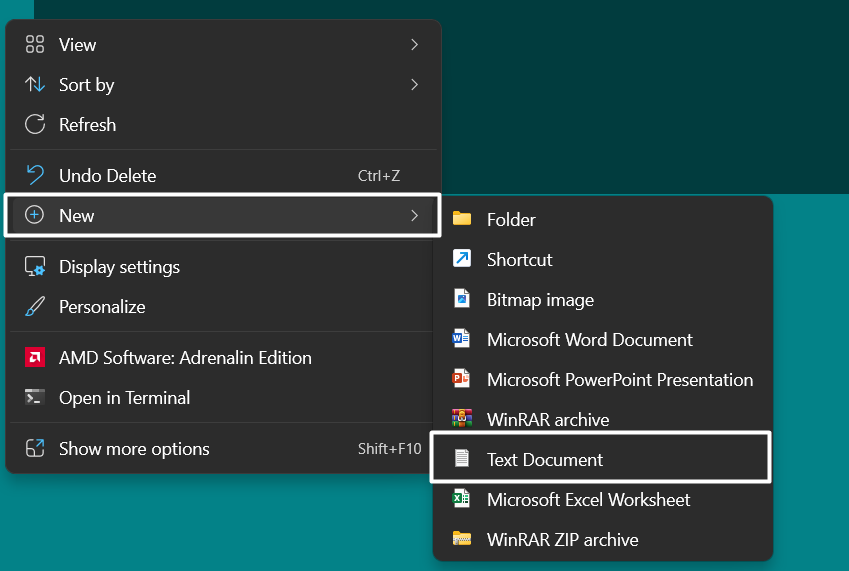
1. Right-click on your desktop’s blank space, and then hover the arrow on the New option.

2. Select the Text Document option from the New dropdown menu to create a new text file.
3. Once the new text document is created, copy-paste the below-mentioned line of codes into it:
Windows Registry Editor Version 5.00[HKEY_LOCAL_MACHINE\SOFTWARE\Microsoft\Windows\CurrentVersion\Internet Settings\WinHttp] “DefaultSecureProtocols”=dword:00000a00[HKEY_LOCAL_MACHINE\SOFTWARE\Wow6432Node\Microsoft\Windows\CurrentVersion\Internet Settings\WinHttp] “DefaultSecureProtocols”=dword:00000a00[HKEY_LOCAL_MACHINE\SYSTEM\CurrentControlSet\Control\SecurityProviders\SCHANNEL\Protocols\TLS 1.1\Client] “DisabledByDefault”=dword:00000000 “Enabled”=dword:00000001[HKEY_LOCAL_MACHINE\SYSTEM\CurrentControlSet\Control\SecurityProviders\SCHANNEL\Protocols\TLS 1.2\Client] “DisabledByDefault”=dword:00000000 “Enabled”=dword:00000001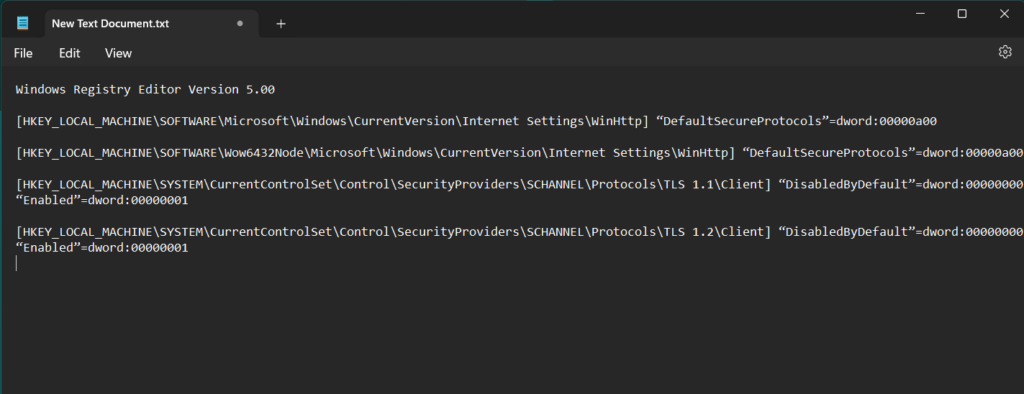
4. Click on File in the top ribbon menu, and then select Save as from the dropdown menu.
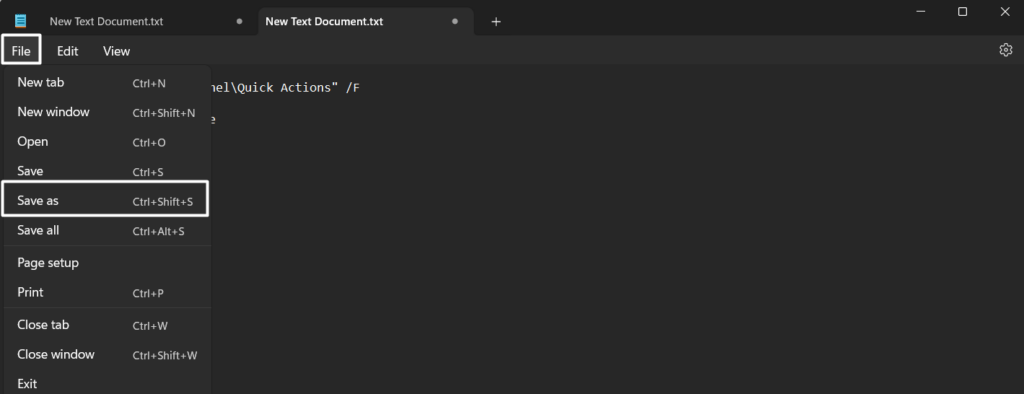
5. Type Enable TLS.reg in the File name: field and click on the Save button to save the file with this name.

6. Double-click on the new Enable TLS.reg registry file to apply it and then check the issue’s status.

8. Make Sure Enough Space Is Available on Your System Disk
To use the Media Creation tool on your Windows 11 PC, it should have at least 8 GB of free space on your hard disk. So make sure your Windows system’s disk has this much free storage. You can check the same in the This PC section of the Windows File Explorer.
9. Restart All the Important Services
The working of the Media Creation tool also depends on the functioning of a few Windows services. It’s possible that the below-mentioned services aren’t working, which is why this issue is occurring:
- Background Intelligent Transfer Service (BITS)
- Server
- TCP/IP NetBIOS Helper
- Workstation
- IKE and AuthIP IPsec Keying Modules
- Windows Update or Automatic Updates
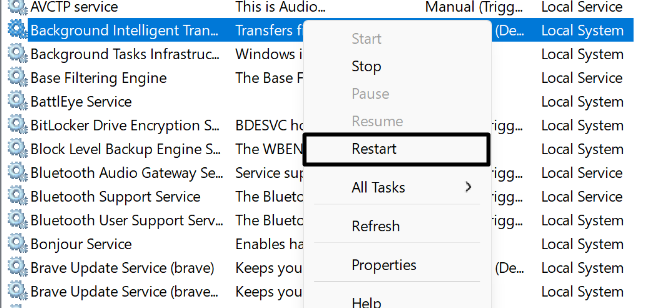
Due to this reason, we suggest you restart all the stated Windows services and check if doing so fixes the issue. You can check the below-mentioned steps to know how to restart them:
1. Open the Services utility on your Windows 11 PC using the Run utility or any other way.

2. Search for any of the above-mentioned Windows services in the Services tab and right-click on it.
3. Choose the Restart option from the right-click menu to restart the selected Windows service.
4. Apply the same steps to other mentioned Windows services and check if the issue is gone.
10. Create a New Registry Key
If nothing worked out for you until now, then there’s a higher chance that this solution would work. So, all you need to do is, dig a bit in the Registry Editor and create a new registry key called AllowOSUpgrade.
So, try the same with the below-mentioned instructions:
1. Open the Run utility, type regedit in its search box, and hit Enter to get the UAC prompt.
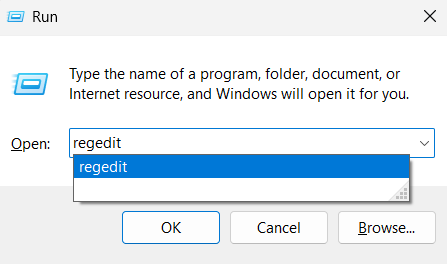
2. Click on Yes on the UAC prompt and go to the below-mentioned path in the Registry Editor:
Computer\HKEY_LOCAL_MACHINE\SOFTWARE\Microsoft\Windows\CurrentVersion\WindowsUpdate\OSUpgrade![]()
3. Right-click the OSUpgrade key on the left and choose the New > DWORD (32-bit) Value option.
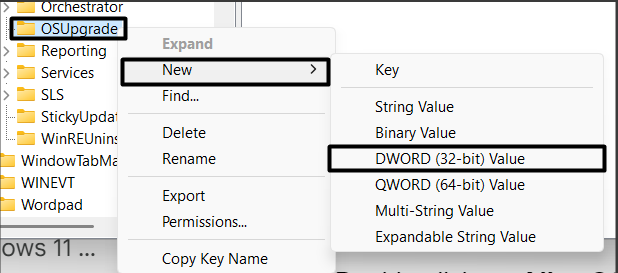
4. Enter AllowOSUpgrade in the Value name: text field and click the OK button to save the name.
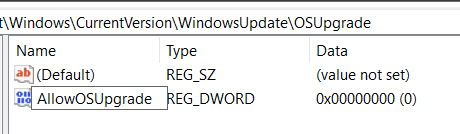
5. Double-click on AllowOSUpgrade in the right pane and enter 1 in the Value data: text field.
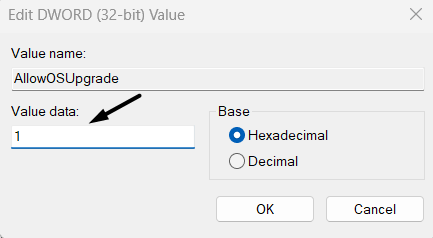
6. Click the OK button on the Edit DWORD(32-Bit) Value prompt and restart your PC to check the issue’s status.

11. Make Sure You’re On the Latest Windows Version
It could be possible that your Windows 11 PC isn’t running on the latest version of Windows. As a result, this problem is appearing. In that case, we suggest you install all pending Windows updates and then check if the Windows 11 Media Creation tool not working issue is fixed.
Try updating your Windows 11 PC by following the below-mentioned steps:
1. Launch the Settings app and click on the Windows Update option at the top right corner.
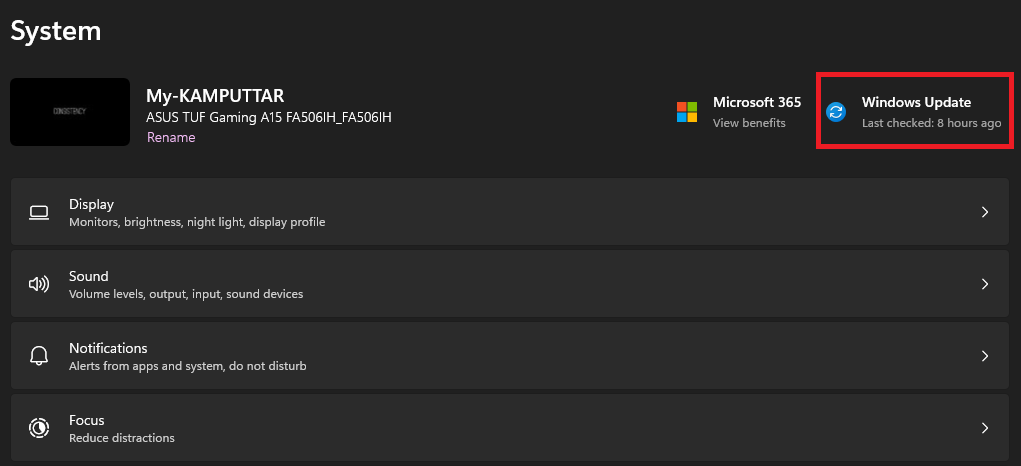
2. Click the Check for updates button in the following window to search for new Windows updates.

3. In case it shows some Windows updates to install, click the respective button to install them.

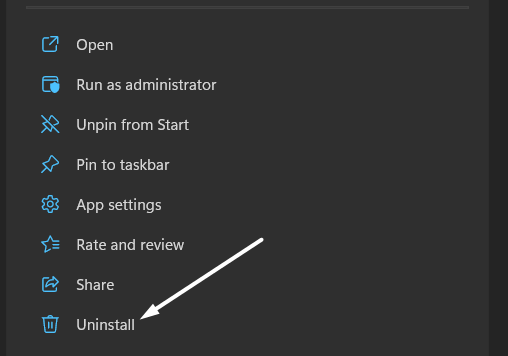
12. Reinstall the Media Creation Tool
One of the easiest ways to resolve all kinds of issues with the Windows Media Creation tool is to reinstall the tool itself. So, uninstall Media Creation from your system and reinstall it by clicking here. Once the tool is downloaded, install it and then check the issue’s status.
13. Clean the Installation Drive
One of Microsoft’s Independent Advisors advised affected users to clean the installation disk before upgrading to Windows’ latest edition.
This is because errors in the disk could also make the Media Creation tool ill. So clean your disk by following the steps right below:
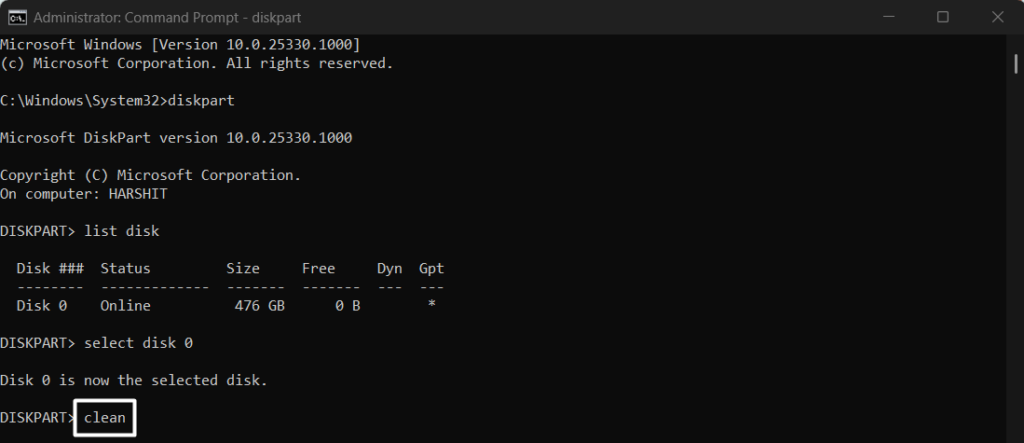
1. Open the Command Prompt program with administrative privileges on your Windows 11 PC.
2. Execute the below-listed command in the console to get a list of all disks with available space:
list disk
3. Run the below command in it but make sure to change “1” with the disk’s number that you want to clean:
select disk 1
4. Lastly, type the clean command in it and press Enter to start cleaning the selected disk.
14. Try An Alternate Way
If you’re still unable to clean install the new Windows 11 on your PC, then try another way. One of the ways to do so is by creating an installation USB drive. For that, you need to use the Rufus software.
You check our guide, as it explains the same in detail. This guide also mentions other ways to upgrade the system to the latest version, so check them too.
15. Clean Install Windows 11 Using ISO File
If the previous method also doesn’t work, then direct download the Windows 11 ISO file on your system and use it to install Windows 11 on your system’s drive. So, click here to download the Windows 11 ISO file on your PC.
Once you’ve downloaded the ISO, check the instructions mentioned in our guide to know how to clean install Windows 11 using it.
FAQs
Why Is Windows Media Creation Tool Not Launching?
You may not have the required permission to open the Windows Media Creation tool on your system. Some other reasons could be viruses, conflicting apps, insufficient disk space, etc.
Why Can’t Windows 11 Media Creation Tool Find USB?
If the Windows 11 Media Creation tool is unable to detect your USB, it could be possible that it isn’t properly connected to the system. Another reason could be problems with the USB port.
How Do I Fix Windows Media Creation Tool Error?
Restarting the system is one of the easiest solutions to resolve all the Windows Media Creation tool’s related errors. You can also try disabling the VPN client to check if it fixes those errors with it.
How Do I Fix Error Code 0x80072F8F 0x20000?
Follow the below-mentioned instructions to fix the 0x80072F8F 0x20000 error in Windows 11:
1. Hit the Windows key and R keys concurrently to open Run and type the below path in it:
C:\Windows\SoftwareDistribution\Download2. Press the Ctrl + A keys at the same time to select all the files and then click on the Bin icon in the top menu.
3. After deleting all the files, open the Command Prompt utility and execute the below command in it:
wuauclt.exe /updatenowHow To Install Windows 11 Without Media Creation Tool?
One of the methods to install Windows 11 without the Media Creation tool is directly downloading the Windows 11 ISO file. Another possible method is using the Rufus software.
Upgrade Windows With Ease
Most of us use the Media Creation tool to upgrade our system to the latest version. But sometimes, it suddenly stops working, due to which it becomes difficult to upgrade or clean install Windows on our system.
If you were also facing issues with the Media Creation tool on your Windows 11 PC, we hope they have gotten fixed now, as we shared some proven ways in this in-depth guide. Also, make sure to share which fix helped you get rid off Media Creation tool not working issue.