При разработке веб-сайтов и веб-приложений можно столкнуться с ошибкой 500 internal server error. Сначала она может испугать и ввести в заблуждение, поскольку обычно веб-сервер выдает более конкретные ошибки, в которых указана точная причина проблемы, например, превышено время ожидания, неверный запрос или файл не найден, а тут просто сказано что, обнаружена внутренняя ошибка.
Но не все так страшно и в большинстве случаев проблема вполне решаема и очень быстро. В этой статье мы разберем как исправить ошибку Internal server error в Nginx.
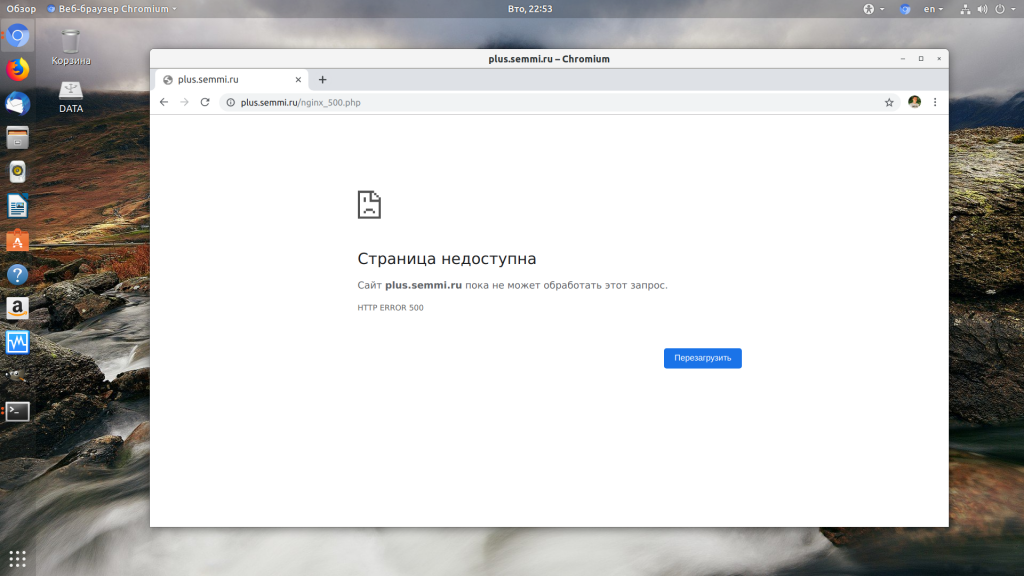
Дословно Internal server error означает внутренняя ошибка сервера. И вызвать её могут несколько проблем. Вот основные из них:
- Ошибки в скрипте на PHP — одна из самых частых причин;
- Превышено время выполнения PHP скрипта или лимит памяти;
- Неправильные права на файлы сайта;
- Неверная конфигурация Nginx.
А теперь рассмотрим каждую из причин более подробно и разберем варианты решения.
1. Ошибка в скрипте PHP
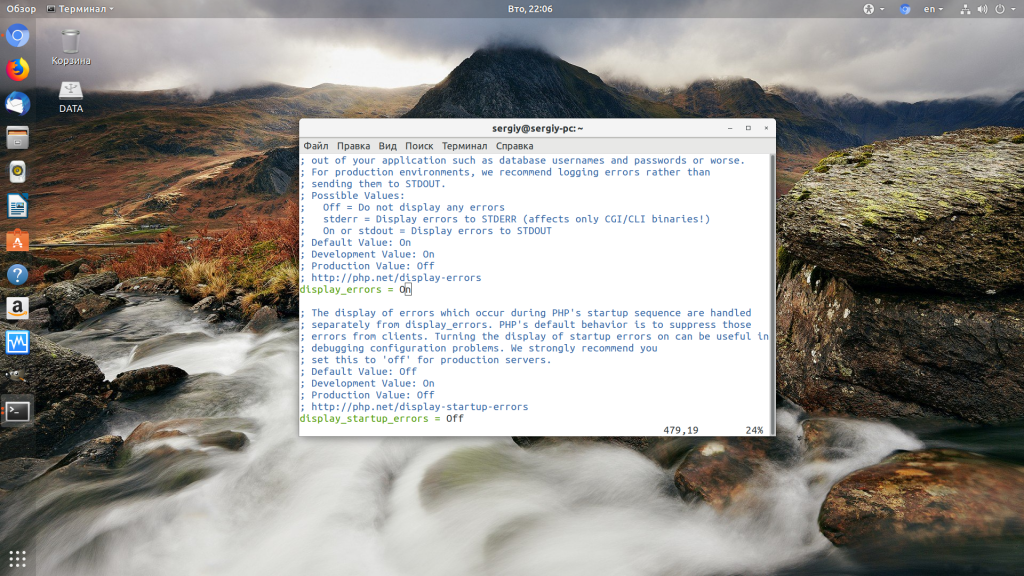
Мы привыкли к тому, что если в PHP скрипте есть ошибки, то сразу же видим их в браузере. Однако на производственных серверах отображение сообщений об ошибках в PHP отключено, чтобы предотвратить распространение информации о конфигурации сервера для посторонних. Nginx не может отобразить реальную причину ошибки, потому что не знает что за ошибка произошла, а поэтому выдает универсальное сообщение 500 internal server error.
Чтобы исправить эту ошибку, нужно сначала понять где именно проблема. Вы можете включить отображение ошибок в конфигурационном файле php изменив значение строки display_errors с off на on. Рассмотрим на примере Ubuntu и PHP 7.2:
vi /etc/php/7.2/php.ini
display_errors = On
Перезапустите php-fpm:
sudo systemctl restart php-fpm
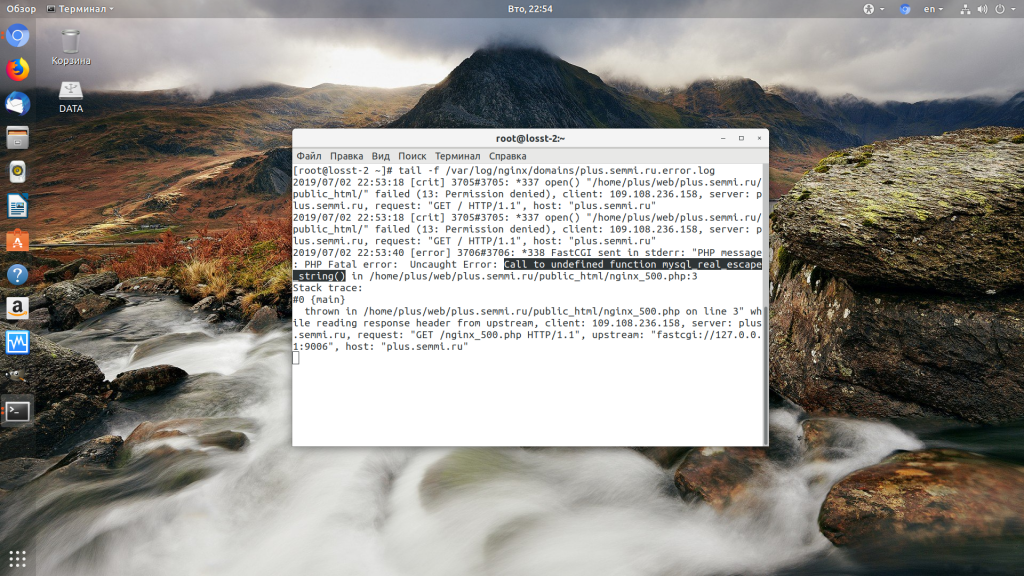
Затем обновите страницу и вы увидите сообщение об ошибке, из-за которого возникла проблема. Далее его можно исправить и отключить отображение ошибок, тогда все будет работать. Ещё можно посмотреть сообщения об ошибках PHP в логе ошибок Nginx. Обычно он находится по пути /var/log/nginx/error.log, но для виртуальных доменов может настраиваться отдельно. Например, смотрим последние 100 строк в логе:
tail -n 100 -f /var/log/nginx/error.log
Теперь аналогично, исправьте ошибку и страница будет загружаться нормально, без ошибки 500.
2. Превышено время выполнения или лимит памяти
Это продолжение предыдущего пункта, так тоже относится к ошибкам PHP, но так, как проблема встречается довольно часто я решил вынести её в отдельный пункт. В файле php.ini установлены ограничения на время выполнения скрипта и количество оперативной памяти, которую он может потребить. Если скрипт потребляет больше, интерпретатор PHP его убивает и возвращает сообщение об ошибке.
Также подобная ошибка может возникать, если на сервере закончилась свободная оперативная память.
Если же отображение ошибок отключено, мы получаем error 500. Обратите внимание, что если время ожидания было ограничено в конфигурационном файле Nginx, то вы получите ошибку 504, а не HTTP ERROR 500, так что проблема именно в php.ini.
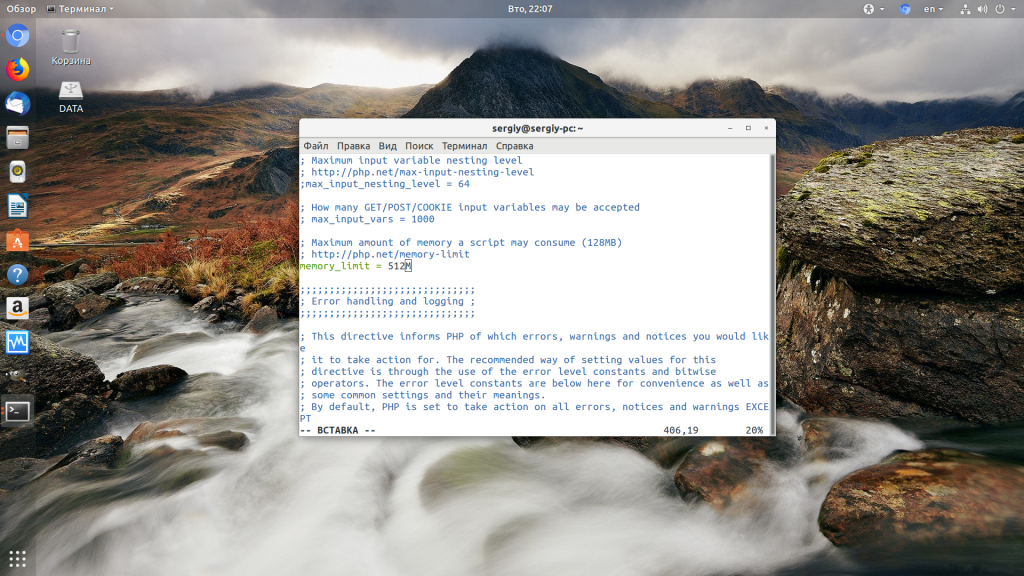
Чтобы решить проблему увеличьте значения параметров max_execution_time и memory_limit в php.ini:
sudo vi /etc/php/7.2/php.ini
max_execution_time 300

memory_limit 512M
Также проблема может быть вызвана превышением других лимитов установленных для скрипта php. Смотрите ошибки php, как описано в первом пункте. После внесения изменений в файл перезапустите php-fpm:
sudo systemctl restart php-fpm
3. Неверные права на файлы
Такая ошибка может возникать, если права на файлы, к которым обращается Nginx установлены на правильно. Сервисы Nginx и php-fpm должны быть запущены от имени одного и того же пользователя, а все файлы сайтов должны принадлежать этому же пользователю. Посмотреть от имени какого пользователя запущен Nginx можно командой:
nginx -T | grep user
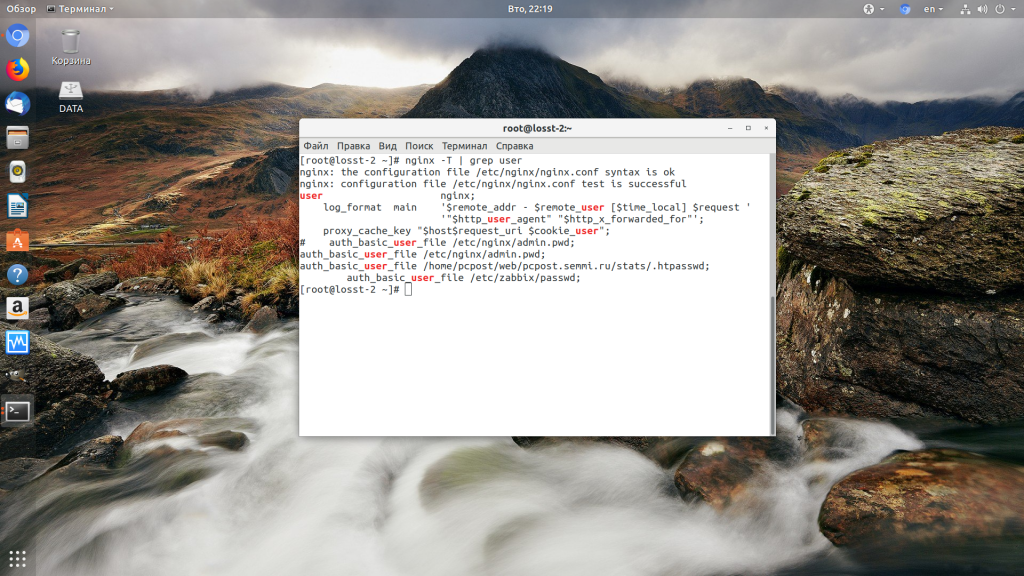
Чтобы узнать от какого пользователя запущен php-fpm посмотрите содержимое конфигурационного файла используемого пула, например www.conf:
sudo vi /etc/php-fpm.d/www.conf
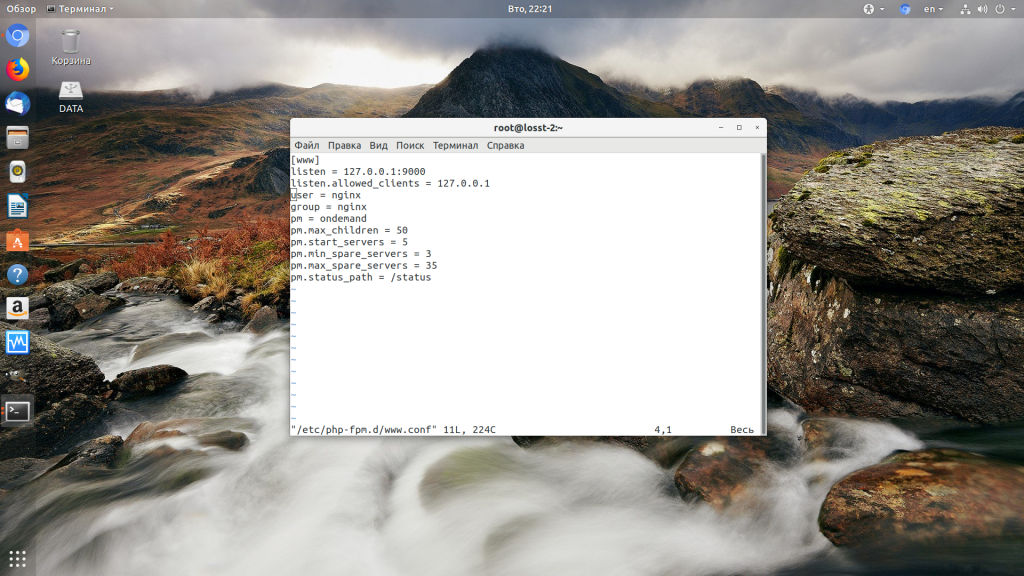
В моем случае это пользователь nginx. Теперь надо убедится, что файлы сайта, к которым вы пытаетесь обратиться принадлежат именно этому пользователю. Для этого используйте команду namei:
namei -l /var/www/site
Файлы сайта должны принадлежать пользователю, от имени которого запущены сервисы, а по пути к каталогу с файлами должен быть доступ на чтение для всех пользователей. Если файлы принадлежат не тому пользователю, то вы можете все очень просто исправить:
sudo chown nginx:nginx -R /var/www/site
Этой командой мы меняем владельца и группу всех файлов в папке на nginx:nginx. Добавить права на чтение для всех пользователей для каталога можно командой chmod. Например:
sudo chmod o+r /var/www/
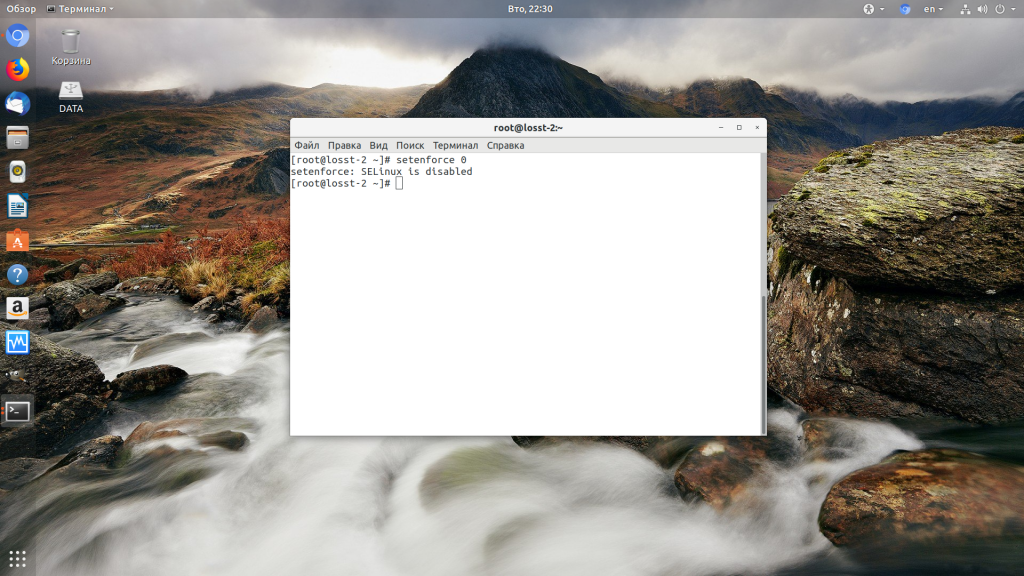
Далее все должно работать. Также, проблемы с правами может вызывать SELinux. Настройте его правильно или отключите:
setenforce 0
Выводы
В этой статье мы разобрали что делать если на вашем сайте встретилась ошибка 500 internal server error nginx. Как видите проблема вполне решаема и в большинстве случаев вам помогут действия описанные в статье. А если не помогут, напишите свое решение в комментариях!
Обнаружили ошибку в тексте? Сообщите мне об этом. Выделите текст с ошибкой и нажмите Ctrl+Enter.

Статья распространяется под лицензией Creative Commons ShareAlike 4.0 при копировании материала ссылка на источник обязательна .
When running a web server powered by NGINX, you may encounter some errors. One such error is “NGINX 500 Internal Server Error”. This error indicates that something went wrong on the server side, preventing it from processing requests.
This error can be a headache for developers, especially in the production environment, as they break the functionality of the entire website. However, it is possible to make your server work again after identifying the causes of this error and fixing it. So, in this article, we will explore common causes of NGINX 500 Internal Server Error and provide you with potential fixes to resolve the issue.
What is the NGINX 500 internal server error?
NGINX 500 Internal Server Error is a generic HTTP status code implying an internal problem within the server. Unlike error codes that pinpoint the problem, such as Error 404 for “Not Found” or 403 for “Forbidden”, the 500 error does not reveal the exact cause of the problem.
NGINX is multipurpose software. Both reverse proxy server, load balancer or web server can cause such error. When you encounter a 500 Internal Server Error, it indicates that the NGINX server encountered an error while trying to perform its tasks.
Possible causes for the NGINX 500 internal server error
As mentioned above, this error indicates a general problem with your server that has not been detailed. However, there are some possible causes to consider that might trigger the error. Some possible causes of the NGINX 500 Internal Server Error include:
Misconfigured Server Settings
One of the primary causes of the Nginx 500 Internal Server Error is misconfigured server settings. These settings control the server’s behavior, and incorrect configurations can lead to unexpected errors. Misconfigured server configuration files may contain incompatible directives or incorrect syntax.
Insufficient Server Resources
Another potential cause of the Nginx 500 Internal Server Error is insufficient server resources, such as CPU, RAM or disk space. When these resources are exhausted, the server cannot respond to users’ requests. This causes a “bottleneck” situation. This issue can also be caused by many simultaneous users in your website, or it can be caused by malicious requests sent automatically to harm your website.
Backend Application Errors
The Nginx 500 Internal Server Error can also be a result of errors in the backend application that Nginx is proxying to. In Nginx, proxying refers to the action of forwarding client requests to another server or service. For example, Nginx can receive requests from clients and forward them to a Nodejs backend application. At this point the issue can occur if you didn’t configure the proxy connection between Nodejs and Nginx.
Insufficient File Permissions
Nginx needs the appropriate file permissions to access and serve the requested files. Nginx may not be able to access the required resources and cause a 500 Internal Server Error if you have incorrect permissions. For example, let’s say you are hosting a WordPress site, your public_html folder permissions should be set to allow your php and html files to be served.
Browser Related Problems
This cause is about client-side. You may not be seeing the 500 Internal Server Error message only because of server-related issues. If you are sure that you have configured your server well, you may be getting this error due to the caching mechanism of browsers or the extensions you have installed on your browser.
How to fix NGINX 500 internal server error
We have discussed the problems that can cause 500 Internal Server Errors. Now let’s look at the steps that can be taken to fix these problems.
Fixing Misconfigured Server Settings
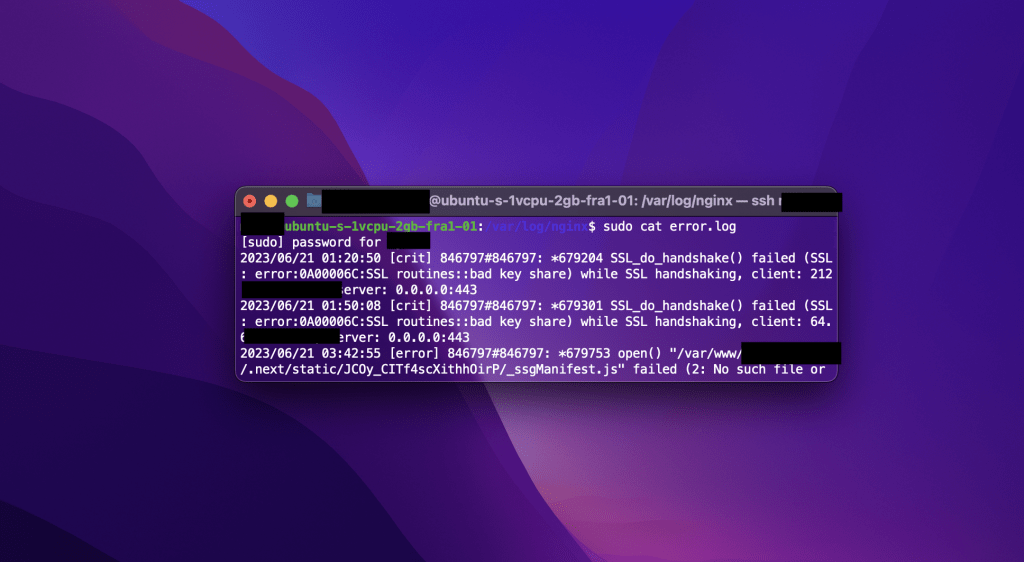
- Fix 1 – Check Nginx Error Logs
Start by checking the NGINX error log file, it can provide valuable insights into the specific configuration error. The default location for the error log is usually /var/log/nginx/error.log. So, run the following commands in Linux to access it.
cd /var/log/nginx
cat error.log
This page will show you errors affecting NGINX functionality. For example, in the image below, the error indicates that an SSL/TLS connection was not established between a client and server due to an issue with the SSL certificate.
Of course, that’s just a problem, you may find different kinds of errors in your Nginx log file. In this case, you can find the cause of your problem with a simple google search.
- Fix 2 – Verify the Configuration Syntax
Then, review your Nginx configuration files, paying attention to syntax errors or misplaced directives. Commands like nginx -t or nginx -t -c /path/to/nginx.conf will help you validate the syntax and detect any errors. You can simply run the following commands to navigate to the config files and detect errors.
cd /etc/nginx/sites-available
nginx -t
After running the commands above, you should get an result as show in image below.
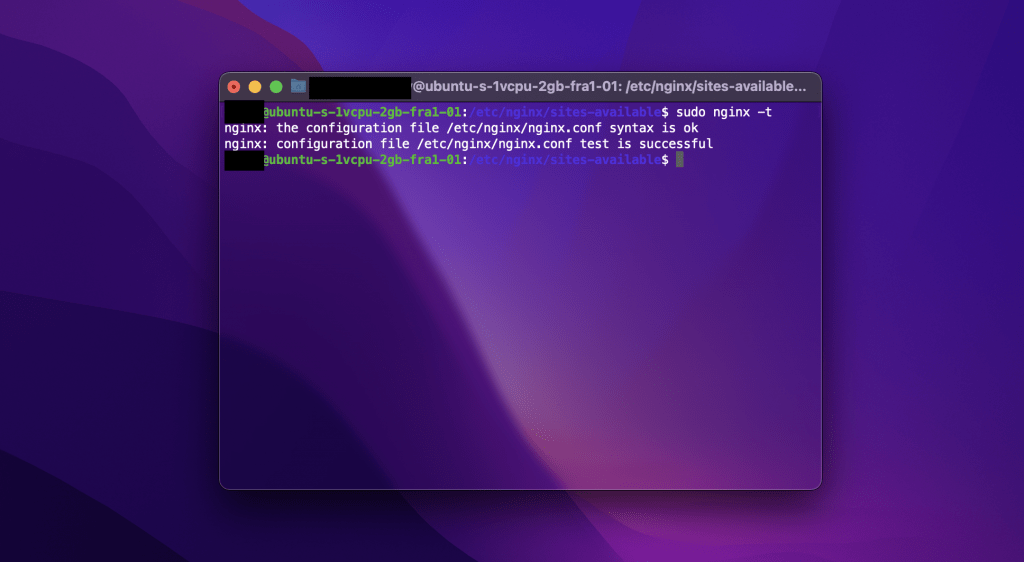
However, if you see a syntax error, you must fix it. Once fixed the syntax errors, restart the Nginx server using the command sudo service nginx restart or else nginx -s reload.
Fixing Insufficient Server Resources
- Fix 3 – Monitor System Resources
If you suspect a lack of system resources, you firstly need to check the system’s memory usage, CPU load and disk space availability. You can achieve this using the commands like top , htop and free . Here is an example of using the htop command to see the server’s remaining resources.
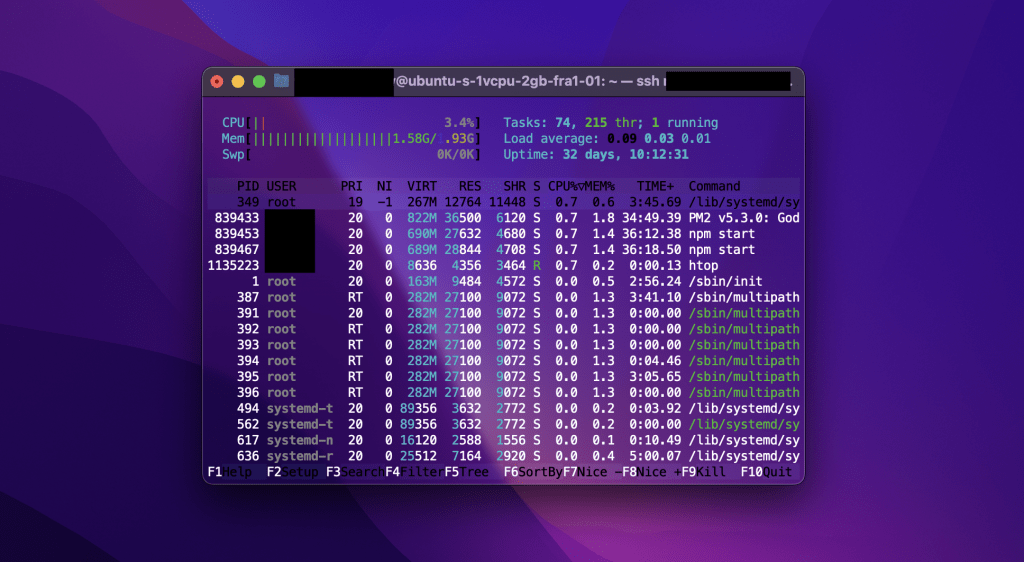
Once you identify the problem in sources, you can try to remove unnecessary files, if the resource limitations persist, you should consider upgrading your server hardware or migrating to a higher-performance hosting solution.
Fixing Backend Application Errors
- Fix 4 – Check Backend Application Logs
Inspect the logs of the backend application to identify any errors or exceptions. The logs may be located in different locations depending on the application stack (e.g. /var/www/example.com/logs/error.log for WordPress or pm2 logs if you are using the pm2 package with Nodejs)
- Fix 5 – Check Proxy Configurations
Ensure that the proxy pass configuration in your Nginx server block correctly set up. You can look for the proxy_pass directive and ensure it points to the correct backend server. For example:
location / {
    proxy_pass http://backend_server;
}
If you’re using Nginx as a reverse proxy, issue could be related to the upstream configuration. You can check the file mostly located in the path /etc/nginx/nginx.conf on linux. For example:
upstream backend {
    server backend_server1;
    server backend_server2;
}
backend_server1 and backend_server2 should be replaced with the actual addresses or hostnames of your backend servers and make sure each backend server is running on different ports and these ports ports do not conflict.
After making any changes, restart the Nginx service to apply the modifications using commands sudo service nginx restart or nginx -s reload .
Fixing Insufficient File Permissions
- Fix 6 – Check directory permissions
Check the permissions of the file or directory that Nginx is trying to access. You can use the chmod command to modify the permissions, typically 644 for files and 755 for directories.
- Fix 7 – Confirm ownership
Ensure that the file or directory is owned by the user running the Nginx process. You can check the ownership using the ls -l command, which will display the owner and group. If the ownership is incorrect, you can change it using the chown command. For example:
chown www-data:www-data path/to/fileAfter making changes in permissions and ownership, you should restart the Nginx using commands sudo service nginx restart or else nginx -s reload .
Fixing Browser Related Problems
- Fix 8 – Clear Browser Cache
Cached files in the browser can sometimes conflict with the server, clearing the browser cache can help resolve this issue. In Google Chrome, you can remove cached files as in shown image below.
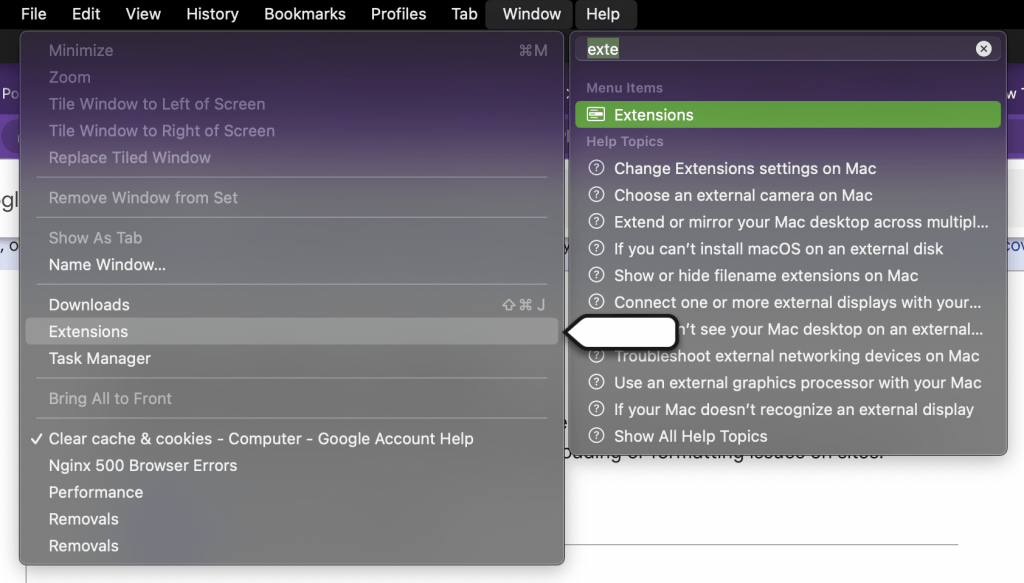
- Fix 9 – Disable Browser Extensions
Some browser extensions, especially vpn related extensions, can block communication between the browser and the server. So, you can try disabling all extensions and then reload the webpage to see if the error persists. You can find your extensions on Google Chrome as shown below:
FAQ
Are there other less common causes for the NGINX 500 Internal Server Error?
Yes. Various factors can cause the NGINX 500 Internal Server Error. So troubleshooting the exact cause requires analyzing server logs and configuration settings. However, some common causes of the NGINX 500 server error include, i.e.:
- PHP configuration issues: If you’re using PHP with NGINX, misconfigurations in the PHP settings, such as incorrect file permissions, memory limits, or incompatible modules, can trigger a 500 error. Checking the PHP error logs and ensuring the PHP configuration aligns with the server requirements can help resolve such issues.
- Incorrect NGINX configuration: Errors in the NGINX configuration files, such as syntax errors or conflicting directives, can lead to a 500 server error. Verifying the NGINX configuration files and ensuring they are correctly written and properly structured is essential to resolve these issues.
- Insufficient file or directory permissions: NGINX may encounter a 500 error if it lacks proper permissions to access required files or directories. Ensuring that the NGINX user (usually “www-data” or “nginx”) has appropriate read, write, and execute permissions on the necessary files and directories can resolve such issues.
- Faulty upstream server: If NGINX is configured to proxy requests to an upstream server (e.g., a backend application or another web server), a 500 error may occur if the upstream server is experiencing issues. Checking the logs and health of the upstream server can help identify and address any problems.
- Resource limitations: Insufficient server resources such as CPU, memory, or disk space can cause NGINX to encounter a 500 error. Monitoring the server’s resource usage and ensuring it has adequate resources available can help prevent such errors.
It’s important to note that the 500 Internal Server Error is a generic error indicating that something went wrong on the server side, and the specific cause may vary depending on the server configuration and setup. Analyzing the NGINX error logs and consulting with server administrators or web developers can help diagnose and resolve the issue effectively.
Is NGINX a reliable web server? Or is this error frequent?
Yes, NGINX is widely regarded as a reliable and high-performance web server. It has gained popularity for its ability to handle high levels of concurrent connections and efficiently serve static and dynamic content. NGINX is known for its lightweight architecture, scalability, and robustness, making it a popular choice for websites and web applications of all sizes.
Here are some reasons why NGINX is considered a reliable web server:
NGINX is designed to handle a large number of concurrent connections and deliver content quickly. It uses an asynchronous, event-driven architecture that optimizes resource utilization and provides high-performance delivery of web content.
NGINX is highly scalable and can handle a significant amount of traffic. It efficiently distributes incoming requests across multiple worker processes or threads, enabling it to handle heavy workloads and spikes in traffic without sacrificing performance.
Stability
NGINX is known for its stability and resilience. It has a small memory footprint, efficient memory management, and effective handling of connections, which contributes to its stability under high loads. NGINX’s modular architecture also allows for easy customization and configuration to meet specific requirements.
NGINX has a reputation for reliability and uptime. It has built-in features for load balancing, fault tolerance, and high availability, which help ensure continuous service even in the event of server failures or network issues.
NGINX has a large and active community of users and developers, which provides extensive support, documentation, and resources. The NGINX community actively contributes to the development and improvement of the web server, making it reliable and well-maintained.
While no web server is entirely immune to issues or vulnerabilities like the error 500, NGINX has proven to be a dependable choice for hosting websites and serving web content due to its performance, scalability, stability, and strong community support.
Conclusion
Nginx 500 Internal Server Error indicates that there are some problems with your server. In this article, we have discussed the possible causes of these problems, how to detect them and the steps needed to fix them. Remember, such errors prevent access to your website, so you should test your application step by step both while developing and publishing it to avoid such errors in production.
Thank you for reading.
Was this helpful?
Thanks for your feedback!
If you’ve ever encountered the 500 internal server error Nginx on your website, we know how frustrating and stressful it can be. You may have spent hours or even days creating and designing your website, and the thought of visitors being unable to access it can be disheartening.
But you do not need to worry, we’re here to help you to fix this Nginx server error with the best possible troubleshooting methods!
In this Guide, we’ll walk you through the main causes that trigger 500 internal server error Nginx, How to prevent it, and the steps to fix the Nginx 500 error and get your website back up and running.

Let us get started then!
Read: 🚩 How to fix HTTP 500 Internal Server Error in WordPress?
What does the 500 internal server error Nginx mean?
The 500 internal server error Nginx simply means that something has gone wrong on the server side of things. It is a generally comprehensive response that indicates the server could not able to determine the exact error code in response.
This could be due to a variety of factors, including faulty scripts, misconfigured servers, incompatible plugins, or inadequate file permissions.
Whatever the cause may be, the 500 Internal Server Error Nginx is a sign that something is preventing the server from functioning as it should.
One of the most common reasons for this error is an issue with one of the web servers that NGINX is working with, such as Apache. If the web server encounters an issue and returns a 500 error response to NGINX, this error message can then be returned to the client’s browser and displayed on the screen as 500 Internal Server Error Nginx.
What Are The Causes Of 500 Internal Server Errors Nginx?
The Nginx 500 Internal Server Error can be a real headache for website owners, causing frustration and anxiety. Below are some of the most common reasons that cause 500 internal server errors in Nginx.
- Misconfigured Server
- Incompatible Plugins
- A faulty script
- Inadequate File Permissions
1. A misconfigured server
A misconfigured server can lead to an error, causing a conflict between the server and the browser, leading to a disruption in the communication between the two. This can be due to server mismanagement, which can be caused by human error, a lack of expertise, or outdated software.
2. Incompatible plugins
Sometimes the WordPress plugins that you have installed can be the possible cause of the 500 internal server error Nginx. These plugins may have compatibility issues with the website, leading to the error. This can be due to plugin updates, which can cause compatibility issues with other plugins or website software.
3. A faulty script
A faulty script is another possible cause of the Nginx 500 Internal Server Error. Scripts can become corrupted, causing issues with the website’s functionality, and leading to the error. This can be due to programming errors, file corruption, or compatibility issues.
4. Inadequate file permissions
Insufficient file permissions can prevent the server from accessing or modifying files, leading to errors. This can be due to user error, misconfigured file permissions, or file corruption.
By understanding and identifying the root cause of the 500 Internal Server Error in Nginx, you can take the necessary steps to resolve the issue and ensure that the website runs smoothly and efficiently.
Let us check out them in detail.
1. Force Refresh or Reload your Webpage
The 500 Internal Server Error in Nginx can sometimes appear on your screen due to a temporary issue with your server. The server may be restarting or may be overburdened with too many requests to handle, resulting in insufficient resources to process them.
If it is the case, then Force refreshing or reloading the webpage can do the job. To do this,
- Press the Windows + R key simultaneously or Press the F5 key in windows.
- For Mac, Press Apple + R or Cmd+shift+ R key simultaneously
- For Linux, Press F5 Key
2. Clear Browser Cookies and Cache memory
If the Nginx 500 internal server error is triggered due to a cache-related issue, clearing your browser’s cookies and cache memory can help. Here are the steps you can follow:
Note: Since Chrome has a major Browser market share, here we will be using Chrome for this tutorial.
Step 1: Depending on your browser, navigate to the settings menu. In Google Chrome, you can click on the three vertical dots in the upper right corner of the window.
Step 2: Select “More tools” and Click on “Clear browsing data“.

Step 3: A pop-up window will open on which, you can select all three options under the “Basic” section as shown in the picture below. These options are “Browsing history“, “Cookies and other site data“, and “Cached images and files“.
Step 4: Click on “Clear data” to initiate the process.

Quick tip: Alternatively you can try to access the website in Private or Incognito mode, in which the browser doesn’t store any cookies/cache of the website you visit.
3. Deactivate or Disable VPN
Sometimes, your Internet Service Provider (ISP) can be at fault. You can add a VPN or use a VPN client to access the website again.
However, if you have already used VPN, try to deactivate it and then access the website. To do this,
Press the Windows Key + I simultaneously to open the settings interface.
Go to the Network and Internet
Click on VPN, located on the right pane, select your VPN and click on the Remove button.
If you are using any VPN client, do not forget to disconnect it from the VPN.

After completing all the steps, restart your device and check whether the 500 internal server error in Nginx has been resolved or not.
4. Remove Unwanted Browser Extensions
If you have installed a lot of plugins or extensions on your browsers, try to delete or remove the unwanted ones. Sometimes, extensions can also create issues that can trigger such types of errors.
5. Check Server Logs
You can also check out your error logs and find out the possible causes that trigger 500 internal server errors Nginx. All you need to do is log in to the FTP client and then navigate to the Error log Directory and either download it or directly open it in an editor.
This will help you to narrow down the issue so that you easily figure out the exact problem and you can immediately fix it.
You can also read our complete guide on How to access and set up WordPress error logs?
6. Check out the Scripts
- Check Nginx error logs: The first step is to look at the error logs for Nginx, which are usually located in the /var/log/nginx/error.log file (or a similar location depending on your configuration). Look for any error messages related to the 500 error, such as “upstream timed out” or “connect() failed”.
- Check PHP error logs: If you’re running PHP scripts, check the PHP error logs as well. These logs may provide more specific information about the cause of the error, such as syntax errors or runtime issues.
- Check permissions: Make sure that the script and any files it accesses have the correct permissions. Check the owner and group of the script and files and make sure they match the user running the Nginx process.
- Check syntax: If the script is written in a scripting language like PHP, make sure that the syntax is correct. You can do this by running the script from the command line and checking for any syntax errors.
- Check for infinite loops: If the script is in a loop that never ends, it can cause Nginx to timeout and return a 500 error. Look for any infinite loops in the script and fix them.
- Check resource limits: Check the resource limits for the server, such as the maximum memory or CPU usage. If the script is using too many resources, it can cause Nginx to timeout and return a 500 error. Increase the limits if necessary.
- Check for database errors: If the script is accessing a database, check the database logs for any errors or connection issues.
Read: 🚩 How to Fix HTTP 504 Gateway Timeout Error?
7. Check whether adequate permission is granted to folders and files.
To make the WordPress website work perfectly fine, it is essential to have all the directory and file permissions correctly configured. The recommended file permission settings are as follows:
- 755 for all folders and sub-folders.
- 644 for all files.
Incorrect permission settings will lead to the blocking of some plugins, themes, and scripts to work.
At WPOven you can use the “Fix Permissions” tool for fixing file permissions in Sites->Tools in the dashboard.
8. Check all your redirections
Sometimes misconfigured or incorrect redirections in web servers can show 500 internal server error Nginx. Make sure to check that files like mod_rewrite or .htaccess are properly configured and working as they should be.
9. Increase Script timeout value
Sometimes, web servers take longer time than usual to send a request, and if the response time exceeds the timeout value, the web server may time out on the request without waiting for Nginx to respond. This can result in a 500 internal server error Nginx.
To avoid this situation, it is recommended that you increase your web server’s timeout value. This will give your server more time to connect with Nginx and receive a valid response.
10. Contact your Web hosting provider or Developer
If none of the above-mentioned methods can help you fix the 500 Internal Server Error Nginx, the last option left is to contact the support team of your web hosting provider or seek assistance from a developer for further help
Best Practices For Preventing 500 Internal Server Error Nginx
- Regularly update server software and plugins
- Monitor server logs
- Use a content delivery network (CDN)
- Optimize website performance and reduce resource usage
- Use a backup system
Regular Update Server Software and plugins: Regularly updating server software and plugins with their latest version available is crucial to ensure that your website is running on the latest and most secure version of your server and plugins. Outdated software can be vulnerable to security threats, which can cause internal server errors.
Monitor server logs: Monitoring server logs is also important, as it can help you identify potential issues before they become major problems. Checking server logs regularly can help you detect unusual activity or errors, allowing you to take quick action before it causes an internal server error.
Use CDN: CDN or Content Delivery Network can help improve website performance and reduce server load, reducing the risk of internal server errors. CDNs help distribute website content across multiple servers, reducing the load on any single server and improving website speed.
Optimizing website performance and reducing resource usage: It is another important step in preventing internal server errors. This can involve techniques like image compression, minification of code, and reducing the number of HTTP requests.
Use a backup system: It is crucial for ensuring that your website can quickly recover from any internal server errors or other issues. Regular backups can help you restore your website to a previous version quickly and easily, reducing downtime and minimizing the impact of any errors or issues. Check out this dedicated blog on “How to Backup WordPress Site in 5 minutes“.
Conclusion
Tackling the 500 internal server error Nginx can be stressful and frustrating for any individual, but with the proper troubleshooting steps outlined that we have mentioned in this guide, you can easily figure out the issue and fix it.
In addition to that, also do not forget to implement the best practices that we have mentioned to prevent to prevent this error to happen in the future.
Always remember, a well-functioning website is essential for the success of your business, and we’re here to assist you in achieving that. If you have any queries or would like to add any valuable points to it, please do let us know in the comment section below.
Frequently Asked Questions
How do I fix NGINX 500 internal server error?
Here are some best troubleshooting methods you can try to fix 500 internal server errors Nginx on Ubuntu, PHP, WordPress, or other platforms.
1. Force Refresh or Reload your Webpage
2. Clear Browser Cookies and Cache memory
3. Deactivate or Disable VPN
4. Remove Unwanted Browser Extensions
5. Check Server Logs
6. Check out the Scripts
7. Check whether adequate permission is granted to folders and files.
8. Check all your redirections
9. Increase Script timeout value
What causes 500 internal server error?
Here are some of the most common issues due to which your WordPress website has an HTTP 500 Internal Server Error.
1. Corrupt .htaccess file
2. Exceeding PHP Memory Limit
3. Faulty Plugin or theme Issue
4. Corrupted Core Files
5. Check File Permissions
6. Unsupported PHP Version
7. Incorrect DNS entries
8. Problem with the Server itself
9. Inode Limitation Reached
Is a 500 error my fault?
If you are getting 500 internal server error Nginx message, it means there is something went wrong on the server side. There is nothing wrong, with the client side, i.e browser, your computer, or the internet connectivity. It is simply a problem with your website.
Introduction
500 Internal Server Error tells you there may be some problem with the server website you visit. There may be too many hits at the same time, a corrupt .htaccess file, etc. or the server can’t know what the specific problem is.
In the following article, we will tell you what 500 Internal Server Error is and how to fix it as we go through below.
How to recognize 500 Internal Server Error
Depending on the design, the code structure of each different website will have different error messages. But generally, when you encounter this problem, you will receive messages similar to the following:
- 500 Internal Server Error
- 500 Error
- HTTP 500 – Internal Server Error
- HTTP Error 500
- HTTP 500 Internal Error
- Temporary Error (500)
- Internal Server Error
- 500. That’s an error


How to fix 500 Internal Server Error
1. Reload the page
This error is a temporary error on the server, you need to reload the page to fix the error. You can press the F5 button or use the Ctrl + R key combination to reload.
2. Clear browser cache
It is possible that the website cache issue is down causing the 500 Internal Server Error. If you have this problem, let’s clear the browser cache.
3. Delete Cookies on Browser
After clearing cookies on your browser, restart your browser.
Conclusion
The above post is an explanation of what 500 Internal Server Error is, signs, and how to fix it. Thanks for reading!

Karim Buzdar holds a degree in telecommunication engineering and holds several sysadmin certifications including CCNA RS, SCP, and ACE. As an IT engineer and technical author, he writes for various websites.
Nginx is a very popular web server these days. This article will show you some common errors when running an Nginx web server and possible solutions. This is not a complete list. If you still can’t fix the error after trying the advised solutions, please check your Nginx server logs under /var/log/nginx/ directory and search on Google to debug the problem.
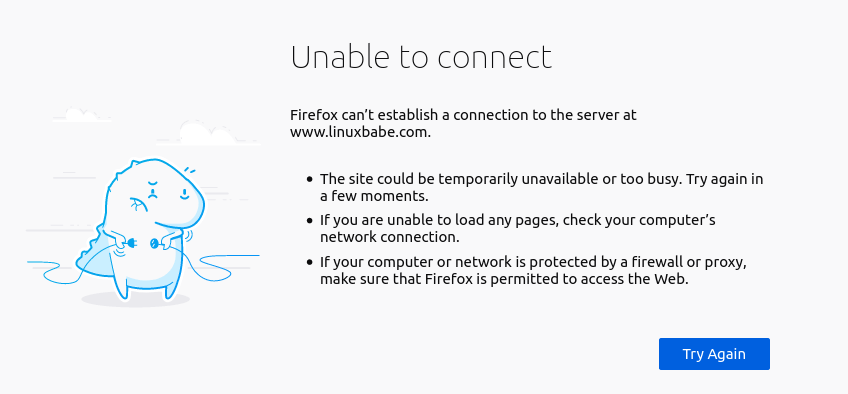
Unable to connect/Refused to Connect
If you see the following error when trying to access your website:
Firefox can’t establish a connection to the server at www.example.com
or
www.example.com refused to connect
or
The site can't be reached, www.example.com unexpectedly closed the connection.
It could be that
- Nginx isn’t running. You can check Nginx status with
sudo systemctl status nginx. Start Nginx withsudo systemctl start nginx. If Nginx fails to start, runsudo nginx -tto find if there is anything wrong with your configuration file. And check the journal (sudo journalctl -eu nginx) to find out why it fails to start. - Firewall blocking ports 80 and 443. If you use the UFW firewall on Debian/Ubuntu, run
sudo ufw allow 80,443/tcpto open TCP ports 80 and 443. If you use Firewalld on RHEL/CentOS/Rocky Linux/AlmaLinux, runsudo firewall-cmd --permanent --add-service={http,https}, thensudo systemctl reload firewalldto open TCP ports 80 and 443. - Fail2ban. If your server uses fail2ban to block malicious requests, it could be that fail2ban banned your IP address. Run
sudo journalctl -eu fail2banto check if your IP address is banned. You can add your IP address to the fail2banignoreiplist, so it won’t be banned again. - Nginx isn’t listening on the right network interface. For example, Nginx isn’t listening on the server’s public IP address.
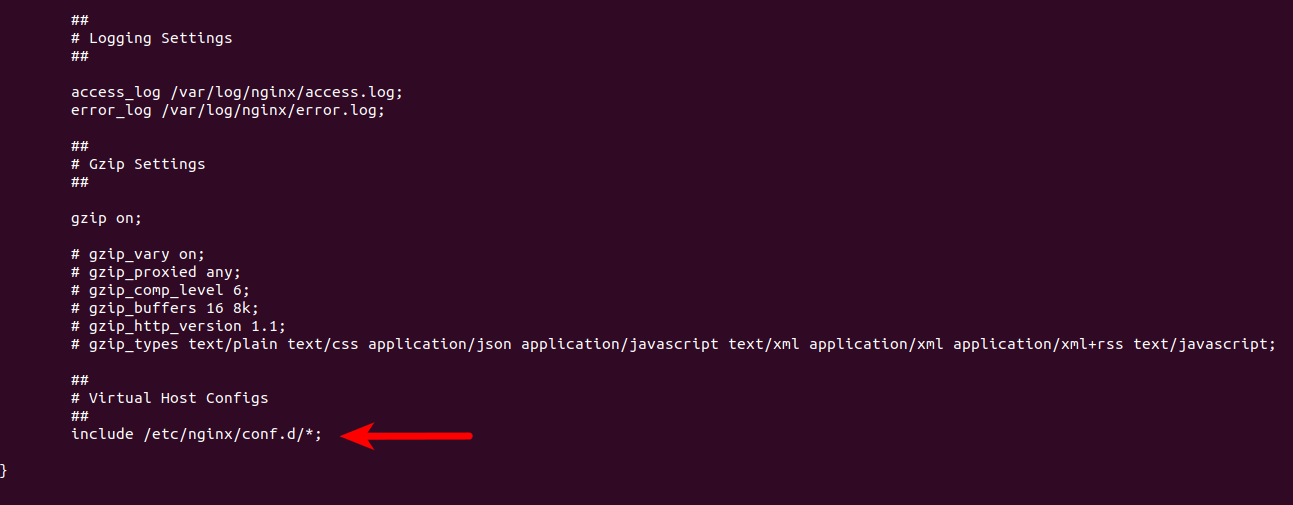
If systemctl status nginx shows Nginx is running, but sudo ss -lnpt | grep nginx shows Nginx is not listening on TCP port 80/443, it could be that you deleted the following lines in the /etc/nginx/nginx.conf file.
include /etc/nginx/conf.d/*;
So Nginx doesn’t use the virtual host files in /etc/nginx/conf.d/ directory. Add this line back.
The Connection Has Timed Out
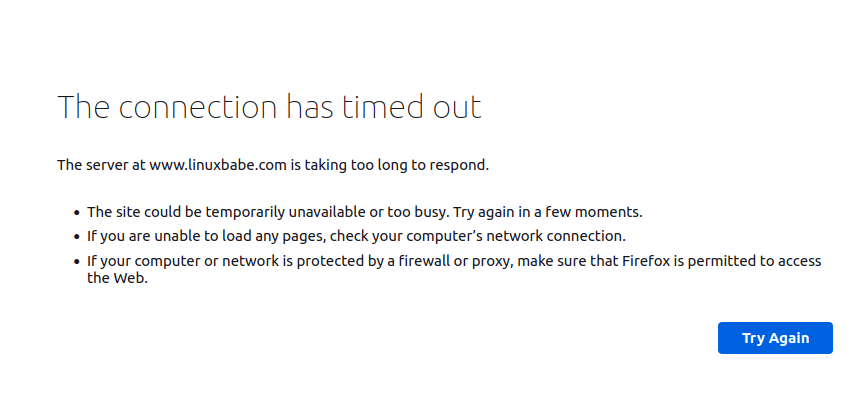
This could mean that your server is offline, or Nginx isn’t working properly. I once had an out-of-memory problem, which caused Nginx to fail to spawn the worker processes. If you can see the following error message in /var/log/nginx/error.log file, your server is short of memory.
fork() failed while spawning "worker process" (12: Cannot allocate memory)
404 Not Found
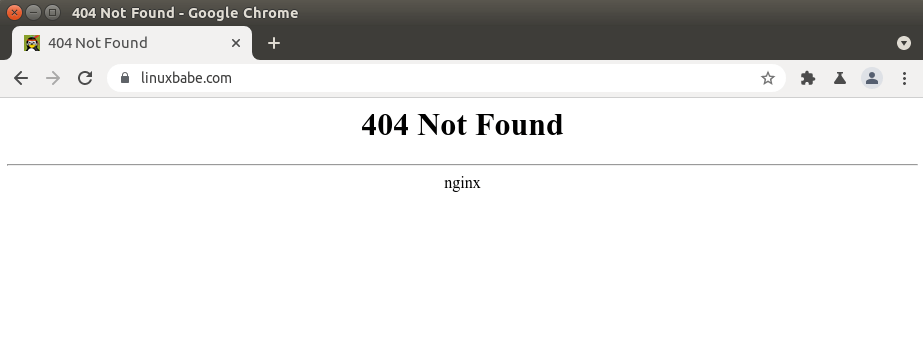
404 not found means Nginx can’t find the resources your web browser asks for. The reason could be:
- The web root directory doesn’t exist on your server. In Nginx, the web roor directory is configured using the
rootdirective, like this:root /usr/share/nginx/linuxbabe.com/;. Make sure your website files (HTML, CSS, JavaScript, PHP) are stored in the correct directory. - PHP-FPM isn’t running. You can check PHP-FPM status with
sudo systemctl status php7.4-fpm(Debian/Ubuntu) orsudo systemctl status php-fpm. - You forgot to include the
try_files $uri /index.php$is_args$args;directive in your Nginx server config file. This directive is needed to process PHP code. - Your server has no free disk space. Try to free up some disk space. You can use the
ncduutility (sudo apt install ncduorsudo dnf install ncdu) to find out which directories are taking up huge amount of disk space.
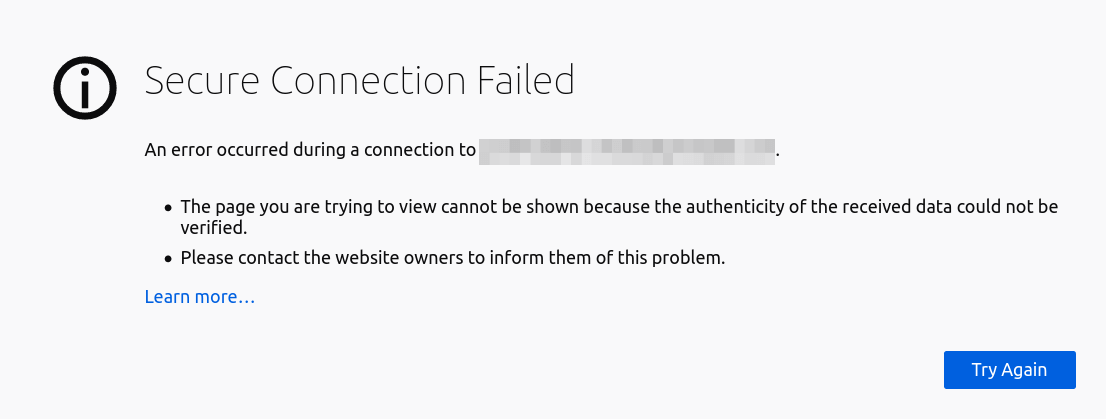
403 Forbidden
This error means that you are not allowed to access the request resources. Possible scenario includes:
- The website administrator blocks public access to the requested resources with an IP whitelist or other methods.
- The website could be using a web application firewall like ModSecurity, which detected an intrusion attack, so it blocked the request.
Some web applications may show a different error message when 403 forbidden happens. It might tell you that “secure connection failed”, while the cause is the same.
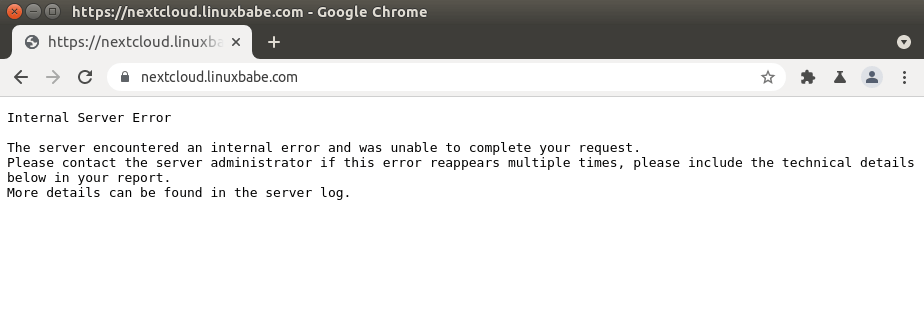
500 Internal Server Error
This means there is some error in the web application. It could be that
- The database server is down. Check MySQL/MariaDB status with
sudo systemctl status mysql. Start it withsudo systemctl start mysql. Runsudo journalctl -eu mysqlto find out why it fails to start. MySQL/MariaDB process could be killed due to out-of-memory issue. - You didn’t configure Nginx to use PHP-FPM, so Nginx doesn’t know how to execute PHP code.
- If your web application has a built-in cache, you can try flushing the app cache to fix this error.
- Your web application may produce its own error log. Check this log file to debug this error.
- Your web application may have a debugging mode. Turn it on and you will see more detailed error messages on the web page. For example, you can turn on debugging mode in the Modoboa mail server hosting platform by setting
DEBUG = Truein the/srv/modoboa/instance/instance/settings.pyfile. - PHP-FPM could be overloaded. Check your PHP-FPM log (such as
/var/log/php7.4-fpm.log). If you can find the[pool www] seems busy (you may need to increase pm.start_servers, or pm.min/max_spare_servers)warning message, you need to allocate more resources to PHP-FPM. - Sometimes reloading PHP-FPM (
sudo systemctl reload php7.4-fpm) can fix the error. - It also might be that you didn’t install the database module for PHP, so PHP can’t connect to the database. For MySQL/MariaDB, install it with
sudo apt install php7.4-mysql. For PostgreSQL, install it withsudo apt install php7.4-pgsql.
Nginx Shows the default page
If you try to set up an Nginx virtual host and when you type the domain name in your web browser, the default Nginx page shows up, it might be
- Your Nginx virtual host file doesn’t have the
server_namedirective. - You didn’t use a real domain name for the
server_namedirective in your Nginx virtual host. - You forgot to reload Nginx.
- You can try deleting the default virtual host file in Nginx (
sudo rm /etc/nginx/sites-enabled/default).
The page isn’t redirecting properly
Firefox displays this error as The page isn’t redirecting properly. Google Chrome shows this error as www.example.com redirected you too many times.

This means you have configured Nginx redirection too many times. For example, you may have added an unnecessary return 301 directive in the https server block to redirect HTTP to HTTPS connection.
If you have set up a page cache such as Nginx FastCGI cache, you need to clear your server page cache.
504 Gateway time-out
This means the upstream like PHP-FPM/MySQL/MariaDB isn’t able to process the request fast enough. You can try restarting PHP-FPM to fix the error temporarily, but it’s better to start tuning PHP-FPM/MySQL/MariaDB for faster performance.
Optimize MySQL/MariaDB Performance
Here is the InnoDB configuration in my /etc/mysql/mariadb.conf.d/50-server.cnf file. This is a very simple performance tunning.
innodb_buffer_pool_size = 1024M
innodb_buffer_pool_dump_at_shutdown = ON
innodb_buffer_pool_load_at_startup  = ON
innodb_log_file_size = 512M
innodb_log_buffer_size = 8M

#Improving disk I/O performance
innodb_file_per_table = 1
innodb_open_files = 400
innodb_io_capacity = 400
innodb_flush_method = O_DIRECT
innodb_read_io_threads = 64
innodb_write_io_threads = 64
innodb_buffer_pool_instances = 3
Where:
- The InnoDB buffer pool size needs to be at least half of your RAM. ( For VPS with small amount of RAM, I recommend setting the buffer pool size to a smaller value, like 400M, or your VPS would run out of RAM.)
- InnoDB log file size needs to be 25% of the buffer pool size.
- Set the read IO threads and write IO thread to the maximum (64) and
- Make MariaDB use 3 instances of InnoDB buffer pool. The number of instances needs to be the same number of CPU cores on your system.
After saving the changes, restart MariaDB.
sudo systemctl restart mariadb
Recommended reading: MySQL/MariaDB Database Performance Monitoring with Percona on Ubuntu Server
Find Out Which PHP Script Caused 504 Error
You can check the web server access log to see if there are any bad requests. For example, some folks might find the following lines in the Nextcloud access log file (/var/log/nginx/nextcloud.access).
"GET /apps/richdocumentscode/proxy.php?req=/hosting/capabilities HTTP/1.1" 499 0 "-" "Nextcloud Server Crawler"
"GET /apps/richdocumentscode/proxy.php?req=/hosting/capabilities HTTP/1.1" 499 0 "-" "Nextcloud Server Crawler"
"GET /apps/richdocumentscode/proxy.php?req=/hosting/capabilities HTTP/1.1" 499 0 "-" "Nextcloud Server Crawler"
Notice the HTTP status code 499, which means the HTTP client quit the connection before the server gives back an answer. Successful HTTP code should be 2xx or 3xx. If you can find HTTP code 4xx, it means there’s a problem with this HTTP request. In this example, the Nextcloud richdocumentscode app isn’t working.
Increase Timeout Settings
You can also set a longer timeout value in Nginx to reduce the chance of gateway timeout. Edit your Nginx virtual host file and add the following lines in the server {...} block.
  proxy_connect_timeout       600;
  proxy_send_timeout          600;
  proxy_read_timeout          600;
  send_timeout                600;
If you use Nginx with PHP-FPM, then set the fastcgi_read_timeout to a bigger value like 300 seconds. Default is 60 seconds.
 location ~ \.php$ {
     try_files $uri /index.php$is_args$args;
     include snippets/fastcgi-php.conf;
     fastcgi_split_path_info ^(.+\.php)(/.+)$;

     fastcgi_pass unix:/var/run/php/php7.4-fpm.sock;
     fastcgi_param SCRIPT_FILENAME $document_root$fastcgi_script_name;
     include fastcgi_params;
     fastcgi_read_timeout 300;
 }
Then reload Nginx.
sudo systemctl reload nginx
PHP-FPM also has a max execution time for each script. Edit the php.ini file.
sudo nano /etc/php/7.4/fpm/php.ini
You can increase the value to 300 seconds.
max_execution_time = 300
Then restart PHP-FPM
sudo systemctl restart php7.4-fpm
Memory Size Exhausted
If you see the following line in your Nginx error log, it means PHP reached the 128MB memory limit.
PHP Fatal error: Allowed memory size of 134217728 bytes exhausted (tried to allocate 57134520 bytes)
You can edit the php.ini file (/etc/php/7.4/fpm/php.ini) and increase the PHP memory limit.
memory_limit = 512M
Then restart PHP7.4-FPM.
sudo systemctl restart php7.4-fpm
If the error still exists, it’s likely there’s bad PHP code in your web application that eats lots of RAM.
PR_END_OF_FILE_ERROR
- You configured Nginx to rediect HTTP request to HTTPS, but there’s no server block in Nginx serving HTTPS request.
- Maybe Nginx isn’t running?
- Sometimes, the main Nginx binary is running, but a worker process can fail and exit due to various reasons. Check the Nginx error log (
/var/log/nginx/error.log) to debug.
PHP-FPM Upstream Time Out
Some folks can find the following error in Nginx error log file ( under /var/log/nginx/).
[error] 7553#7553: *2234677 upstream timed out (110: Connection timed out) while reading response header from upstream
Possible solutions:
- Restart PHP-FPM.
- Upgrade RAM.
- Optimize database performance. Because PHP-FPM needs to fetch data from the database, if the database is slow to process requests, PHP-FPM will time out.
502 Bad Gateway
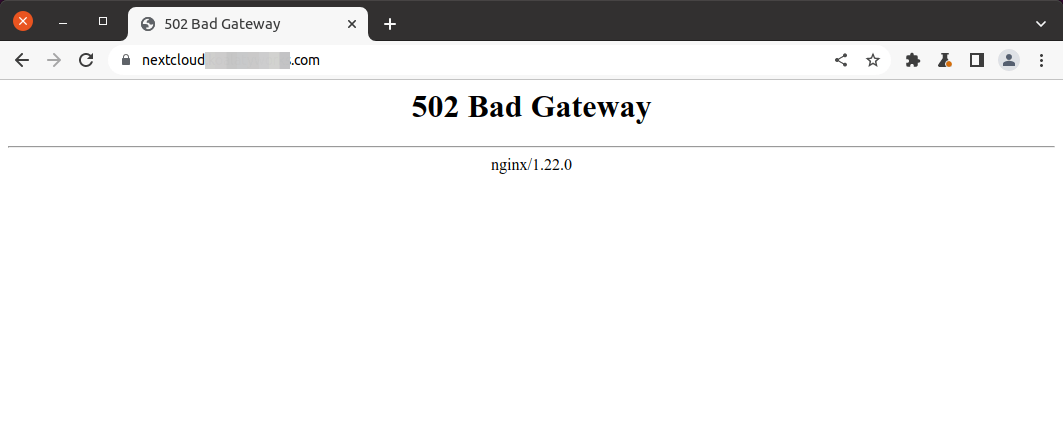
This error could be caused by:
- PHP-FPM isn’t running. Check its status:
sudo systemctl status php7.4-fpm. - PHP-FPM is running, but Nginx isn’t able to connect to PHP-FPM (Resource temporarily unavailable), see how to fix this error below.
- PHP-FPM is running, but Nginx doesn’t have permission to connect to PHP-FPM socket (Permission denied). It might be that Nginx is running as nginx user, but the socket file
/run/php/php7.4-fpm.sockis owned by thewww-datauser. You should configure Nginx to run as thewww-datauser.
Resource temporarily unavailable
Some folks can find the following error in Nginx error log file ( under /var/log/nginx/).
connect() to unix:/run/php/php7.4-fpm.sock failed (11: Resource temporarily unavailable)
This usually means your website has lots of visitors and PHP-FPM is unable to process the huge amounts of requests. You can adjust the number of PHP-FPM child process, so it can process more requests.
Edit your PHP-FPM www.conf file. (The file path varies depending on your Linux distribution.)
sudo nano /etc/php/7.4/fpm/pool.d/www.conf
The default child process config is as follows:
pm = dynamic
pm.max_children = 5
pm.start_servers = 2
pm.min_spare_servers = 1
pm.max_spare_servers = 3
The above configuration means
- PHP-FPM dynamically create child processes. No fixed number of child processes.
- It creates at most 5 child processes.
- Start 2 child processes when PHP-FPM starts.
- There’s at least 1 idle process.
- There’s at most 3 idle processes.
The defaults are based on a server without much resources, like a server with only 1GB RAM. If you have a high traffic website, you probably want to increase the number of child processes, so it can serve more requests. (Make sure you have enough RAM to run more child processes.)
pm = dynamic
pm.max_children = 20
pm.start_servers = 8
pm.min_spare_servers = 4
pm.max_spare_servers = 12
Save and close the file. Then we also increase the PHP memory limit.
sudo nano /etc/php/7.4/fpm/php.ini
Find the following line.
memory_limit = 128M
By default, a script can use at most 128M memory. It’s recommended to set this number to at lest 512M.
memory_limit = 512M
Save and close the file. Restart PHP-FPM. (You might need to change the version number.)
sudo systemctl restart php7.4-fpm
To monitor the health of PHP-FPM, you can enable the status page. Find the following line in the PHP-FPM www.conf file.
;pm.status_path = /status
Remove the semicolon to enable PHP-FPM status page. Then restart PHP-FPM.
sudo systemctl restart php7.4-fpm
Then edit your Nginx virtual host file. Add the following lines. The allow and deny directives are used to restrict access. Only the whitelisted IP addresses can access the status page.
location ~ ^/(status|ping)$ {
        allow 127.0.0.1;
        allow your_other_IP_Address;
        deny all;

        fastcgi_param SCRIPT_FILENAME $document_root$fastcgi_script_name;
        fastcgi_index index.php;
        include fastcgi_params;
        #fastcgi_pass 127.0.0.1:9000;
        fastcgi_pass   unix:/run/php/php7.4-fpm.sock;
}
Save and close the file. Then test Nginx configurations.
sudo nginx -t
If the test is successful, reload Nginx for the changes to take effect.
sudo systemctl reload nginx
Sample PHP-FPM status page.
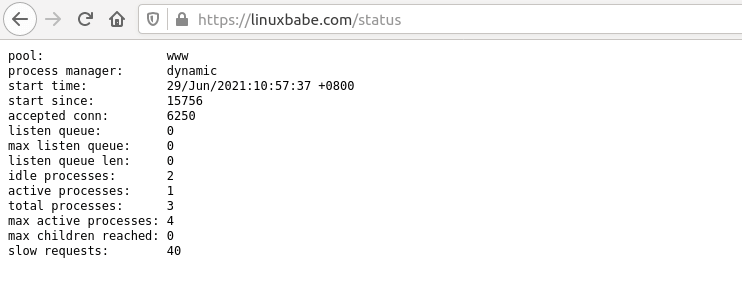
The PHP-FPM www.conf file gives you a good explanation of what each parameter means.
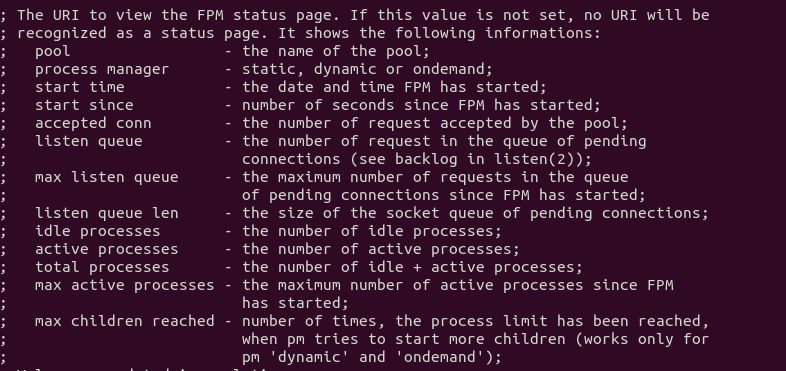
If PHP-FPM is very busy and unable to serve a request immediately, it will queue this request. By default, there can be at most 511 pending requests, determined by the listen.backlog parameter.
listen.backlog = 511
If you see the following value on the PHP-FPM status page, it means there has never been a request put in the queue, i.e. your PHP-FPM can process requests quickly.
listen queue:         0
max listen queue:     0
If there are 511 pending requests in the queue, it means your PHP-FPM is very busy, so you should increase the number of child processes.
You may also need to change the Linux kernel net.core.somaxconn setting, which defines max number of connections allowed to a socket file on Linux, such as the PHP-FPM Unix socket file. By default, its value is 128 before kernel 5.4 and 4096 starting with kernel 5.4.
linuxbabe@ubuntu:~$ sysctl net.core.somaxconn
net.core.somaxconn = 128
If you run a high traffic website, you can use a big value. Edit /etc/sysctl.conf file.
sudo nano /etc/sysctl.conf
Add the following two lines.
net.core.somaxconn = 20000
net.core.netdev_max_backlog = 65535
Save and close the file. Then apply the settings.
sudo sysctl -p
Note: If your server has enough RAM, you can allocate a fixed number of child processes for PHP-FPM like below. In my experience, this fixed the 500 internal error for a Joomla + Virtuemart website.
pm = static
pm.max_children = 50
Two Virtual Host files For the Same Website
If you run sudo nginx -t and see the following warning.
nginx: [warn] conflicting server name "example.com" on [::]:443, ignored
nginx: [warn] conflicting server name "example.com" on 0.0.0.0:443, ignored
It means there are two virtual host files that contain the same server_name configuration. Don’t create two virtual host files for one website.
PHP-FPM Connection reset by peer
Nginx error log file shows the following message.
recv() failed (104: Connection reset by peer) while reading response header from upstream
This may be caused by a restart of PHP-FPM. If it’s retarted manually by yourself, then you can ignore this error.
Nginx Socket Leaks
If you find the following error message in the /var/log/nginx/error.log file, your Nginx has a socket leaks problem.
2021/09/28 13:27:41 [alert] 321#321: *120606 open socket #16 left in connection 163
2021/09/28 13:27:41 [alert] 321#321: *120629 open socket #34 left in connection 188
2021/09/28 13:27:41 [alert] 321#321: *120622 open socket #9 left in connection 213
2021/09/28 13:27:41 [alert] 321#321: *120628 open socket #25 left in connection 217
2021/09/28 13:27:41 [alert] 321#321: *120605 open socket #15 left in connection 244
2021/09/28 13:27:41 [alert] 321#321: *120614 open socket #41 left in connection 245
2021/09/28 13:27:41 [alert] 321#321: *120631 open socket #24 left in connection 255
2021/09/28 13:27:41 [alert] 321#321: *120616 open socket #23 left in connection 258
2021/09/28 13:27:41 [alert] 321#321: *120615 open socket #42 left in connection 269
2021/09/28 13:27:41 [alert] 321#321: aborting
You can restart the OS to solve this problem. If it doesn’t work, you need to compile a debug version of Nginx, which will show you debug info in the log.
invalid PID number “” in “/run/nginx.pid”
You need to restart your web server.
sudo pkill nginx
sudo systemctl restart nginx
Cloudflare Errors
Here are some common errors and solutions if your website runs behind Cloudflare CDN (Content Delivery Network).
521 Web Server is Down
- Nginx isn’t running.
- You didn’t open TCP ports 80 and 443 in the firewall.
- You changed the server IP address, but forgot to update DNS record in Cloudflare.
The page isn’t redirecting properly
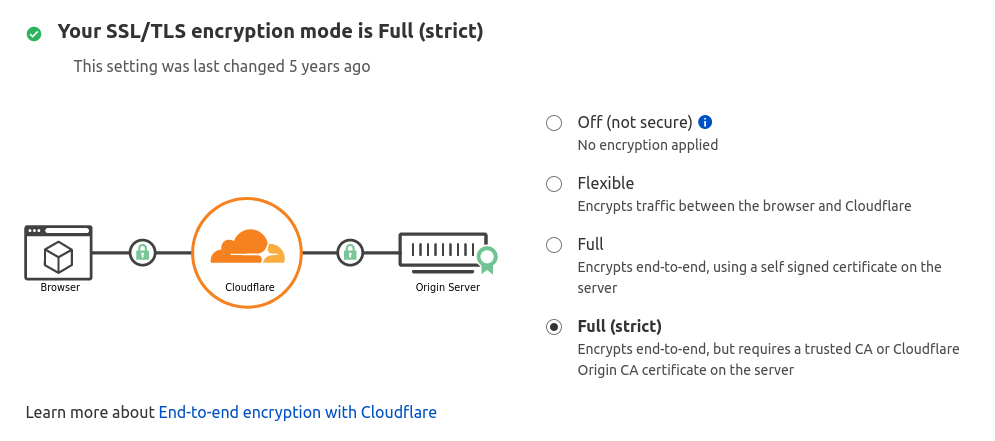
If your SSL setting on the SSL/TLS app is set to Flexible, but your origin server is configured to redirect HTTP requests to HTTPS, Your Nginx server sends reponse back to Cloudflare in encrypted connection. Since Cloudflare is expecting HTTP traffic, it keeps resending the same request, resulting in a redirect loop. In this case, you need to use the Full (strict) SSL/TLS option in your Cloudflare settings.
Wrapping Up
I hope this article helped you to fix common Nginx web server errors. As always, if you found this post useful, then subscribe to our free newsletter to get more tips and tricks 🙂
You may want to check out:
- How to Fix Common Let’s Encrypt/Certbot Errors