Core Data builds on functionality provided by other parts of Cocoa. When diagnosing a problem with an application that uses Core Data, take care to distinguish between problems that are specific to Core Data and those that stern from an error with another framework or that are architecture-related. Poor performance, for example, may not be a Core Data problem, but instead due to a failure to observe standard Cocoa techniques of memory management or resource conservation. If a user interface does not update properly, this may be due to an error in how you have configured Cocoa bindings.
Object Life Cycle Problems
Merge errors
Problem: You see the error message, «Could not merge changes.»
Cause: Two different managed object contexts tried to change the same data. This is also known as an optimistic locking failure.
Remedy: Either set a merge policy on the context, or manually (programmatically) resolve the failure. You can retrieve the currently committed values for an object using committedValuesForKeys:, and you can use refreshObject:mergeChanges: to refault the object, so that when it is next accessed, its data values are retrieved from its persistent store.
Assigning a managed object to a different store
Problem: You see an exception that looks similar to this example.
<NSInvalidArgumentException> [<MyMO 0x3036b0>_assignObject:toPersistentStore:]:Can’t reassign an object to a different store once it has been saved.
Cause: The object you are trying to assign to a store has already been assigned and saved to a different store.
Remedy: To move an object from one store to another, you must create a new instance, copy the information from the old object, save it to the appropriate store, and then delete the old instance.
Fault cannot be fulfilled
Problem: You see the error message, NSObjectInaccessibleException; «Core Data could not fulfill a fault.»
Cause: The object that Core Data is trying to realize has been deleted from the persistent store.
Remedy: Discard this object by removing all references to it.
Details: This problem can occur in at least two situations:
First situation:
-
You started with a strong reference to a managed object from another object in your application.
-
You deleted the managed object through the managed object context.
-
You saved changes on the object context.
At this point, the deleted object has been turned into a fault. It isn’t destroyed because doing so would violate the rules of memory management.
Core Data will try to realize the faulted managed object but will fail to do so because the object has been deleted from the store. That is, there is no longer an object with the same global ID in the store.
Second situation:
-
You deleted an object from a managed object context.
-
The deletion failed to break all relationships from other objects to the deleted object.
-
You saved changes.
At this point, if you try to fire the fault of a relationship from another object to the deleted object, it may fail, depending on the configuration of the relationship, which affects how the relationship is stored.
The delete rules for relationships affect relationships only from the source object to other objects (including inverses). Without potentially fetching large numbers of objects, possibly without reason, there is no way for Core Data to efficiently clean up the relationships to the object.
Keep in mind that a Core Data object graph is directional. That is, a relationship has a source and a destination. Following a source to a destination does not necessarily mean that there is an inverse relationship. So, in that sense, you need to ensure that you are properly maintaining the object graph across deletes.
Core Data uses inverse relationships to maintain referential integrity within the data model. If no inverse relationship exists and an object is deleted, you will be required to clean up that relationship manually.
In practice, a well-designed object graph does not require much manual post-deletion clean-up. Most object graphs have entry points that in effect act as a root node for navigating the graph, and most insertion and deletion events are rooted at those nodes just like fetches. This means that delete rules take care of most of the work for you. Similarly, because smart groups and other loosely coupled relationships are generally best implemented with fetched properties, various ancillary collections of entry points into the object graph generally do not need to be maintained across deletes, because fetched relationships have no notion of permanence when it comes to objects found through the fetched relationship.
Managed object invalidated
Problem: You see an exception that looks similar to this example:
<NSObjectInaccessibleException> [<MyMO 0x3036b0>_assignObject:toPersistentStore:]:The NSManagedObject with ID:#### has been invalidated.
Cause: Either you have removed the store for the fault you are attempting to fire, or the managed object’s context has been sent a reset.
Remedy: Discard this object by removing all references to it. If you add the store again, you can try to fetch the object again.
Class is not key-value coding-compliant
Problem: You see an exception that looks similar to the following example.
<NSUnknownKeyException> [<MyMO 0x3036b0> valueForUndefinedKey:]:this class is not key value coding-compliant for the key randomKey.
Cause: Either you used an incorrect key, or you initialized your managed object with init instead of initWithEntity:insertIntoManagedObjectContext:.
Remedy: Use a valid key (check the spelling and case carefully—also review the rules for key-value coding compliance in Key-Value Coding Programming Guide). Ensure that you use the designated initializer for NSManagedObject (see initWithEntity:insertIntoManagedObjectContext:).
Entity class does not respond to invocations of custom methods
Problem: You define an entity that uses a custom subclass of NSManagedObject, then in code you create an instance of the entity and invoke a custom method, as illustrated in this code fragment:
Objective-C
NSManagedObject *entityInstance = [NSEntityDescription insertNewObjectForEntityForName:@"MyEntity" inManagedObjectContext:moc];
[entityInstance setAttribute: newValue];
Swift
let entityInstance = NSEntityDescription.insertNewObjectForEntityForName("MyEntity", inManagedObjectContext: moc)entityInstance.attribute = newValue
You get a runtime error like this:
"2005-05-05 15:44:51.233 MyApp[1234] ***-[NSManagedObject setNameOfEntity:]: selector not recognized [self = 0x30e340]
Cause: In the model, you misspelled the name of the custom class for the entity.
Remedy: Ensure that the spelling of the custom class name in the model matches the spelling of the custom class you implement.
Custom accessor methods are not invoked, and key dependencies are not obeyed
Problem: You define a custom subclass of NSManagedObject for a particular entity and implement custom accessors methods (and perhaps dependent keys). At runtime, the accessor methods are not called, and the dependent key is not updated.
Cause: In the model, you did not specify the custom class for the entity.
Remedy: Ensure that the model specifies the custom class name for the entity rather than NSManagedObject.
Problems with Fetching
SQLite store does not work with sorting
Problem: You create a sort descriptor that uses a comparison method defined by NSString, such as the following:
Objective-C
NSSortDescriptor *mySortDescriptor = [[NSSortDescriptor alloc] initWithKey:@"lastName" ascending:YES selector:@selector(localizedCaseInsensitiveCompare:)];
Swift
let mySortDescriptor = NSSortDescriptor(key: "lastName", ascending: true, selector: #(localizedCaseInsensitiveCompare:))
You then either use this descriptor with a fetch request or as one of an array controller’s sort descriptors. At runtime, you see an error message that looks similar to the following:
NSRunLoop ignoring exception 'unsupported NSSortDescriptor selector:
localizedCaseInsensitiveCompare:' that raised during posting of
delayed perform with target 3e2e42 and selector 'invokeWithTarget:'
Cause: Exactly how a fetch request is executed depends on the store—see Fetching Objects.
Remedy: If you are executing the fetch directly, do not use Cocoa-based sort operators—instead, sort the returned array in memory. If you are using an array controller, you may need to subclass NSArrayController, so that it will not pass the sort descriptors to the database but will instead do the sorting after your data has been fetched.
Problems with Saving
Cannot save documents because entity is null
Problem: You have a Core Data document-based application that is unable to save. When you try to save the document you get an exception:
Exception raised during posting of notification. Ignored. exception: Cannot perform operation since entity with name 'Wxyz' cannot be found
Cause: This error is emitted by an instance of NSObjectController (or one of its subclasses) that is set in Entity mode but can’t access the entity description in the managed object model associated with the entity name specified in Interface Builder. In short, you have a controller in entity mode with an invalid entity name.
Remedy: Select in turn each of your controllers in Interface Builder, and press Command-1 to show the inspector. For each controller, ensure you have a valid entity name in the Entity name field at the top of the inspector.
Exception generated in retainedDataForObjectID:withContext
Problem: You add an object to a context. When you try to save the document you get an error that looks like this:
[date] My App[2529:4b03] cannot find data for a temporary oid: 0x60797a0 <<x-coredata:///MyClass/t8BB18D3A-0495-4BBE-840F-AF0D92E549FA195>x-coredata:///MyClass/t8BB18D3A-0495-4BBE-840F-AF0D92E549FA195>
This exception is in -[NSSQLCore retainedDataForObjectID:withContext:], and the backtrace looks like this:
#1 0x9599a6ac in -[NSSQLCore retainedDataForObjectID:withContext:]#2 0x95990238 in -[NSPersistentStoreCoordinator(_NSInternalMethods) _conflictsWithRowCacheForObject:andStore:]#3 0x95990548 in -[NSPersistentStoreCoordinator(_NSInternalMethods) _checkRequestForStore:originalRequest:andOptimisticLocking:]#4 0x9594e8f0 in -[NSPersistentStoreCoordinator(_NSInternalMethods) executeRequest:withContext:]#5 0x959617ec in -[NSManagedObjectContext save:]
The call to _conflictsWithRowCacheForObject: is comparing the object you’re trying to save with its last cached version from the database. Basically, it’s checking to see if any other code (thread, process, or just a different managed object context) changed this object without your knowledge.
Core Data does not do this check on newly inserted objects because they could not have existed in any other scope. They haven’t been written to the database yet.
Cause: You may have forced a newly inserted object to lose its inserted status and then changed or deleted it. This could happen if you passed a temporary object ID to objectWithID:. You may have passed an inserted object to another managed object context.
Remedy: There are a number of possible remedies, depending on the root cause:
-
Do not pass an inserted (not yet saved) object to another context. Only objects that have been saved can be passed between contexts.
-
Do not invoke
refreshObject:on a newly-inserted object. -
Do not make a relationship to an object that you never insert into the context.
-
Ensure that you use the designated initializer for instances of
NSManagedObject.
Before you save (frame #5 in the stack trace), make sure that the context’s updatedObjects and deletedObjects sets should only have members whose object ID returns NOfalse from isTemporaryID.
Debugging Fetching
Use the user default com.apple.CoreData.SQLDebug setting to log to stderr the actual SQL statement sent to SQLite. (Note that user default names are case sensitive.) For example, you can pass the following as an argument to the application:
-com.apple.CoreData.SQLDebug 1
Higher levels of debug numbers produce more information, although using higher numbers is likely to be of diminishing utility.
The information the output provides can be useful when debugging performance problems—in particular it may tell you when Core Data is performing a large number of small fetches (such as when firing faults individually). Like file I/O, executing many small fetches is expensive compared to executing a single large fetch. For examples of how to correct this situation, see Preventing a Fault from Firing.
Managed Object Models
Your application generates the message «+entityForName: could not locate an NSManagedObjectModel»
Problem: The error states clearly the issue—the entity description cannot find a managed object model from which to access the entity information.
Cause: The model may not be included in your application resources. You may be trying to access the model before it has been loaded. The reference to the context may be nil.
Remedy: Be sure that the model is included in your application resources and that the corresponding project target option in Xcode is selected.
The class method you invoked requires an entity name and a managed object context, and it is through the context that the entity gets the model. Basically, the core data stack looks like:
managed object context —> persistent store coordinator —> managed object model
If the managed object model cannot be found, make sure of the following:
-
The managed object context is not
nil.If you are setting the reference to the context in a
.nibfile, make sure the appropriate outlet or binding is set correctly. -
If you are managing your own Core Data stack, make sure that the managed object context has an associated coordinator (
setPersistentStoreCoordinator:) after allocating. -
The persistent store coordinator has a valid model.
Bindings Integration
Many problems relating to bindings are not specific to Core Data and are discussed in Troubleshooting Cocoa Bindings. This section describes some additional problems that could be caused by the interaction of Core Data and bindings.
Cannot access contents of an object controller after a nib is loaded
Problem: You want to perform an operation with the contents of an object controller (an instance of NSObjectController, NSArrayController, or NSTreeController) after a .nib file has been loaded, but the controller’s content is nil.
Cause: The controller’s fetch is executed as a delayed operation performed after its managed object context is set (by nib loading)—the fetch therefore happens after awakeFromNib and windowControllerDidLoadNib:.
Remedy: Execute the fetch manually with fetchWithRequest:merge:error:. See Using Core Data with Cocoa Bindings.
Cannot create new objects with array controller
Problem: You cannot create new objects using an NSArrayController. For example, when you click the button assigned to the add: action, you get an error similar to the following:
2005-05-05 12:00:)).000 MyApp[1234] *** NSRunLoopignoring exception 'Failed to create new object' that raisedduring posting of delayed perform with target 123456and selector 'invokeWithTarget:'
Cause: In your managed object model, you may have specified a custom class for the entity, but you have not implemented the class.
Remedy: Implement the custom class, or specify that the entity is represented by NSManagedObject.
A table view bound to an array controller doesn’t display the contents of a relationship
Problem: You want to display the contents of a relationship in a table view bound to an array controller, but nothing is displayed and you get an error similar to the following:
2005-05-27 14:13:39.077 MyApp[1234] *** NSRunLoop ignoring exception'Cannot create NSArray from object <_NSFaultingMutableSet: 0x3818f0> ()of class _NSFaultingMutableSet - consider using contentSetbinding instead of contentArray binding' that raised during posting ofdelayed perform with target 385350 and selector 'invokeWithTarget:'
Cause: You bound the controller’s contentArray binding to a relationship. Relationships are represented by sets.
Remedy: Bind the controller’s contentSet binding to the relationship.
A new object is not added to the relationship of the object currently selected in a table view
Problem: You have a table view that displays a collection of instances of an entity. The entity has a relationship to another entity, instances of which are displayed in a second table view. Each table view is managed by an array controller. When you add new instances of the second entity, they are not added to the relationship of the currently selected instance of the first.
Cause: The two array controllers are not related. There is nothing to tell the second array controller about the first.
Remedy: Bind the second array controller’s contentSet binding to the key path that specifies the relationship of the selection in the first array controller. For example, if the first array controller manages the Department entity, and the second array controller manages the Employee entity, then the contentSet binding of the second array controller should be [Department Controller].selection.employees.
Table view or outline view contents not kept up-to-date when bound to an NSArrayController or NSTreeController object
Problem: You have a table view or outline view that displays a collection of instances of an entity. As new instances of the entity are added and removed, the table view is not kept in sync.
Cause: If the controller’s content is an array that you manage yourself, then it is possible you are not modifying the array in a way that is KVO-compliant.
If the controller’s content is fetched automatically, then you have probably not set the controller to «Automatically prepare content.»
Alternatively, the controller may not be properly configured.
Remedy: If the controller’s content is a collection that you manage yourself, then ensure you modify the collection in a way that is KVO-compliant. See Troubleshooting Cocoa Bindings.
If the controller’s content is fetched automatically, set the «Automatically prepares content» switch for the controller in the Attributes inspector in Interface Builder (see also automaticallyPreparesContent). Doing so means that the controller will track inserts into and deletions from its managed object context for its entity.
Also check to see that the controller is properly configured (for example, that you have set the entity correctly).
Performance
Frequently Asked Questions
Copyright © 2018 Apple Inc. All rights reserved.
Terms of Use |
Privacy Policy |
Updated: 2017-03-27
I get the following error during a build.
«API Misuse: Attempt to serialize store access on non-owning coordinator (PSC = 0x7fb5ae208890, store PSC = 0x0) CoreData
Why am I getting a CoreData error in my app? I’m not using CoreData!
asked Sep 1, 2018 at 9:41
![]()
This message is not referring to your use of CoreData, rather it is referring to Xcode’s internal use in order to manage part of your project.
One possibility (it happened to me) is that there is corruption in one of the .xcassets files in your project.
In my case a problem with git-lfs meant that the .xcasset file did not have contents. Correcting this (in my case with a git-lfs pull) meant that once the assets within the .xcassets file were available, the compilation error was fixed.
So in general check .xcassets files and any other Xcode managed project resources that might require use of CoreData internally to XCode
answered Sep 1, 2018 at 9:41
![]()
I just wasted two days to this.
It seems to be triggered when using Xcode 14 1024 pt single size icon xcassets alongside certain other assets.
Workaround was to go back to the old multiple size icon assets.
The other weird thing is that it only gives the error when archiving.
answered Nov 7, 2022 at 14:18
![]()
I found the same issue in Xcode 14 and noticed I added only one app icon image of 1024×1024.
Though it was an Xcode feature, still digging into the problem of why this failed.
answered Sep 20, 2022 at 12:13
![]()
Sunil TargeSunil Targe
7,2715 gold badges50 silver badges80 bronze badges
I was getting the same error in XCode 12.5.1. It might occur in other situations also, but in my case, it turned out to be due to having two assets in the same asset library with the same name. The two assets had different file extensions, and the error occurred even when they were in different directories in the same asset library. I fixed it by giving all of the assets unique names.
answered Sep 18, 2021 at 19:58
![]()
TravisTravis
2,9614 gold badges22 silver badges29 bronze badges
I had a very similar problem, but in my case it turned out to be 3 things:
- Outdated pods, that were using Core Data (had to remove them);
- Lottie added a file to the Assets folder, which triggered this error.
- I had a couple of broken files in the Assets folder (no idea why). I needed to remove all assets, and manually readd all of them in order to localise the corrupted ones, and replace them with new instances.
This fixed the issue for me.
answered Dec 15, 2021 at 16:46
![]()
If you code is not using CoreData API, this helped to fix the issue in Xcode 14.2
My app’s alternate icon were configured with a single size, and its primary icon (1024×1024 png) with individual sizes
This issue got resolved after I changed my primary app icon to single size which helped to archive the app successfully
answered Jun 21 at 13:29
![]()
RpjRpj
5,36817 gold badges63 silver badges126 bronze badges
I was getting this issue on Xcode 14.2. As I had always done, I set my images to be iPad 2x. Once I changed them all to be Universal, the issue resolved. I left the AppIcon set to single size.
answered Sep 6 at 17:07
![]()
#ios #swift #xcode #sqlite #core-data
Вопрос:
Я получаю ошибку основных данных, когда мое приложение находится в открытом состоянии в режиме блокировки экрана.
Мой код:
 func savePesistenceContext() {
     //try! self.dataStack.mainContext.save()
     do {
           try self.dataStack.mainContext.save()
        } catch {
          let nserror = error as NSError
          debugPrint("savePesistenceContext", nserror)
        }
}
Ошибка:
 CoreData: error: SQLCore dispatchRequest: exception handling request: <NSSQLSaveChangesRequestContext: 0x280697540> , I/O error for database at /var/mobile/Containers/Data/Application/6EBC7CD6-9299-431A-A24A-1F6FA86792BD/Documents/Coral.sqlite.  SQLite error code:778, 'disk I/O error' with userInfo of {
    NSFilePath = "/var/mobile/Containers/Data/Application/6EBC7CD6-9299-431A-A24A-1F6FA86792BD/Documents/Coral.sqlite";
    NSSQLiteErrorDomain = 778;
}

CoreData: error: (778) I/O error for database at /var/mobile/Containers/Data/Application/6EBC7CD6-9299-431A-A24A-1F6FA86792BD/Documents/Coral.sqlite.  SQLite error code:778, 'disk I/O error'


Error Domain=NSCocoaErrorDomain Code=256 "The file “Coral.sqlite” couldn’t be opened." UserInfo={NSFilePath=/var/mobile/Containers/Data/Application/9AB16F39-8933-4A75-AB6A-59CBBCC42A4F/Documents/Coral.sqlite, NSSQLiteErrorDomain=23}
Когда произойдет эта ошибка и как мы можем устранить эту ошибку?
Комментарии:
1. У вас есть какая — то защита данных?
2. @lorem ipsum, какая-то защита данных по средствам. Можете ли вы объяснить мне, что именно?
3. @lorem ipsum, Привет, мы используем зашифрованные данные
4. Вероятно, именно поэтому. Я бы не ожидал, что смогу писать в заблокированную базу данных. Скорее всего, вам потребуется кэшировать его где-нибудь, где он не зашифрован, и когда приложение снова будет активно, запишите его в CoreData.
5. Я не мог бы точно сказать вам, как это преодолеть, я не использую зашифрованные данные. Я говорю только исходя из опыта работы в других областях, где используется шифрование. Когда телефон заблокирован, вы не можете писать в зашифрованную часть. Что касается кэширования. Я бы сказал, поместите его в файл, и когда ваша сцена вернется в активное состояние, проверьте содержимое этого файла и перенесите любые данные в основные данные
This post is part of a series called Data Validation With Core Data.
No matter what persistence framework an application uses, the developer decides what is stored in the application’s persistent store. This also means that the developer is in charge of validating the data before it is inserted into the persistent store.
If your application uses Core Data for persisting data, then you are in luck. The framework has a number of APIs for validating objects before they are persisted to disk. In this tutorial, I show you what options Core Data offers developers for validating objects.
1. Project Setup
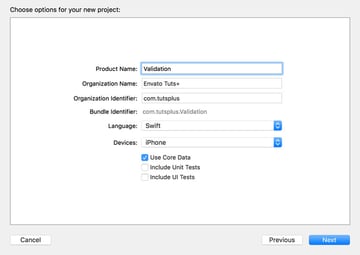
The best way to learn is by doing. Open Xcode and create a new project based on the Single View Application template.


Name the project Validation and set Language to Swift. Check Use Core Data at the bottom and click Next.


2. Populate Data Model
Open Validation.xcdatamodeld, create a new entity, and name it User. Add the following attributes to the User entity:
- first of type String
- last of type String
- email of type String
- age of type Integer 16
Create another entity, name it Note, and add the following attributes to the entity:
- title of type String
- contents of type String
- createdAt of type Date
A user can have many notes and a note can belong to only one user. This means that we need to add a To Many relationship to the User entity with the Note entity as the destination. We also need to add a To One relationship to the Note entity with the User entity as the destination and notes as the inverse relationship. This is what that looks like in Xcode’s data model editor.


3. Constraining Attributes
Common constraints can be defined in the data model. Let me show you how this works. Open Validation.xcdatamodeld and select the User entity. Select the email attribute and open the Data Model Inspector on the right.


In the Validation section, you can set the minimum and maximum length of the attribute. You can even enter a regular expression the value of the attribute must match in order to be valid. The Data Model Inspector also adds the ability to set a default value, which is convenient for required attributes.
This brings us to the most obvious constraint for attributes, their optionality. By unchecking the Optional checkbox at the top, you tell Core Data that the attribute must have a value for it to be valid.
If an object doesn’t pass validation, Core Data throws an error if a save operation is performed. It goes without saying that Core Data doesn’t allow invalid objects to be pushed to the application’s persistent store.
If you select the age attribute of the User entity, you will notice that the Validation section looks slightly different. Because the age attribute is of type Integer 16, you can set a minimum and a maximum value for the attribute. You can also define a default value.


Select the createdAt attribute of the Note entity and open the Data Model Inspector. Note that you can specify a minimum and a maximum date as well as a default date.


The most important downside of constraints defined in the data model is the lack of dynamism. For example, if you want to constrain an attribute of type Date to values based on the current date, then you need to implement custom validation in code. We take a look at how that works later.
4. Constraining Relationships
Relationships are not very different from attributes. They too can be constrained. A relationship can be optional or required. The count of a To Many relationship can be constrained to a minimum and a maximum value. Select the notes attribute of the User entity and open the Data Model Inspector. The count of the notes relationship can have a minimum and a maximum value.


Having the ability to add constraints to a data model is a powerful concept and it is nice to know that this is built into the Core Data framework.
5. Validating Objects
Select the User entity and mark every attribute as required by unchecking the Optional checkbox in the Data Model Inspector. Select the age attribute and set the minimum value to 0 and the maximum value to 120. Set the attribute’s default value to 21.


Open AppDelegate.swift and update application(_:didFinishLaunchingWithOptions:) as shown below. We create an instance of the User entity and populate its attributes. Note that we set the age attribute to a value that exceeds the maximum value we specified in the data model. We can ask the managed object whether it is valid for insertion into the persistent store by invoking validateForInsert(). Because this method is throwing, we wrap it in a do-catch statement.
1 |
func application(application: UIApplication, didFinishLaunchingWithOptions launchOptions: [NSObject: AnyObject]?) -> Bool { |
2 |
if let entity = NSEntityDescription.entityForName("User", inManagedObjectContext: self.managedObjectContext) { |
3 |
// Create Managed Object
|
4 |
let user = NSManagedObject(entity: entity, insertIntoManagedObjectContext: self.managedObjectContext) |
5 |
|
6 |
// Populate Managed Object
|
7 |
user.setValue(140, forKey: "age") |
8 |
user.setValue("Bart", forKey: "first") |
9 |
user.setValue("Jacobs", forKey: "last") |
10 |
user.setValue("me@icloud.com", forKey: "email") |
11 |
|
12 |
do { |
13 |
try user.validateForInsert() |
14 |
|
15 |
} catch { |
16 |
let validationError = error as NSError |
17 |
|
18 |
print(validationError) |
19 |
}
|
20 |
|
21 |
}
|
22 |
|
23 |
return true |
24 |
}
|
If you run the application in the simulator or on a physical device, you should see the following error in the console.
1 |
Error Domain=NSCocoaErrorDomain Code=1610 "The operation couldn’t be completed. (Cocoa error 1610.)" UserInfo={NSValidationErrorObject=<NSManagedObject: 0x7fef63611dd0> (entity: User; id: 0x7fef63613eb0 <x-coredata:///User/t8C45E95D-D8C3-4900-82FA-BC313D53D5882> ; data: { |
2 |
age = 140; |
3 |
email = "me@icloud.com"; |
4 |
first = Bart; |
5 |
last = Jacobs; |
6 |
notes = ( |
7 |
); |
8 |
}), NSValidationErrorValue=140, NSValidationErrorKey=age, NSLocalizedDescription=The operation couldn’t be completed. (Cocoa error 1610.)} |
The error is pretty clear about what is wrong with the managed object. Even though the localized description is a bit vague, the error indicates the value of the age attribute isn’t meeting the constraints we defined in the data model.
It is possible that multiple validation errors were thrown during validation. Let me show you what that looks like. To avoid migration issue, delete the application from simulator. Revisit the data model and select the last attribute of the User entity. Open the Data Model Inspector on the right and uncheck Optional to make the attribute required.
Open AppDelegate.swift and remove the line in which we set the last name of the User record.
1 |
user.setValue("Jacobs", forKey: "last") |
Run the application again and inspect to output in the console.
1 |
Error Domain=NSCocoaErrorDomain Code=1560 "(null)" UserInfo={NSDetailedErrors=( |
2 |
"Error Domain=NSCocoaErrorDomain Code=1610 "The operation couldnU2019t be completed. (Cocoa error 1610.)" UserInfo={NSValidationErrorObject=<NSManagedObject: 0x7feab8419690> (entity: User; id: 0x7feab84196f0 <x-coredata:///User/tD1D0A3BA-7F23-41A7-9567-5C1A30D6A0132> ; data: {n age = 140;n email = "me@icloud.com";n first = Bart;n last = nil;n notes = (n );n}), NSValidationErrorValue=140, NSValidationErrorKey=age, NSLocalizedDescription=The operation couldnU2019t be completed. (Cocoa error 1610.)}", |
3 |
"Error Domain=NSCocoaErrorDomain Code=1570 "The operation couldnU2019t be completed. (Cocoa error 1570.)" UserInfo={NSValidationErrorKey=last, NSLocalizedDescription=The operation couldnU2019t be completed. (Cocoa error 1570.), NSValidationErrorObject=<NSManagedObject: 0x7feab8419690> (entity: User; id: 0x7feab84196f0 <x-coredata:///User/tD1D0A3BA-7F23-41A7-9567-5C1A30D6A0132> ; data: {n age = 140;n email = "me@icloud.com";n first = Bart;n last = nil;n notes = (n );n})}" |
4 |
)}
|
The userInfo dictionary of the error object contains an array of errors that inform us what went wrong during validation. Understand that the same errors are thrown if you try to save a managed object that doesn’t pass validation.
Conclusion
Data validation is a key aspect of data persistence. You need to make sure that the data you insert into the persistent store is valid. In other words, the data you insert needs to conform to the requirements you define in the data model and your application code.
Next week, I show you how you can create more complex validation rules in code. Even though this approach requires a bit more work, validation rules in code are more flexible and powerful.
/*
CoreDataErrors.h
Core Data
Copyright (c) 2004-2022, Apple Inc.
All rights reserved.
*/
#import <Foundation/NSObject.h>
/* NSError codes for Core Data added errors in NSCocoaErrorDomain. Foundation error codes can be found in <Foundation/FoundationErrors.h>. AppKit error codes can be found in <AppKit/AppKitErrors.h>.
*/
#import <CoreData/CoreDataDefines.h>
NS_ASSUME_NONNULL_BEGIN
// User info keys for errors created by Core Data:
COREDATA_EXTERN NSString * const NSDetailedErrorsKey API_AVAILABLE(macosx(10.4),ios(3.0)); // if multiple validation errors occur in one operation, they are collected in an array and added with this key to the «top-level error» of the operation
COREDATA_EXTERN NSString * const NSValidationObjectErrorKey API_AVAILABLE(macosx(10.4),ios(3.0)); // object that failed to validate for a validation error
COREDATA_EXTERN NSString * const NSValidationKeyErrorKey API_AVAILABLE(macosx(10.4),ios(3.0)); // key that failed to validate for a validation error
COREDATA_EXTERN NSString * const NSValidationPredicateErrorKey API_AVAILABLE(macosx(10.4),ios(3.0)); // for predicate-based validation, the predicate for the condition that failed to validate
COREDATA_EXTERN NSString * const NSValidationValueErrorKey API_AVAILABLE(macosx(10.4),ios(3.0)); // if non-nil, the value for the key that failed to validate for a validation error
COREDATA_EXTERN NSString * const NSAffectedStoresErrorKey API_AVAILABLE(macosx(10.4),ios(3.0)); // stores prompting an error
COREDATA_EXTERN NSString * const NSAffectedObjectsErrorKey API_AVAILABLE(macosx(10.4),ios(3.0)); // objects prompting an error
COREDATA_EXTERN NSString * const NSPersistentStoreSaveConflictsErrorKey API_AVAILABLE(macosx(10.7),ios(5.0)); // key in NSError’s userInfo specifying the NSArray of NSMergeConflict
COREDATA_EXTERN NSString * const NSSQLiteErrorDomain API_AVAILABLE(macosx(10.5),ios(3.0)); // Predefined domain for SQLite errors, value of «code» will correspond to preexisting values in SQLite.
enum : NSInteger {
NSManagedObjectValidationError = 1550, // generic validation error
NSManagedObjectConstraintValidationError = 1551, // one or more uniqueness constraints were violated
NSValidationMultipleErrorsError = 1560, // generic message for error containing multiple validation errors
NSValidationMissingMandatoryPropertyError = 1570, // non-optional property with a nil value
NSValidationRelationshipLacksMinimumCountError = 1580, // to-many relationship with too few destination objects
NSValidationRelationshipExceedsMaximumCountError = 1590, // bounded, to-many relationship with too many destination objects
NSValidationRelationshipDeniedDeleteError = 1600, // some relationship with NSDeleteRuleDeny is non-empty
NSValidationNumberTooLargeError = 1610, // some numerical value is too large
NSValidationNumberTooSmallError = 1620, // some numerical value is too small
NSValidationDateTooLateError = 1630, // some date value is too late
NSValidationDateTooSoonError = 1640, // some date value is too soon
NSValidationInvalidDateError = 1650, // some date value fails to match date pattern
NSValidationStringTooLongError = 1660, // some string value is too long
NSValidationStringTooShortError = 1670, // some string value is too short
NSValidationStringPatternMatchingError = 1680, // some string value fails to match some pattern
NSValidationInvalidURIError = 1690, // some URI value cannot be represented as a string
NSManagedObjectContextLockingError = 132000, // can’t acquire a lock in a managed object context
NSPersistentStoreCoordinatorLockingError = 132010, // can’t acquire a lock in a persistent store coordinator
NSManagedObjectReferentialIntegrityError = 133000, // attempt to fire a fault pointing to an object that does not exist (we can see the store, we can’t see the object)
NSManagedObjectExternalRelationshipError = 133010, // an object being saved has a relationship containing an object from another store
NSManagedObjectMergeError = 133020, // merge policy failed — unable to complete merging
NSManagedObjectConstraintMergeError = 133021, // merge policy failed — unable to complete merging due to multiple conflicting constraint violations
NSPersistentStoreInvalidTypeError = 134000, // unknown persistent store type/format/version
NSPersistentStoreTypeMismatchError = 134010, // returned by persistent store coordinator if a store is accessed that does not match the specified type
NSPersistentStoreIncompatibleSchemaError = 134020, // store returned an error for save operation (database level errors ie missing table, no permissions)
NSPersistentStoreSaveError = 134030, // unclassified save error — something we depend on returned an error
NSPersistentStoreIncompleteSaveError = 134040, // one or more of the stores returned an error during save (stores/objects that failed will be in userInfo)
NSPersistentStoreSaveConflictsError = 134050, // an unresolved merge conflict was encountered during a save. userInfo has NSPersistentStoreSaveConflictsErrorKey
NSCoreDataError = 134060, // general Core Data error
NSPersistentStoreOperationError = 134070, // the persistent store operation failed
NSPersistentStoreOpenError = 134080, // an error occurred while attempting to open the persistent store
NSPersistentStoreTimeoutError = 134090, // failed to connect to the persistent store within the specified timeout (see NSPersistentStoreTimeoutOption)
NSPersistentStoreUnsupportedRequestTypeError = 134091, // an NSPersistentStore subclass was passed an NSPersistentStoreRequest that it did not understand
NSPersistentStoreIncompatibleVersionHashError = 134100, // entity version hashes incompatible with data model
NSMigrationError = 134110, // general migration error
NSMigrationConstraintViolationError = 134111, // migration failed due to a violated uniqueness constraint
NSMigrationCancelledError = 134120, // migration failed due to manual cancellation
NSMigrationMissingSourceModelError = 134130, // migration failed due to missing source data model
NSMigrationMissingMappingModelError = 134140, // migration failed due to missing mapping model
NSMigrationManagerSourceStoreError = 134150, // migration failed due to a problem with the source data store
NSMigrationManagerDestinationStoreError = 134160, // migration failed due to a problem with the destination data store
NSEntityMigrationPolicyError = 134170, // migration failed during processing of the entity migration policy
NSSQLiteError = 134180, // general SQLite error
NSInferredMappingModelError = 134190, // inferred mapping model creation error
NSExternalRecordImportError = 134200, // general error encountered while importing external records
NSPersistentHistoryTokenExpiredError = 134301 // The history token passed to NSPersistentChangeRequest was invalid
};
NS_ASSUME_NONNULL_END

Beginning Core Data with RubyMotion
Buy on Leanpub
Table of Contents
-
1. Introduction
- Core Data
- RubyMotion
- Core Data & RubyMotion
- Technical Notes and Bugs
- Structure of this Book
-
2. Diving into Core Data
- App Structure
- The Core Data Stack
- Setting up our Entities
- Setting up the Stack
- Creating, Reading, Updating and Deleting Records
- Searching and Sorting
- Wrapping Up
-
3. Tips & Troubleshooting
- Debugging Core Data
- Interacting With Views in the Console
- Uninitialized constant NSSQLiteStoreType
- Undefined method `viewWillAppear’
- Other Errors and Crashes
1. Introduction
Core Data
Core Data programming is hard. Apple warn as much in their document Core
Data Core Competencies:
Important: Core Data is an advanced technology that is not required for
creating simple applications.
That doesn’t sound so severe but it does contrast greatly with the rest of the
documentation that seems to suggest that iOS/OSX programming is made easy by
all the frameworks and widgets ready for us to customise and use in our
applications.
Certainly, at each major release of iOS it seems that we have less to do
everywhere, with new APIs being released constantly that do for us what we
would have achieved before using the lower-level APIs. A recent example would
be TextKit, released as part of iOS 7: having wrestled with typesetting in
CoreText before I am certainly grateful that kerning, ligatures, hyphenation,
line-breaking, justification and pretty much everything else that goes into
making text look good is now considered to be a basic element of the platform.
For those of us who are more software developer than designer this is most
welcome indeed.
Would that we could say the same for Core Data. It is without doubt a solid
and mature solution for persisting and syncing your app data, including
between iOS, iCloud and OSX, but it hasn’t (yet) had quite the same
user-friendliness refactoring that other parts of the platform have had.
TextKit, for example, which makes life so much easier when dealing with text,
is simply built on top of CoreText. In the same way, we have 3rd-party
libraries like MagicalRecord and Core Data Query that can make working with
CoreData significantly easier. The problem with using these libraries is that
you are going to hit problems that are unique to your app and then you will be
largely at the mercy of the available documentation and perhaps the support of
the developers of the library you are using to abstract away the less
aesthetically-pleasing parts of CoreData. Given how new RubyMotion is, that
documentation and community knowledge is perhaps going to be somewhat thin on
the ground.
A more robust approach would be for us to first learn the raw Core Data API
and delve into its inner workings. We will then be well placed to benefit from
the use of 3rd party libraries, and perhaps even to extend them or write our
own.
RubyMotion
RubyMotion has the potential to greatly increase the speed at which we create
software for both iOS and OSX. Not only that but I also contend that the
quality of the software you create may well increase too. Thanks to an
ingenious implementation you not only have access to every last corner of the
latest SDKs, you also have access to the same language constructs in Ruby that
make Rails as powerful and pleasing to work with as it is1.
Core Data & RubyMotion
As you experiment with RubyMotion I think you will find that you are able to
iterate more quickly than you could before, creating and customising your view
controllers from the console and seeing the results live in the simulator.
You have perhaps already found though that when it comes to building an app
that needs to store data that Core Data requires a prohibitive amount of
boilerplate just to get the simplest of records saved.
So, you turn to one of the libraries that promises ActiveRecord-style ease of
use, the ability to write model schemas just as you would in Rails perhaps,
but what happens when you need to do something that isn’t documented? These
3rd-party libraries, which we will cover in this book, will accelerate your
development for future apps but we’re also going to do our best to dive deep
into Core Data itself and learn it in detail too–once you have completed this
book a good way to advance your skills further might be to tackle some of the
outstanding issues in their GitHub repositories.
Technical Notes and Bugs
This book has been written and tested with RubyMotion 2.32, with Xcode 5.1.1
installed on a MacBook running OSX 10.9.4.
Despite best efforts some bugs may slip into the text and code. There is
nothing worse than code examples that don’t work–they can be a learning
opportunity for the extremely positive-minded among us but to the rest of us
they’re a source of wasted time. So, if you encounter major stumbling blocks
or something just isn’t adding up please assume that it is my fault and
not yours, either because there’s a mistake in the code or because I haven’t
explained the concept well enough. In either case please drop me a line
(stefan@haflidason.com)
and I’ll puzzle it out with you.
Structure of this Book
Normally when you create an app using Core Data using Xcode you use the visual
data modeller to define your data model. This produces an .xcdatamodeld
bundle that contains not just your data model but each version of the data
model. With this bundle, Core Data can automatically load the latest version
and even perform the majority of schema migrations for you automatically.
Then, to set up the Core Data stack itself you might use the boilerplate code
which you can optionally have added to your project when you create it.
With RubyMotion though we are not only missing the visual data modeller but we
have lost the option to add in that boilerplate Core Data stack-creation code
too.
Thanks to some quality open-source libraries though (that we will review in
this book) we need not worry though as in the following chapters we will learn
how to:
- Model all of our data versions in a schema language much like that of
Rails/ActiveRecord - Set up a Core Data stack in 5 minutes and just two lines of code
- Access our entities as if they were (almost!) Rails models
- Evolve our data model using automatic migrations
- Set up an equivalent stack from scratch
- Set up and perform migrations manually, for when we need finer control.
- And finally, we will understand the limitations of all of the above.
All code from the book will be published here on
GitHub. You
will generally have a much easier time copying code from there rather than
from the book. For the best learning experience however I would recommend
typing out the examples to become familiar with each line as you progress. If
you find a bug, please feel free to open an issue about it there.
The Principle of Minimal Magic
Those last three points are I think crucially important: there are lots of
libraries out there that will help abstract away the complexity of frameworks
like Core Data but when writing an app for the store you are bound to run into
issues that are not (yet) documented online.
Our approach is going to be to make use of that magic on a regular basis and
enjoy all the benefits to our productivity but to know how the underlying
libraries work so that when we run into trouble we will be able to
troubleshoot and move past it.
So without further ado, let’s dive into writing some RubyMotion-powered Core
Data code!
2. Diving into Core Data
In this chapter we will set up a full Core Data stack purely in code, with no
assistance from the graphical tools that Xcode provides. The aim here is to
show that when you pull it all apart there is nothing terribly mysterious or
complicated going on.
Later we will allow ourselves the use of some of the libraries out there to
make our lives easier but first we’ll start with a good grounding in the
fundamentals so that we will know how those libraries work and won’t get
caught out later by ‘magic’ that we don’t understand.
We will now create the beginnings of a simple app that will use Core Data to
store a list of tasks; we won’t implement the full app, rather we’ll just
focus how to set up Core Data so that we can persist and retrieve our tasks.
App Structure
To get started, we create a new RubyMotion app:
$ motion create CoreDataTasks
Create CoreDataTasks
Create CoreDataTasks/.gitignore
Create CoreDataTasks/app/app_delegate.rb
Create CoreDataTasks/Gemfile
Create CoreDataTasks/Rakefile
Create CoreDataTasks/resources/Default-568h@2x.png
Create CoreDataTasks/spec/main_spec.rb
And update our Rakefile to load in the Core Data framework:
1Motion::Project::App.setupdo|app|2# Use `rake config' to see complete project settings.3app.name='CoreDataTasks'4app.frameworks+=['CoreData']5end
That’s it! We now have a freshly-created app which will link in the CoreData
framework when the app is built.
Before we get into the code itself, let’s take a moment to familiarise
ourselves with the components of the Core Data stack and how they work
together to shuttle our records to and from the data store.
The Core Data Stack
A basic Core Data stack generally involves the following classes:
-
NSManagedObject: Models of the data to be stored, each of which has an
associated entity description (NSEntityDescription) -
NSManagedObjectModel: A container for our models, including any
relationships between them. -
NSPersistentStore: A place to store our records (a persistent store); in
almost all cases you will want this to be an SQLite database (i.e. of type
NSSQLiteStoreType) -
NSPersistentStoreCoordinator: An object to coordinate access to this store -
NSManagedObjectContext: An object which manages access to all of the above
This may look complicated, but in general your application code will only work
with the NSManagedObjectContext instance that you create on application
launch, with the rest being essentially implementation details that your view
controllers and helper classes won’t be concerned with; they will simply use
the context to create and fetch records. In this way the Core Data stack looks
complex but once set up we will spend 99% of our time thinking about and
working with models and the context only.
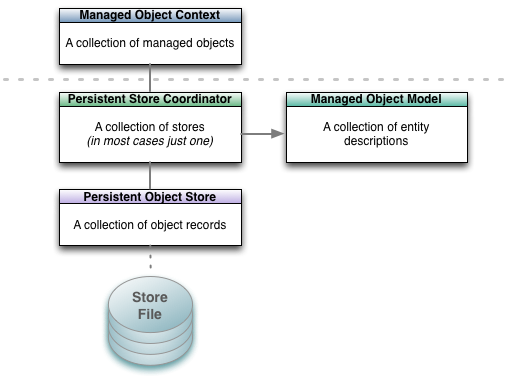
The Core Data stack. In your application you will generally only work with
the managed object context; it will then interact with the objects beneath the
dotted grey line on your behalf.
Typically, the AppDelegate is responsible for initialising the context (and so
the persistent store and data model) and passing it to the root view
controller. The root view controller would then pass it as appropriate to
child view controllers such as for adding or editing records. In this example
however we will provide access to the context from anywhere in the app via a
Singleton.
To set up our Core Data stack we will step through the following process:
-
Setting up our entities. For our example tasks app we will define a
Taskentity with a description (what is to be done) a priority and a
boolean (true/false value) to track whether it has been done or not. -
Create a managed object model containing one entity:
Task. - Set up a persistent store coordinator for this managed object model.
-
Create a physical data store and let the coordinator know about it; in
doing so we will create an SQLite database file which will be stored in the
application’s Documents directory). -
Create a managed object context and link it to the persistent storage
coordinator.
Setting up our Entities
The first thing we do is describe the entity that we would like to store.
There is no fixed place that this code needs to go but we will put it in a new
file,
app/task.rb.
The Task class will be of type NSManagedObject and will have one class
method that will return an NSEntityDescription describing the fields it
contains:
app/task.rb
1classTask<NSManagedObject2defself.entity3@entity||=begin4# A task has a description field, a numeric priority (where 5 will5# signify 'no priority' and will otherwise be set between 1 and 4,6# with 1 being the highest priority and 4 the lowest.7# A boolean field `completed` tracks whether the task has been8# completed or not9entity=NSEntityDescription.alloc.init10entity.name='Task'11entity.managedObjectClassName='Task'12entity.properties=13['task_description',NSStringAttributeType,14'priority',NSInteger32AttributeType,15'completed',NSBooleanAttributeType]16.each_slice(2).mapdo|name,type,optional|17property=NSAttributeDescription.alloc.init18property.name=name19property.attributeType=type20property.optional=false21property22end2324# Return the entity25entity26end27end28end
The class defines just one method, Task.entity that returns an
NSEntityDescription describing the entity. Note that by defining the method
as def self.entity it is a class method that we call on the Task class
directly rather than via a Task instance.
Setting up the Stack
Now that we have our NSManagedObjectModel we can move on to setting up the
rest of the Core Data Stack. Create a new file, app/tasks_store.rb and type
in the following definition for a Singleton class called TasksStore that we
will use to create a nice interface around the creation and fetching of Tasks:
app/tasks_store.rb
1classTasksStore2defself.shared3Dispatch.once{@instance||=new}4@instance5end6end
We will be able to access the sole instance of this class from anywhere in the
app as TasksStore.shared. The first invocation will create the instance and
store it as @instance, subsequent calls will simply return @instance.
We’re calling new to instantiate the class so we create an initialize
method for the class2. Here is the full
implementation,
we will then step through each part:
app/tasks_store.rb
1classTasksStore2defself.shared3Dispatch.once{@instance||=new}4@instance5end67definitialize8# Initialise the Core Data stack910model=NSManagedObjectModel.alloc.init11model.entities=[Task.entity]1213store=NSPersistentStoreCoordinator14.alloc.initWithManagedObjectModel(model)15store_path=File.join(NSHomeDirectory(),16'Documents',17'CoreDataTasks.sqlite')18store_url=NSURL.fileURLWithPath(store_path)1920puts"[INFO] Database file path:#{store_path}"2122error_ptr=Pointer.new(:object)2324unlessstore.addPersistentStoreWithType(NSSQLiteStoreType,25configuration:nil,26URL:store_url,27options:nil,28error:error_ptr)29raise"[ERROR] Failed to create persistent store: "+30error_ptr[0].description31end3233context=NSManagedObjectContext.alloc.init34context.persistentStoreCoordinator=store3536# Store the context as an instance variable of TasksStore37@context=context38end39end
Creating the Managed Object Model
1model=NSManagedObjectModel.alloc.init2model.entities=[Task.entity]
For this simple tasks app our object model only contains a single entity,
provided by the class method Task.entity which we implemented earlier.
Creating the Persistent Store
1store=NSPersistentStoreCoordinator.alloc2.initWithManagedObjectModel(model)34store_path=File.join(NSHomeDirectory(),5'Documents',6'CoreDataTasks.sqlite')7store_url=NSURL.fileURLWithPath(store_path)89puts"[INFO] Database file path:#{store_path}"1011error_ptr=Pointer.new(:object)1213unlessstore.addPersistentStoreWithType(NSSQLiteStoreType,14configuration:nil,15URL:store_url,16options:nil,17error:error_ptr)18raise"[ERROR] Failed to create persistent store: "+19error_ptr[0].description20end
Breaking it down
- We instantiate an
NSPersistentStoreCoordinatorwith the managed object
model we’ve just created. - We then set up the persistent store that will store the records: we name
the SQLite database file CoreDataTasks.sqlite and place it in the Documents
directory where all such local content must live within an app. - We print the path out to make it easy to get at the database file (when
running the app in the simulator) in case we want to access it directly, or
delete it and start afresh. - Finally we pass the persistent store to the coordinator.
Creating the Managed Object Context
1context=NSManagedObjectContext.alloc.init2context.persistentStoreCoordinator=store34# Store the context as an instance variable of TasksStore5@context=context
Finally, we create the context and link it to the persistent storage
coordinator. We store the context in an instance variable @context for use
in the rest of the class.
Creating, Reading, Updating and Deleting Records
At this point we have a full Core Data stack set up, ready for us to persist
and retrieve Task objects via the managed object context.
Let’s start by adding a method create_task to our TasksStore class that
will let us create a new task:
1defcreate_task(task_description,2withPriority:priority,3andCompleted:completed)4task=NSEntityDescription5.insertNewObjectForEntityForName('Task',6inManagedObjectContext:@context)7task.task_description=task_description8task.priority=priority9task.completed=completed10task11end1213defcreate_task(task_description)14create_task(task_description,withPriority:5,andCompleted:false)15end
If you build and run the app now you will now be able to create tasks:
1$rake2(main)>tasks_store=TasksStore.shared3(main)>bank=tasks_store.create_task("Go to the bank")4=>#<Task_Task_:0x8c9ce50>
The task has not been saved yet though, it has only been inserted into the
context in memory but the context has not yet been persisted to the store. So
now let’s create a helper method save_context that will, when called, save
any changes we have made to the context, back to the persistent store (our
SQLite database):
1defsave_context2error_ptr=Pointer.new(:object)34unless@context.save(error_ptr)5raise"[ERROR] Error saving the context:#{error_ptr[0].description}"6end78true9end
Now if we build and run the app we will be able to persist our tasks to the
store but as yet we don’t have a way to retrieve them, so let’s add a method
get_tasks that will retrieve all tasks from the store:
1defget_tasks2request=NSFetchRequest.alloc.init3request.entity=NSEntityDescription4.entityForName('Task',5inManagedObjectContext:@context)67error_ptr=Pointer.new(:object)89data=@context.executeFetchRequest(request,error:error_ptr)1011ifdata==nil12raise"[ERROR] Error fetching taskss:#{error_ptr[0].description}"13end1415data16end
Retrieval is a little more involved than creation or saving. What we are doing
is creating an NSFetchRequest, specifying the entity we wish to fetch and
then executing this request without specifying any other criteria (e.g.
filters on the data, or instructions on how to sort the retrieved records).
Core Data therefore hands us back all records for the Task entity.
With these three helper methods in place, now when we build and run our app we
can create, persist and fetch our tasks:
1$rake2(main)>tasks_store=TasksStore.shared3=>#<TasksStore:0x8e23db0 @context=#<NSManagedObjectContext:0x9c2d440>>4(main)>bank=tasks_store.create_task("Go to the bank")5=>#<Task_Task_:0x9c2e170>6(main)>t1=tasks_store.get_tasks.first7=>#<Task_Task_:0x9c2e170>8(main)> t1.task_description9=>"Go to the bank"10(main)> tasks_store.save_context11=>true12(main)>exit
Now if we build and run the app again we find that we can still access the
task that we saved–it has been persisted to the store:
1$rake2(main)>tasks_store=TasksStore.shared3=>#<TasksStore:0x8c4d310 @context=#<NSManagedObjectContext:0x8f3f610>>4(main)>t1=tasks_store.get_tasks.first5=>#<Task_Task_:0x8eca300>6(main)> t1.task_description7=>"Go to the bank"8(main)>exit
Searching and Sorting
In most applications we will find ourselves wanting to be able to:
- Look up individual records
- Filter records by certain criteria based on the record attributes (e.g.
find all tasks where completed=true) - Sort the returned records based on their attributes (e.g. sorting tasks by
the date that they were created)
In this section we will take each of these in turn and show how they can be
implemented.
Looking up Individual Records
A common use case in an iOS app is to display a list of records retrieved from
Core Data in a UITableView. When the view controller is loaded we will
generally load all records into an instance variable (e.g. an NSArray)
within the view controller and provide access to these records via the usual
UITableView delegate methods.
When a user taps a row and we wish to show a detail view for that record, we
would typically instantiate the detail view controller and pass it the
individual record from our local array rather than requesting it again from
Core Data.
As such, there are not many scenarios in which you would typically be
retrieving one and only one record from Core Data. One scenario where you
might do so however is when you are working with nested contexts and you wish
to determine whether the Core Data NSManagedObject that you have is still in
the store, or whether its attributes have changed.
At this stage we have not encountered nested contexts–we are dealing with
only one context for our app and as such we don’t need to worry about
instances changing in the store without our knowledge; we are only displaying
one view controller at a time and each view controller is accessing the same
context.
We will revisit this however when we begin working with nested contexts later
in the book.
Filtering Records
We will often want to filter records as we retrieve them from the store. For
our tasks app some common use cases could be to filter tasks by their status
(completed, not completed), their priority and perhaps a text search on the
description of the task itself. In this section we will investigate how we can
implement these kinds of filters.
Filtering on Priority and Completion Status
Let’s extend our get_tasks method to allow for optional filtering on the
task priority and its completion status. If we pass in nil for either, or
don’t pass them in, then no filtering will occur. So a call to
get_tasks(priority: 1, completed: false) will return all tasks at priority
level 1 which have not yet been completed, while a bare call to get_tasks
will return all tasks as before.
Replace the previous implementation of get_tasks with this extended version:
1defget_tasks(opts={})2defaults={priority:nil,completed:nil}3opts=defaults.merge(opts)45request=NSFetchRequest.alloc.init6request.entity=NSEntityDescription7.entityForName('Task',8inManagedObjectContext:@context)910predicates=[]1112unlessopts[:completed].nil?13completed=NSNumber.numberWithBool(opts[:completed])14completed_pred=NSPredicate.predicateWithFormat("completed == %@",15completed)16predicates<<completed_pred17end1819unlessopts[:priority].nil?20priority=NSNumber.numberWithInt(opts[:priority])21priority_pred=NSPredicate.predicateWithFormat("priority == %@",22priority)23predicates<<priority_pred24end2526ifpredicates.count>027# Create a compound predicate by ANDing together any predicates28# specified thus far.29compound_predicate=NSCompoundPredicate30.andPredicateWithSubpredicates(predicates)31request.setPredicate(compound_predicate)32end3334error_ptr=Pointer.new(:object)3536data=@context.executeFetchRequest(request,error:error_ptr)3738ifdata==nil39raise"[ERROR] Error fetching taskss:#{error_ptr[0].description}"40end4142data43end
Breaking it down
- The method now takes a parameter
optswhich defaults to an empty hash. - We provide our defaults for this hash (in this case they are all nil) and
merge the two so that when you callget_tasksyou can override these
default values. - If a value for either
completedorpriorityis provided then we create
a filter predicate expressing the appropriate condition and attach it to
the fetch request. - The predicates (of type
NSPredicate) are created using a format string,
with the arguments being passed in as objects (%@). - As we are dealing with numeric types in both cases (a boolean is 1 or 0,
priorities are integers) we create and pass in anNSNumberwhen creating
the predicates. - As we can only specify one predicate for a given
NSFetchRequestwe create
a compound predicate which is made byANDing each of the predicates
together.
Filtering on the Task Description
If we would like to add a search function to our app then we can extend our
get_tasks method to support this using the same approach as before. The
principal difference will be that we will be using a different comparison
operator, CONTAINS rather than ==.
First let’s extend our default arguments to include task_description:
1defaults={priority:nil,completed:nil,task_description:nil}
Now we add our predicate, just below the priority predicate:
1unlessopts[:task_description].nil?2task_description=opts[:task_description]3task_description_predicate=NSPredicate4.predicateWithFormat("task_description CONTAINS[cd] %@",5task_description)6predicates<<task_description_predicate7end
The CONTAINS operator simply checks that the value for the attribute on the
left-hand side (task_description) contains the argument on the right-hand
side. We could also have written the predicate using LIKE and with wildcard
* to get the same effect. The extra [cd] options specify that we would
like the search to be case and diacritic insensitive which is generally what
you would like for a search function. There are many more operators and
options described in the official documentation on predicate
syntax.
Our get_tasks method is now quite capable: we can retrieve all tasks or
filter on any combination of priority, completion status or search for a
fragment of a task description name.
Let’s try it out. First let’s add in some more tasks:
1$rake2(main)>tasks_store=TasksStore.shared3(main)> tasks_store.get_tasks4=>[Priority: 5 Completed: 0 Description:'Go to the bank']5(main)> tasks_store.create_task("Do the laundry and dry cleaning")6=> Priority: 5 Completed: 0 Description:'Do the laundry'7(main)> tasks_store.create_task("Go to the supermarket")8=> Priority: 5 Completed: 0 Description:'Go to the supermarket'9(main)>tax_return=tasks_store.create_task("Complete tax return")10=> Priority: 5 Completed: 0 Description:'Complete tax return'11(main)> tax_return.priority=112=> 113(main)> tax_return.completed=114=> 115(main)> tasks_store.save_context16=>true17(main)>exit
We now have a selection of tasks with a mix of priorities and completion
statuses. Let’s exercise the fetching and filtering code:
1$rake2(main)>tasks_store=TasksStore.shared3=>#<TasksStore:0x9086600 @context=#<NSManagedObjectContext:0x9155df0>>4(main)> tasks_store.get_tasks5=>[6Priority: 5 Completed: 0 Description:'Go to the bank',7Priority: 1 Completed: 1 Description:'Complete tax return',8Priority: 5 Completed: 0 Description:'Go to the supermarket',9Priority: 5 Completed: 0 Description:'Do the laundry'10]11(main)> tasks_store.get_tasks.count12=> 413(main)> tasks_store.get_tasks(priority: 1)14=>[Priority: 1 Completed: 1 Description:'Complete tax return']15(main)> tasks_store.get_tasks(priority: 1, completed:false)16=>[]17(main)> tasks_store.get_tasks(priority: 1, completed:true)18=>[Priority: 1 Completed: 1 Description:'Complete tax return']19(main)> tasks_store.get_tasks(priority: 5).count20=> 321(main)> tasks_store.get_tasks(priority: 5, task_description:"supermarket")22=>[Priority: 5 Completed: 0 Description:'Go to the supermarket']23(main)>exit
Updating Records
Updating records is straightforward: you simply retrieve the record
(encapsulated as an NSManagedObject as usual), make changes to the
attributes as necessary, on as many objects as you like, and then save the
context. This is perhaps where the benefits of having the context start to be
apparent: you make all the changes you need to across all objects in the graph
and then persist when it is necessary or convenient to do so.
We have already had one example of this, when we were creating records with
which to test our filtering. Here’s another where we
retrieve, modify the description of and persist back two tasks. Note how
straightforward this is:
1$rake2(main)>tasks_store=TasksStore.shared3=>#<TasksStore:0x937d880 @context=#<NSManagedObjectContext:0x93b7b60>>4(main)> task_1,task_2=tasks_store.get_tasks().last(2)5=>[#<Task_Task_:0xff9f640>, #<Task_Task_:0xff9f690>]6(main)> task_1.task_description7=>"Go to the supermarket"8(main)> task_1.task_description="Go to the supermarket and chemist"9=>"Go to the supermarket and chemist"10(main)> task_2.task_description11=>"Do the laundry"12(main)> task_2.task_description="Do the laundry and dry cleaning"13=>"Do the laundry and dry cleaning"14(main)> tasks_store.save_context15=>true
Deleting Records
In the case where an object has no relationships to other objects then
deletion is straightforward:
1@context.deleteObject(aManagedObject)
At this point the object still exists in the store however and won’t be
deleted until the context is saved. In this manner you can create, edit and
delete several objects in one go and have all of the changes persisted when
you save, as long as validation passes on all the objects involved.
We can extend our TasksStore to support deletion by adding a helper method
delete_task as follows:
1defdelete_task(task)2@context.deleteObject(task)3end
Sorting Records
In retrieving your records you will often want to order the results, e.g. in
alphabetical order, by priority, with completed tasks last and so on.
In our example application we would indeed like to order first by completed
status (tasks that are due should come first), then by priority (highest to
lowest) and then alphabetically by task description.
We can implement this by adding in three sort predicates into our fetch
request (in the get_tasks method), one for each attribute:
1completed_sort=NSSortDescriptor.alloc.initWithKey("completed",2ascending:true)3priority_sort=NSSortDescriptor.alloc.initWithKey("priority",4ascending:true)5description_sort=NSSortDescriptor.alloc.initWithKey("task_description",6ascending:true)78request.setSortDescriptors([completed_sort,9priority_sort,10description_sort])1112error_ptr=Pointer.new(:object)1314data=@context.executeFetchRequest(request,error:error_ptr)
In each case we perform a simple sort in ascending order so that non-completed
tasks are first (0 < 1), high priority (e.g. priority 1) tasks come before low
priority tasks (e.g. priority 2-5) and finally when those attributes match we
sort alphabetically on the task description.
Let’s see this in action. We will fetch our tasks, and then
send the first task to the end of the list by completing the task (completed
tasks should always come after tasks that are due):
1$rake2(main)>tasks_store=TasksStore.shared3=>#<TasksStore:0x904b680 @context=#<NSManagedObjectContext:0x93d8a60>>4(main)> tasks_store.get_tasks5=>[Priority: 1 Completed: 0 Description:'Complete tax return',6Priority: 5 Completed: 0 Description:'Do the laundry and dry cleaning',7Priority: 5 Completed: 0 Description:'Go to the bank',8Priority: 5 Completed: 0 Description:'Go to the supermarket and chemist']9(main)>tax=tasks_store.get_tasks.first10=> Priority: 1 Completed: 0 Description:'Complete tax return'11(main)> tax.completed=true12=>true13(main)> tasks_store.save_context14=>true15(main)> tasks_store.get_tasks16=>[Priority: 5 Completed: 0 Description:'Do the laundry and dry cleaning',17Priority: 5 Completed: 0 Description:'Go to the bank',18Priority: 5 Completed: 0 Description:'Go to the supermarket and chemist',19Priority: 1 Completed: 1 Description:'Complete tax return']
Wrapping Up
At this stage we are able to define entities in our data model from scratch,
create, fetch, update and delete instances of them and persist these changes
back to the store when we choose to do so. In order to create a fully-fledged
production app however we still need to know about correct error handling,
migrations and overall design patterns for accessing and working with our
data, including the use of nested contexts.
Before we dive further into these topics however let’s first make life easier
for ourselves by bringing in two third party libraries: one that lets us write
our models in a simple schema language, and the other that will take what we
have done so far and reduce it to one line of setup code.
At this point you may be wondering why we didn’t start with these libraries;
the reason for this is that while these libraries can save us a lot of time,
if we don’t understand how they work then when we inevitably encounter
issues then we would be at the mercy of the (perhaps incomplete) documentation
and StackOverflow answers, or else we would simply need to go back to the
fundamentals to work out what went wrong. Starting with the fundamentals as we
have done should, I hope, save you considerable time in the long run.
3. Tips & Troubleshooting
RubyMotion is still relatively new software and while it works well enough for
production usage, in development you’re likely to bump into some quirks and
possibly bugs.
Debugging Core Data
Increase the log level
1$rakeargs="-com.apple.CoreData.SQLDebug 32-com.apple.CoreData.MigrationDebug 1"
Can be set to 1, 2 or 3 for increasing amounts of debug information.
Core Data Error Codes
A full list of error codes is available in the Core Data Framework API
docs.
Code 1570: Missing Mandatory Property
On attempting to save your context, you have a managed object in the context
that is missing a required attribute (i.e. it is set to nil).
Look for NSValidationErrorKey in the error output to find the offending
property. Now you need to trace through your code to find out why this
property is not being set.
1"Error Domain=NSCocoaErrorDomain Code=1570"The operation couldn't be2completed.(Cocoaerror1570.)" UserInfo=0x98264203{NSValidationErrorObject=<Task:0x8d77f90>(entity:Task;id:0x8d7ad504<x-coredata:///Task/tAA6226D8-1347-4F26-925B-EE0C3FA3D6802> ; data: {n5completed=nil;npriority=nil;n"task_description"= nil;n}),6NSValidationErrorKey=completed,NSLocalizedDescription=Theoperation7couldn'tbecompleted.(Cocoaerror1570.)}"
In this case, a Task in the context has no property values set at all. This
particular error refers to the completed property but there will be similar
messages for the priority and task_description properties as well.
This collection of errors will be bundled along with an error of code 1560,
which indicates multiple validation problems with the referenced managed
object.
Code 134100: Current Schema is Incompatible with Current Store
You have updated your data model (schema) but you already have a persistent
store which has been initialised with a schema that is not compatible with the
schema you are now trying to load.
Look for the NSStoreModelVersionIdentifiers key in the error message to see
what version the current data store is at.
To correct the situation you either need to:
- Revert your schema (if this was an accidental change),
- Delete the persistent store if you want to start afresh (e.g. run
rake simulator),
clean=1 - Or migrate the data store. If you are using Core Data Query (CDQ) then
follow the steps here, otherwise if you are using pure
Core Data you can follow the steps here instead.
Interacting With Views in the Console
One of the key features of RubyMotion is the REPL (Read-Execute-Print-Loop, or
console), which makes it easy to interact with your program while it is
running. For example, you could add new elements to a view or tweak their
attributes until you are happy–certainly much faster than repeatedly changing
and hitting ‘Build and Run’ as would be required if we were using Xcode.
One issue you will hit right away though is that there isn’t an easy way to
quickly refer to the current view. The following trick is a little ‘dirty’ and
you will need to take care to remove such lines from your code after debugging
but you can make the current view available via a global variable for easy
access in the console.
For example if we have a view controller DetailViewController:
1classDetailViewController2defviewDidLoad3$this_view=self45@textField=UITextField.alloc.initWithFrame([[20,84],[280,31]])6end7end
Now when this view controller has loaded you can access it easily in the
console:
1=>$this_view.instance_variable_get('@textField').frame2=>#<CGRectorigin=#<CGPointx=20.0y=84.0>3size=#<CGSizewidth=280.0height=31.0>>
Note how we use instance_variable_get to access the instance variable
@textField; we could now for example tweak the origin or size of the frame,
alter its attributes, or anything else we would like to do.
Uninitialized constant NSSQLiteStoreType
If you start a new RubyMotion project and forget to add the Core Data
framework to your Rakefile before you build/run the app then even if you
update your Rakefile you are still likely to get NameError exceptions for Core
Data types, e.g.
1***Terminatingappduetouncaughtexception'NameError',2reason:'app_delegate.rb:19:in`initialise_core_data_stack':3uninitializedconstantAppDelegate::NSSQLiteStoreType(NameError)
The solution in almost all cases should just be that you need to run rake whenever you change the list of frameworks you load into your app. On
clean
the next build all names should be resolved as you would expect.
Undefined method `viewWillAppear’
This error could occur, and cause a crash in your application, if you have
attempted to override a method such as viewWillAppear as follows:
1classMyViewController<UIViewController2defviewWillAppear3# Your code4end5end
This can cause the RubyMotion runtime to complain that MyViewController has
no viewWillAppear method. As you have just defined one that doesn’t sound
quite right.
What the error message is really saying is that it can’t find
viewWillAppear, and the reason for that is that our definition above is
shadowing the one that the runtime would like to invoke, because it is
looking for viewWillAppear(animated).
As such, to fix this we should be sure to override viewWillAppear(animated)
and not the bare method viewWillAppear, thus changing our code to be:
1classMyViewController<UIViewController2defviewWillAppear(animated)3# Your code4end5end
Other Errors and Crashes
Have you updated RubyMotion? If so, be sure to run rake clean in the shell
before continuing.
If you are encountering errors which you can find no reference to online you
might have discovered a bug; check the RubyMotion changelog for a reference
to it and try updating to the latest version (followed by a rake clean) to
see if that fixes it.
If you are still having problems then there is the RubyMotion Google
Group, RubyMotion
Support
or you are very welcome to get in touch with
me
and I will do my best to help.
Убедитесь, что:
- Масштаб ваших complication assets установлен на «Единый Размер», а не на «Индивидуальные Масштабы».
- все значки настроены на «Единый Размер», будь это ваш основной AppIcon или альтернативный
Когда я впервые услышал о поддержке значков одного размера на WWDC22, я был взволнован. У меня была довольно хорошая настройка, чтобы генерировать изображения с помощью Affinity Designer и Быстрой Команды, но, возможно, и не стоило переживать.
Начальный размер
Первое, что я cделал, это использовал сборку архива и проверку размера, как это делал Антуан ван дер Ли, что дало мне данный отчет (я упростил его). Apple объясняет этот процесс в их руководстве по Уменьшению размера вашего приложения.
# iPhone 14 Pro
App + On Demand Resources size: 71,8 MB compressed, 82,4 MB uncompressed
App size: 71,8 MB compressed, 82,4 MB uncompressed
On Demand Resources size: Zero KB compressed, Zero KB uncompressed
# Watch Ultra
App + On Demand Resources size: 26,1 MB compressed, 32,2 MB uncompressed
App size: 26,1 MB compressed, 32,2 MB uncompressed
Assets — каталог активов — это отдельная папка в Xcode, которую вы используете для организации изображений, значков, цветов и многого другого для вашего приложения. Вместо того, чтобы добавлять отдельные изображения в органайзер файлов Xcode, вы добавляете активы, аккуратно организованные в единый каталог. Каталоги активов также включают метаданные, например, о масштабе изображения.
До сих пор у меня было:
- один AppIcon в Assets.xcassets для iOS, со значками как для iOS, так и для watchOS (не могу вспомнить, почему…)
- один AppIcon в Assets.xcassets для watchOS
Итак, первое, что я сделал, это:
- получил единые Assets как для iOS, так и для watchOS (добавьте его в целевое приложение Watch): я создал новый «Heavy.xcassets» для всех активов, используемых для iOS (а вскоре и для других…), таким образом мои Assets.xcassets были бы ограничены активами, совместно используемыми всеми приложениями (для вещей, совместно используемых приложениями с расширениями, у меня есть другие каталоги). Это означает, что пока у меня был только AppIcon.
- удалил AppIcon из Assets для целевого приложения Watch
Я опираюсь на Watch, чтобы убедиться, что изменение ничего не испортило.
Я создал новый архив и снова прошел через процесс экспорта архива для разработки с истончением приложения, чтобы посмотреть, что изменилось.
# iPhone 14 Pro
App + On Demand Resources size: 71,8 MB compressed, 82,4 MB uncompressed
App size: 71,8 MB compressed, 82,4 MB uncompressed
On Demand Resources size: Zero KB compressed, Zero KB uncompressed
# Watch Ultra
App + On Demand Resources size: 26,1 MB compressed, 32,2 MB uncompressed
App size: 26,1 MB compressed, 32,2 MB uncompressed
On Demand Resources size: Zero KB compressed, Zero KB uncompressed
Всё хорошо!
Переход на Единый Размер
Я пошёл дальше и выбрал Single Size

Я собрал свое приложение, и оно упало:
❌ Ошибка команды CompileAssetCatalog с ненулевым кодом завершения
Сообщение об ошибке не было таким уж запутанным: каким образом в этом участвуют Core Data?
AssetCatalogSimulatorAgent *** Terminating app due to uncaught exception ‘NSInvalidArgumentException’, reason: ‘Object 0x906e9858c73ac8ba persistent store is not reachable from this NSManagedObjectContext’s coordinator’
*** First throw call stack:
(
0 CoreFoundation 0x00000001807a3b44 __exceptionPreprocess + 172
1 libobjc.A.dylib 0x000000018005c144 objc_exception_throw + 56
2 CoreData 0x00000001858739cc _PFRetainedObjectIDCore + 680
3 CoreData 0x000000018586a1e4 -[NSManagedObjectContext objectWithID:] + 424
4 CoreThemeDefinition 0x000000019d9b5b2c __34-[TDRenditionsDistiller _distill:]_block_invoke + 36
5 CoreData 0x0000000185871720 developerSubmittedBlockToNSManagedObjectContextPerform + 156
6 …
)
2022-11-09 14:00:32.369 AssetCatalogSimulatorAgent[38516:518671] *** Terminating app due to uncaught exception ‘NSInvalidArgumentException’, reason: ‘Object 0x906e9858e65ac95a persistent store is not reachable from this NSManagedObjectContext’s coordinator’
*** First throw call stack:
(…)
2022-11-09 14:00:32.369 AssetCatalogSimulatorAgent[38516:518675] *** Terminating app due to uncaught exception ‘NSInvalidArgumentException’, reason: ‘Object 0x906e9858e5fac8ba persistent store is not reachable from this NSManagedObjectContext’s coordinator’
*** First throw call stack:
(…)
2022-11-09 14:00:32.369 AssetCatalogSimulatorAgent[38516:518672] *** Terminating app due to uncaught exception ‘NSInvalidArgumentException’, reason: ‘Object 0x906e9858c3dac8ba persistent store is not reachable from this NSManagedObjectContext’s coordinator’
*** First throw call stack:
(…)
libc++abi: terminating with uncaught exception of type NSException
/* com.apple.actool.errors */
: error: ERROR: Identical key for two renditions
(E)Key
element: Grouped/Packed Images
part: Artwork Image
value: (null)
identifier:0
dimension1:0
state: (null)
scale: 2
idiom: watch
subtype: 0
gamut: sRGB
target: any
sizeClassHorizontal: universal
sizeClassVertical: universal
graphicsFeatureSetClass: GLES2,0
memoryClass: 0
target: any
appearance: (null)
localization: (null)
glyphWeight:(null)
tglypSize: (null)
deployment: any
Я застрял в этом месте примерно на месяц:
Кто-нибудь с приложением Watch переключился на значок приложения Единого Размера?
Что-то не так с моими Assets, и я не могу собрать свое приложение (я получаю непонятную/вводящую в заблуждение ошибку c Core Data)
— Арно Жубе (@sowenjub) 11 октября 2022 г.
У меня были более срочные дела, но с объявлением нового раунда «Спросите Apple» я решил дать ему еще один шанс, таким образом я бы мог подать запрос.
Немного покопавшись, я нашел виновника: Complications Assets.
Я переключился с «Individual Scales» на «Single Scale», обновил одну из иконок для Graphic Extra Large, 38 мм, и на этом все: ошибка сборки исчезла.
Я подумал, что все готово, и на этот раз попытался заархивировать приложение, а не просто собрать его: не удалось.
Для Graphic Extra Large я изменил ширину экрана Apple Watch с «Individual Widths» на «Any». В этот раз я получил новую ошибку.
❌ CoreData: API Misuse: Attempt to serialize store access on non-owning coordinator (PSC = 0x600003cb9110, store PSC = 0x0)
Результат
# iPhone 14 Pro
App + On Demand Resources size: 74,7 MB compressed, 85,3 MB uncompressed
App size: 74,7 MB compressed, 85,3 MB uncompressed
On Demand Resources size: Zero KB compressed, Zero KB uncompressed
# Watch Ultra
App + On Demand Resources size: 26 MB compressed, 32,2 MB uncompressed
App size: 26 MB compressed, 32,2 MB uncompressed
On Demand Resources size: Zero KB compressed, Zero KB uncompressed
74,7 МБ со сжатием в “Single Size” против 71,8 МБ со сжатием в “All Sizes”.
Это скорее разочаровывает как итог после стольких ожиданий и отладки! Но еще не все потеряно. В процессе я обнаружил, что мое приложение может весить намного меньше! Но это для другого поста 
Наконец-то мне удалось использовать новую опцию значка приложения Singe Size в Xcode, но мое приложение кажется тяжелее (74,7 МБ против 71,8 МБ для iPhone 14 Pro). Что бы вы сделали? — Арно Жубе (@sowenjub) 9 ноября 2022 г.
Опубликовано: Арно Жубе. Перевод и адаптация: SwiftBook.
Оригинал статьи