I am trying to make an API call through Axios in my React Application. However, I am getting this CORS issue on my browser. I am wondering if i can resolve this issue from a client side as i dont have any access to the API internally. Attached is my code.
const response = axios({
  method: "post",
  dataType: "jsonp",
  url: "https://awww.api.com",
  data: {
    appToken: "",
    request: {
      applicationName: "ddfdf",
      userName: "jaime@dfd.com",
      password: "dfd",
      seasonIds: [1521ddfdfd5da02],
    },
  },
});

return {
  type: SHARE_REVIEW,
  payload: "response",
};
Attached is my WebPack.config.js
module.exports = {
  entry: ["./src/index.js"],
  output: {
    path: __dirname,
    publicPath: "/",
    filename: "bundle.js",
  },
  module: {
    loaders: [
      {
        exclude: /node_modules/,
        loader: "babel",
        query: {
          presets: ["react", "es2015", "stage-1"],
        },
      },
      { test: /\.json$/, loader: "json-loader" },
    ],
  },
  resolve: {
    extensions: ["", ".js", ".jsx"],
  },
  devServer: {
    historyApiFallback: true,
    contentBase: "./",
  },
  node: {
    dns: "mock",
    net: "mock",
  },
};
In Part 2 of this series, we’ll be making a REST API call from our React project to a service that has some CORS policies implemented. In this particular example, we’ll make REST API calls to xkcd’s API.
Make REST API calls to xkcd
What is xkcd?
xkcd is a webcomic series created by American author Randall Munroe. You can find the awesome comics here.
xkcd has an API?
Yes, it does indeed have an API.
You can find the great and concise API docs here.
What are we going to do?
We’ll make REST API calls to one of my favorite comic strips that has an ID of 327, i.e. our endpoint will be https://xkcd.com/327/info.0.json. This will return JSON data about that particular comic strip.
Let’s try calling it!
OK, so the implementation should be fairly simple. We made our REST API call to the Random User Generator API in our previous article — we just have to switch around the endpoint URL, right?
//const restEndpoint = "https://randomuser.me/api/";
const restEndpoint = "https://xkcd.com/327/info.0.json";
Enter fullscreen mode
Exit fullscreen mode
OK that was super easy! Now let’s refresh our React page.

…? Access to fetch at blah blah from origin bleh bleh has been blocked by CORS policy …. say what now???
Well, it looks like the response didn’t render. And there seems to be a whole lot of red text in the console…_(┐「ε:)_
That error we see in the console is well known as the CORS Error. Basically, resources that lie on xkcd’s domain cannot be requested from another domain (i.e. our front-end React App).

There are several ways we can overcome this issue:
- Make REST API calls from the same domain as xkcd
- Edit the CORS settings of xkcd’s server
- Make REST API calls from our own backend server
We can quickly experience method 1 if we navigate to any page on xkcd, and run the following code in the console.
fetch('https://xkcd.com/327/info.0.json')
  .then(response => response.json())
  .then(data => console.log(data));
Enter fullscreen mode
Exit fullscreen mode
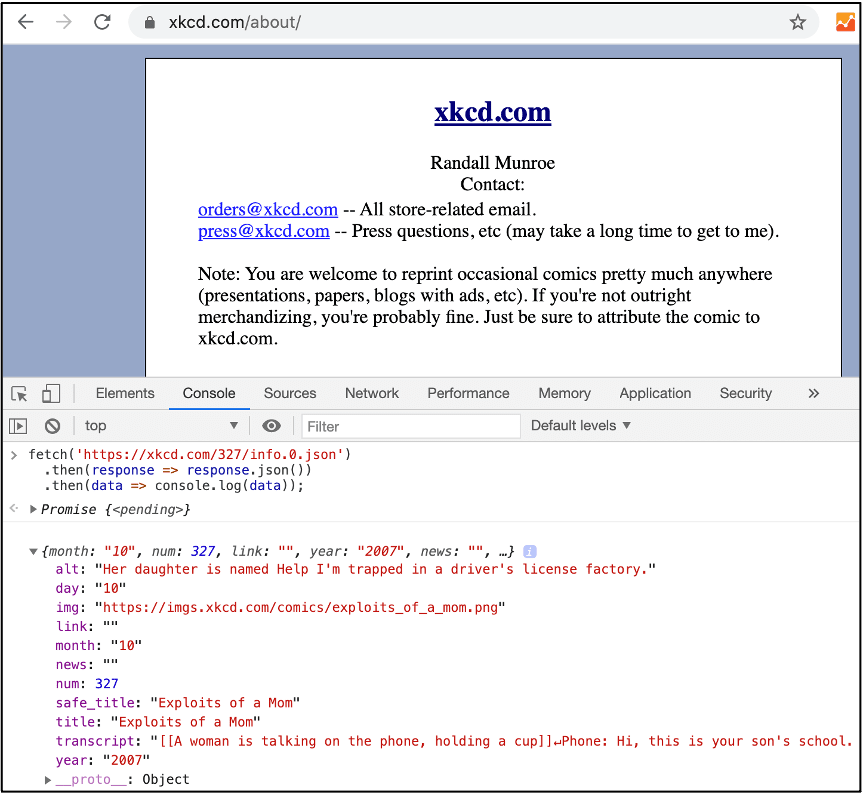
The REST API request is being made on the same domain, so we don’t run into any CORS errors. But it’s highly unlikely that xkcd will host our React App on their site for us, so this isn’t a realistic approach.
Method 2 again is unrealistic, since we don’t have permission to access the settings of xkcd’s server ¯\(ツ)/¯
Method 3 is achievable by either setting up your own server and making requests from it, or using a services such as Zapier or Power Automate to make the requests for us.
In this article, we’ll proceed with Method 3 by setting up a backend server using Express, which will act as a proxy to make REST API calls to xkcd.
Set up Express
What is Express?
Express is a back-end web application framework for Node.
How will we use Express?
In this article, we’ll treat Express as a tool for creating custom endpoints that our front-end React App can make calls to. When we make requests to these custom endpoints, the Express server will make REST API calls to our desired 3rd party service endpoint, receive the response, and then route the response back to our React App.
If that was a bit hard to grasp, think of it like ordering food at a nice restaurant. If we (front-end App) go directly to the kitchen and order food directly to the chef (3rd party service), we’ll be scolded for bad manners (CORS errors). What we need to do is order food to the server (Express App). The server (Express App) will take our order, walk to the kitchen, and request for the food to the chef (3rd party service). After some time, the chef (3rd party service) will respond by giving the server (Express App) back a plate of food. The server (Express App) then carries the plate back to the table so that we (front-end App) can consume it.
Set up Express
OK, so let’s go ahead to set up Express. This is basically a new node project with the Express dependencies installed. We’ll want this project to be in a separate location from our React App, so let’s navigate back up to our myproject directory, create a new directory called backend, and navigate into it. Since the terminal we were using is running the React app, go ahead to use the commands in a new terminal window.
mkdir backend
cd backend
Enter fullscreen mode
Exit fullscreen mode
From here we’ll follow the Express installation tutorial to make our Express project.
npm init
Enter fullscreen mode
Exit fullscreen mode
You’ll be asked a number of questions but you can skip through them by hitting enter until it’s finished.
Continue to install some dependencies.
npm install express node-fetch cors
Enter fullscreen mode
Exit fullscreen mode
Finally, create a JavaScript file to work on — we’ll call ours server.js.
touch server.js
Enter fullscreen mode
Exit fullscreen mode

Set up the Express code
We’ll use this code for server.js
const express = require('express');
const cors = require('cors');
const fetch = require('node-fetch');

const PORT = 5000;
const app = express();

app.use(cors());
const corsOptions = {
    origin: "http://localhost:3000"
};

const requestEndpoint = "https://xkcd.com/327/info.0.json";

// This function runs if the http://localhost:5000/getData endpoint
// is requested with a GET request
app.get('/getData', cors(corsOptions), async (req, res) => {
    const fetchOptions = {
        method: 'GET'
    }
    const response = await fetch(requestEndpoint, fetchOptions);
    const jsonResponse = await response.json();
    res.json(jsonResponse);
});

app.listen(PORT, () => {
    console.log(`Example app listening at http://localhost:${PORT}`);
});
Enter fullscreen mode
Exit fullscreen mode
So, let’s go through the code.
We first set our port to 5000, as we need it to be separate from the port we use on our front-end React App, which was defaulted to port 3000.
const PORT = 5000;
Enter fullscreen mode
Exit fullscreen mode
Express commonly uses routing that defines how the server’s endpoints will respond to our front-end React App’s requests. In this case, we’ve defined how the server will react when the endpoint http://localhost:5000/getData is accessed with a GET request.
app.get('/getData', cors(corsOptions), async (req, res) => {
  //...
});
Enter fullscreen mode
Exit fullscreen mode
But by default, our Express server will return CORS errors if accessed from our front-end React App that lies on a different domain (port). By setting up some CORS options, we allow requests from port 3000 to access our resources that lie on http://localhost:5000/getData.
app.use(cors());
const corsOptions = {
    origin: "http://localhost:3000"
};

app.get('/getData', cors(corsOptions), async (req, res) => {
  //...
});
Enter fullscreen mode
Exit fullscreen mode
If we were to access http://localhost:5000/getData with a GET request from our React App, Express will run the related function, which in this case would be a fetch request to the xkcd REST API endpoint. As this request is made from the server side, it does not run in to any CORS errors. The response from xkcd is obtained, and returned back to our React App through the res.json() method.
const fetchOptions = {
    method: 'GET'
}
const response = await fetch(requestEndpoint, fetchOptions);
const jsonResponse = await response.json();
res.json(jsonResponse);
Enter fullscreen mode
Exit fullscreen mode
OK, now that’s ready, let’s start running the express server!
node server.js
Enter fullscreen mode
Exit fullscreen mode
We can quickly see if it’s running successfully by accessing http://localhost:5000/getData through the browser. We should see the JSON response being displayed.

OK, so it looks like the Express App is making successful REST API calls to https://xkcd.com/327/info.0.json. Note that if we want to make any changes to server.js, we should restart the App to see the changes take place.
Let’s leave the Express server running, and return back to our React code so that it points to the Express App rather than directly to the xkcd server.
Update the React code
There isn’t much to do here, except for updating our REST endpoint to our Express server instead of the xkcd endpoint.
// const restEndpoint = "https://xkcd.com/327/info.0.json";
const restEndpoint = "http://localhost:5000/getData";
Enter fullscreen mode
Exit fullscreen mode
Refresh the browser, and let’s see if we’ve managed to bypass the CORS error.
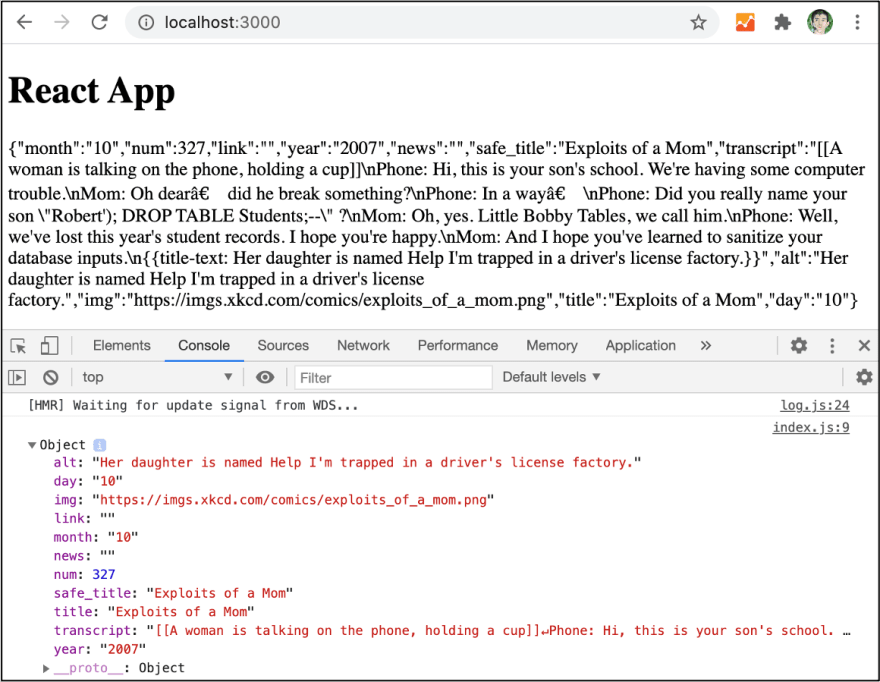
Great! The REST API response has successfully rendered onto our HTML, and there are no CORS errors in our console.
And with that, we’ve managed to successfully avoid CORS errors to make REST API calls to xkcd by using our Express server as a proxy!
Next steps
In the next part of the series, we’ll make a REST API call to a Web Database service, Kintone, which will challenge us to our next issue.
                   _人人人人人人人人人_
                   > AUTHENTICATION <
                    ̄Y^Y^Y^Y^Y^Y^Y^Y ̄
                   (\__/)
                   (•ㅅ•)
                   /つ つ
Enter fullscreen mode
Exit fullscreen mode
Introduction to CORS error in React
When developing a React application that makes API requests to a server, you might encounter the CORS error. CORS stands for Cross-Origin Resource Sharing and it’s a security feature implemented by modern web browsers to prevent unauthorized access to web APIs.
This error occurs when a React app running on one server tries to access an API on a different server. By default, modern web browsers block these types of requests for security reasons. This means that if you try to make an API request to a different domain or port than the one your React app is running on, the browser will block it.
In order to fix the CORS error, you need to configure the server to allow requests from the domain and port that your React app is running on. There are different ways to do this depending on the server technology you are using. Additionally, you can also use a proxy server to avoid CORS restrictions, but it’s not a recommended solution for production environments.
Now that you have an understanding of what the CORS error is and why it occurs, let’s explore some solutions to fix it in your React application.
Understanding the cause of CORS error in React and how it impacts your application
CORS (Cross-Origin Resource Sharing) is a security feature implemented by web browsers to prevent or limit access to resources that are hosted on a different domain than the one that made the request. When a React application hosted on one domain tries to access resources from another domain, the browser invokes the CORS mechanism to determine whether to allow or block the request.
If the server hosting the resources doesn’t explicitly allow requests from the domain of the React application, the browser blocks the request and returns a CORS error. This error can impact your React application in several ways, such as:
- Preventing the application from accessing important resources, such as API endpoints, images, or scripts.
- Causing unexpected behavior, such as failing to load data or crashing the application.
- Making it harder to develop and test the application, especially when using different environments or deploying to different servers.
Therefore, it’s crucial to understand the cause of CORS errors in React and how to handle them properly. Some common strategies include:
- Configuring the server to allow CORS requests from specific domains, using techniques such as CORS headers or server-side proxies.
- Using JSONP (JSON with Padding) as an alternative to regular AJAX requests, which bypasses the CORS restrictions by loading resources as scripts rather than XHR (XMLHttpRequest) objects.
- Using a browser extension or a proxy server to modify the CORS headers or spoof the domain of the requests, which can be useful for testing or debugging purposes but shouldn’t be used in production environments.
By understanding the cause of CORS errors in React and how to handle them effectively, you can ensure that your application works as expected and provides a smooth user experience without security risks or technical issues.
Practical approaches to resolve CORS error in React application
If you have been developing web applications using React, you may have come across the CORS error. CORS, which stands for Cross-Origin Resource Sharing, is a security feature implemented by web browsers that prevents a web page from making requests to a different domain than the one that served the web page. When a React application running on one domain tries to make a request to a server running on a different domain, the browser will block the request, resulting in a CORS error.
To resolve a CORS error in a React application, you can try the following practical approaches:
- Add CORS headers to the server response: You can solve the CORS error by adding the appropriate Access-Control-Allow-Origin headers to the server response. This header tells the browser that it is allowed to make requests to the server. You can either add the headers to the server configuration or write a middleware function that adds the headers to each response sent from the server.
- Use a proxy server: Another way to solve the CORS error is to use a proxy server. You can set up a proxy server that forwards requests from the React application to the server running on a different domain. The proxy server can add the necessary CORS headers to the request, so the browser does not block it.
- Add a CORS browser extension: If you are developing the application for local testing purposes, you can use a browser extension to disable the CORS feature temporarily. This method is not recommended for production environments, as it may compromise security.
By following these practical approaches, you can resolve the CORS error in your React application and make requests to servers running on different domains.
How to use a proxy server to fix CORS error in React
If you are developing a web application using React, you might come across the term CORS. CORS stands for Cross-Origin Resource Sharing, which is a security feature implemented by web browsers. It restricts web pages from making requests to a different domain than the one that served the web page. When you try to fetch data from a different domain, you might encounter a CORS error. In this article, we will discuss how to use a proxy server to fix the CORS error in React.
Proxy server acts as an intermediary server between the client and the main server. It helps to forward the client’s request to the main server and then returns the server’s response back to the client. By using a proxy server, you can bypass the CORS restrictions and fetch data from a different domain. Let’s see how to use a proxy server in React:
- Create a new file called
setupProxy.jsin thesrcfolder of your React project. - Add the following code to the
setupProxy.jsfile:
const { createProxyMiddleware } = require('http-proxy-middleware');

module.exports = function(app) {
  app.use(
    '/api',
    createProxyMiddleware({
      target: 'http://example.com',
      changeOrigin: true,
    })
  );
};
In the above code, we are creating a middleware using the http-proxy-middleware package. We are using the createProxyMiddleware function to create the middleware. The first parameter of the function is the path that we want to redirect to the proxy server. In our case, we are redirecting to the /api path. The second parameter is an object that contains the target server address and the changeOrigin property. The target property is the address of the main server, and the changeOrigin property is set to true, so the request headers will be modified to the target URL.
After creating the setupProxy.js file, start your React development server. Now, all the requests to the /api path will be redirected to the proxy server. You can make a request to the proxy server without encountering the CORS error. For example:
fetch('/api/data')
  .then(res => res.json())
  .then(data => console.log(data));
In the above code, we are making a request to the /api/data path, which will be redirected to the proxy server. You can replace the /api path with any path that you want to redirect to the proxy server.
By using a proxy server, you can easily fix the CORS error in your React application.
Alternative ways to fix CORS error in React by enabling CORS on the server-side
When working with React applications, you may encounter the CORS error, which usually occurs due to security restrictions imposed by web browsers. One common approach to fixing this error is by enabling CORS on the server-side, but there are also alternative methods that you can use.
Here are some alternative ways to fix CORS error in React:
1. Using a Proxy server: You can use a proxy server to forward your requests to the target server, thus bypassing the CORS restrictions. You can set up a proxy server using tools such as “http-proxy-middleware” or “http-proxy-agent.”
2. Using JSONP: JSONP (JSON with padding) is an alternative to making XMLHttpRequests that can bypass the CORS restrictions. It involves adding a callback parameter to the URL, which returns a JavaScript function that is executed by the browser.
3. Using CORS Anywhere: CORS Anywhere is a proxy server that adds the necessary CORS headers to the response, thus allowing you to bypass the CORS restrictions. You can use it as a middleware or a standalone server.
4. Modifying the server-side code: You can modify the server-side code to add the necessary CORS headers to the response. This approach may require modifying the backend code of the server.
Enabling CORS on the server-side is still a viable option to fix the CORS error in React, but it might not be the best solution in all cases. Try out these alternative methods and choose the one that works best for your project.
Common mistakes and errors that can cause CORS error in React and how to avoid them
Cross-Origin Resource Sharing (CORS) error is a common problem faced by React developers. CORS occurs when a web application running under one domain tries to access resources from a server located in another domain. When this happens, the browser blocks the request.
Here are some common mistakes and errors that can cause CORS error in React:
- Not configuring the server correctly.
- Using different protocols (HTTP and HTTPS).
- Using different ports (ex: http://localhost:3000 and http://localhost:5000).
- Not including the correct headers in the request (Access-Control-Allow-Origin).
To avoid CORS error in React, you can follow these steps:
- Configure the server to accept requests from your React application.
- Make sure the server is running on the same protocol and port as your React application.
- Include the Access-Control-Allow-Origin header in your server’s response.
- Use a proxy server to redirect the request from your React application to the server.
By avoiding these common mistakes and errors, you can prevent CORS error in your React application.
Final thoughts: Best practices to prevent CORS error in React and improve application performance.
CORS (Cross-Origin Resource Sharing) error can be a frustrating issue while building a React application that interacts with APIs. However, there are some best practices that you can adopt to prevent CORS errors and improve your application’s performance.
One of the best practices is to involve a proxy server that acts as a middleman between your React app and the API. This way, you can avoid the CORS error and also make your application more secure. Another practice is to ensure that the API you are using allows the request origins from your React app. This can be achieved by the configuration of the API server.
Furthermore, implementing authentication and authorization in your React app can also be helpful in mitigating CORS errors. By doing so, you can restrict unauthorized access to your API server. Limiting the number of requests to the server by using pagination or caching is also a good practice as it improves your application’s performance.
In conclusion, CORS errors can be frustrating, but adopting the best practices mentioned above can help you prevent them and improve your application’s security and performance.
Overview
Cross-Origin Resource Sharing (CORS) is a mechanism that allows client applications to request limited resources hosted on a server. These resources include web fonts, videos, scripts, iframes, images, and style sheets. By default, a client application making an AJAX request can only request resources that are on the same origin as the site on which the client application is running.
CORS stands for Cross-Origin Resource Sharing. When one domain requests a resource from another domain, it is called a cross-domain request. For security reasons, you may only want domains that can access server resources (other than our domain). This is where CORS comes in. CORS technology allows servers to specify resources to load from sources other than HTTP headers (domain, scheme, or port).
CORS Error in React
Cross-Origin Resource Sharing (CORS) is a protocol that allows scripts running in browser clients to interact with resources from different origins. This is useful because JavaScript can only call URLs that have the same origin as where the script is running, thanks to the same-origin policy followed by XMLHttpRequest and fetching. For example, if a JavaScript app needs to make an AJAX call to an API running on a different domain, the same origin policy will prevent it.
Solution for CORS Error in React
The first solution for CORS Error in React is that you can tell your React app to forward requests to your server using the proxy property in your package.json file.
This is a simple one-step process. Go to your app’s package.json file and add the following property:
After restarting the React dev server, we can see that all requests go to localhost:8080 instead of localhost:3000. Transferred the React development server to the backend server. The above works for third-party services as well.
Under the hood, when a React app requests a resource from localhost:8080, it pretends to request it from the origin localhost:8080 instead of localhost:3000. This seems to match the browser’s SOP and no longer causes CORS Error in React.
Let’s say you’re using a service at https://randomservice.com and you get a CORS error. You can add the URL inside the proxy property of your package.json file.
The development server tries to send the request to the proxy without text/html in the Accept header.
So for the above method to work, you need to make sure there is no text/html in the server’s Accept header. In rare cases, you may need to specify multiple proxy URLs. You can manually configure the proxy using the HTTP-proxy-middleware package by following the instructions here.
Another solution for CORS Error in React is to create a proxy middleware for creating this following these steps.
Add the add setupProxy.js file to the src directory and add the following code block.
Now, like in the previous step, all requests starting with /api from your react app will be intercepted by the middleware and served from http://localhost:8080/api.
Method to Setup CORS Request in React App at Front End Level
-
Axios:
Axios every time uses the Uniform Resource Locator(URL) to initiate the request, and the browser knows that the HTTP OPTIONS request is made to itself first. Often, a token needs to be passed for certification, and it is found by the bearer. The body must pass an additional CORS header. I need this because the browser needs to check with the server if it is allowed to access the resource. -
Fetch:
Use the mode option and set it to cors while fetching.
Create a New React App
Let’s create it with the following command:
After creating the project folder, switch with the following command.
For getting the API data, we used Axios. You have to install it by passing the command:
Demo of CORS options for ReactJS. Write down the following code
index.js:
App.js:
Now run the application by passing the following command on the terminal
Output:
Open your browser. It will by default open a tab with localhost running (localhost:3000).
Explanation:
You can see there are no CORS errors in the console. So you have successfully mastered CORS Error in React.
Conclusion
- CORS is a mechanism that allows certain domains to accept requests from other domains and share resources with each other.
- As we have seen, enabling CORS in the browser is very easy. This will open up many new possibilities that we can use more easily for both developers and users.
- The next time a CORS Error in React occurs, it needs to be handled server-side first. If you’re short on time, you can set up a proxy for your React app for development.
- CORS is primarily implemented in web browsers, but can optionally be used by API clients. It is present in all popular web browsers such as Google Chrome, Firefox, Opera, and Safari.
- I’ve tried to explain what CORS is and what are the most common problems with CORS Errors in React.
- In this article, you learned what CORS is and how it works in general.
Table of Contents
In the previous article, I have explained how to deploy a Node.js application to Heroku.
In this tutorial, we will be making use of the endpoint created there and see if we can use it in our React project.
Project Setup
Let’s create a React project using the following command:
1npx create-react-app react-cors
Now update the App.js with the following code:
App.js
1import { useEffect, useState } from "react"
2import "./App.css"
3
4function App() {
5 const [message, setMessage] = useState("")
6 useEffect(() => {
7 fetch("https://nodejs-using-github.herokuapp.com/")
8 .then(response => response.json())
9 .then(data => {
10 setMessage(data.message)
11 })
12 .catch(err => console.log(err))
13 }, [])
14 return <div className="App">{message ? message : "Loading.."}</div>
15}
16
17export default App
Here we have a local state called message, which we show to the user.
If the message is empty, then we display them with a loading text.
When the component is mounted (useEffect), we make a call to the API endpoint and fetch the message.
Now let’s run this and see if it works:
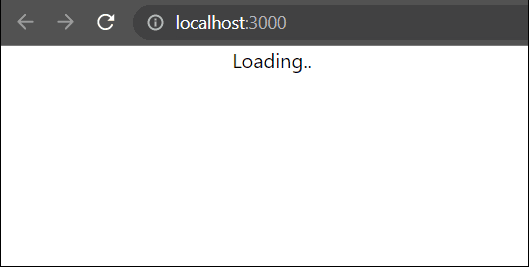
You will see that only «Loading..» text is displayed and the message never loads.
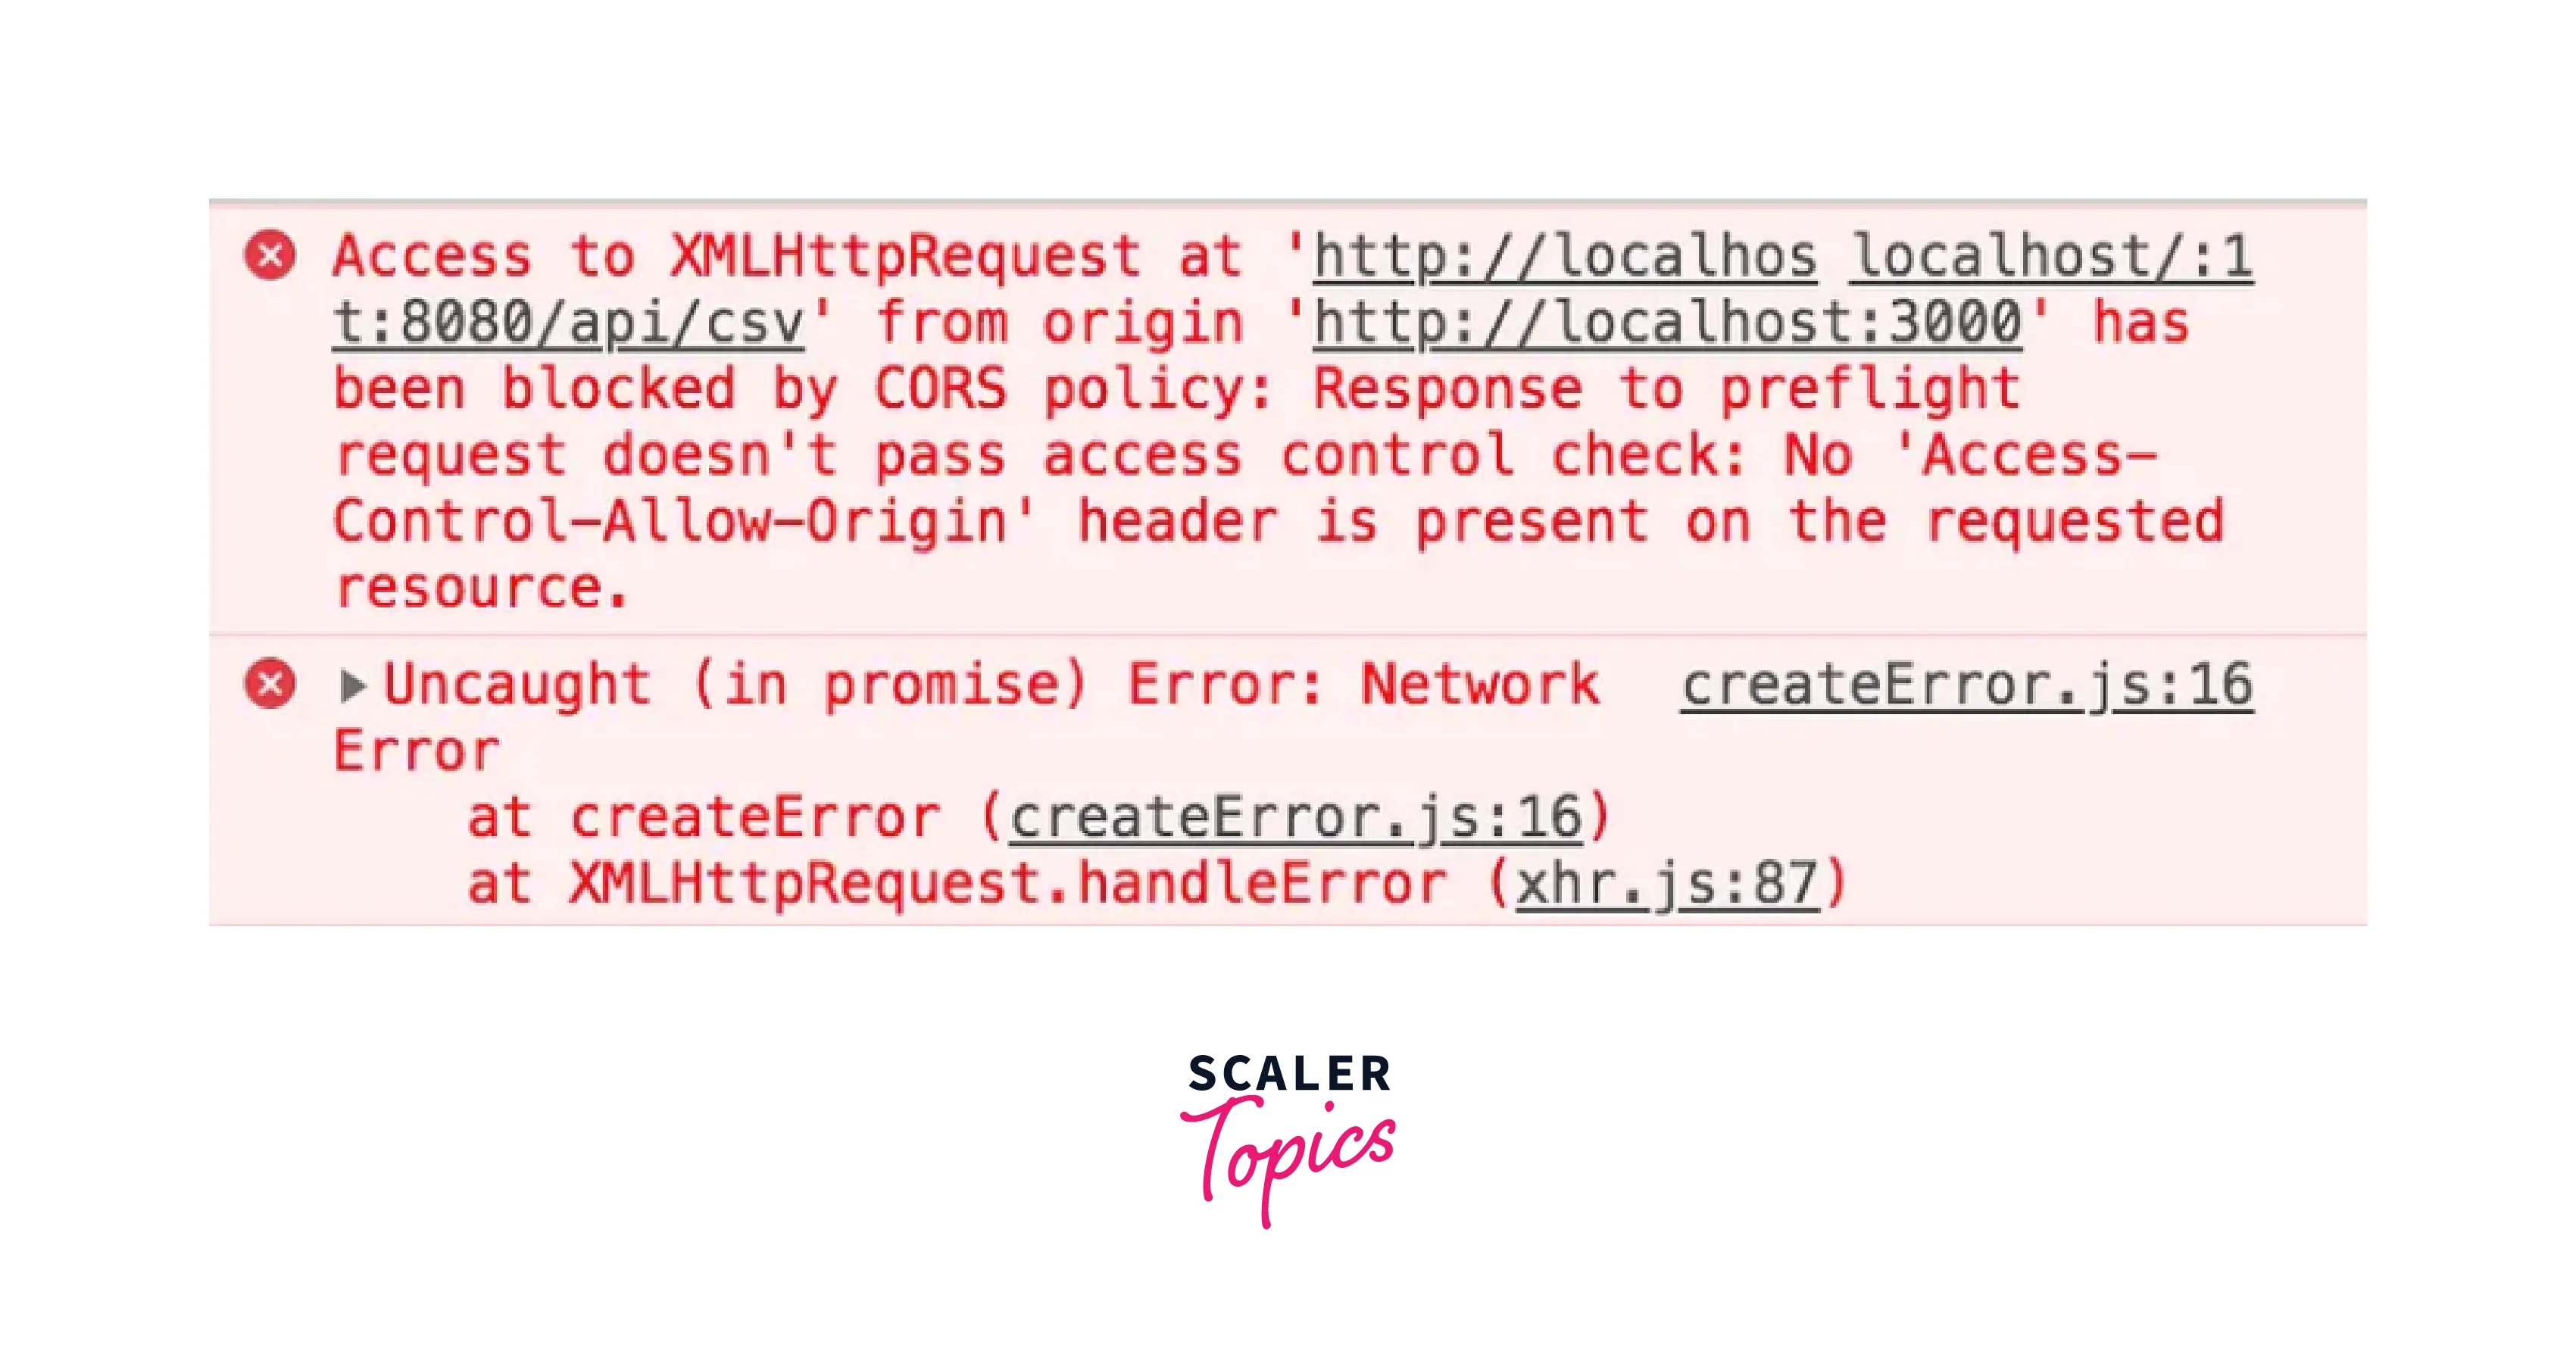
If we inspect the page and see the console, we will see the following error:
Access to fetch at 'https://nodejs-using-github.herokuapp.com/' from origin 'http://localhost:3000' has been blocked by CORS policy: No 'Access-Control-Allow-Origin' header is present on the requested resource. If an opaque response serves your needs, set the request's mode to 'no-cors' to fetch the resource with CORS disabled.

In the next sections, we will see what is CORS and how to fix this error.
What is CORS (Cross-Origin Resource Sharing)?
CORS stands for Cross-Origin Resource Sharing,
which is an HTTP header based mechanism that helps the server to tell the browser,
from which all domain requests can be made (except the same domain).
That is, in our case, the Node.js server hosted at https://nodejs-using-github.herokuapp.com/,
does not tell the browser that request can be made from http://localhost:3000.
When this happens, your browser will throw an error as seen earlier.
Why CORS (Cross-Origin Resource Sharing)?
The next question that would come to your mind is why do we really need this mechanism.
Imagine you are logged into your bank account or any social media website, then you visit a malicious website.
This malicious website could run some scripts in the background to make API calls to your banking or social media to get your personal details.
To prevent this, your browser checks if the request to the banking or social media server can be made from the malicious website and throws the CORS error.
So CORS exists to share certain resources between trusted third-parties (across different origins/domains), hence the name Cross-Origin Resource Sharing.
How to configure CORS in Node.js
Since we are clear about what and why is CORS required, let’s see how to enable CORS in the Node.js application.
You may clone the Node.js code from this repo.
Once the project is cloned, open it in your code editor and install cors package.
Now open index.js and update it with the following code:
index.js
1const express = require("express")
2const cors = require("cors")
3const app = express()
4const port = process.env.PORT || 3000
5
6const whitelist = ["http://localhost:3000"]
7const corsOptions = {
8 origin: function (origin, callback) {
9 if (!origin || whitelist.indexOf(origin) !== -1) {
10 callback(null, true)
11 } else {
12 callback(new Error("Not allowed by CORS"))
13 }
14 },
15 credentials: true,
16}
17app.use(cors(corsOptions))
18
19app.get("/", (req, res) => {
20 res.send({ message: "Hello World!" })
21})
22
23app.listen(port, () => {
24 console.log(`Example app listening at Port: ${port}`)
25})
Here we check if the origin (client’s domain) is in the whitelist, then we tell the clients that requests can be made.
If it is not in the list then we throw an error saying the client is not allowed to make CORS requests to this server.
The domain should not have any trailing slashes (/)
We can deploy the changes to Heroku and see if this works.
Now if you reload your page, you should be able to see the message.
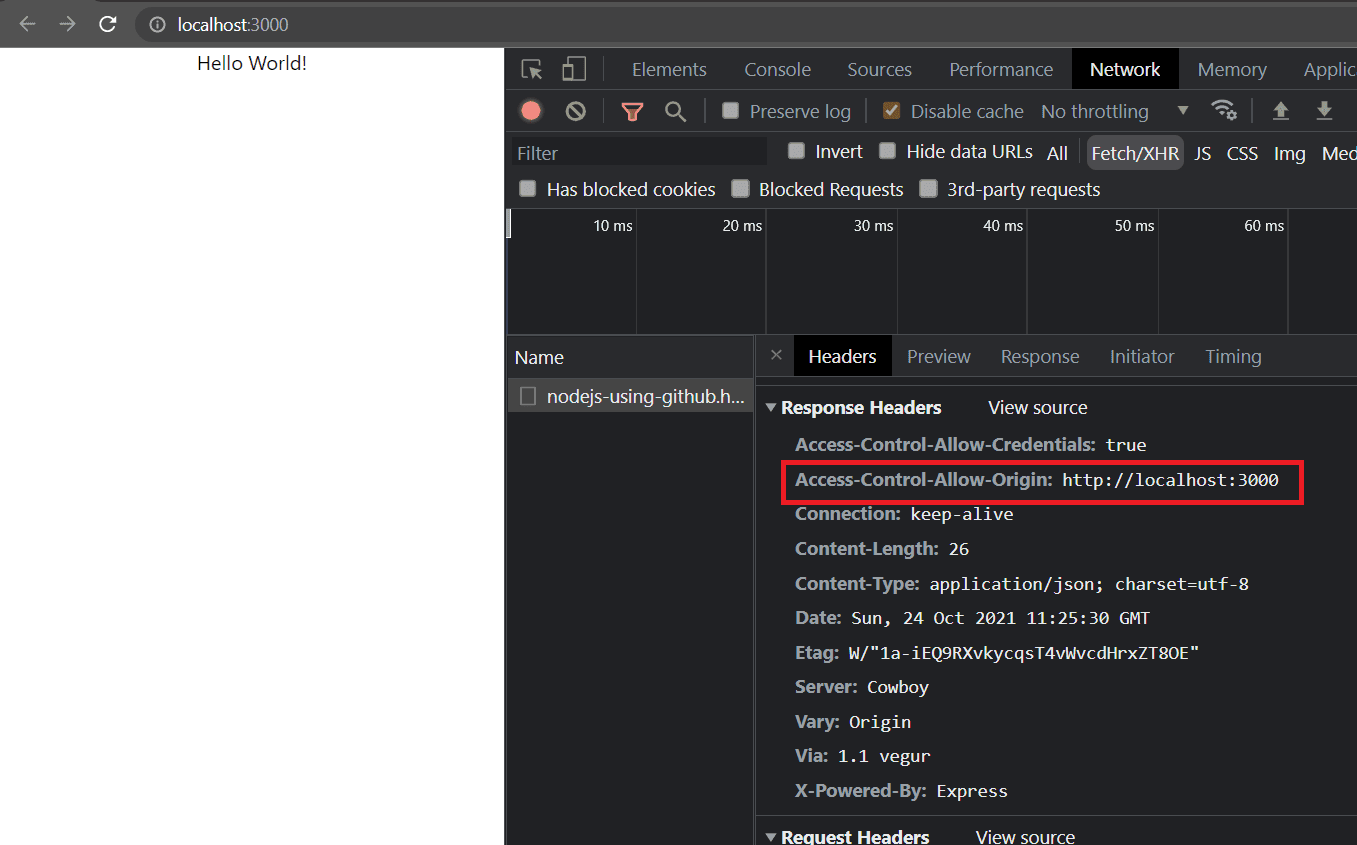
You will also see that a response header called Access-Control-Allow-Origin has been added with the value http://localhost:3000.
Making CORS domains configurable
If you have multiple client origins to be connected to you, and you want them to be configurable, you can do so by using environment variables:
index.js
1const express = require("express")
2const cors = require("cors")
3const app = express()
4const port = process.env.PORT || 3000
5
6const domainsFromEnv = process.env.CORS_DOMAINS || ""
7
8const whitelist = domainsFromEnv.split(",").map(item => item.trim())
9
10const corsOptions = {
11 origin: function (origin, callback) {
12 if (!origin || whitelist.indexOf(origin) !== -1) {
13 callback(null, true)
14 } else {
15 callback(new Error("Not allowed by CORS"))
16 }
17 },
18 credentials: true,
19}
20app.use(cors(corsOptions))
21
22app.get("/", (req, res) => {
23 res.send({ message: "Hello World!" })
24})
25
26app.listen(port, () => {
27 console.log(`Example app listening at Port: ${port}`)
28})
Testing environment variables locally
To test environment variables locally, you can install the package called dotenv:
Now create a file called .env in the root directory of your project with the domains:
1CORS_DOMAINS = http://localhost:3000, http://localhost:3001, https://example.com
Update index.js to use the dotenv package:
index.js
1const express = require("express")
2const cors = require("cors")
3const app = express()
4const port = process.env.PORT || 3000
5
6if (process.env.NODE_ENV !== "production") {
7 require("dotenv").config()
8}
9
10const domainsFromEnv = process.env.CORS_DOMAINS || ""
11
12const whitelist = domainsFromEnv.split(",").map(item => item.trim())
13
14const corsOptions = {
15 origin: function (origin, callback) {
16 if (!origin || whitelist.indexOf(origin) !== -1) {
17 callback(null, true)
18 } else {
19 callback(new Error("Not allowed by CORS"))
20 }
21 },
22 credentials: true,
23}
24app.use(cors(corsOptions))
25
26app.get("/", (req, res) => {
27 res.send({ message: "Hello World!" })
28})
29
30app.listen(port, () => {
31 console.log(`Example app listening at Port: ${port}`)
32})
Here we made sure that .env files are loaded only in non-production environments.
It is recommended to store the configurations in the server host rather than in .env files for production.
Remember to add
.env*to the.gitignorefile so that you don’t accidentally push them to the repo.
Configuring environment files in heroku
With our latest code, we can configure environment files in the heroku settings:
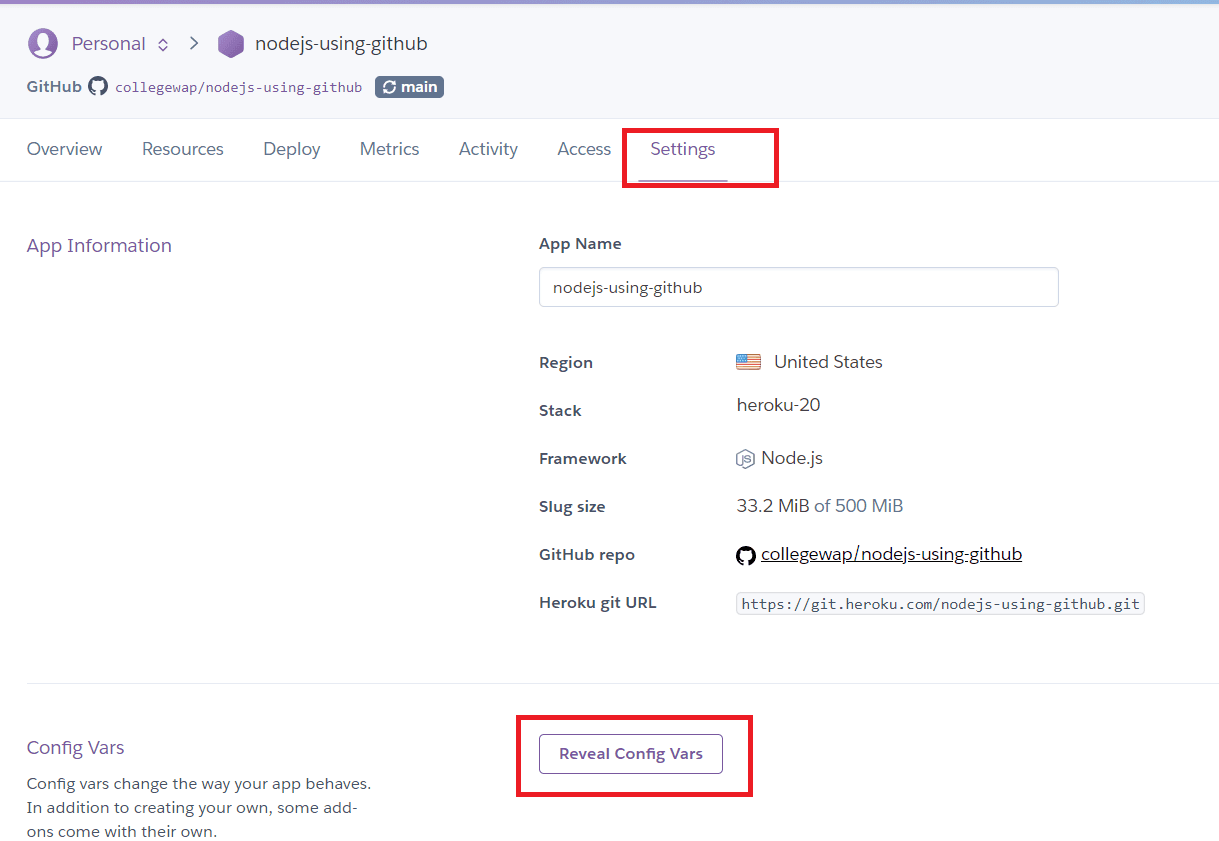
Go to your project settings and click on «Reveal Config Vars». Now you can provide the key and values here and click on «Add»
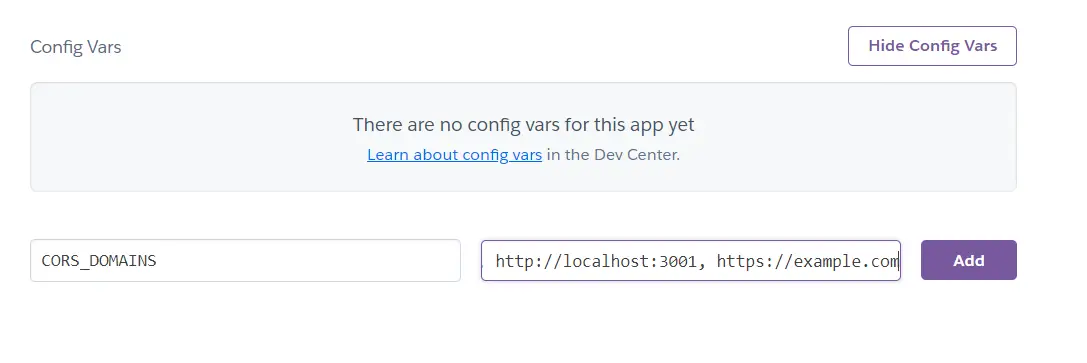
Once added, you can push your changes and see if the changes work.
If you have liked article, stay in touch with me by following me on twitter.