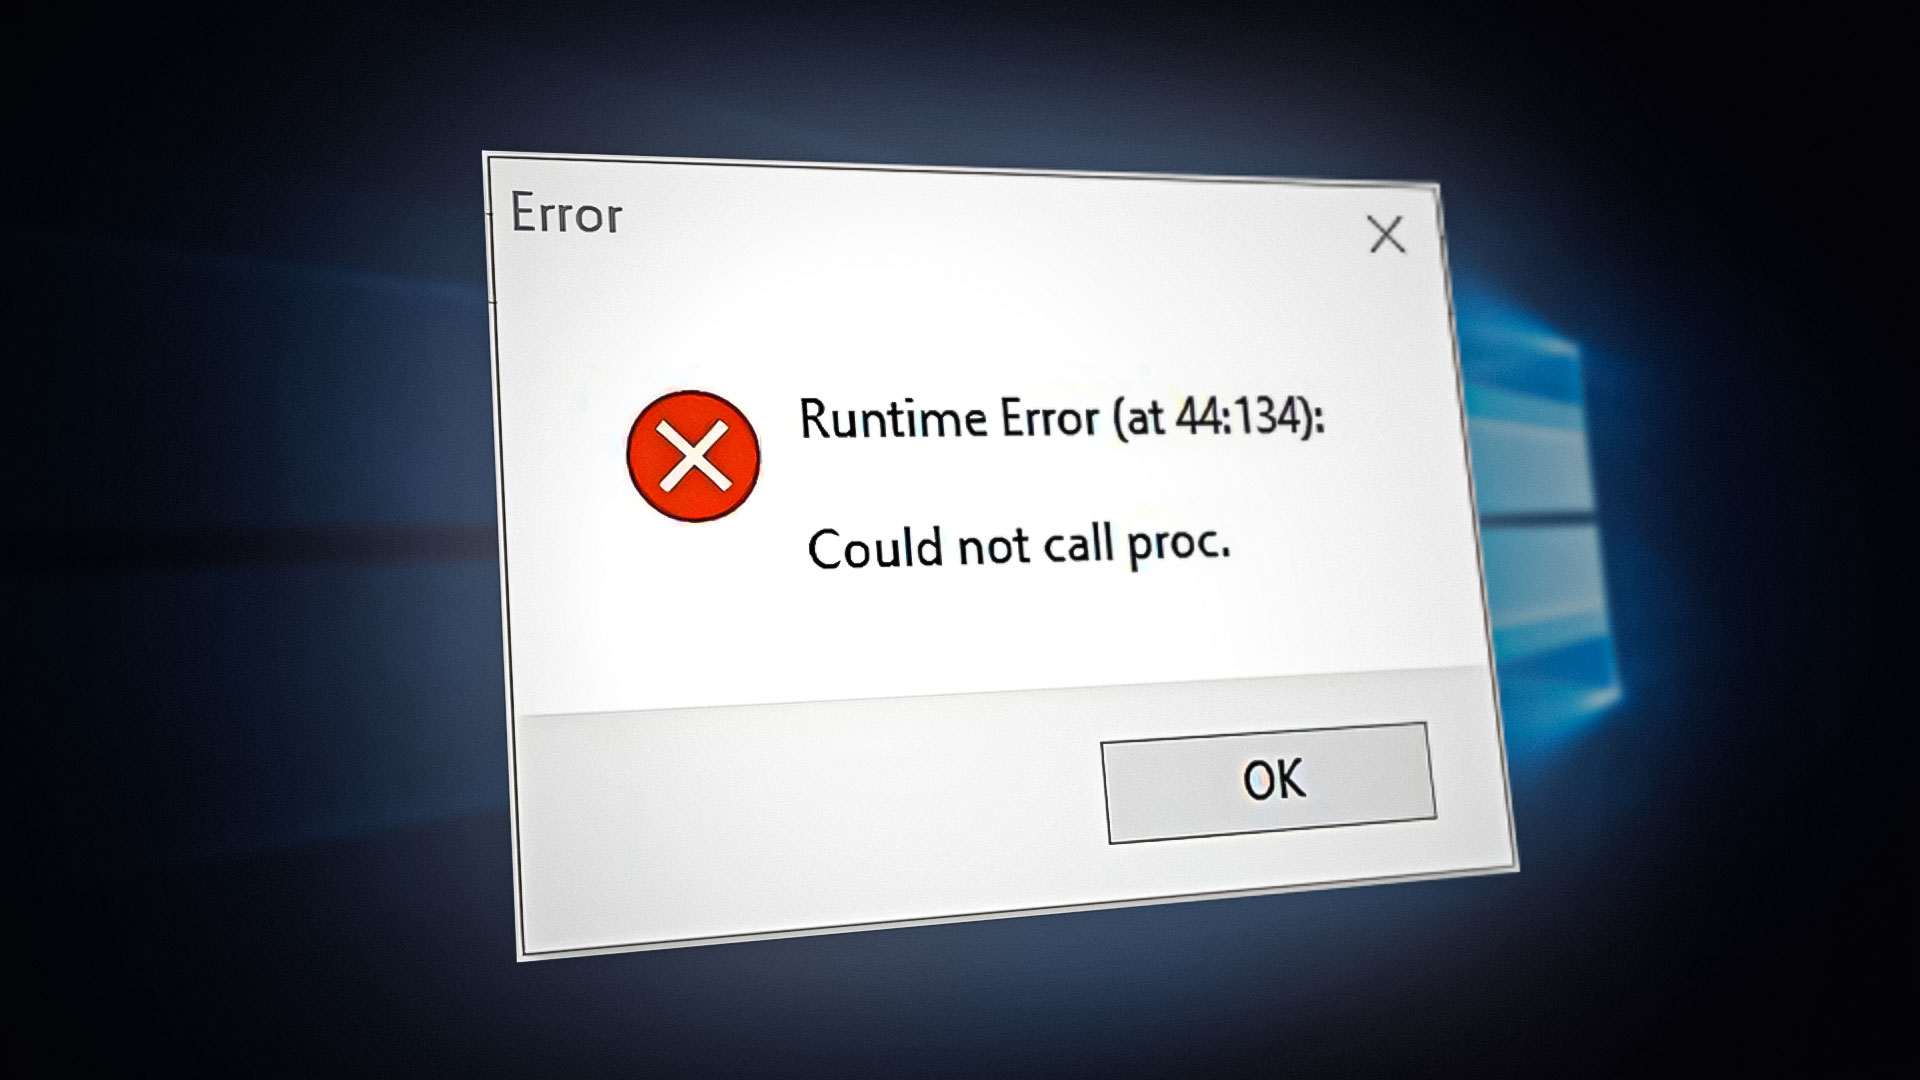
При установке приложения появилась Runtime Error Could not call proc. Если что, я устанавливал Euro Truck Simulator 2. На ПК стоит Windows 10 со всеми, кажется, обновлениями. Сам ПК довольно слабенький, но для игрушки должно хватить. Подскажите, что можно сделать?
Решение
«Runtime Error Could not call proc» — это крайне непростая ошибка, которая возникает при выполнении тех или иных приложений на Windows. От XP до последних сборок Windows 11 — ошибке могут быть подвержены все пользователи.
К сожалению, одного надежного решения для этой ошибки не существует: приходится перебирать доступные способы и надеяться на лучшее. Чтобы попробовать исправить ошибку Runtime, можно сделать следующее:
- запустите приложение от администратора;
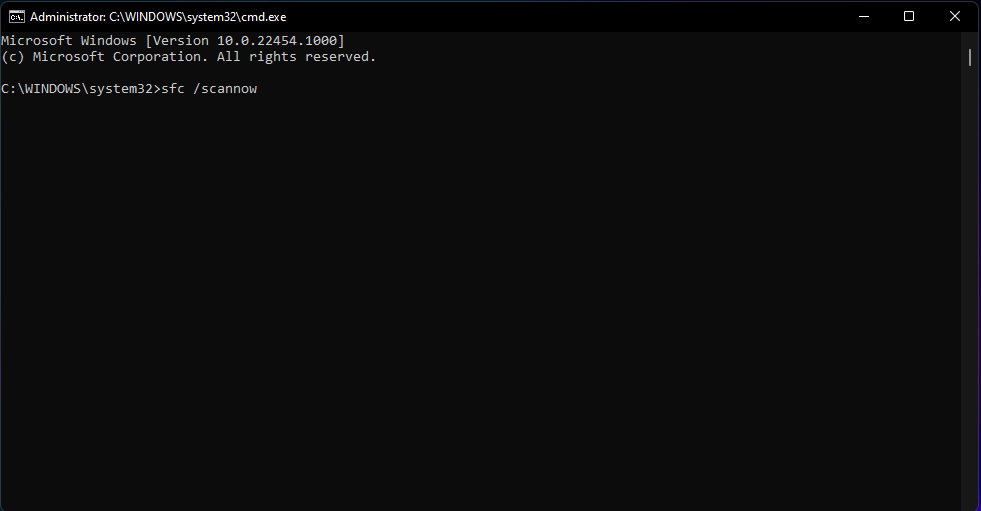
- пустите в дело утилиты SFC и DISM:
- нажмите WIN+R;
- вставьте CMD и нажмите CTRL+SHIFT+ENTER;
- выполните в консоли команды:
- sfc/scannow
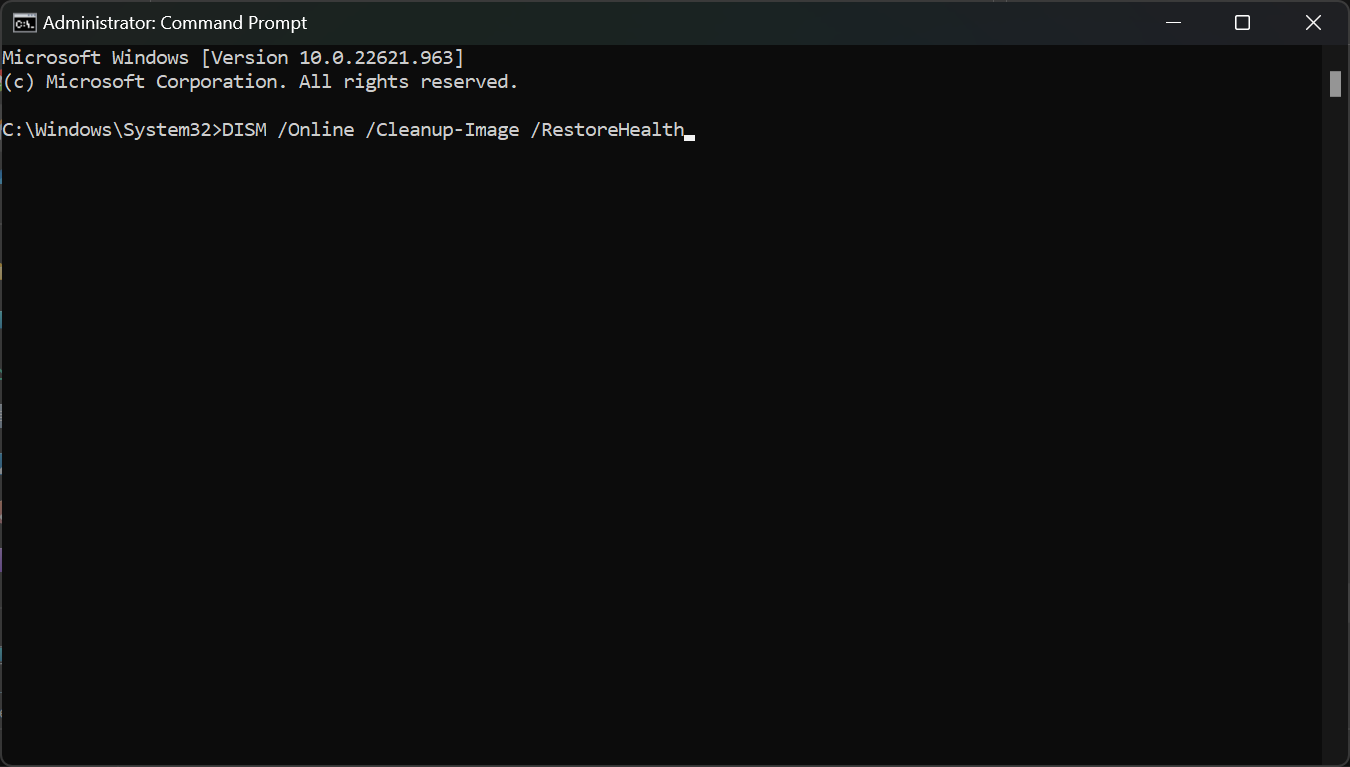
- DISM /Online /Cleanup-Image /CheckHealth
- DISM /Online /Cleanup-Image /ScanHealth
- DISM /Online /Cleanup-Image /RestoreHealth
- перезагрузите ПК;
- поэкспериментируйте с режимами совместимости в свойствах исполняющего файла приложения;
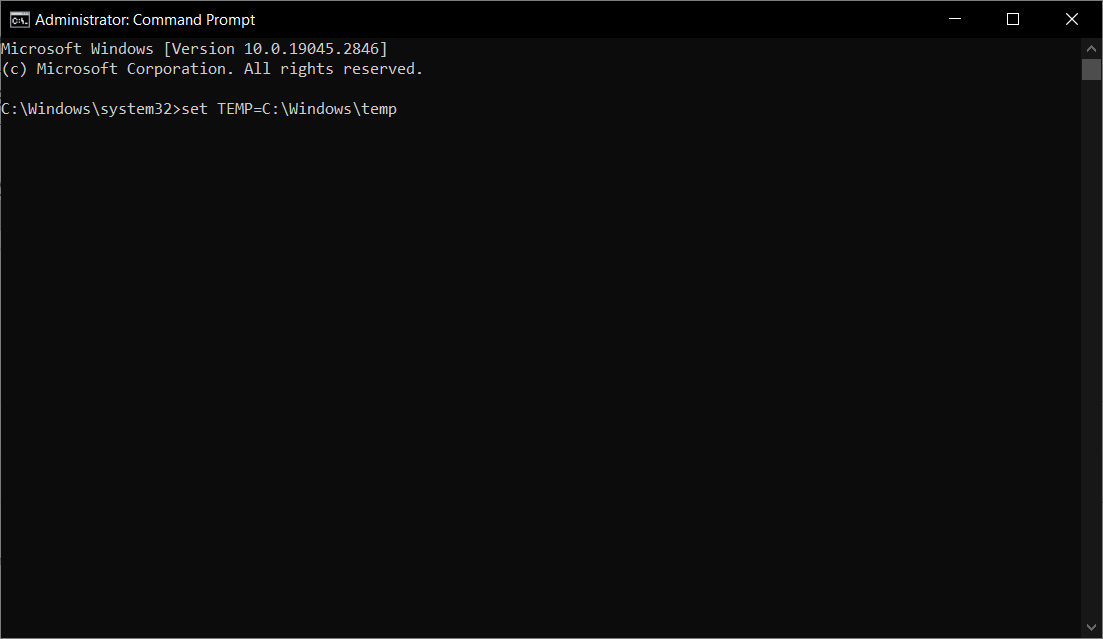
- модифицируйте папку %temp%:
- нажмите WIN+R;
- вставьте CMD и нажмите CTRL+SHIFT+ENTER;
- выполните в консоли команды:
- set TEMP=C:\Windows\temp
- set TMP=C:\Windows\tmp
- cd «%USERPROFILE%\Downloads»
- выполните чистую загрузку ОС:
- нажмите WIN+S и найдите элемент Конфигурация системы;
- перейдите во вкладку Службы;
- поставьте галочку на Не отображать службы Майкрософт;
- нажмите на Отключить все;
- перезагрузите ПК;
- проверьте наличие ошибки.
Here’s how to fix the Runtime Error: Could not call proc
by Claudiu Andone
Oldtimer in the tech and science press, Claudiu is focused on whatever comes new from Microsoft. His abrupt interest in computers started when he saw the first Home… read more
Updated on
- The Runtime Error: Could not call proc message occurs when the software you’re trying to install is missing some files.
- Redownloading and reinstalling the app again usually fixes this problem quickly but we have other solutions as well.
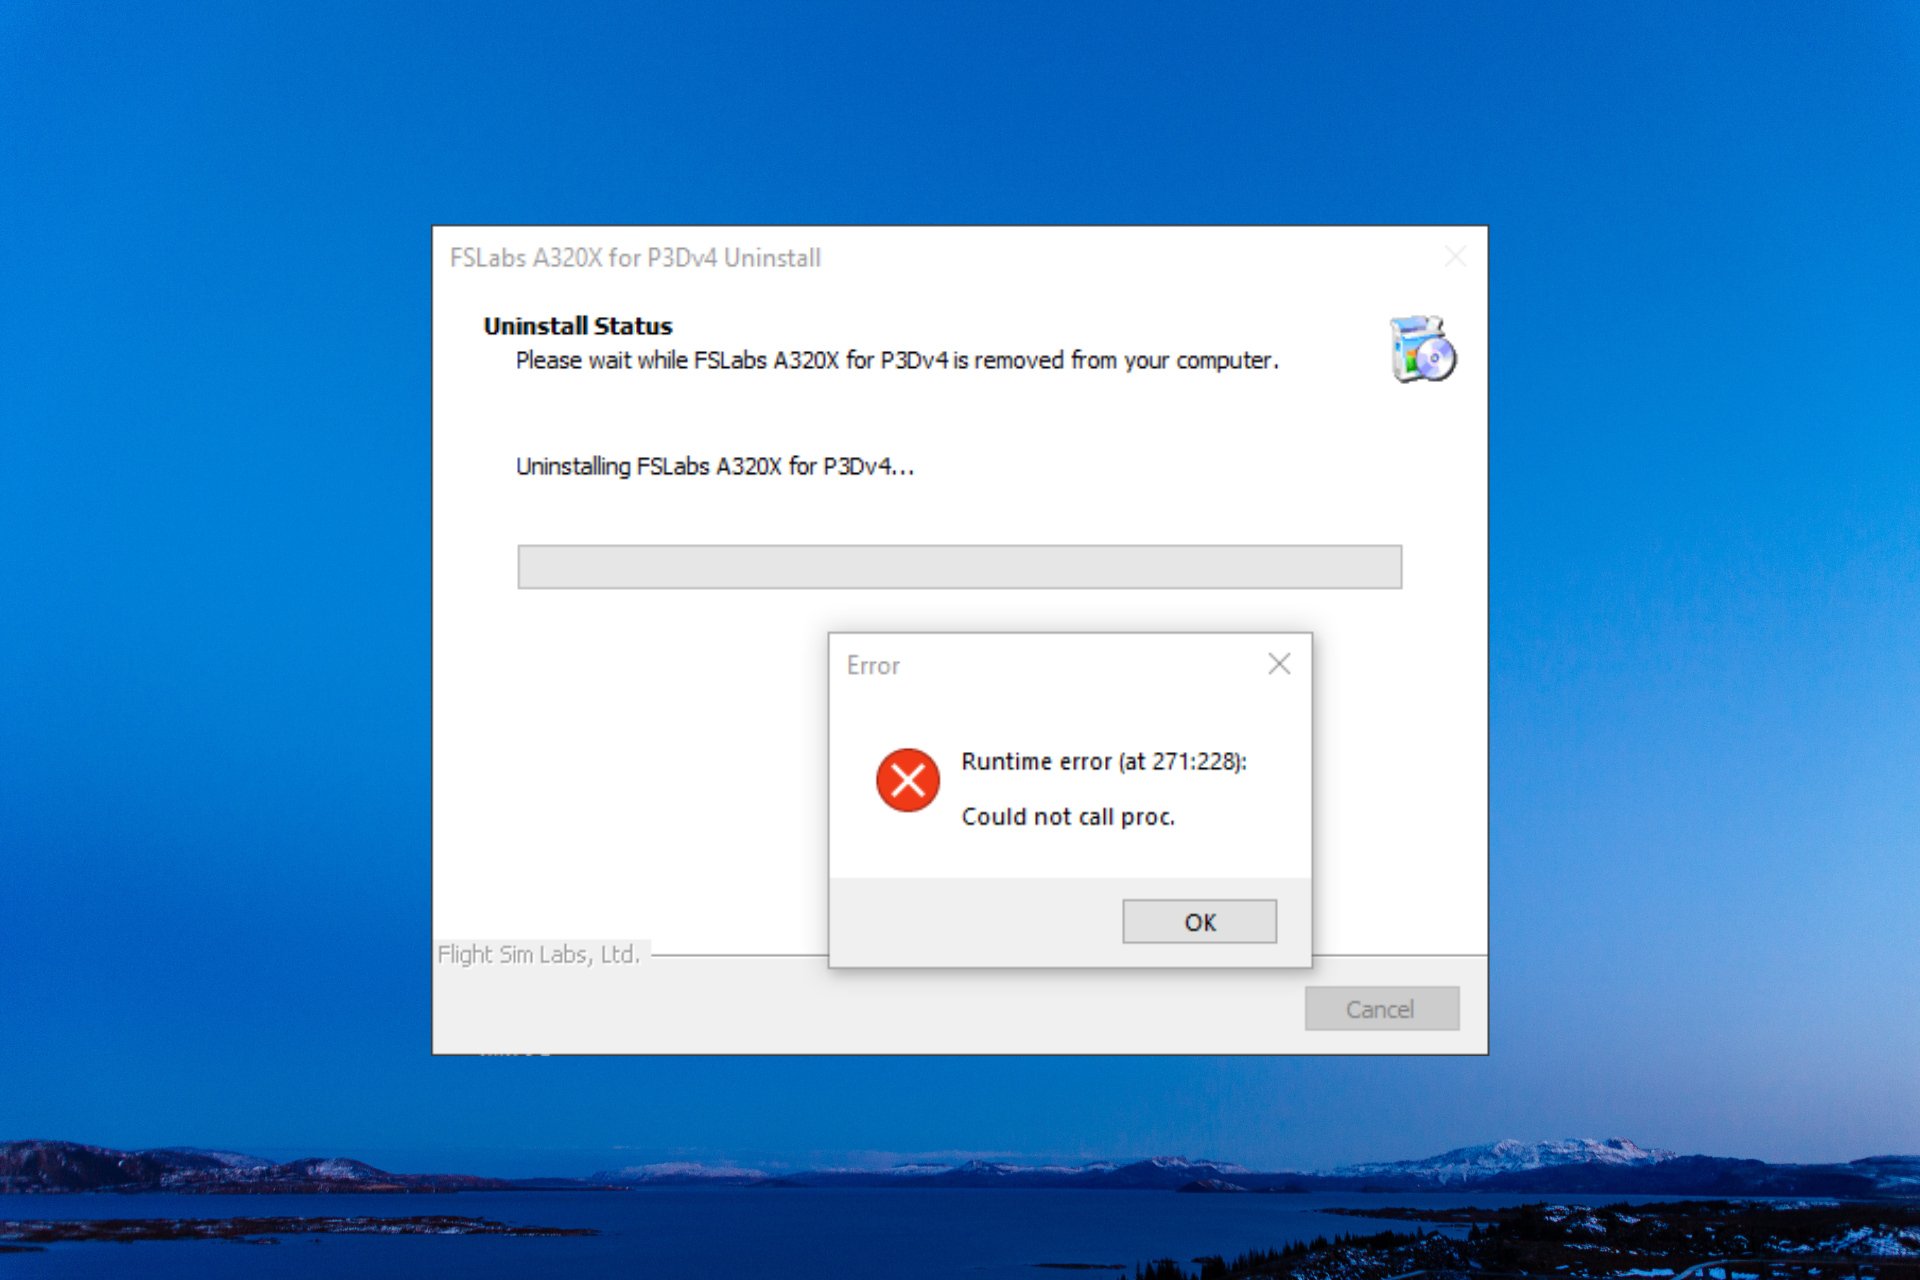
Runtime errors occur when running or executing a program that hangs or crashes, displaying an error message. The Could not call proc part means the app or script can’t execute a function or procedure. This often occurs due to a missing library or dependency.
Why do I get the Runtime error: Could not call proc?
There are many causes of the Runtime error: Could not call proc, but we will highlight the most probable:
- The PC doesn’t meet the system requirements – If you’re trying to install software or a game without meeting the minimum system requirements, this error may occur.
- Memory leaks – Due to memory leaks, although you have the right amount of RAM or GPU memory, the app is detecting less.
- Corrupted installer – If the installer download didn’t finish properly, you might have a corrupted software kit, and installing it will return this error instead.
- Virus or malware infection – Viruses and malware are known to mess with the system and files and if some of the installation files are corrupted, you will get this runtime error.
Now that we know the possible causes for the Runtime error: Could not call proc, let’s try to fix it.
How do I fix the Runtime error: Could not call proc?
Before getting into more complicated solutions, let’s check a few trusted methods for quicker recovery:
- Check if your device meets the app system requirements.
- Try to download the app installer again and ensure you have all the files for it.
- Close all the programs and processes you don’t need before running the installer.
- Run a full scan using a reliable antivirus.
If these preliminary measures didn’t fix the problem, apply the solutions below.
1. Change the Temp folder location
- Click the Start button, type cmd, and select Run as administrator from the results.
- Type or paste the following commands one by one, pressing Enter after each:
set TEMP=C:\Windows\temp
set TMP=C:\Windows\tmp
- Now, try to relaunch the installer and see if the error persists.
As weird as it seems, if the Temp folder doesn’t have the right location, it can cause runtime errors while installing an application. Setting things right will solve the issue like magic.
2. Run SFC and DISM scans
- Click the Windows button, type cmd, and select Run as administrator from the results.
- Type or paste the following command and press Enter to run it:
sfc /scannow
- Wait for the scan to finish, then paste the following command to execute the DISM scan and press Enter:
DISM /Online /Cleanup-Image /RestoreHealth
- Wait for the scan to finish, then restart your PC and check if the error persists.
In case you find the steps below too technical and time-consuming, there is another method we tested for you.
It’s more likely to fix this runtime error code using a dedicated PC repair tool, as it can diagnose the system and replace corrupted system files immediately.
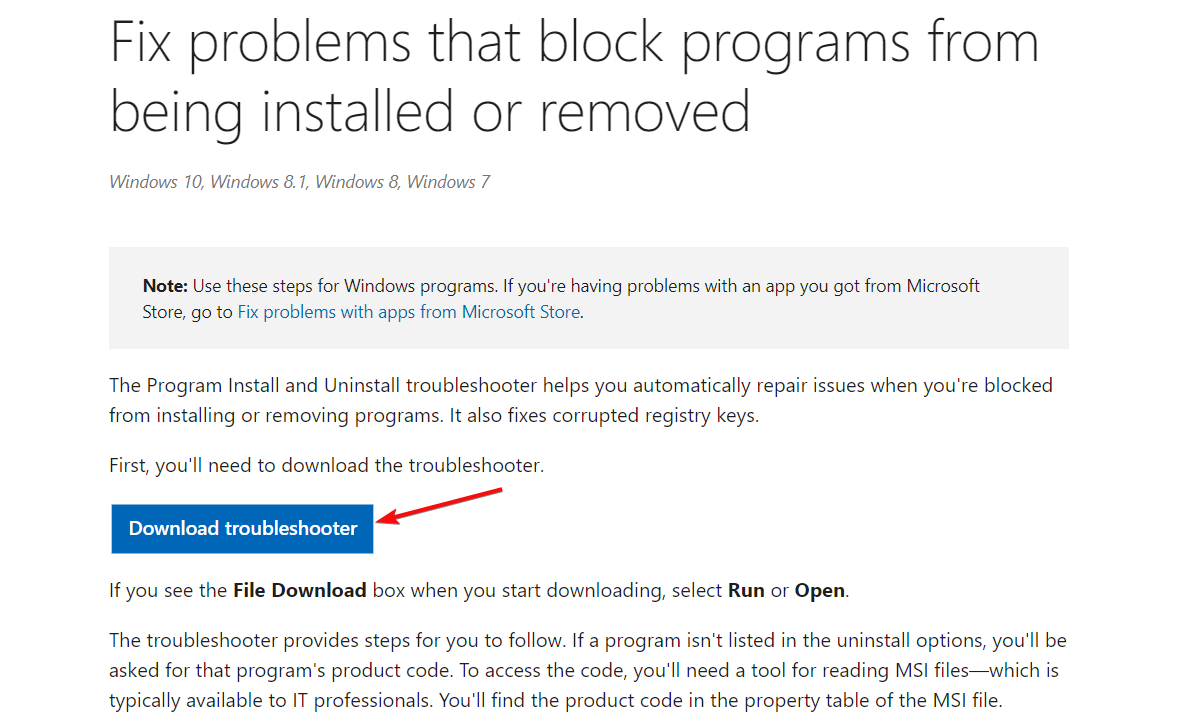
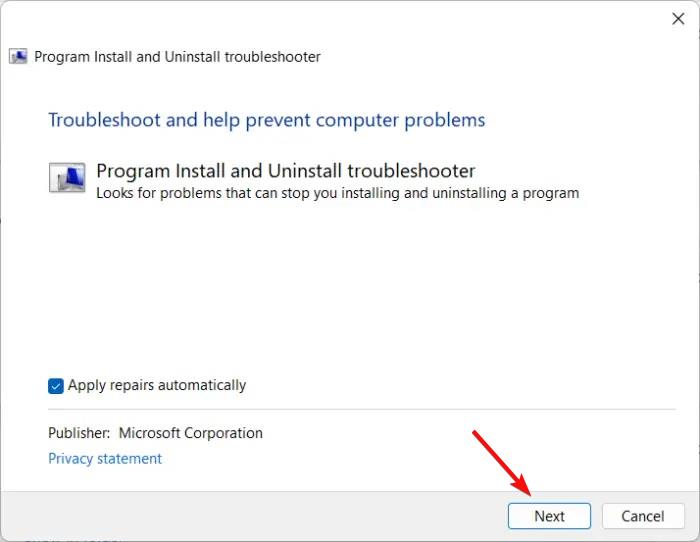
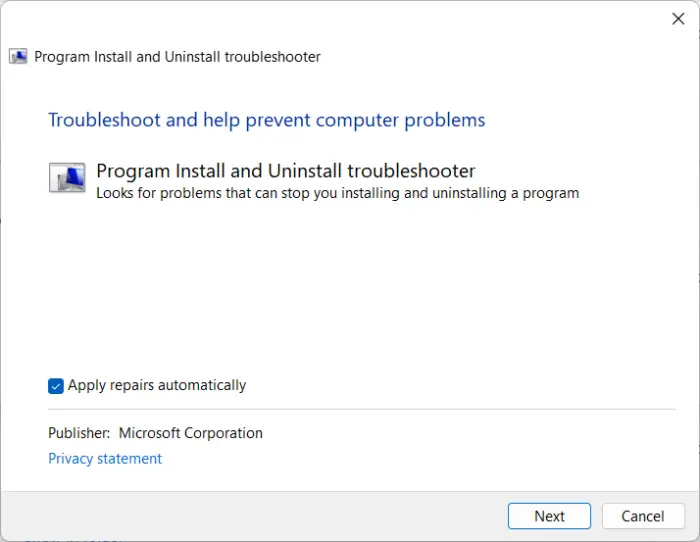
3. Use the Program Install and Uninstall troubleshooter
- Go to Microsoft’s official page and download the Program Install and Uninstall troubleshooter.

- Double-click the installer, then hit Next and Install.

- Select the program you’re having trouble installing and follow the on-screen instructions to fix it.
- 3 Ways to Block Internet Access for Specific Apps in Windows 11
- 4 Ways to Fix LiveKernelEvent 144 Error on Windows 11
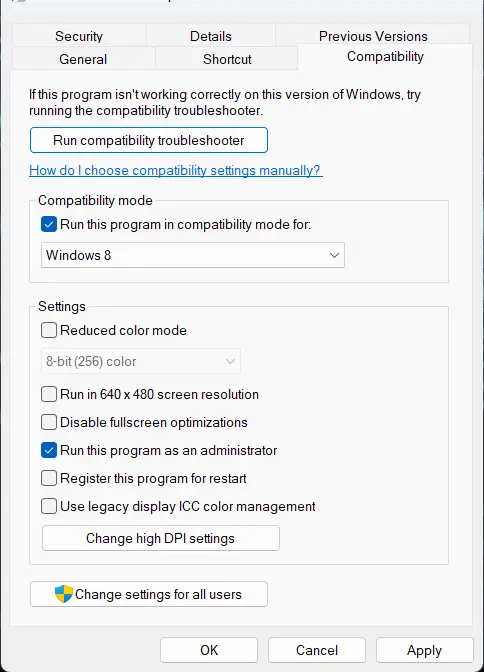
4. Run the installer in Compatibility mode
- Right-click on the apps shortcut file on your PC and select Properties.
- Go to the Compatibility tab.
- Check the option Run this program in compatibility mode for and select Windows 8 from the drop-down below.

- Now check the option Run this program as an administrator.
- Click on OK to save changes.
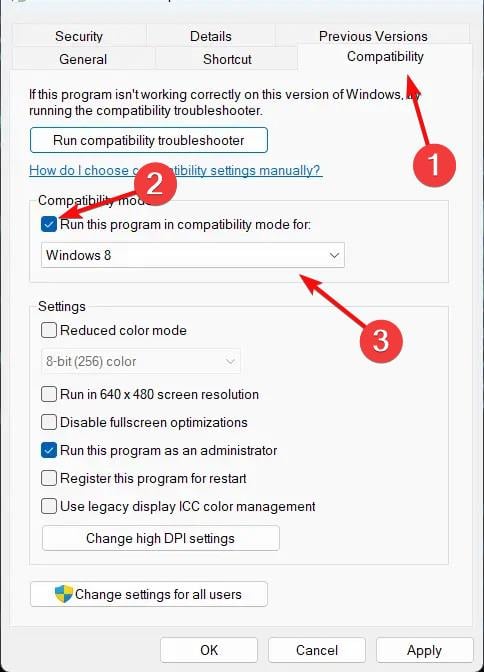
Maybe the app you’re trying to run is not compatible with Windows 11 or even with the older Windows 10, and this solution will fix that problem.
All the solutions we highlighted above can also be applied to Windows 10 without any problems.
We also recommend exploring our runtime errors guides for more information regarding this problem.
If you have any questions or suggestions, we wait for your feedback in the comments section below.
![]()
If the Runtime Error, Could not call proc keeps occurring on your Windows 11/10 computer, then this post may be able to help you. You can follow some simple steps to fix this error.

What does a Runtime error mean?
Runtime errors are errors that occur at the time of running or executing a program. When this error occurs, the program may hang or crash displaying an error message. There are many reasons for a runtime error, like when the program enters an infinite loop, it triggers the runtime error. These errors usually occur due to Memory leak, Programming errors, corrupted program or system files, etc.
What does Could not call proc mean?
The “Could not call proc” error means the program or script is unable to execute a function or procedure. This usually occurs due to a technical issue such as a missing library or dependency.
To fix the Runtime Error, Could not call proc, restart your device and see if it makes the problem go away. However, if that doesn’t help, continue with the fixes listed below:
- Check System Requirements
- Run SFC and DISM
- Use Program Install and Uninstall Troubleshooter
- Run the Program as an Admin in Compatibility Mode
- Modify %temp% Folder Location
- Troubleshoot in Clean Boot State
- Reinstall the program or game that is giving this error
Now let us see these in detail.
1] Check System Requirements
Before getting started with different troubleshooting methods, check if your device meets the minimum System requirements. It’s possible your device doesn’t meet the minimum requirements to run the app or game.
2] Run SFC and DISM
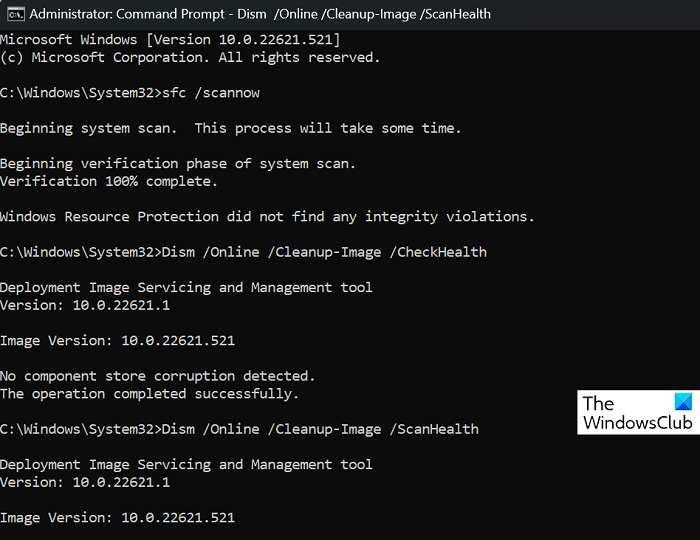
Runtime error could not call proc may occur due to corrupted/damaged Windows system files or system image corruptions. Run SFC and DISM to scan and repair these. Here’s how:
- Click on the Windows key and search for Command Prompt.
- Click on Run as Administrator.
- Type the following commands one by one and hit Enter:
For SFC:
sfc/scannow
For DISM:
DISM /Online /Cleanup-Image /CheckHealth
DISM /Online /Cleanup-Image /ScanHealth
DISM /Online /Cleanup-Image /RestoreHealth
- Restart your device once done and check if the Kernelbase.dll making applications crash is fixed.
3] Use Program Install and Uninstall Troubleshooter
Running the Program Install and Uninstall Troubleshooter can help Windows users automatically repair issues related to installing or removing programs. This troubleshooter can also help fix and repair corrupted registry keys. Here’s how you can use it:
- Download the Program Install and Uninstall Troubleshooter from Microsoft’s official download page.
- Click on the downloaded file, and the troubleshooter will open.
- Click on Next and select Installing.
- A program list will appear now. Select the program or game you’re facing the issue with.
- Finally, click on Next to start the troubleshooting.
4] Run the Program as an Admin in Compatibility Mode
The runtime error may occur on your Windows device due to a lack of permissions. Try running the application as an administrator in compatibility mode to fix the error. Here is how you can do it:
- Right-click on the apps shortcut file on your device.
- Click on Properties and navigate to the Compatibility tab.
- Check the option Run this program in compatibility mode for and select Windows 8 in the drop-down below.
- Now check the option Run this program as an administrator.
- Click on OK to save changes.
5] Modify %temp% Folder Location
Improper location of the %temp% folder can also cause runtime errors while installing an application. Modify the folder’s location to its default and check if the error gets fixed. Here’s how:
- Click on Start, search for cmd and select Run as Administrator.
- Now type these commands one by one and hit Enter.
set TEMP=C:Windowstemp
set TMP=C:Windowstmp
cd "%USERPROFILE%Downloads"
- Close the Command Prompt and try relaunching the program.
6] Troubleshoot in Clean Boot
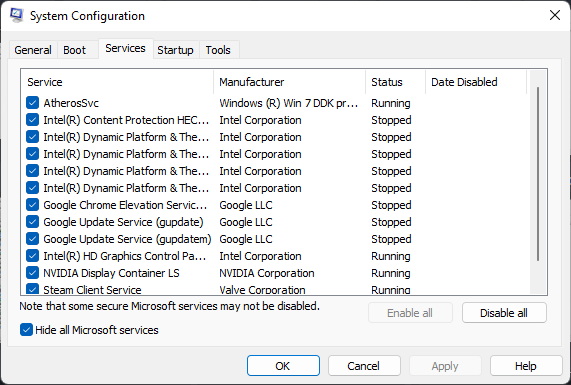
Third-party applications can sometimes cause apps and games to malfunction by blocking them. Performing a Clean Boot ensures your operating system loads with minimal system files and device drivers. Here’s how you can perform a clean boot:
- Click on Start, search for System Configuration and open it.
- Navigate to the General tab and check the Selective Startup option and the Load System Services Option under it.
- Then navigate to the Services tab and check the option Hide all Microsoft services.
- Click on Disable all at the bottom right corner and hit Apply then Ok to save changes.
If the runtime error doesn’t appear in the Clean Boot State, you may need to manually enable one process after another and see who the culprit is. Once you’ve identified it, disable or uninstall the software.
7] Reinstall the program or game that is giving this error
If none of these steps can help you, consider reinstalling the game. This has been known to help most gamers get over this error.
How to fix a Runtime Error on Windows?
There are many different runtime errors, and the method to fix them is not the same. If you receive it due to Microsoft Visual C++ Runtime Library, you can download the latest Microsoft Visual C++ Redistributable Package from the Microsoft official website and install it on your system.
Download Windows Speedup Tool to fix errors and make PC run faster
If the Runtime Error, Could not call proc keeps occurring on your Windows 11/10 computer, then this post may be able to help you. You can follow some simple steps to fix this error.
What does a Runtime error mean?
Runtime errors are errors that occur at the time of running or executing a program. When this error occurs, the program may hang or crash displaying an error message. There are many reasons for a runtime error, like when the program enters an infinite loop, it triggers the runtime error. These errors usually occur due to Memory leak, Programming errors, corrupted program or system files, etc.
What does Could not call proc mean?
The “Could not call proc” error means the program or script is unable to execute a function or procedure. This usually occurs due to a technical issue such as a missing library or dependency.
To fix the Runtime Error, Could not call proc, restart your device and see if it makes the problem go away. However, if that doesn’t help, continue with the fixes listed below:
- Check System Requirements
- Run SFC and DISM
- Use Program Install and Uninstall Troubleshooter
- Run the Program as an Admin in Compatibility Mode
- Modify %temp% Folder Location
- Troubleshoot in Clean Boot State
- Reinstall the program or game that is giving this error
Now let us see these in detail.
1] Check System Requirements
Before getting started with different troubleshooting methods, check if your device meets the minimum System requirements. It’s possible your device doesn’t meet the minimum requirements to run the app or game.
2] Run SFC and DISM
Runtime error could not call proc may occur due to corrupted/damaged Windows system files or system image corruptions. Run SFC and DISM to scan and repair these. Here’s how:
- Click on the Windows key and search for Command Prompt.
- Click on Run as Administrator.
- Type the following commands one by one and hit Enter:
For SFC:
sfc/scannow
For DISM:
DISM /Online /Cleanup-Image /CheckHealth
DISM /Online /Cleanup-Image /ScanHealth
DISM /Online /Cleanup-Image /RestoreHealth
- Restart your device once done and check if the Kernelbase.dll making applications crash is fixed.
3] Use Program Install and Uninstall Troubleshooter
Running the Program Install and Uninstall Troubleshooter can help Windows users automatically repair issues related to installing or removing programs. This troubleshooter can also help fix and repair corrupted registry keys. Here’s how you can use it:
- Download the Program Install and Uninstall Troubleshooter from Microsoft’s official download page.
- Click on the downloaded file, and the troubleshooter will open.
- Click on Next and select Installing.
- A program list will appear now. Select the program or game you’re facing the issue with.
- Finally, click on Next to start the troubleshooting.
4] Run the Program as an Admin in Compatibility Mode
The runtime error may occur on your Windows device due to a lack of permissions. Try running the application as an administrator in compatibility mode to fix the error. Here is how you can do it:
- Right-click on the apps shortcut file on your device.
- Click on Properties and navigate to the Compatibility tab.
- Check the option Run this program in compatibility mode for and select Windows 8 in the drop-down below.
- Now check the option Run this program as an administrator.
- Click on OK to save changes.
5] Modify %temp% Folder Location
Improper location of the %temp% folder can also cause runtime errors while installing an application. Modify the folder’s location to its default and check if the error gets fixed. Here’s how:
- Click on Start, search for cmd and select Run as Administrator.
- Now type these commands one by one and hit Enter.
set TEMP=C:\Windows\temp
set TMP=C:\Windows\tmp
cd "%USERPROFILE%\Downloads"
- Close the Command Prompt and try relaunching the program.
6] Troubleshoot in Clean Boot
Third-party applications can sometimes cause apps and games to malfunction by blocking them. Performing a Clean Boot ensures your operating system loads with minimal system files and device drivers. Here’s how you can perform a clean boot:
- Click on Start, search for System Configuration and open it.
- Navigate to the General tab and check the Selective Startup option and the Load System Services Option under it.
- Then navigate to the Services tab and check the option Hide all Microsoft services.
- Click on Disable all at the bottom right corner and hit Apply then Ok to save changes.
If the runtime error doesn’t appear in the Clean Boot State, you may need to manually enable one process after another and see who the culprit is. Once you’ve identified it, disable or uninstall the software.
7] Reinstall the program or game that is giving this error
If none of these steps can help you, consider reinstalling the game. This has been known to help most gamers get over this error.
How to fix a Runtime Error on Windows?
There are many different runtime errors, and the method to fix them is not the same. If you receive it due to Microsoft Visual C++ Runtime Library, you can download the latest Microsoft Visual C++ Redistributable Package from the Microsoft official website and install it on your system.
Shubham is a graduate in Information Technology who likes to write about Windows Troubleshooting as well as Gaming Tips. He’s always engaged with new tech and gadgets. When not writing, he enjoys reading books, watching movies, and exploring new technologies.
When unwanted malware enters your computer, it directly affects how your system functions by corrupting the system files. This prevents you from uninstalling certain programs from your system. This causes the system to trigger the Runtime Error and you receive the “Runtime Error. Could not call proc” message.
In this guide, we will be showing you the methods to fix the Runtime Error. Could not call proc.
1. Perform the system scans
The major cause of this Runtime error is the presence of unwanted malware that causes the system to face corruption within its files. Therefore, performing the system scans will help remove the corruption from the affected system files through a complete scan. Below are the instructions for performing the system scans in Windows:
- Open the Windows Start Menu by pressing the Win key.
- Type “cmd” and right-click on the app.
- Select the “Run as administrator” option to gain administrative control over the app.

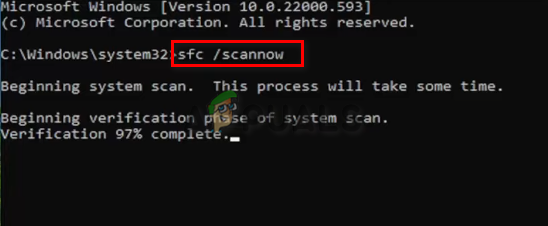
Running command prompt as administrator - Perform the system file checker by typing the following command and pressing the Enter key:
sfc /scannow

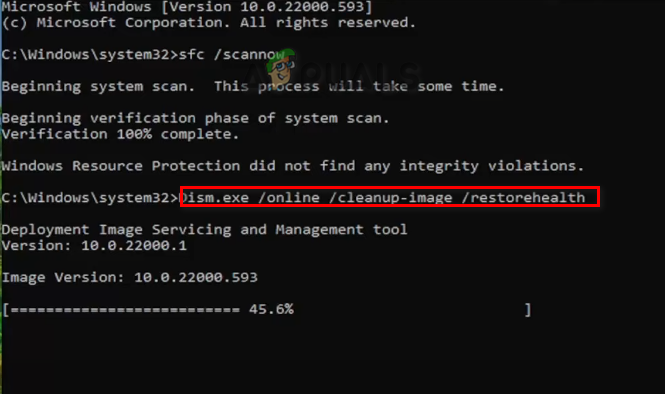
Running system file checker on the command prompt. - After the system files are checked and repaired, you must run the DISM command as well. Simply paste the following command into the command prompt and press the Enter key:
Dism.exe /online /cleanup-image /restorehealth

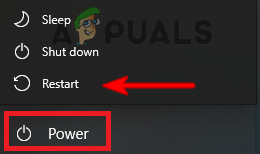
Running DISM Command on the Command Prompt - After each scan is completed, restart your computer.
- Open the Windows Start Menu and click on the Power option.
- Select Restart to perform a system restart.

Restarting the computer

2. Repair the application from Windows settings
Windows comes with a built-in feature that allows you to repair the corrupted programs and applications installed on your device. Therefore, performing an application repair will help you fix the application at fault causing the Runtime error. These are the steps for using the repair feature in Windows:
- Open the Windows Setting by pressing the Win + I keys together.
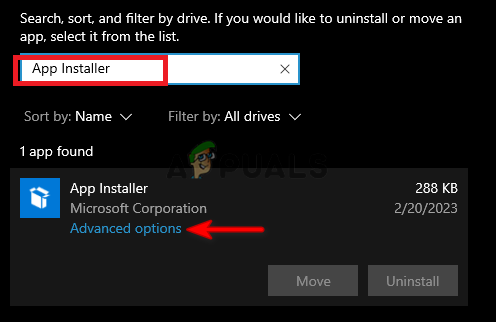
- Navigate to Apps > Apps and features.
- Search for the application at fault in the search box and press the Enter key.
- Click on the Advanced options of the application.

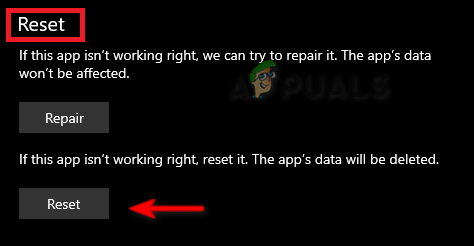
Opening application Advanced options - Select the “Repair” option under “Reset” to repair the corruption in the application.

Repairing the application Note: If the error persists, you can reset the application to fix the error. However, this will delete all of the saved data.
- To Reset the application, click on the “Reset” option below “Repair.”
Resetting the application - After the application is reset, restart your computer and make the changes.

3. Download the latest Microsoft Visual C++ Redistributable
Having an outdated Microsoft Visual C++ Redistributable also becomes a reason why you are facing the Runtime error as it prevents interference with certain programs that support the latest MS Visual C++. Therefore, you must follow the instructions below to download the latest Microsoft Visual C++ Redistributable:
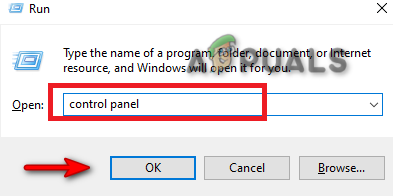
- Open the Run Command by pressing the Win + R keys together.
- Type “control panel” and click OK.

Opening the control panel - View the icons in large by selecting “Large icons” next to “View.”

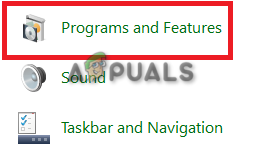
Viewing icons in large size - Click on the Programs and features option.

Opening programs and features - Right-click on the Installed Microsoft C++ and select the “Uninstall” option.

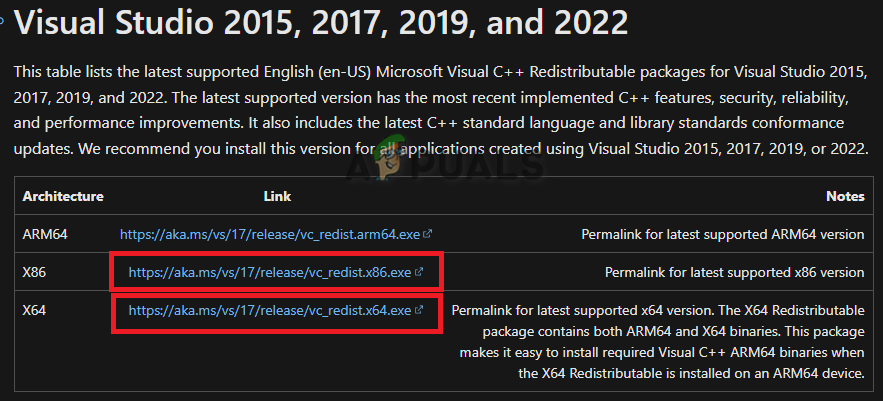
Uninstalling the program - Now, restart your computer and visit the Official Microsoft C++ Redistributable Website.
- Download both x64 and X86 versions of the package by clicking on each link one at a time.

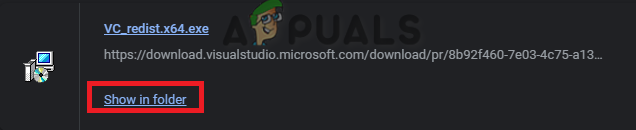
Downloading the latest MS C++ Redistributable - open the downloads page by pressing the Ctrl + J keys together.
- Click on “Show in folder” to open the ISO file location.

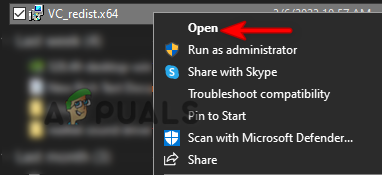
Locating the file - Right-click on the EXE file and select “Open.”

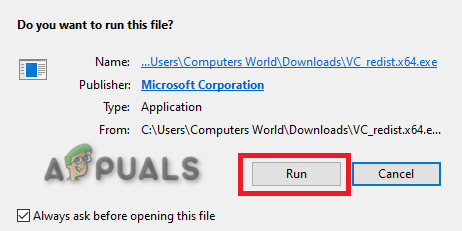
Opening the EXE file - Run the setup by clicking on the “Run” option.

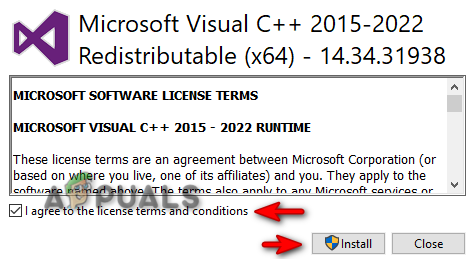
Running the setup - Check the box to agree with the License agreement and click on the “Install” option.

Installing the MS Visual C++ Runtime - After the installation is completed, restart your computer to make the required changes.

4. Boot the system on safe mode
Safe Mode is a designed feature in Windows that allows the system to boot with a minimal set of drivers and default programs. This state helps in detecting the issue of certain programs. Therefore, booting your system in Safe Mode will help prevent the error from occurring when removing or installing your desired program/application.
- Start your computer in Safe Mode.
- Open the Run Command by pressing the Win + R keys together.
- Type “control panel” and click OK.
Opening the control panel - View the icons in large by selecting “Large icons” next to “View.”
Viewing icons in large size - Click on the Programs and features option.
Opening programs and features - Select the program at fault and right-click on it.
- Click on the Uninstall option and remove the program from your system.

Uninstalling the program - After the program has been removed, get out of Safe Mode.
5. Use a third-party removal software
If the error persists, you can manually remove the program or application through the use of third-party software. Follow the list of instructions below to install and use third-party software to uninstall the program at fault from your system:
- Go to the Revo Uninstaller Website.
- Download the software by clicking on the Download option.
- Press the Ctrl + J keys together to open the downloads page.
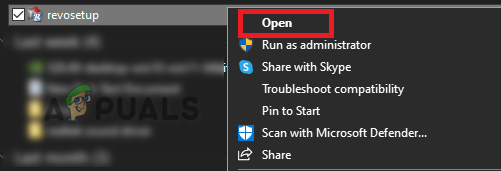
- Open the file location.
- Right-click on the setup and select “Open.”

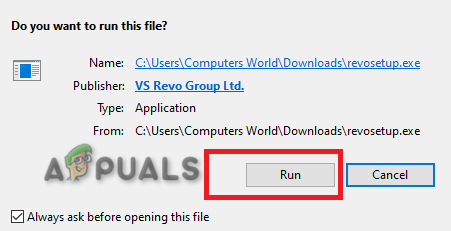
Opening the file setup - Click on the Run option and start the Installation.

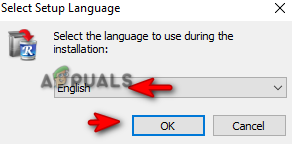
Running the file setup - Select the language as per your preference and click OK.

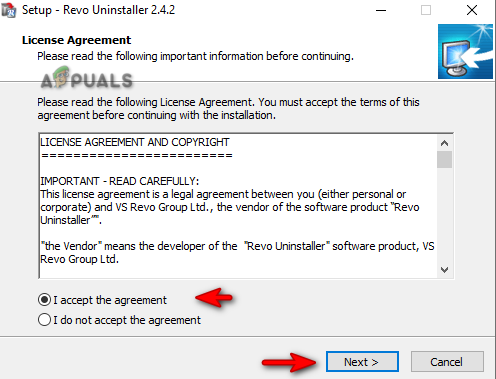
Selecting language - Accept the license agreement.

Accepting terms and conditions - Click on Install to start the installation process.

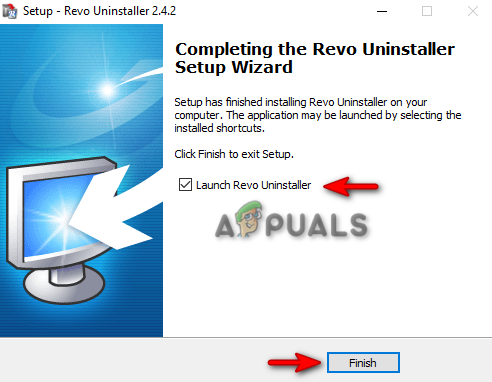
Installing the program - Launch the program by clicking on Finish and checking the “Launch” box.

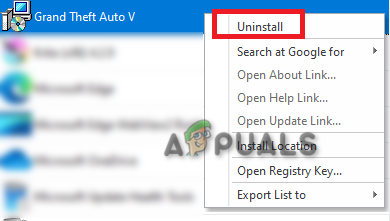
Launching the program - Right-click on the program at fault and select the “Uninstall” option.

Uninstalling program - Restart your computer to make the necessary changes.

6. Reinstall Windows
Windows 11 ISO file allows you to install Windows from the scratch and helps upgrade all the required files to run the system properly. When facing errors related to installing and uninstalling programs from the system, this tool will help you overcome them through its upgrade process.
Before performing this method, you must have a backup copy of your data saved in a flash drive in case it gets removed.
- Open the Official Microsoft Website.
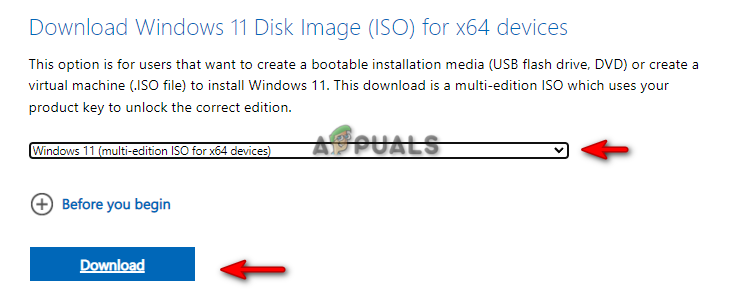
- Select the download type “Windows 11” under “Download Windows 11 Disk Image (ISO)” and click the Download option.

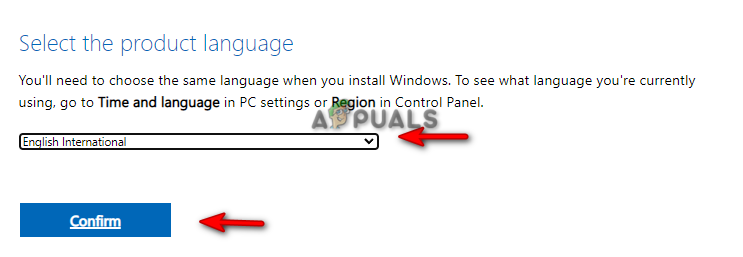
Selecting download type - Choose the language as per your choice and click on the Confirm option.

Selecting the language of the product - Now, download the Windows ISO by clicking on the “64-bit Download” option.

Downloading Windows 11 ISO - After the download is completed, open the downloads page by pressing the Ctrl +J keys together.
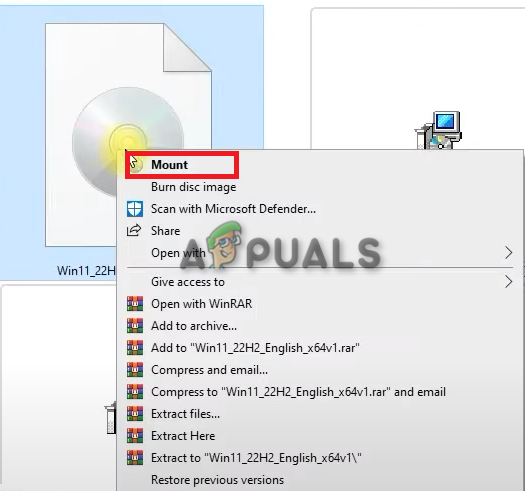
- Click on “Show in folder” to open the ISO file location.

Opening the file location - Right-click on the file and select the “Mount” option.

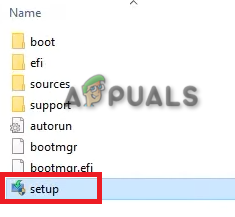
Mounting the ISO file - Double-click on the setup and start the Installation process.

Installing Windows 11 setup - After the installation is completed, you will have successfully upgraded to Windows 11.


Muhammad Zubyan
Muhammad Zubyan is a certified Google IT Support Professional with over 7 years of extensive experience. He has worked on more than 1500 computers, gaining valuable insights that enable him to detect and troubleshoot any complicated root cause of Windows-related issues and errors. In addition to managing Appuals as a Senior Editor, he is currently developing his own Game Optimization program that caters to both gamers and casual users alike.