Solutions on this page can efficiently help fix this error on write-protected pen drives, USBs, SD cards, and eternal hard drives/SSDs.
What Is «The Disk Is Write-Protected» Error on USB/Pen Drive
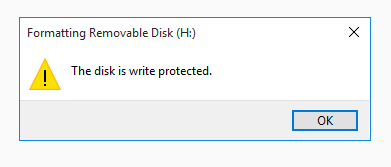
Are you having the «disk is write protected» error while formatting write protected USB pen drive? What does it mean when you receive «The disk is write-protected» error message while trying to format a flash drive, pen drive or SD card?
It means the Windows operating system has set administrator limitations, the registry entry is damaged, virus infection or third-party encryption software locked your USB pen drive. With the write protection status on the USB pen drive, you can’t format it and you’ll get a «The disk is write-protected» error message.
You may wonder «How do I remove write protection on a USB drive?» on your mind. Briefly, you need to remove write protection from USB, pen drive, SD card, external hard drive, etc., by following solutions in Part 1 at first.
And then, you can format the device with a reliable disk formatting tool like EaseUS Partition Master in Part 2 to make it work perfectly again with ease.
Part 1. Guide to Fix ‘The Disk Is Write Protected’ Error on USB/Pen Drive
As you can’t format a write-protected device, your should first fix «the disk is write protected» error and remove write protection from your problematic devices. Here in this part, there are six ways that you can try to remove the write protection from your USB, pen drive, etc., storage devices.
See all the tools that you can try for write-protection removal. Or, you can also follow the video listed on the right to make your device work normally again. It covers 3 commonly used resolutions for you to try: 0:46 Use Registry; 1:49 Use CMD; 3:00 Use File Explorer.
- #1. Unlock USB via Its Lock
- #2. Use Write Protection Removal Tool
- #3. Clear Virus
- #4. Use CMD
- #5. Use Registry
- #6. Use File Explorer Properties
If you feel like the provided solutions and it worked to fix your USB write protection issue, please share this guide to help more people around you!
After fixing this issue, you may follow the guide of Part 2 to format the USB flash drive and pen drive with no hassle.
#1. Unlock Write Protected USB/Pen Drive by Switching Its Lock
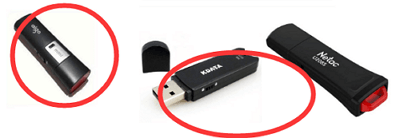
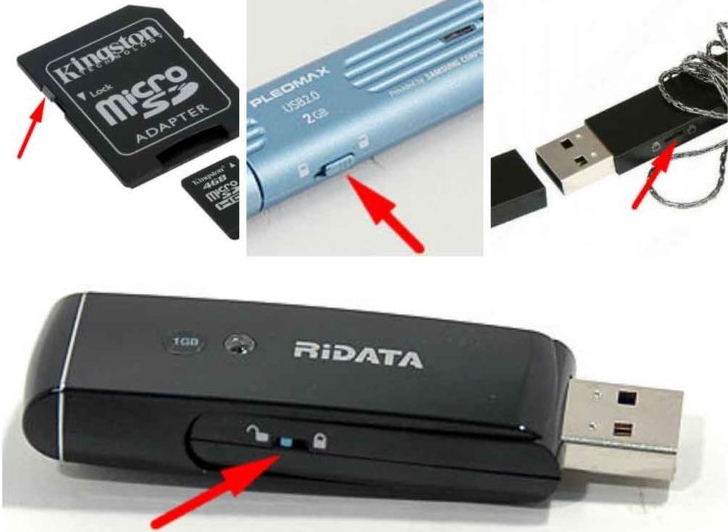
If you have previously locked your USB flash drive or pen drive by switching its Lock to ON, the device is locked and write-protected. It means that you cannot format the device nor make any changes to it. Here is how to unlock the write-protected USB:
Step 1. Find the physical switch on your USB or pen drive.
Step 2. Move the switch from ON to OFF.
Now, you can connect the USB to your PC and you can re-access or format the device again.
#2. Fix Write Protected USB/Pen Drive with Write Protection Removal Tool
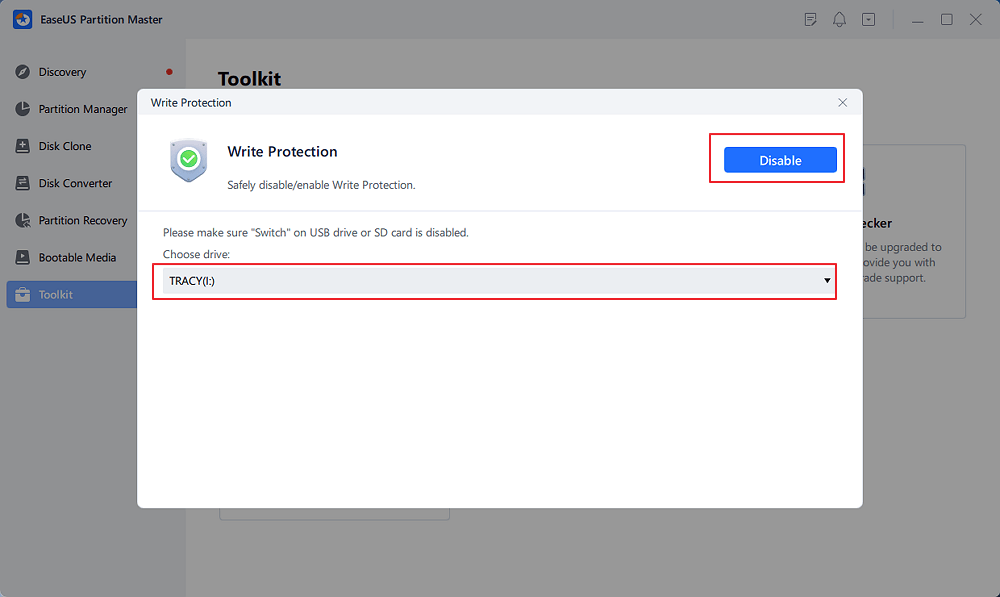
EaseUS Partition Master with its newly developed feature — Write Protection enables you to efficiently unlock a write-protected USB or pen drive in just one simple click. Here is how to do so:
Step 1. Download and install EaseUS Partition Master, go to the Toolkit section, and click «Write Protection».
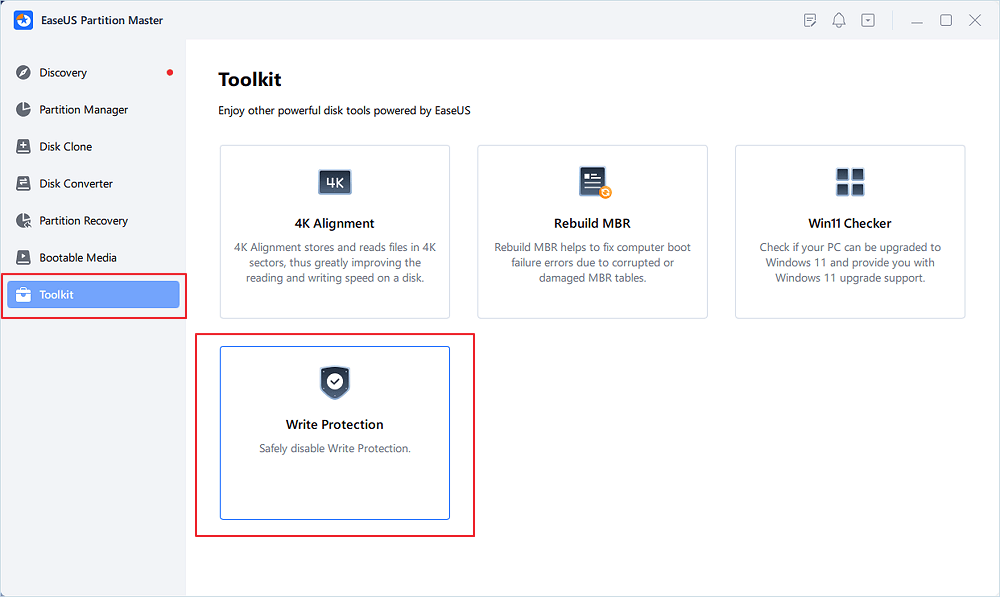
Step 2. Select your write protected USB, USB external disk or SD card, and click «Disable».
Wait! It’s so easy to remove write protection from the USB drive with EaseUS Partition Master right? Share this great news with your friends now:
#3. Cleanup Virus that Causes Write Protected USB or Pen Drive
Virus infection may also sometimes cause storage devices like USB flash drives write-protected or locked. The best way to fix this issue is to run professional virus cleaner software to fully remove the virus and unlock the device.
Here is a list of recommended virus removal programs for you to try:
- Avast Antivirus
- Norton AntiVirus
- McAfee
- BitDefender
- AVG
All you need is to install one of the recommended virus cleaners, connect the problematic device to your PC, run and let the virus cleaner tool to scan and remove all write-protection virus from your USB or pen drive.
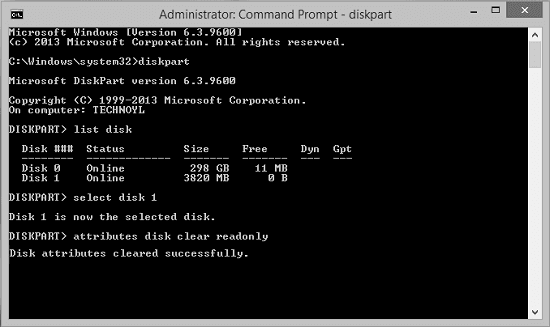
#4. Remove Write Protection from Device Using CMD
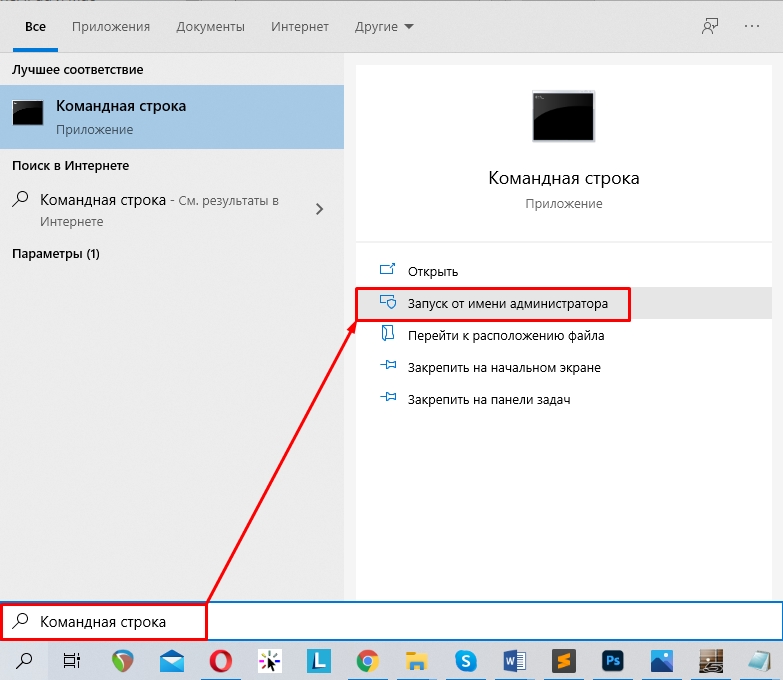
Step 1. Type cmd in the search box, right-click «Command Prompt» and select «Run as Administrator».
Step 2. Type the following command lines and hit Enter after each command line.
- diskpart
- list disk
- select disk #
- attributes disk clear readonly
Replace # with the number of your write-protected flash drive or memory card.
Let CMD command to remove the write protection from your device.
Step 3. Type exit when the process finishes.
#5. Remove Write Protection on USB Flash Drive/Pen Drive using Regedit.exe
When a device is locked or a disk is write-protected, you can using Registry Editor to change its key from 1 to 0 so as to unlock the device.
- Warning
- Note that you need to be very careful while using Registry Editor — Regedit.exe to remove write protection on a device. Any false operation or typo error will cause serious problem.
- If you are a beginner, try the former solutions.
Step 1. Type: Regedit in the search box, click «Regedit.exe« to open the Registry editor.
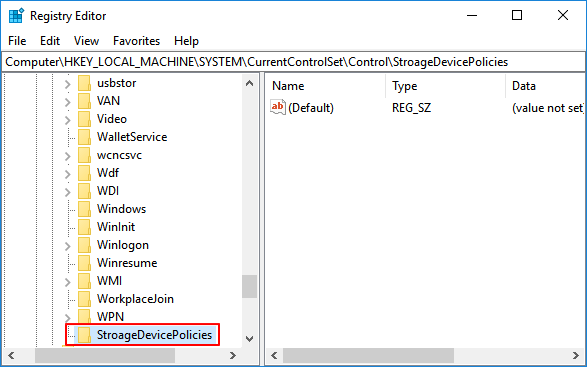
Step 2. Navigate to: Computer\HKEY_LOCAL_MACHINE\SYSTEM\CurrentControlSet\Control\StorageDevicePolicies
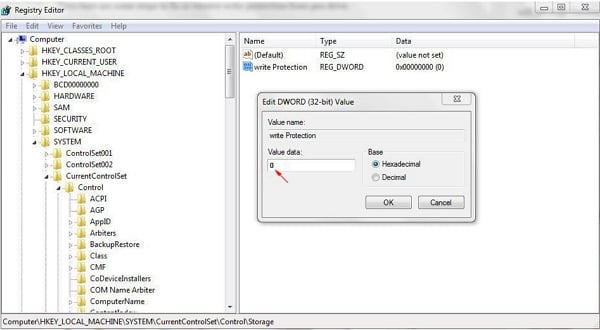
Step 3. Double-click on the «WriteProtect» value in the right-hand pane of Regedit.exe.
Make sure the volume data filed is marked as «0».
Step 4. Double-click to open it and change the «Value» data from «1» to «0» and click «OK» to save the change.
Step 5. Close Regedit and restart your computer.
- If you don’t see the StorageDevicePolicies folder in Registry, you can create one with the guide here:
- 1. Go to HKEY_LOCAL_MACHINE\SYSTEM\CurrentControlSet\Control, right-click on the Control (folder) key and select «New».
- 2. And click on «Key», name the new folder as «StorageDevicePolicies», and hit Enter.

- 3. Then, right-click the blank space in the right pane of StorageDevicePolicies folder, and select «New».
- 4. Choose «DWORD (32-bit) Value», and rename the file as «WriteProtect» and hit Enter.
- 5. Dobule-clck the WriteProtect key, and change the value data in DWORD value from «0» to «1».
After this, you can reconnect your USB flash drive or pen drive to your PC again, and you should find the write protection is removed and the device is no longer write-protected.
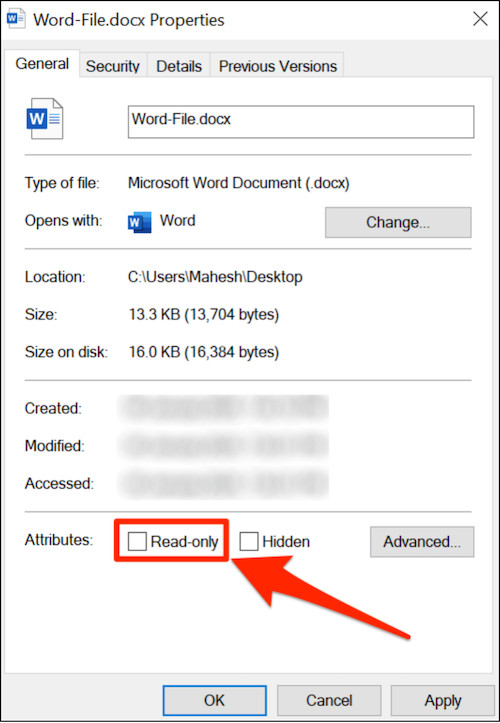
#6. Change Read-Only or Write-Protected Files/Folders on USB/Pen Drive to Normal
Sometimes, your drive may also get locked or write-protected if you set it as read-only. And you can simply change the read-only state to remove the device write protection.
Note that this method can also be applied to remove the read-only state on your files to normal.
Step 1. Connect your USB or pen drive to PC.
Step 2. Open Windows File Explorer, locate and right-click on the files or folder which is write-protected in your USB drive, and select «Property».
Step 3. Go to the General tab, uncheck «Read Only», click «Apply» and «OK» to finish.
After removing write protection on your USB or pen drive, you can directly access the device with ease. However, if the USB or pen drive still contains some logical or internal error, you may need to format the device to be recognizable again.
Part 2. How to Format Write Protected USB Pen Drive after Removing Protection
Usually, Disk Management or Windows File Explorer can format a device that is in a normal state. But if the storage device is in a special state, such as displaying as I/O device error, Windows was unable to complete the format, USB cannot be formatted, etc., you will need a professional all-in-one formatting tool.
EaseUS Partition Master is capable of formatting your USB or pen drive, etc., from any of the above logical errors. Besides a USB flash drive, the program also allows you to format a write-protected SD card after removing the write protection error.
Here is the detailed guide:
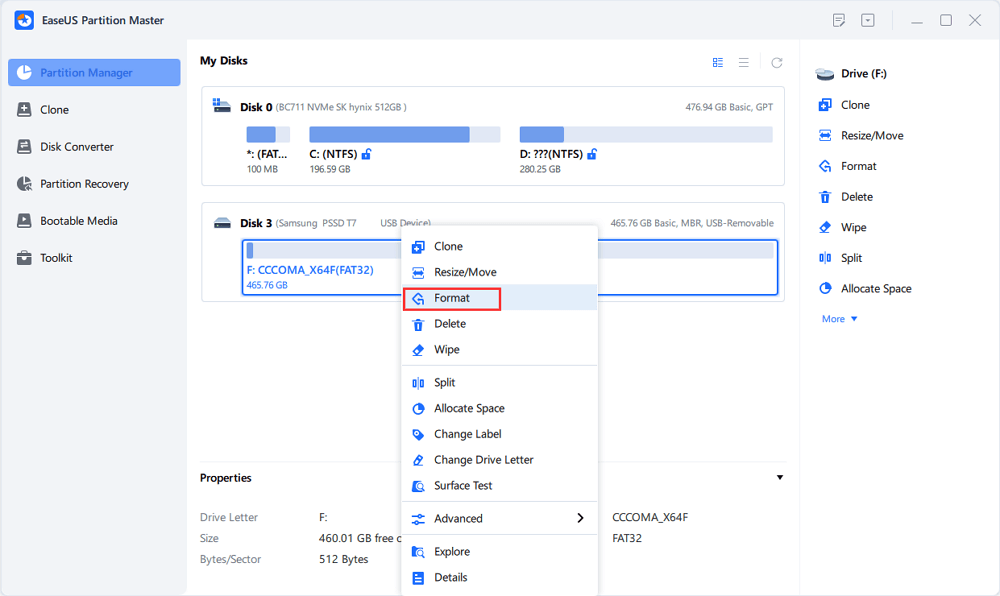
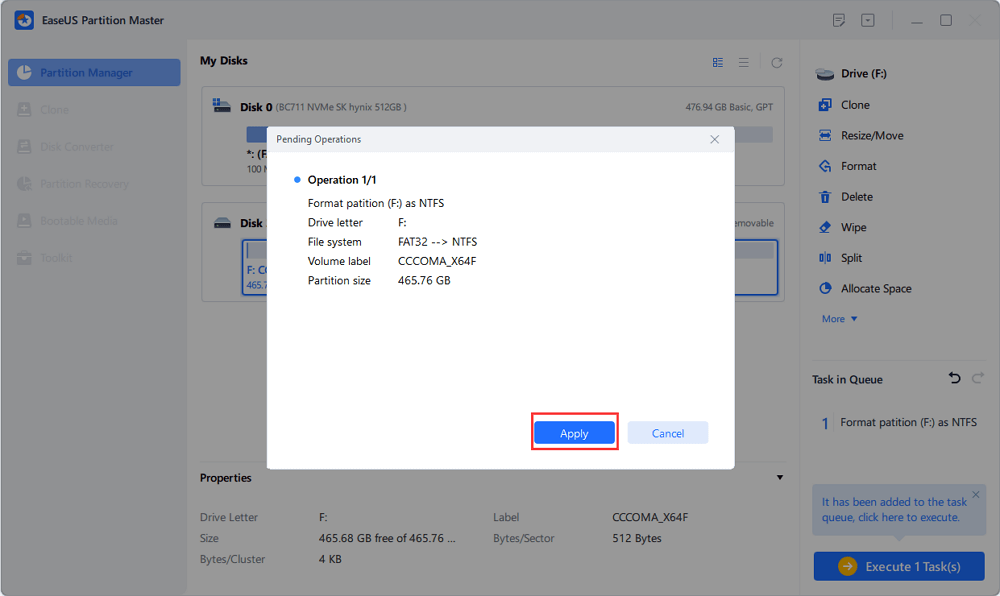
Step 1. Launch EaseUS Partition Master, right-click the partition on your external hard drive/USB/SD card which you want to format and choose the «Format» option.
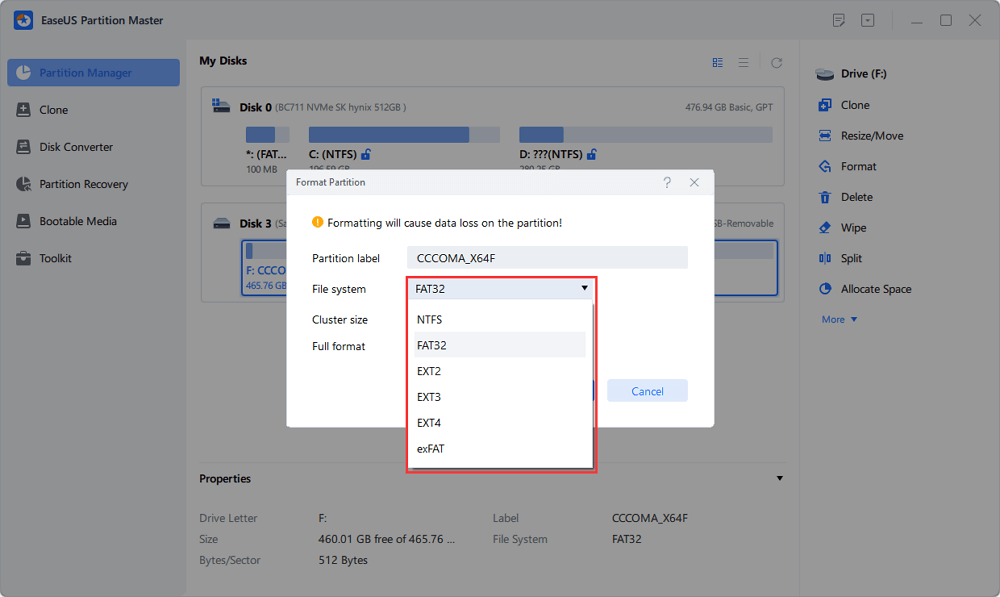
Step 2. Assign a new partition label, file system (NTFS/FAT32/EXT2/EXT3/EXT4/exFAT), and cluster size to the selected partition, then click «OK».
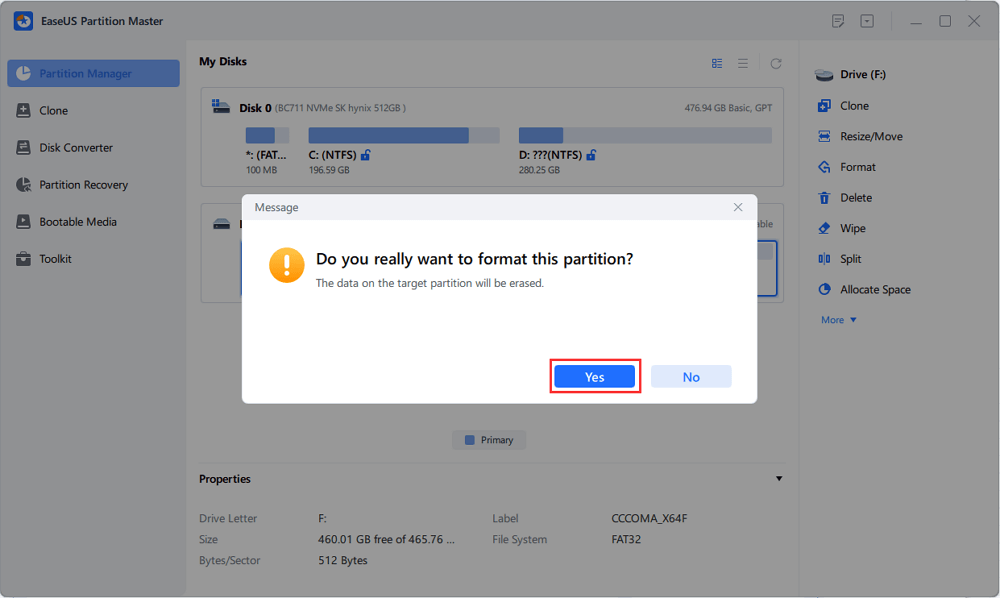
Step 3. In the Warning window, click «Yes» to continue.
Step 4. Click the «Execute 1 Task(s)» button in the top-left corner to review the changes, then click «Apply» to start formatting your external hard drive/USB/SD card.
Aside USB drive, you can also apply EaseUS Partition Master to format other types of write-protected devices. Refer to the links here and find your respective solutions:
When the formatting process finishes, you’ve finished the process of formatting a write-protected USB/pen drive on your own. And now, your device is in a good state for you to save and store data again.
FAQs about USB, Pen Drive, SD Write Protection
This page answers the questions of «How do I remove write protection on a USB drive» and «How can I format a write-protected pen drive». With the provided solutions in Part 1 and Part 2, you can easily resolve «The disk is write-protected» error and successfully format your USB flash drive, pen drive, SD card, external hard drive, and even internal hard drive after removing the write protection.
However, some of you may have more concerns that are related to the write protection issue. Here, we have found some top FAQs asked in Google searching result and left a brief answer below each question. If you have the same doubts, check and find your answers here immediately.
1. How do I format write-protected USB in Windows 10?
As introduced on this page, to format a write-protected USB in Windows 10, you need first remove the write protection by following methods in Part 1.
Then you can apply EaseUS Partition Master or Windows built-in formatting tool — Disk Management, Windows File Explorer, CMD to format the USB in Windows 10.
2. What is the best write-protected USB format tool?
As you search online, you may find that there is no one professional write-protected USB format tool available for free download. The reason is that write protection error is complex and most formatting tips don’t even work.
So the best solution to this issue is that you should first remove the USB write protection and then apply the best USB format tool for help.
3. How to format read-only USB?
When a USB displays as read-only on your computer, you cannot directly format the device either. You should first remove or fix the «Read Only» error on USB. Then apply Windows Disk Management, File Explorer or EaseUS formatting software — EaseUS Partition Master to format your USB to FAT32 (usable) again.
4. Can you recover data after formatting a write-protected SD card?
When you removed the write protection and formatted your SD card, it’s safe for you to save the data on the card again. As for the lost data, you can recover data from SD card with powerful data recovery software. If you need a reliable one, EaseUS Data Recovery Wizard is available to help.
![]()
Загрузить PDF
![]()
Загрузить PDF
Из-за ограничений, которые накладывает на флеш-накопитель защита от записи, вы не сможете его ни отформатировать, ни изменять на нем файлы. Флеш-накопитель с защитой от записи можно отформатировать при помощи редактора реестра или командной строки в Windows или с помощью Дисковой утилиты в Mac OS X.
-

1
Откройте меню «Пуск» и запустите поиск программы «Regedit.exe». Она присутствует во всех версиях Windows, начиная с Windows XP.
-
2
Дважды щелкните по программе, чтобы запустить редактор реестра.
-
3
Пройдите по следующему пути: Компьютер > HKEY_LOCAL_MACHINE > SYSTEM.
-
4
Пройдите по следующему пути в разделе SYSTEM: CurrentControlSet > Control > StorageDevicePolicies.
- Если папка «StorageDevicePolicies» отсутствует, щелкните правой кнопкой мыши в правой части редактора реестра, наведите курсор на «Создать» и выберите «Раздел».
- Введите имя раздела, щелкните по нему дважды, а затем снова щелкните правой кнопкой мыши в правой части редактора реестра.
- Наведите курсор на «Создать» и выберите «Параметр DWORD», после чего перейдите к шагу 5.
-
5
В столбце «Данные» необходимо дважды нажать на значение справа от параметра «WriteProtect».
-
6
В поле «Значение» измените «1» на «0» и нажмите «ОК».
-
7
Закройте редактор реестра и перезагрузите компьютер.
-
8
Вставьте флеш-накопитель с защитой от записи в свободный USB-порт на компьютере.
-
9
Откройте Проводник и щелкните правой кнопкой мыши по флеш-накопителю на левой боковой панели.
-
10
Нажмите на «Форматировать» и укажите параметры форматирования, вроде размера единицы распределения и файловой системы.
-
11
Нажмите «Начать». Windows отформатирует флеш-накопитель и снимет с него защиту от записи.[1]
Реклама


-
1
Вставьте защищенный от записи флеш-накопитель в свободный USB-порт на компьютере с Windows.
-
2
Откройте меню «Пуск» и введите «cmd.exe» в поисковое поле.
-
3
Дважды нажмите на Командную строку, чтобы ее открыть.
-
4
Введите «diskpart», затем нажмите на клавиатуре клавишу «Enter».
-
5
Введите «list disk» и нажмите Enter.
-
6
Введите «select disk x», где «x» замените номером флеш-накопителя, под которым он указан в командной строке, а затем нажмите Enter. Если вы не уверены, под каким номером значится флеш-накопитель, обратите внимание на размер диска. Например, если размер флеш-накопителя составляет 2 ГБ, выберите диск, у которого в графе «Размер» указано 2 ГБ.
-
7
Введите «attributes disk clear readonly» и нажмите Enter.
-
8
Введите «clean» и нажмите Enter.
-
9
Введите «create partition primary» и нажмите Enter.
-
10
Введите «format fs=fat32» и нажмите Enter. Замените «fat32» на «ntfs», если планируете подключать флеш-накопитель только к устройствам под управлением Windows.
-
11
Введите «exit» и нажмите Enter. Windows отформатирует флеш-накопитель и снимет с него защиту от записи.
Реклама


-
1
Вставьте флеш-накопитель с защитой от записи в свободный USB-порт на компьютере Mac.
-
2
Откройте папку «Программы» и нажмите на «Служебные программы».
-
3
Запустите программу «Дисковая утилита». Окно программы появится на экране.
-
4
Выберите флеш-накопитель в левой панели Дисковой утилиты.
-
5
Откройте вкладку «Стереть», а затем укажите формат. Если вы хотите, чтобы флеш-накопитель был совместим с компьютерами Windows и Mac, выберите формат «MS-DOS File System» или «exFAT».
-
6
Нажмите «Стереть» в нижней части окна «Дисковая утилита». Компьютер отреформатирует накопитель с защитой от записи и изменит его атрибуты на «чтение и запись».[2]
Реклама


Советы
- Если вы пытаетесь получить доступ к флеш-накопителю с защитой от записи или использовать его на Mac, попробуйте открыть накопитель на компьютере под управлением Windows, прежде чем переходить к форматированию диска. Возможно, флеш-накопитель имеет статус «только чтение» на Mac из-за проблем с совместимостью между файлами Apple и Windows.
Реклама
Предупреждения
- Если на флеш-накопителе повреждены данные или имеются физические повреждения, шаги в этой статье могут оказаться неэффективными при форматировании накопителя с защитой от записи. Если у вас не получается отформатировать флеш-накопитель после выполнения всех описанных выше действий, вам стоит задуматься о покупке новой флешки.
Реклама
Об этой статье
Эту страницу просматривали 13 817 раз.
Была ли эта статья полезной?
Всем привет, с вами Бородач! Сегодня разберем вопрос – как форматировать флешку, если она защищена от записи. При попытке очистить устройство, вы видите соответствующее сообщение в Windows. В первую очередь присмотритесь внимательно в самой флэшке, на ней может быть специальный переключатель, который физически защищает носитель от перезаписывания. Переключатель будет как обычный тумблер – переведите его в состояние открытого замочка. Кстати, это касается и карт памяти.
Если такого тумблера нет, или он уже включен в нужное положение, а отформатировать флешку защищенную от записи невозможно, то читаем эту инструкцию. Пишите в комментариях, какой способ помог именно вам.
Содержание
- Способ 1: Через командную строку
- Способ 2: Через редактор локальной групповой политики
- Способ 3: Formatter SiliconPower
- Способ 4: Реестр
- Способ 5: Тотальное восстановление
- Задать вопрос автору статьи
Способ 1: Через командную строку
- Запускаем командную строку с правами администратора. Проще всего это сделать через поиск – вводим название системной утилиты, кликаем правой кнопкой (в Windows 7) или выбираем уже нужный вариант (в Windows 10).
- Теперь вводим команду:
diskpart
- Она переведет нас в раздел «diskpart», который управляет дисками. Выведем список всех физических носителей:
list disk
- Вы увидите все ваши подключенные диски, в том числе флешку. Они все будут пронумерованы. Выберите вашу флешку исходя из её размера:
select disk X (Вместо X впишите номер устройства)
- Теперь вводим три команды:
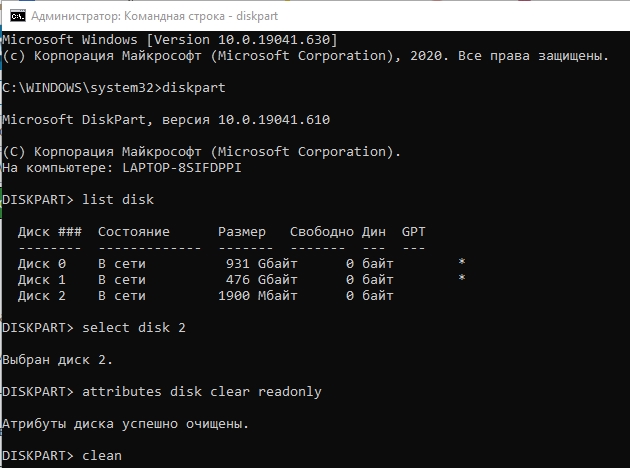
attributes disk clear readonly
clean
create partition primary
ПРИМЕЧАНИЕ! Если после команды «clean» вы увидите сообщение: «Программа DiskPart обнаружила ошибку: Отказано в доступе. Дополнительные сведения см. в журнале событий системы». Еще раз введите эту команду и все будет «ОК».
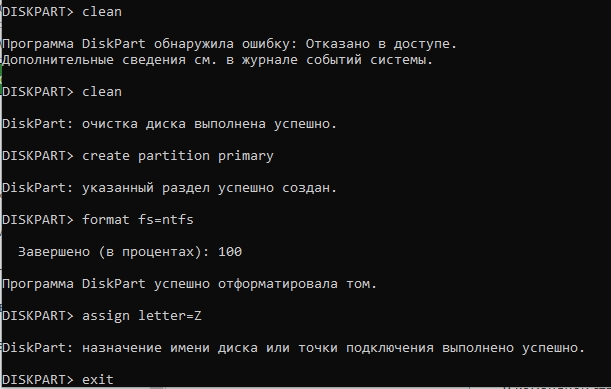
- Теперь форматируем её:
format fs=fat32 (или можете использовать NTFS)
- Ждем, когда процедура закончится, и вводим команду, которая дает нашей флешке букву:
assign letter=Z
- Выходим из DiskPart:
exit
Способ 2: Через редактор локальной групповой политики
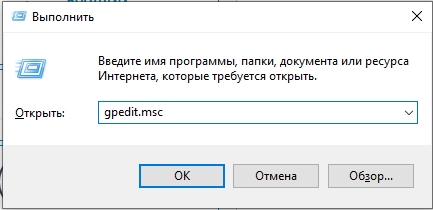
Нажимаем на клавиатуре на две кнопки «Win» и «R», а после этого вписываем:
gpedit.msc
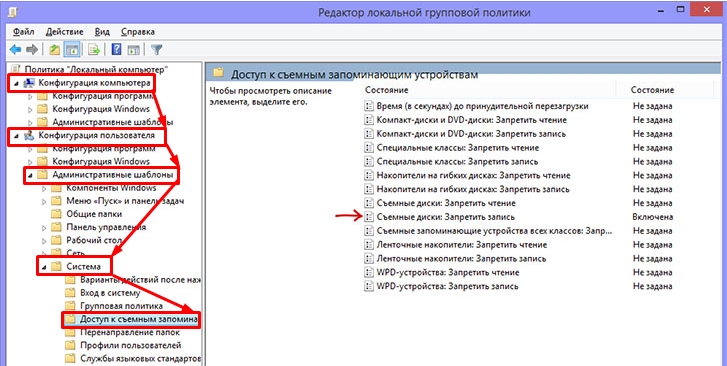
Теперь выбираем основной раздел «Конфигурация компьютера», ниже находим «Конфигурацию пользователя» и выбираем «Административные шаблоны». Теперь под сетями должна быть папка «Система», а в ней уже открываем нужную нам папку – «Доступ к съемным запоминающим устройствам». В ней находим пункт «Съемные диски: Запретить запись» – смотрите, чтобы он не был включен, если это так – деактивируем! После этого идем и стандартным способом очищаем устройство – оно должно полностью очиститься без каких-либо проблем.
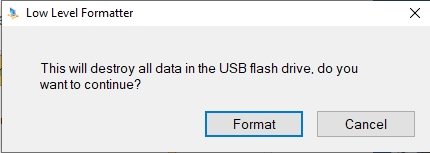
Способ 3: Formatter SiliconPower
Это отличная программа, которая не раз спасала меня. Сначала скачиваем её по этой ссылке. Устанавливать ничего не нужно, так как она полностью портативная – просто запускаем. Далее вы увидите вот такое окошко, где вам сообщают: что с диска будут удалены все данные. Нажимаем «Format» и опять соглашаемся. Потом ждем, когда операция закончится.
Способ 4: Реестр
- Жмем «Win+R» и вписываем:
Regedit
8
- Идем по пути:
HKEY_LOCAL_MACHINE\SYSTEM\CurrentControlSet\Control
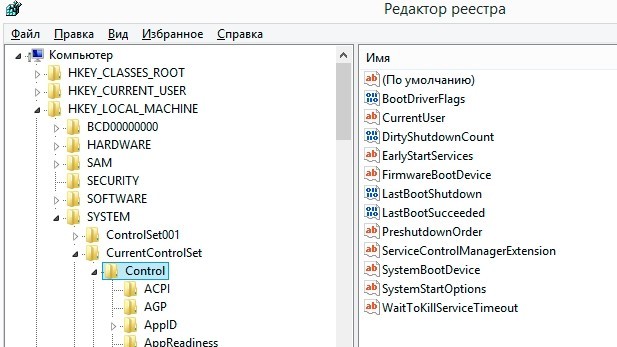
- Теперь в этой папке внимательной нужно найти другую папочку «StorageDevicePolicies». Если её по каким-то причинам нет, то создайте и зайдите туда.
- Создайте там параметр типа «QWORD» с названием «WriteProtect» и задайте ему значение 0 (ноль).
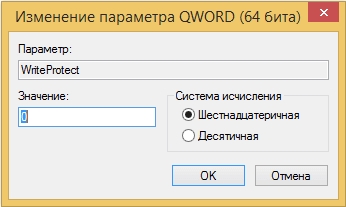
- Если же этот параметр уже есть, посмотрите, чтобы не стояло значение 1 (один) – исправляем на 0 (ноль).
Способ 5: Тотальное восстановление
Если два прошлых варианта не дали результата, то значит проблема лежит куда глубже. Возможно есть проблема с самим контроллером. Или может помочь низкоуровневое форматирование с помощью специальных программ. Можно попробовать её перепрошить. Но это уже другой уровень, и нужно именно восстанавливать флешку – об этом я уже подробно писал в этой статье, так что идем туда.