


В общем так, Р0345 это ошибка по левой голове.
Нужно смотреть через FreeSSM, или хотя-бы OBD углы поворота распредвалов.
Если угол одного из распредвалов равен 0, то значит это неисправность ДПРВ, и его надо менять, или звонить проводку.
Если углы правого и левого банков отличаются от нуля, то надо смотреть на сколько, если разбег больше нескольких градусов, сдох клапан AVCS, и требуется его замена.
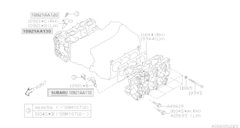
Верхние клапана взаимозаменяемы, — 10921-AA110 — 2 передних/верхних одинаковых;
— 10921-AA120 — нижний с пассажирской стороны;
— 10921-AA130 — нижний с водительской стороны, но лучше их сразу менять на более современные, которые шли с 2011 года (10921AA190 10921AA200)
Я так понимаю:
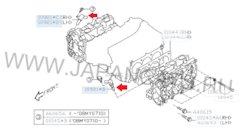
10921-AA110 — на такой же, передние/верхние одинаковые = 2 шт
10921-AA120 — на 10921AA190 нижний с пассажирской стороны = 1 шт
10921-AA130 — на 10921AA200 нижний с водительской стороны = 1 шт
Спасибо за информацию, почет и уважение = iCr
Всем участникам спасибо за поддержку!
Отпишусь о результатах.
Для начала все клапана очищу, отмою, посмотрю что будет. В случае решения проблемы — оставляю очищенные. В противном случае буду заказывать все. Дорого, ну а куда деваться. Как в пословице: «Хорошо смазал, хорошо и поехал».
Нижние можно сразу заказывать новые, они не отмываются, и продолжают чудить в дальнейшем.
Уже заказал нижние. Спасибо Вам!
А эта вообще с номером 10921AA190 и тоже для EZ36D
И какой из них?
Отвечаю сам:
Все 4 клапана (все верно)
1 позиция в кол-ве 2 шт
2 и 3 позиции по 1 шт


Посмотри по autodoc через vin
Посмотрел. Выдало на фото. Выходит они еще и разные. Ща крышу снесет, во засада
Остаётся вживую номерок на клапане посмотреть.
Это они? Я правильно понял?
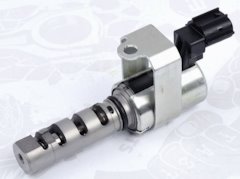
Это не ошибка датчика. Это умирает клапан AVCS.
Привет земляк !
Еду еду я значит, круиз на 100 и бац — гирлянда моргающий круиз, пьяная машина, чек двигателя и потеря тяги (круиз отключился сам). Пару раз сбросил — появляется снова. Доехал до дома нормально — обороты не плавали. У дома осмотр под капотом — все на месте, ничего не болтается, подтеков нет.
Это Капан AVCS сдох, надо читать какой, правый или левый, верхний или нижний.
А можно поподробней про этот клапан: ошибка говорит одно, а на самом деле клапан AVCS. Как же так? Я запутался. И как узнать какой?Объясните
ДПРВ реагирует на неправильное положение распредвала, и выдает ошибку. Причина ошибки — клапан AVCS, заклинивающий от чрезмерного износа.

ходит пешком
Санкт-Петербург
Cообщений: 25479
to voltik: Доброго времени суток. Напряжение в цепи датчика распредвала. Проверяйте проводку и сам датчик, возможно, на замену. После замены на сервис — для сброса ошибки компом.

to voltik: Ошибка в цепи датчика распредвала. Какой пробег?
Скорее всего дело в проводке.

Chery Tiggo
Санкт-Петербург
Cообщений: 1531
Пробег 140000 км., ошибку сбрасываю Мультитрониксом.
to voltik: При появлении ошибки мощность двигателя падает? Или едет как и ехала?
Chery Tiggo
Санкт-Петербург
Cообщений: 1531
После появления ошибки ничего не меняется, но топлива кушает много, был на диагностике, ничего криминального не нашли.
ходит пешком
Санкт-Петербург
Cообщений: 25479
to voltik: Проблема должна решиться заменой датчика.
voltik: После появления ошибки ничего не меняется, но топлива кушает много, был на диагностике, ничего криминального не нашли. #
В таком случае, надо искать причины увеличения расхода. Это, прежде всего сечи.
Обратите внимание на проводку датчика и его разъем.
Rain: Проверяйте проводку и сам датчик, возможно, на замену. #
Поддерживаю.

Поддерживаю низкий уровень сигнала от датчика. Либо проблема датчике или же контактах.
Chery Tiggo
Санкт-Петербург
Cообщений: 1531
Поменял датчик, расход с 20 литров на 100км стал 14, прочитал в инете, что эти датчики умирают медленно, и очень плохо диагностируются.
ходит пешком
Санкт-Петербург
Cообщений: 25479
to voltik: Ну отлично. Уже близко к правде. Еще пару литров можно списать на кондей. Можно сетку почистить, фильтр поменять. Заправку…Сделать балансировку, проверить давление в шинах. В общем, уже дело техники.
voltik: Поменял датчик, расход с 20 литров на 100км стал 14 #
Поменяете свечи — расход станет еще меньше.
Chery Tiggo
Санкт-Петербург
Cообщений: 1531
Со свечами не прокатило, да и ежу понятно, авто сделанное для Америки, мало кушать бензина не может.
to voltik: Кушать сверх меры даже американец не должен. Но 14л на сотню — это очень хороший показатель.
As an Amazon Associate, I earn from qualifying purchases.
If there is any issue with the camshaft position sensor, you can easily replace it and fix it. But, the true problem arises when you notice that the error code is still on the dashboard even after changing the sensor.
Generally you find these two codes P0340 and P0011 after replacing the camshaft position sensor. These error codes will stay for several reasons.
So, in the article, you will know why the error code stays even after the sensor is replaced. Also, you will find some possible fixes that might help you eliminate the error codes.
What Error Codes Show by Camshaft Position Sensor Problems?
After replacing the camshaft position sensor, you might notice a few error codes which indicate different issues. Here is the list of error codes you might get:
P0340: It means there is an issue with your vehicle’s Camshaft Position Sensor A circuit. The code indicates that the signal from the camshaft position sensor to the PCM is broken.
P0343: The code refers to the problem on “Camshaft Position Sensor “A” Circuit High Bank 1 or Single Sensor.” This indicates the PCM has detected an issue with the sensor signal.
P0345: This code means that the bank two camshaft position sensor is sending an incorrect voltage reading.
P0011: The code indicates that the ECM/PCM of your vehicle cannot differentiate between the desired and the actual camshaft position angle. For this, it cannot reach its programming target, which the camshaft position sensor needs.
What Does P0340 Error Code Means?
Among all error codes related to camshaft position sensor P0340 is commonly occurs after replacing the sensor.
If you didn’t know already, the camshaft sensor is responsible for recording the speed and position of the camshaft when it rotates, as well as for synchronizing the ignition and firing of the coils.
Now, there are different modules inside the car that make use of the camshaft sensor. The Engine Control Module and the Power-train Control Module or PCM are two such users of the sensor.
When the aforementioned reading from the sensor is shady, the injection and ignition spark timing set by the PCM fails. This is when the PCM activates or stores P0340. This is one of the most common codes for a faulty sensor.
There is a similar code to the P0340, which is the P0345. When this code is triggered, the PCM again fails to create the correct injecting and ignition timing. The similarity between them is that both of them warn you that there is a problem with the electric circuit of the sensor.
But the difference is that while the P0345 code comes up when there is incorrect voltage reading, the P0340 comes up when there are issues with the control of the intake and exhaust valves.
Why Are You Still Getting Code After Replacing Camshaft Position Sensor?
You will usually get the P0340 and P0011 codes after replacing the camshaft position sensor. Here are common reasons why the error code stays:
- Removing error codes and relearn process isn’t done yet
- ECU is still coded with the old camshaft position sensor
- Bad installation or defective new camshaft position sensor
- Old O-ring isn’t removed from the camshaft sensor
- Problem with the Electric Circuit or Wiring.
- The Reluctor wheel is damaged or not functioning properly
- Wear and stretch on the timing chain and guide plates
- Faulty starter motor can cause the P0340 error code
- A faulty PCM
How To Get Rid Of This Code? [ 7 Steps To Follow]
You know that the code stays due for several reasons. So, you need to inspect all the components that might cause the issue if you notice the code even after replacing the camshaft position sensor.
Here are a few possible fixes; you might try to fix the issue.
1: Relearn or recalibrate the sensor
Most of the time, after replacing the sensor, if you don’t relearn the sensor, the ECU might store the old sensor data, which causes throw the code. So, follow the below steps to relearn the camshaft position sensor:
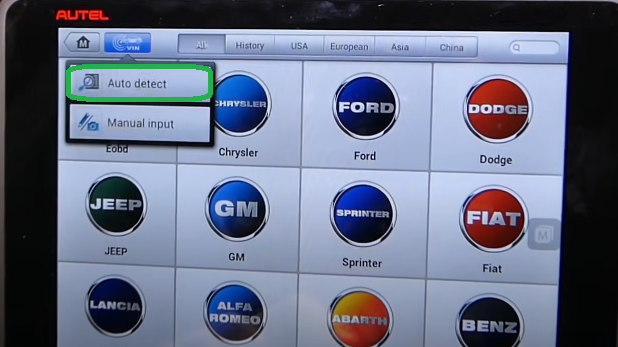
Step 1: Turn on the vehicle and connect an OBD2 scanner tool. Turn on the scanner tool and select your vehicle brand and model. Or, select the Auto Detect option. It will automatically read your system. You can use the MaxiSys scanner tool to get better output.
Step 2: Go to the Diagnosis option and follow the image order below.
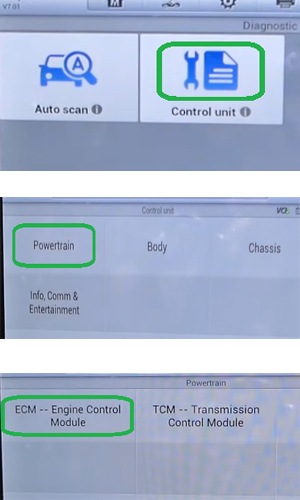
Step 3: Go to the “Special Function” option and the Cam crank relearn option. A new window will inform you when you should relearn the sensor. After reading it, select Ok.

Step 4: Then, the scanner will ask you to start the engine. Start the engine. Now, you must wait until the engine coolant temperature reaches what it requires. Accelerate the vehicle to increase the temperature. After reaching the required temperature, the vehicle will do the relearn process automatically.
Note: Dodge Jeep Chrysler used to show the process. The process will be almost the same for other vehicles.
2: Check the O-rings
You need to use two O-rings on the camshaft position sensor for proper functionality. One comes with the camshaft position sensor, and the other comes from the car manufacturer.
The camshaft position sensor comes with an O-ring attached to the main component. But it looks like a plastic ridge. For this, many people think that the O-ring is missing, and they try to install the old o-ring in the new one, which creates an obstacle to proper installation and creates a gap that causes the issue.
If you put the old O-ring on the new one, you must remove it. Then, you need to use the original O-ring. Also, clean the O-ring before using it.
3: Test and Fix Camshaft Position Sensor Wiring
If the relearning doesn’t fix the issue and still shows the code, it usually refers to the wiring that sends signals to the ECU that has a problem. For this, you need to test the camshaft position sensor wiring harness to find the defect and fix the issue.
The wiring section will vary according to vehicle brand. You need to follow the below order for proper inspection:
Analysis the wiring diagram: Generally, you will get three wires in the camshaft sensor. They come in different colors, which might differ from vehicle to vehicle. The wiring is known as the power supply, sensor signal, and sensor ground.
Sensor power supply test: Start testing with the power supply. For this, you need to use a multimeter. Set the multimeter with PIN 1 and check the voltage. If the voltage is around 5 amp, the circuit power supply works properly.
Sensor Ground circuit test: Check the continuity of the ground circuit between the sensor wiring harness and the ECM wiring harness with a multimeter. Also, ensure that continuity has existed. Otherwise, it means there is a problem with the ground circuit.
Sensor signal circuit test: You also need to check the continuity between the cam sensor and ECM harness connector. Continuity must be needed for proper functioning.
If you find any of the wires are defective, you need to repair or replace them. If you haven’t any technical knowledge, take help from a professional.
4: Check the Reluctor wheel
If the above method doesn’t solve the issue, then you need to inspect the Reluctor wheel. After changing the camshaft position sensor, many people forget to adjust the sensor with the Reluctor wheel.
For this, you need to properly adjust the camshaft position sensor with the Reluctor wheel teeth. Most of the vehicle’s sensors align with the 20th teeth of the Reluctor wheel. Also, you need to inspect the Reluctor wheel to see whether any teeth are broken or not.
5: Inspect timing chain
There are many mixed reactions among the professional mechanics that the timing chain is a cause of the error code. But, if the error codes stay even after checking the above component, you need to inspect the timing chain.
If the timing chain is responsible for this problem, you need to replace it. Depending on the vehicle model, it will cost you around $200-$1000.
6: Inspect starter motor
The starter motor turns the engine over during ignition, allowing everything else to occur. If the starter motor face issues, it can hamper the signal transfer from the camshaft position sensor to the ECU.
For this, you need to check the starter motor. If you find any malfunction on it, you need to repair or replace it.
7: Inspect ECU
The vehicle electronic control unit gets the signal from the camshaft position sensor. If the wiring sends the proper signal, you still get the code. It might occur due to the ECU malfunction.
For this, you need to check whether the ECU properly gathers the signal and distributes it to all other components. You need to repair the control unit if it fails to function properly to eliminate the code.
Important Note: Sometimes, the error codes stay even after changing the sensor due to the vehicle’s computer. It needs a couple of trips to satisfy that error is solved, and then the light automatically turns off.
FAQs
Can You Replace A Camshaft Position Sensor Yourself?
Yes, anyone with minimum technical knowledge can replace the camshaft position sensor.
If you do the process by yourself, it will not take more than 10 minutes. So, it’s a good decision to do the replacement part to save around $100 labor cost.
What Should You Do After Replacing The Camshaft Sensor?
After replacing the camshaft position sensor, you should cancel the error codes from the engine controller. For this, you should use a diagnostic scanner.
After erasing the error code, you should relearn the camshaft position sensor for proper functionality.
How Much Does It Cost To Replace The Camshaft Position Sensor?
The replacement cost will vary according to vehicle brand and model and also your location.
Generally, you need to spend around $95 to $200 for the parts only. If you want to change it with professional help, it will cost about $70 to $100.
Can I Drive With A Camshaft Position Sensor Problem?
Though you can drive your vehicle with a camshaft position sensor malfunction, it will affect your engine components.
You will get poorer engine performance and fuel consumption. Also, due to the damaged camshaft, you might notice a misfire, loss of power, jerk, or other issues.
How Long Do Camshaft Position Sensors Last?
The camshaft position sensor is designed to last as long as the vehicle lasts. But, most of the time, you need to replace it before its expected life.
The reason is that the camshaft position sensor takes a lot of abuse because the engine produces heat.
Conclusion
You can easily change the camshaft position sensor, but the problem occurs when the code still stays even after changing the sensor. It can cause various reasons, so you need to inspect and fix them.
I hope my above guide will help you know the reason, and some possible fixes will help you eliminate the codes.
- Read Also>> Is It Safe To Drive With A Bad Camshaft Sensor? (Find Now)
- Read Also>> What Are The Temporary Fix For Crankshaft Position Sensor?
- Read Also>> What to Do Before and After Replacing Camshaft Sensor?
- Read Also>> What Are The Symptoms Of A Bad Solenoid Pack E4od?
- Read Also>> 4 Major Symptoms of a Briggs and Stratton Blown Head Gasket

Cargroot is reader-supported. When you buy through links on our site, we may earn an affiliate commission.
The Camshaft sensors in your car allow the engine control to identify the exact position of the crankshaft drive using the crankshaft sensor. Together, both the sensors help the engine control know when the first cylinder is in the top dead point, which is necessary for certain purposes like sequential injection, pump-nozzle injection, and cylinder-selective knocking control.
When encountering a fault, it is necessary to replace a malfunctioning camshaft position sensor to prevent the engine from failing completely and shutting down. However, in very rare events, there’s a likelihood that the camshaft position sensor malfunctions, even when you’ve already replaced it. There can be several reasons for this issue to occur.
Due to this, you may encounter the error code P0340 on your vehicle. One tell-tale sign to know if there’s anything wrong with the camshaft position sensor is the check engine light. It will illuminate right away in the event of an issue. Here’s everything you need to know about this issue and how you can get rid of it in no time.
Error Code P0340 – What Does It Mean?
The error code P0340 is an OBDII diagnostic code that indicates a circuit malfunction with the Camshaft Position Sensor A. It’s related to the entire circuit attached to the sensor, including the powertrain control module and the electric wiring. That’s why replacing the sensor might not always help you get rid of the issue.
The sensor measures the engine’s camshaft rotation speed and also tracks the exact position of the shaft. It sends the data to the PCM that uses it to specify the timing for fuel injection systems and the ignition. Any disruption in the camshaft sensor’s signal hinders your engine’s precise timings and leads to several performance-related issues.
In such cases, problems like sub-optimal fuel-to-air mixes and misfires occur, and the PCM produces an error code P0340 while also activating the Check Engine Light to notify you that something has gone wrong with your vehicle. Since it’s a generic powertrain code, the error isn’t limited to a specific vehicle make or model.
Common Symptoms of The P0340 Error Code
If your vehicle encounters the P0340 error code, it may show certain revealing symptoms that indicate a problem with the circuit such as:
- The Check Engine Light turned on
- Your car’s engine stalls and hesitates while starting
- The engine completely dies, refusing to start at all
- Your car’s engine starts cranking while failing to start
- The car runs roughly, you experience a lack of acceleration or misfiring
Reasons for The Error Code P0340
There can be several reasons why you’re still getting the error code P0340 even after replacing the camshaft position sensor in your vehicle. Let us take a look at some of the possible reasons for this issue to occur in your vehicle:
- You might not have completed the removal and relearning process of the error code
- Your car’s ECU might still be coded with the old camshaft position sensor
- Your car’s PCM might be faulty
- There may be a faulty starter motor causing the issue
- The Reluctor wheel might be damaged or malfunctioning
- Your old O-ring may not be removed from the camshaft sensor of your vehicle
- There may be a bad installation of the new camshaft position sensor
- There may be some issues with the wiring or the electric circuit
- The timing chain or guided plates may have some wear or stretch
Diagnosing The Error Code P0340
Troubleshooting the camshaft position sensor can help you diagnose the error code and determine if the sensor has any damage. It will also allow you to read the fault memory and locate the root cause of the issue. Here’s how you can easily diagnose the error on your own:
Verify The Connecting Line
Firstly, check the connection line emerging from the control unit to the sensor with the help of an ohmmeter. You should consider removing the connector first and then proceed to remove the sensor. Once done, check each of the individual cables for any sign of discontinuity and also conduct a pin assignment using a circuit diagram.
Check for Short Circuits
Now, check the connection lines and determine whether there are any short circuits in the frame or not. To do this, remove the control unit plug and use the ohmmeter to take measurements of the connection lines from the sensor plug to the vehicle ground.
Determine The Supply Voltage
Afterward, you should consider checking the supply voltage from the control unit to the sensor. To do this, simply insert the control unit plug and then turn the ignition on.
Verify The Signal Voltage
Lastly, you should check the signal voltage by connecting the measuring cable to the oscilloscope and then turning the engine on. It should ideally display a square wave signal on the oscilloscope.
How Much Does It Cost to Fix Error Code P0340
As stated above, there can be several reasons for the error code P0340, including faulty ECM, damaged wiring, and even bad sensors. That being said, it’s not possible to provide an estimate of the cost without being able to diagnose the issue first. A mechanic may charge you anywhere between $75-150 for a diagnosis of the issue.
Moreover, based on the diagnosis, your car may require one or more repairs to get rid of the issue. Each potential repair option is associated with a cost, including the price for the replacement of faulty parts and the labor of the mechanic for the repairs. Here’s a list of the estimated cost that you may have to pay for various fixes:
- ECM – $1000-1200
- Camshaft position sensor – $120-300
- Belt or Timing Chain replacement – $200-1000
- Crankshaft position sensor – $190-250
How To Fix the Issue If the Error Still Appears?
As you read above, there may be one or more solutions for the error code, provided that the diagnosis helped you identify the root cause of the issue. Let’s take a look at certain possible fixes that can be used to get rid of the error if it’s not disappearing even after replacing the camshaft position sensor in your car:
Diagnose the O-Rings
The camshaft position sensor requires two O-rings to function properly. While the sensor itself is equipped with one, the other is provided by the vehicle manufacturer. Many people attempt to place a new O-ring along with the old one, which causes installation issues and leaves a gap that causes the problem.
Therefore, make sure that you remove the old O-ring before trying to install a new one. Also, make sure that you use the original O-ring and clean it before using it.
Relearn/Recalibrate the Sensor
After replacing the sensor, if you don’t relearn it, your car’s ECU may retain the data from the previous sensor and trigger the error code. That’s why you should consider retraining the camshaft position sensor by following the steps given below:
- Firstly, start your car and attach an OBDII scanning tool to it. Then, choose the make and model of your vehicle on the tool or proceed with the “Auto Detect” feature instead.
- Then, head to the diagnosis section, followed by choosing the Control Unit > Powertrain > ECM – Engine Control Module option.
- Afterward, choose the Cam crank to relearn option, followed by the “Special Functions” option. On a new window, you will be informed about the retraining status and you just have to choose the ok option on this window.
- Lastly, turn on the engine and start the car. Then, wait until the engine coolant reaches the desired temperature or increase your car’s speed gradually to attain it. After reaching the adequate temperature, the relearning process will take place automatically.
Check Camshaft Position Sensor Wiring
In case the relearn process doesn’t help you to get rid of the error, there might be a problem with the wiring that transmits signals to the ECU causing the issue. You should consider checking the status of the camshaft position sensor wires in that case. You may follow the steps given below to examine the wiring in detail:
- Check The Wiring Diagram: There are three wires included with the camshaft sensor, which are distinguished by their color – the power supply, the sensor ground, and the sensor signal.
- Verify The Power Supply – Use a multimeter to check the voltage of the power supply, which should ideally be near 5 amps for adequate functioning.
- Test The Sensor Ground Circuit – You also need to verify the continuity of the ground circuit between the ECM wiring harness and the sensor wiring harness.
- Check the Sensor Signal Circuit – Lastly, check the continuity between the cam sensor and the ECM harness of the sensor signal circuit and replace any wires that you find damaged.
Test The Starter Motor
The starting motor is responsible to start the engine during the ignition phase that initiates the other processes as well. If this particular component is faulty, then the signal flow from the camshaft sensor to the ECU will be hindered. Examine the started motor and consider getting it replaced in the event of any defects.
Examine The Reluctor Wheel
A lot of people don’t consider it necessary to tune the camshaft position sensor with the reluctor wheel after getting it replaced, which eventually leads to the error code not disappearing at all. You should align the wheel teeth correctly with the camshaft position sensor and check for any potential damage to the teeth.
Diagnose the ECU
The sensor also tends to send a signal to your vehicle’s ECU. Even when the signal is being transmitted successfully, you may still encounter the error code due to an existing issue with the ECU. Determine whether the ECU properly distributes the signal or has some operational problems and get it fixed accordingly by an expert.
Bottom Line
If you’re reading this far, you probably got an idea why you’re still encountering the error code even after replacing the camshaft position sensor in your vehicle. We hope the given information helps you understand more about the issue and get it fixed appropriately.
Рекомендованные сообщения
- Жалоба
Загорелся значек на панели, выдает ошибку P0342 Camshaft Position Sensor «A» Circuit Low
Подозреваю, что течь масла или нагретого тосола просто гдето нарушила контакт.
После того как я пытался (пока безуспешно) поменять «флейту», я пошевелил все соединения до которых доставал, и лампочка больше не говрит. Но все таки хотелось бы долезть до этого сенсора, и быть может поменять его.
Посоветуйте как это сделать, что снимать и где его искать?
Спасибо!
- Цитата
Поделиться сообщением
Ссылка на сообщение
Поделиться на других сайтах
- Жалоба
Это Датчик положения распределительного вала. Скорее всего эта ошибка выскочила из за плохого контакта в разьеме. Нету смысла лезть к нему.
П.С. Двигатель и машина какой ?
- Цитата
Поделиться сообщением
Ссылка на сообщение
Поделиться на других сайтах
- Жалоба
leganza 2.2 американка. Перерыл весь гугл, одни пишут что он сверху, на клапанной крышке, другие что он в районе ремня грм. Стоит копейки, я бы его с удовольствием поменял.
- Цитата
Поделиться сообщением
Ссылка на сообщение
Поделиться на других сайтах
- Жалоба
Разъем этого датчика действительно сверху, но сам датчик расположен сбоку, т.е. надо снимать воздуховод, домкратить двигатель, снимать боковую опору двигателя, крышку ремня ГРМ и вот там-то сверху его и откручивать.
ЗЫ: винтик надо аккуратненько откручивать и прикручивать, чтоб не потерять.
А вообще этот датчик часто не работает. Т.е. не выдает сигнала достаточной амплитуды. Из-за этого ошибка вроде как и не горит, но двигатель работает на попарно-параллельном впуске = увеличенный расход топлива вплоть до черного дыма при прогазовке, а внешне других никаких отличий и нет. Поэтому если желание есть, лучше поменять.
А еще хотел у тебя спросить по поводу вибраций — двигатель вибрирует или нет?
- Цитата
Поделиться сообщением
Ссылка на сообщение
Поделиться на других сайтах
- Жалоба
Да двигатель вибрирует, причем после того как загорелся этот датчик, вибраций поприбавилось. Сейчас датчик погас, и я даже незнаю замарачиваться его менять или нет.
- Цитата
Поделиться сообщением
Ссылка на сообщение
Поделиться на других сайтах
- Жалоба
Разъем этого датчика действительно сверху, но сам датчик расположен сбоку, т.е. надо снимать воздуховод, домкратить двигатель, снимать боковую опору двигателя, крышку ремня ГРМ и вот там-то сверху его и откручивать.
ЗЫ: винтик надо аккуратненько откручивать и прикручивать, чтоб не потерять.
А вообще этот датчик часто не работает. Т.е. не выдает сигнала достаточной амплитуды. Из-за этого ошибка вроде как и не горит, но двигатель работает на попарно-параллельном впуске = увеличенный расход топлива вплоть до черного дыма при прогазовке, а внешне других никаких отличий и нет. Поэтому если желание есть, лучше поменять.
А еще хотел у тебя спросить по поводу вибраций — двигатель вибрирует или нет?
так что лучше датчик поменять? Или если он один раз загорелся и потом погас, то может быть просто провода прогорели или разъем маслом залило..
- Цитата
Поделиться сообщением
Ссылка на сообщение
Поделиться на других сайтах
- Жалоба
если я не ошибаюсь разьем данного датчика подходит на общую коробку там где форсунки .
- Цитата
Поделиться сообщением
Ссылка на сообщение
Поделиться на других сайтах
- Жалоба
если я не ошибаюсь разьем данного датчика подходит на общую коробку там где форсунки .
а можно подробнее, я не совсем понимаю где это(((
- Цитата
Поделиться сообщением
Ссылка на сообщение
Поделиться на других сайтах
- Жалоба
Проводка датчика выходит из этого черного короба вместе с контактами форсунок и датчиком давления в коллекторе, а вот откуда он приходит? Наверное прямо с ЭБУ. Но оно тебе не надо.
Если интересует разъем датчика — откручиваешь 2 болтика и снимаешь крышку, что закрывает свечные колодцы. Слева увидишь этот разъем. Нажимаешь сбоку на фиксатор и снимаешь — точно также как и на разъеме датчика температуры воздуха, что на воздуховоде стоит. Только нажимать надо отверточкой, т.к. разъем в «колодце».
Изменено пользователем DiBuz
- Цитата
Поделиться сообщением
Ссылка на сообщение
Поделиться на других сайтах
- Жалоба
Ошибку P0342 Camshaft Position Sensor может записать неисправность ГРМ. Например растянутый, ослабленный, не правильно установленный ремень. Разбитый шпонопаз в шестерне и т.д. Перед заменой датчика желательно проверить.
- Цитата
Поделиться сообщением
Ссылка на сообщение
Поделиться на других сайтах
- Жалоба
А как определить действительно с датчиком что то не так? У меня только один раз загоралась лампочка, а потом все погасло. Бензина вроде бы жрать больше не стало.
- Цитата
Поделиться сообщением
Ссылка на сообщение
Поделиться на других сайтах
- Жалоба
А как определить действительно с датчиком что то не так? У меня только один раз загоралась лампочка, а потом все погасло. Бензина вроде бы жрать больше не стало.
была такая тема для американок 
ща ДиБуз подтянется,
он уже что-то предлагал с лампочками,
чтоб видеть какой впрыск.
распределенный или попарно-параллельный
:huh:
- Цитата
Поделиться сообщением
Ссылка на сообщение
Поделиться на других сайтах
- Жалоба
ну да … Может более профессиональные тестеры показывают и эту инфу, но я с таковыми не сталкивался. Вообще ЭБУ (Электронный блок управления = «мозги» двигателя) — еще тот «черный ящик» — далеко не все параметры , которыми он оперирует, выводятся на диагностический разъем. Но и то , что выводится на разъем, тоже не все так просто прочитать — часть общих параметров читается простыми «читалками», а многие другие параметры то ли зашифрованы, то ли еще что … Но не выводятся вот так просто.
Тем более у нас — «американоводов», «мозги» не такие как у нормальных людей  К ним вообще отдельный подход требуется … Посему кусок «витой пары» и 4 светодиода мне кажутся наиболее простым и наглядным решением
- Цитата
Поделиться сообщением
Ссылка на сообщение
Поделиться на других сайтах
- Жалоба
DiBuz , как подключал светодиоды? Что то тему не нашел на форуме. И что можно увидеть по ним?
- Цитата
Поделиться сообщением
Ссылка на сообщение
Поделиться на других сайтах
- Жалоба
DiBuz , как подключал светодиоды? Что то тему не нашел на форуме. И что можно увидеть по ним?
к проводам форсунок. 4 штуки.
если будут мигать попарно, значит ДПРВ сдох :huh: и впрыск попарный, хотя чек и не горит.
должны мигать раздельно 1-3-4-2 
а у меня ДПРВ так нет вообще, вот и лампочки не нужны
- Цитата
Поделиться сообщением
Ссылка на сообщение
Поделиться на других сайтах
- Жалоба
+Юра. Больше как бы и добавить нечего. Актуально только для «Америки»
- Цитата
Поделиться сообщением
Ссылка на сообщение
Поделиться на других сайтах
- Жалоба
На двигателе 1,6 по любому парный впрыск (нубира)
- Цитата
Поделиться сообщением
Ссылка на сообщение
Поделиться на других сайтах
- Жалоба
.Неужели так видно на светододах?
- Цитата
Поделиться сообщением
Ссылка на сообщение
Поделиться на других сайтах
- Жалоба
Обсуждалось… Я приводил аргументы в виде формул и цифр, что до 1440 оборотов частота мигания не превышает 24 раза в секунду, а значит ещё различима глазом… Но это если попарно-параллельный впрыск , т.к. фазированный ровно в 2 раза реже, а значит отловить разницу между этими режимами визуально на ХХ вообще труда не составит. А вообще эта разеиза должна быть видна на американке до 2500 оборотов — я вообще редко кручу больше.
- Цитата
Поделиться сообщением
Ссылка на сообщение
Поделиться на других сайтах
- Жалоба
Поделиться сообщением
Ссылка на сообщение
Поделиться на других сайтах
Присоединяйтесь к обсуждению
Вы можете опубликовать сообщение сейчас, а зарегистрироваться позже.
Если у вас есть аккаунт, войдите в него для написания от своего имени.