In this article, we will learn how to solve Error extending volume Size Not Supported In Windows Server 2012 and Windows Server 2016.
-
1
Extend Volume Failed in Windows Server 2016/2012 -
2
Error extending volume Size Not Supported-
2.1
Solving Error extending volume Size Not Supported -
2.2
Extend Operating System Partition
-
2.1
Extend Volume Failed in Windows Server 2016/2012
When I tried to Extend Volume for a specific drive in Windows Server 2012 R2 by doing the following:
- Server Manager > File and Storage Services.

- Navigate to Disks > (I have unallocated free space (19.5GB)).
- Right click on C Drive > Select Extend volume.

- The following dialog will be shown to set New size.

- When I set the New size and clicked OK, I got “Extend failed” as shown below:

- I clicked on Extend failed to find out the reason, I got Error extending volume Size Not Supported

The “Error extending volume Size Not Supported” usually occurs because there is a partition/drive between the original partition and the unallocated space. Thence, If you want to extend the operating system volume/drive, you should first make sure that there is no partition between the original partition and the unallocated space.
Solving Error extending volume Size Not Supported
To be able to extend the operating system drive, you will need to provide unallocated space beside the partition that you would like to extend it. but this means all data in that drive will be deleted. therefore, you will need to back up or move your data located on this partition before deleting it.
In our case, the drive beside the operating system partition is F:\ partition and the unallocated space is beside it, not beside the operating system drive, and our goal is making the unallocated space beside the drive that we need to extend it (C:\) as shown below:

Extend Operating System Partition
- First, you should create a new volume from the unallocated space that available for you.

- Move the data files from F:\ Drive to the newly created volume or any other drive that has sufficient space or back up it to an external hard disk.
- Now, go back to delete F:\ Drive (the partition besides the operating system drive).

- Great, the unallocated space becomes beside the Operating System drive and you will be able to extend it now.
- Now, try to extend the Operating System drive that should be extended properly.
You can also perform the extend operation through the disk management as mentioned at Windows Extend Volume Greyed Out in Disk Management in Windows Server 2016/2012
Conclusion
In conclusion, we have learned how to extend the operating system drive without facing “Error extending volume Size Not Supported” issue.
Applied To
- Windows Server 2012 R2.
- Windows Server 2016.
You might also like to read
- Evaluation Period expired for Windows Server 2012 R2, How to extend it?
- Windows failed to start: The Boot Configuration Data for your PC is missing or contains errors.
- Expand / Extend Operating System Partition Inside VMware.
- Convert from Windows Server 2019 Core to GUI.
Summary
Error extending volume size not supported on the computer when you try to extend partition at Disk Management in Windows system? Don’t worry, you can still extend disk partition without Disk Management.

June 2, 2022
by Andrew Wright
Follow @IM-Magic
Table of Contents
- Error extending volume size not supported
- Error extending volume size not supported using disk management
- Issues with Disk Management: SIZE NOT SUPPORTED
- Solution of error message Error extending volume size not supported
- Extend volume using IM-Magic Partition Resizer Freeware
Error extending volume size not supported
Disk low space is one of the main reasons behind slow operating system and system failure. It also prevents you to add any newer software or update existing ones. It’s unavoidable since Windows gets update regularly and we also add new softwares for better performance. After a certain period of time, we find yourself in a critical situation. Now we have add space to the volume or free it up for optimal performance. So what to do?
Error extending volume size not supported using disk management
Disk free up is a temporary solution to the problem. So the next logical choice is to use the Windows built-in tool disk management. Trusting it we open it and finds that it has some specific problems. First of all to extend a volume we need an unallocated space. Suppose we have some unallocated space coincidently and now we still can’t do it. Because the unallocated space should be at the right side of a drive we want to add some space. If it’s not there then sorry to say, you won’t be able to do that. You now have to delete the partition and create unallocated space for the desired drive.
Issues with Disk Management: SIZE NOT SUPPORTED
Suppose you have fulfilled all the criteria and found the unallocated space. You have entered the right number at the “Extend Volume” dialogue and pressed ok. But now there is an issue, an error showing extend failed. The reason is “Error extending volume: Size Not Supported”. It happens because there a partition/drive between the original partition and the unallocated space. So after checking all the boxes, there is still no guarantee that disk management will let you extend the volume. This kind of “Error extending volume size not supported” normally shows when there is one or more partition between the original partition(that you want to extend) and unallocated space.
Solution of error message Error extending volume size not supported
The most easy solution is to unallocated the drive space beside the desired disk drive you want to extend. But all the data on the drive will be deleted or lost. Yes you can move all data to next drive but it will consume a lot of time & the drive should be larger or have bigger space or you won’t be able to move all the data. So the problem is still there & the risk associated to data loss is still visible.
Extend volume using IM-Magic Partition Resizer Freeware
If you want avoid all these hustles and complication and resize the partition easily and safely then I would recommend you to use IM-Magic Partition Resizer. It’s a freeware means you can use it for free by simply downloading it from the website. To resize using IM-Magic Partition Resizer, you don’t need to have unallocated space next to the desired partition. You can do it no matter where the unallocated space is. Resizing volume was never been this easier. Follow these easy steps and extend the partition size.
Step 1: Run the IM-Magic-Partition resizer & find all available disk partitions
Step 2: Find the partition, right-click to choose “resize/move partition,” option.
Step 4: Use your mouse to extend or shrink the partition easily.
 Steps to extend partition in Windows
Step 5: Apply the changes to resize the partition.

- Remove From My Forums
-
Вопрос
-
I´m in a hard spot here, since I need to extend size of the H:data — partition. This lays down on a Hyper-V host, so the disk you see is VMs disk (vhdx). I tried the extention from VM and then mounting vhdx to the hyper-v host directly (VM shutdown then),
but the end result is the same here. I tried different sizes, but no go. Is this because that allocated size is at the end of the disk and not next to H:?
Ответы
-
Hi
Yes, the reason for your issue is indeed the free space not beeing directly folliwing the H: Partition. You may have the possibility to switch over to dynamic disc where you’d be able to create spanned volumes with free space anywhere available. But that
rather old school… https://technet.microsoft.com/en-us/library/cc731274.aspx?f=255&MSPPError=-2147217396If that’s a VM I’m wondering why you don’t just create and attache another VHDX? It’s anyway more common to create as many VHDX drives (containing just one Partition/Volume) as you need. This way you avoid your current issue. You’ll always be able to increase
the size of the VHDX and it’s Partition inside.So in your case I’d create another VHDX and copy all data from the H: Partition over and give it the H: driveletter afterwards.
Good luck
Lyndon
Lyndon Frei innobit ag, Basel, Switzerland
-
Помечено в качестве ответа
11 марта 2016 г. 8:51
-
Помечено в качестве ответа
If you are getting this error when you try to expand your storage spaces Vdisk, and you are using StorageTiers.
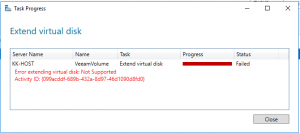
error extending volume size not supported storage spaces
you can expand your volume by using powershell instead
run the following command to get the names of your StorageTiers
Get-VirtualDisk <Vdisk FriendlyName> | Get-StorageTier | Select FriendlyName
In my case the name is VeeamVolume
![]()
Get-VirtualDisk “VeeamVolume” | Get-StorageTier | Select FriendlyName
and then expand the desired StorageTier
Get-StorageTier <StorageTier FriendlyName> | Resize-StorageTier -Size <Size>
![]()
Get-StorageTier VeeamVolume_HDD_Tier | Resize-StorageTier -Size 50TB
and after the resize

after StorageTier Resize
source: https://docs.microsoft.com/en-us/windows-server/storage/storage-spaces/resize-volumes
При попытке создать новый раздел или сжать том или расширить том с помощью утилиты управления дисками вы можете столкнуться с ошибкой, которая говорит: На диске (ах) недостаточно места для выполнения этой операции .
Хотя возможность манипулировать размером тома без переустановки операционной системы является отличной функцией, именно здесь начинаются недостатки. Эта ошибка вызвана из-за MBR Partition Limit . Это означает, что вы не сможете создать более четырех разделов. Другие причины включают в себя наличие меньшего количества нераспределенного пространства, чем необходимо, и, наконец, когда утилита управления дисками не может обнаружить изменения, внесенные в разделы; эта ошибка выскакивает.

На диске недостаточно места для выполнения этой операции
Мы рассмотрим следующие исправления, чтобы избавиться от этой ошибки в Windows 10:
- Используйте стороннее программное обеспечение.
- Пересканируйте диски.
- Контролируйте свои текущие сделанные разделы.
1] Используйте стороннее программное обеспечение
Вы можете использовать любое стороннее бесплатное программное обеспечение для управления разделами, например EaseUS, для управления разделами и управления их свойствами.
2] Повторное сканирование дисков
Нажмите WINKEY + R , чтобы запустить Запустить окно , и введите diskmgmt.msc , чтобы запустить утилиту управления дисками.
На ленте меню выберите Действие.

В раскрывающемся меню выберите Повторное сканирование дисков.
Подождите, пока процесс закончится.
А теперь проверьте, исправляет ли это ваши проблемы.
3] Следите за своими текущими разделами
Другой причиной этой проблемы, как упоминалось выше, может быть тот факт, что вы используете систему разделов MBR. Это более старая система разделов, и за ней следует система разделов GPT.
Система разделов MBR поддерживает не более 4 разделов. Таким образом, если у вас уже есть четыре раздела, вам может потребоваться изменить систему разделов на GPT , чтобы продолжить выполнение вашей задачи.
Однако это может удалить весь контент на вашем жестком диске. Но если вы хотите продолжить в любом случае, конвертируя MBR в GPT.
Надеюсь, что-нибудь поможет!
Несмотря на то, что Windows 11 был выпущен, многие люди до сих пор используют Windows 10 ноутбук/настольный или планшетный компьютер. То же самое с другими версиями, C диск становится полным in Windows 10 после запуска компьютера в течение определенного периода времени. Независимо от системного раздела или объема данных, когда он заполняется, самый быстрый способ расширить его за счет свободного места в другом разделе. Никто не любит тратить много времени, чтобы начать с нуля. Чтобы расширить раздел в Windows 10 компьютер, вы можете попробовать собственный diskpart или инструмент управления дисками или использовать стороннее программное обеспечение для создания разделов диска. В этой статье я расскажу о 3 способах увеличения громкости в Windows 10 без потери данных.
Содержание:
- Расширить раздел в Windows 10 с помощью Diskpart cmd
- Увеличить объем в Windows 10 через Управление дисками
- Продлить Windows 10 объем со свободным partition editor

1. Как расширить раздел в Windows 10 с помощью Diskpart cmd
Diskpart интерпретатор команд текстового режима в Windows 10 и предыдущие версии. Этот инструмент позволяет управлять объектами (дисками, разделами или томами) с помощью сценариев или прямого ввода в командной строке. Diskpart интегрирован в Windows, но он не может расширять каждый раздел. Перед расширением раздела в Windows 10 с командой diskpart, есть несколько моментов, которые вы должны знать:
- Diskpart может только расширять NTFS раздел, FAT32 и любые другие типы разделов не поддерживаются.
- На диске должны быть другие разделы. тот же диск.
- Перед расширением раздела необходимо удалять его смежный раздел справа. Если такого раздела нет или вы не можете его удалить, не запускайте diskpart. Если вы можете удалить его, не забудьте заранее передать все файлы.
- Diskpart не может расширить раздел с нераспределенным пространством, которое налево or несмежно.
Шаги, чтобы продлить Windows 10 раздел с помощью diskpart cmd:
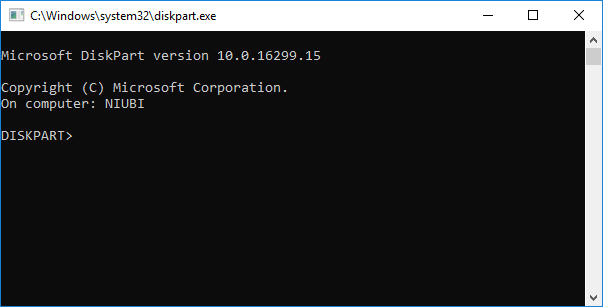
① Нажмите Windows + R клавиши на клавиатуре, ввод diskpart и нажмите Enter.
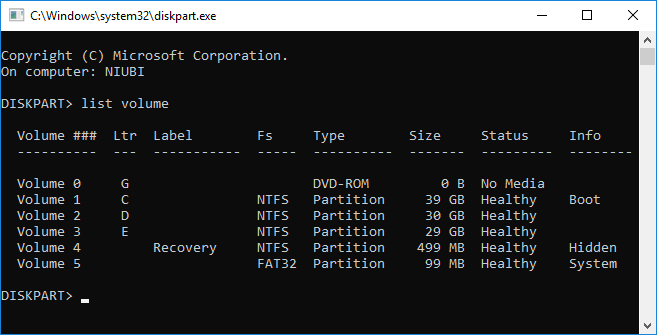
② вход list volume и нажмите Enter, после чего вы увидите все разделы в списке (незанятое пространство не отображается).
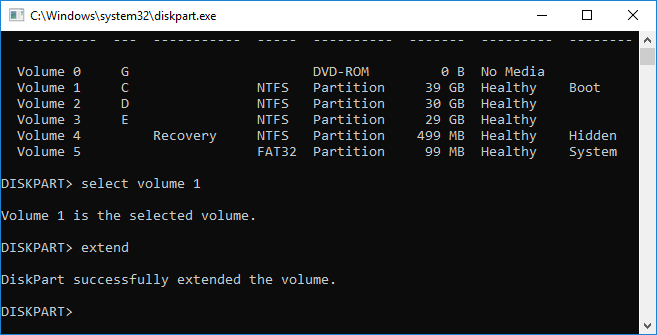
③ вход select volume X и нажмите Enter, X — это номер или буква диска раздела, который вы хотите расширить (например, C :).

④ вход extend продолжить расширение.
Если нет незанятого места рядом с Диск C, вы получите сообщение об ошибке ‘На указанных дисках недостаточно свободного места для расширения тома.‘
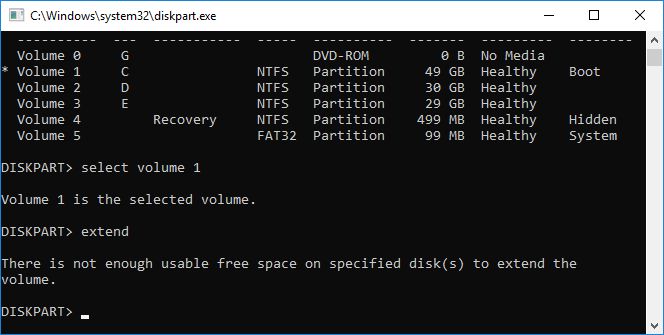
Чтобы получить такое необходимое Незанятое пространство, вы должны удалить непрерывный диск D. Для этого запустите select volume D и delete volume команды одну за другой перед шагом 3.
2. Как увеличить громкость в Windows 10 с управлением дисками
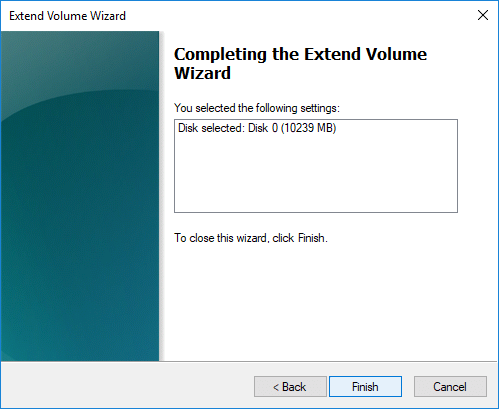
Если вы думаете, что продлить Windows 10 раздел с командой diskpart, есть еще один собственный инструмент — Управление дисками, который имеет графический интерфейс. В нем есть «Мастер расширения тома», поэтому вам просто нужно щелкнуть в диалоговом окне.
То же самое с Diskpart, должно быть примыкающий Нераспределенное пространство на правая сторона раздела, который вы хотите расширить. Это означает, что вы также должны удалить правый непрерывный раздел. Расширяемый раздел также должен быть отформатирован NTFS файловая система, иначе Расширить громкость серым цветом.
Шаги по расширению раздела в Windows 10 с помощью управления дисками:
- Нажмите Windows + X вместе и щелкните в списке Управление дисками.
- Щелкните правой кнопкой мыши соседний раздел (например, D) и выберите Удалить громкости.
- Щелкните правой кнопкой мыши диск C и выберите Расширить том.
- Просто нажмите Далее к Завершить во всплывающем окне Мастера расширения тома windows.
В отличие от команды diskpart, Управление дисками не может продлить диск C даже после удаления D, если D является Логический привод.
3. Как продлить Windows 10 объем со свободным partition editor
Сравнивая с Windows родные инструменты, NIUBI Partition Editor имеет много преимуществ при расширении раздела для Windows 10 компьютер:
- Он способен сжимать и расширять как NTFS, так и FAT32 разделы.
- Он может сделать нераспределенное пространство слева или справа при сжатии раздела.
- Он может расширить раздел любым непрерывным нераспределенным пространством за 1 шаг.
- Он может перемещать и расширять нераспределенное пространство на любой несмежный раздел на том же диске.
Лучше, чем другие инструменты, NIUBI Partition Editor имеет уникальный 1-секундный откат, Отменить-на-хорошо и Виртуальный режим технологии для защиты системы и данных. Кроме того, это 30% до 300% быстрее благодаря усовершенствованному алгоритму перемещения файлов. Имеется бесплатная версия для Windows 11/10/8/7/Vista/XP (32/64 бит) домашние пользователи.
Скачать этого бесплатного инструмента, вы увидите главное окно со структурой разделов диска и другой информацией справа, доступные операции перечислены слева и по щелчку правой кнопкой мыши.

Шаги, чтобы расширить объем в Windows 10 компьютер без потери данных:
Шаг 1: Щелкните правой кнопкой мыши D: диск и выберите «Изменить размер / переместить объем«, тянуть левая граница вправо во всплывающем окне или введите сумму в поле Unallocated space before.
Затем диск D сжимается и создается незанятое пространство. налево.

Шаг 2: Щелкните правой кнопкой мыши C: диск и снова выберите «Изменить размер/переместить громкость», перетащите правая граница вправо во всплывающем окне.
Затем диск C расширяется путем объединения этого Нераспределенного пространства.

Шаг 3: Нажмите Apply вверху слева, чтобы выполнить. (Реальные разделы диска не будут изменены до щелчка Apply чтобы подтвердить).
Посмотрите видео, как расширить перегородку в Windows 10 ноутбук / настольный компьютер / планшет:
Если на тот же диск, никакие программы не могут добавить место с отдельного диска, но можно клонировать диск на больший и расширить раздел дополнительным дисковым пространством.
В итоге
Windows встроенные Diskpart и Disk Management могут расширить раздел NTFS только путем удаления непрерывного тома справа. Чтобы увеличить громкость в Windows 11/10/8/7/Vista/XP, NIUBI Partition Editor лучший выбор. Помимо сжатия и расширения разделов, он помогает выполнять множество других операций по управлению разделами диска, таких как слияние, копирование, преобразование, дефрагментация, скрытие, очистка, сканирование сбойных секторов и многое другое.
Скачать